- Click here for Reservation tutorials.
| Options Available Viewing Arrivals, In-House, and Departure Grids | ||
|---|---|---|
- Options
- Options are things that can be done to a single reservation. For example, select any one reservation to add a room, a sharewith, an activity, take a deposit, etc.
- Navigation
- Items in the Reservations menu not included in the Options submenu are considered Navigation (things that can be done to multiple reservations at once). For example, check availability, view house status, etc.
Arrivals, In-house, and Departures
The total number of reservations in the grid and the people
categories breakdown are displayed below the grid and above the detail tabs for
informational purposes. Leader reservations display the Res# field in
bold.
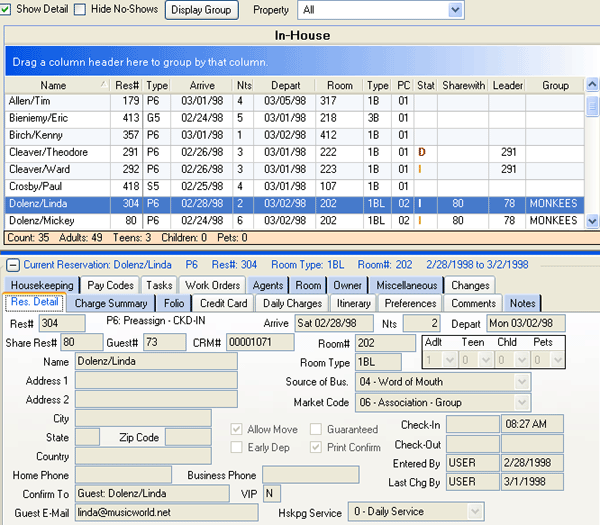
Additional information is available for Grids,
Tabs, and right-click options
- Waiting Only
- When Guest Waiting is
active in reservation configuration, the Arrivals grid includes the Waiting column. When a guest arrives but their room is
not ready, check the box to note the guest is onsite and waiting for
the room. This can be used on inventory reservations
so when no rooms are ready, the front desk personnel can mark guests as
waiting without assigning a room. The Waiting field is cleared
automatically during
checked in.
Use the "Waiting Only" checkbox above the Arrivals grid to view only reservations with an arrival date equal to the current system date who are onsite and waiting for a room assignment.
- Display Group
- When the selected reservation is part of a group, the "Display
Group" button is enabled. Click to display all reservations within
the group of the selected reservation. Check "Hide Cancelled" to
display reservation types of eight or less within the
group. If reservation selected in the grid is not part of a group,
the "Display Group" button is disabled. Hover over the button to
review the tool tip explanation "Selected reservation is not part of a
group".
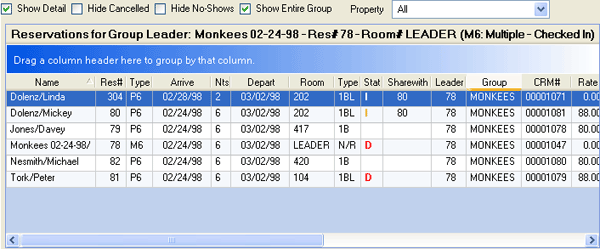
When the "Show Entire Group" box is not checked, only the originally selected group reservation is displayed; however, any sharewiths of the originally selected reservation remain displayed.
- Property
- When Turn on Property Code Feature Switch 422-12 is set to Yes, the Property drop-down allows selection of any property codes available based on User settings. Select a value to filter the reservations displayed based on Property Code.
- Show Detail
- When checked, the reservation detail tabs are displayed below the reservation grid and causes less reservations to display in the grid at one time. Uncheck to view more reservations at one time without regard to detail.
- Hide Cancelled Checkbox
- When Find Reservation is used and the selected reservation is part of a group with a group master or group leader attached, the "Hide Cancelled" checkbox appears above the grid with only the reservations within the selected group displayed. This box is not checked by default. When checked, only reservations within the group that have not cancelled are displayed. Otherwise, the entire group is displayed without regard to cancellation status.
- Show Entire Group
- When Find Reservation is used and the selected reservation is part of a group with a group master or group leader attached, the "Show Entire Group" checkbox appears above the grid with only the reservations within the selected group displayed. This box is checked by default. When checked, only reservations within the group are displayed. When not checked, only the selected reservation is displayed in the grid.
- Arrivals
- Arrivals displays reservations that have a check-in date equal to the system date.
- Hide No-Shows Checkbox
- When checked, only reservations with an arrival date equal to the current system date are displayed. When not checked, those plus any reservations not already checked in with an arrival date equal or prior to the current system date are displayed. The title of the grid changes appropriately based on the checkbox status. When the Allow Direct Check-Out switch is set to yes, this box is automatically checked. Otherwise, the checkbox is unchecked by default to show all arrivals and no shows.
- Departures
- Departures displays reservations checked in with a departure date equal to the current system date. Note: For VRS customers only, Departures can also display reservations with a departure date equal to the current system regardless of whether or not having been checked in. Switch 426-06 must be set to yes and VRS Configuration Allow Direct Check-Out must be checked. For more information, see Direct Check-Out.
- In-House
- In-House displays reservations that have been checked in.
- TY
- Displays the reservation type. RDPWin has standard descriptions, but custom descriptions can be added. The standard descriptions are used together to describe specific types of reservations such as "I9" which is a cancelled inventory reservation.
Change Options
- All Detail
- Select All Detail from the Options | Change Options submenu to access the Change Reservation screen.
- Room & Dates
- Select Room & Dates from the Options | Change Options submenu to access the Change Room & Dates screen.
- Folio
- Select Folio from the Options | Change Options submenu to access the Change Folio screen.
- Activity
- Select Activity from the Options | Change Options submenu to access the Change Activity screen.
- Group Reservations
- Select Group Reservations from the Options | Change Options submenu to access the Change Group Reservations screen.
Activities (Itinerary & Concierge (RP) module required)
Add, change, copy, transfer, and delete activities using this option.
Select Activities from the Options list or the main menu. The activities can be viewed on the Itinerary tab of the
Reservation Details displayed below the Arrivals, In-House, and Departures
screens. Tutorial
For hourly activities, both the Itinerary & Concierge (Module RP) and the Activity
Availability for Itinerary & Virtual Store (Module S6) are required.
- Add Activity
- To add an activity to any reservation, select the reservation from the grid, hover over Activities in Options, and click Add Activity. The itinerary can be previewed and printed and the totals can be reviewed.
- Change Activity
- To change an activity, select the reservation from the grid, hover over Activities in Options, and click Change. The itinerary can be previewed and printed and the totals can be reviewed. Other functions available are Add, Delete, Copy, and Transfer.
- Copy Activity
- To copy an activity to another itinerary (such as from one group guest to others in the group), select the reservation from the grid, hover over Activities in Options, and click Copy.
- Transfer Activity
- To transfer an activity or an entire itinerary, select the reservation from the grid, hover over Activities in Options, and click Transfer. Itineraries cannot be transferred to a checked out reservation.
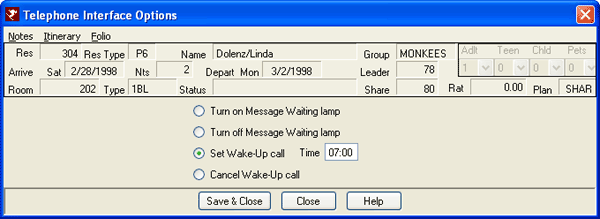
Telephone Options
- Depending on the telephone switch and the voicemail systems installed at the customer site, up to eight telephone-related functions can be initiated. (All eight functions may not be available for every customer.)
These functions are:
- Turn on or off the message waiting lamp.
- Set or cancel wake-up call, including a time designation.
- Restrict or un-restrict telephone use (Guest may not make long distance or even local calls - depending on system configuration).
- Turn on or off the do not disturb (DND) status (DND disallows incoming calls to the telephone extension).
Key Card Options
Properties with key/lock systems (VingCard
only at this time) can make key cards for room changes and arriving reservations (check-in
date = current system date), and verify
keys for in-house reservations. Click to
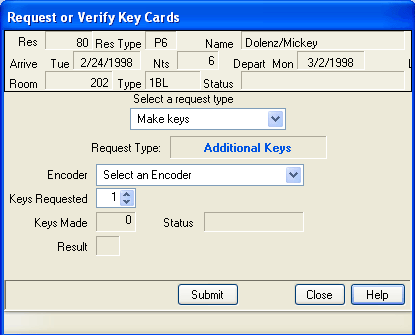
open the "Request or Verify Key Cards" screen (as seen below). The selected reservation
information is displayed on the screen. Using the
Select a Request Type drop-down, choose
Make Keys or Verify a Key Card. Select the
appropriate Encoder machine to be used from the drop-down and use the up and
down-arrows or type directly into the Keys Requested
to designate the number of keys to be processed. Click Submit once all
parameters have been selected. This screen is also
available during the check-in process and when changing the room number or
departure date on in-house reservations.
See
Configuration
and the key card map for details.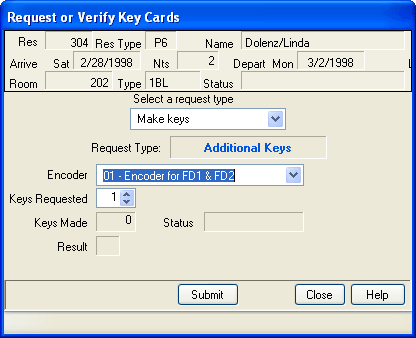
- Select a Request Type
- Make Keys is selected by default, but making additional (if a key has already been made) and verifying key cards can be selected from the drop-down. Choose Verify Key Cards to see what information is on a card. "Select a Request Type" is not available if making keys within the check-in process, since the system automatically assigns the Request Type as "Check In".
- Request Type
- Based on the reservation and request type, the system displays the requested function in color. For example, select an arriving reservation in the grid, then choose "Make Keys" from the Select a Request Type drop-down, and the Request Type displays as PreCheck-In. Select an in-house reservation in the grid, then choose Make Keys from the Select a Request Type drop-down, and the Request Type displays as AdditionalKeys. When "Verify a key card" is selected in the Select a Request Type drop-down, the "Request Type" displays as Verify Card.
- Encoder
- The first time this screen is accessed per workstation, an encoder must FIRST be selected. This sets the default for the station. The default can also be set and changed from the System | Configuration | System | Key Card Interface option: Default Encoder for this Station.
- Keys Requested
- When making keys at check-in, the default number of keys is determined from the number of people on the reservation. Change the requested number of keys using the up and down-arrows or type in directly before clicking the Submit button to send the request to the key system.
- Submit/Verify Button
- Click the Submit button to send the request to the RDP key card folder for processing. Once a key is made, this button label changes to Verify. When Verify Key Cards is selected, click the Verify button to send the request. Insert the card into the encoder to be read and the information is returned from the encoder to RDPWin and displayed in a separate window. Both requests time-out after 30 seconds.
- Make Keys
- Confirm Select a Request Type is set to Make Keys, confirm or update Keys Requested for the number of keys needed, and click Submit. Follow the prompts to insert the keys into the encoder.
- Verify Keys
- Set Select a Request Type to "Verify key cards", confirm or update Keys Requested for the number of keys desired, and click Verify. Follow the prompts to insert the keys into the encoder. The "Information on Key Card" screen displays the room number, guest name, check-in and check-out dates/times, key card type, user group, and access points information (as shown below).
-
Click these links for Frequently Asked Questions or Troubleshooting assistance.
05/20/2010
© 1983-2009 Resort Data Processing, Inc. All rights reserved.