- Click here for Reservation tutorials.
| Options Available Viewing Arrivals, In-House, and Departure Grids | ||
|---|---|---|
|
Folio |
||
Folio
Note: When Reservations --> Configuration --> Use Individual Folios A & B is checked, Folios A and B are included on the Folio tab along with any appropriate group leader folio, group master folio, and individual folio. When not checked, Folios A and B are not available.
Post Charge
Select the reservation and click Post Charge from Options to post any charges necessary. See Post Charges for more detail.
Change/Reverse Charges
Select the reservation and click Change option to change or reverse any charges (except future room charge transactions).
| Buttons | Filters |
|---|---|
- Change
- Select one or more transactions in the grid and click Change. The grid displays each line item plus summary information for the Charge, Tax and Total columns (below the grid). Use the filters to reduce the number of transaction displayed in the list.
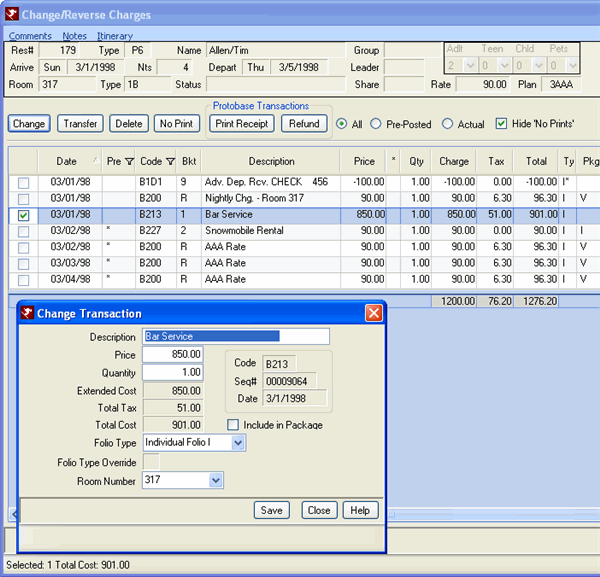
Change the transaction information, including Description, Price, Quantity, Folio Type, and Room Number for anything not part of room charge (packages included) or activity. Folio line items that are part of the package cannot be changed. Activity charges must be changed using Change Activity. - Reverse Other Charges
- Posted Other Charges can be refunded to the guest after cancellation. Other Charges can be reversed but not changed (except for the Folio Type).
- Multiple Transactions
- To select more than one transaction, use the checkbox next to the Date column to place a check in the box. When multiple transactions are selected, the system first determines if the selected option can be performed on all transactions. If not, a screen displays a list of all the selected transactions and a status next to each indicating which can and cannot be performed. If unable to perform, a warning with a description of why is displayed. If changes are allowed, select the Yes button. The system will perform the selected option on the transactions that have the status of OK.
- Direct Check-out/VRS Customers
- When Allow Direct Check-Out is checked on VRS Configuration, the arrival date is equal or prior to the current system date, and the reservation status is between "1" and "4" (future), the system treats the reservation as a checked-in reservation. The selected transaction is reversed, automatically marked as No Print, and a new transaction is posted with the correct information.
Note: RDPWin does not allow future room charge transaction to be changed, transferred, or deleted using the folio change option. To change room charge transactions for the current system date and forward, use the Rates button on the Reservation Change screen and change the rate plans or override the rates for any future room charges. Past room charges can be adjusted from the Change Folio options. - Transfer
- Transfer charge(s) to another reservation by selecting the reservation and the Transfer button. Enter or Find the reservation for which to transfer the charge. Confirmation is requested before the transfer is completed. Once confirmed, the transaction is reversed on the current reservation and posted to the selected reservation.
Note: Balances cannot be transferred to a checked-out reservation when the checked out reservation has a zero balance. - Delete
- Delete a selected transaction. If the reservation is a future reservation or the transaction is pre-posted, the transactions are deleted from the reservation. If the selected reservation is in-house, and the selected transaction has been posted, the transaction will be reversed and marked as No Print. The system displays the original transaction and a reversal transaction as well. Activities cannot be deleted from this screen (available in the Change Activity option).
If Allow Direct Check-Out Switch 414-01 is checked on VRS Configuration, the arrival date is equal or prior to the current system date, and the reservation status is between "1" and "4" (future), the system treats the reservation as a checked-in reservation. The selected transaction is reversed, and automatically marked as No Print. - No Print
- Mark selected transactions as No Print. When a transaction is selected, the total is displayed in the lower left corner of the screen. The total must be zero in order to no print transactions.
- Print Receipt
- The Print Receipt option is only available if a Protobase credit card transaction has been selected. It allows the reprinting of credit card receipts. Highlight the credit card transaction and click Print Receipt to send a duplicate receipt to the designated printer.
- Refund
- The Refund option is only available if a Protobase credit card transaction is selected. When selected, the system processes a refund transaction through Protobase and posts a refund transaction to the reservation. This Refund option uses the same Protobase reference number and if done the same day as the original transaction, it will show as a void on the batch reports.
Filters
-
- All
- When All is selected, all charges -- including actual, pre-posted, and those marked as no-print -- are displayed in the grid. To filter the grid, use the Pre-posted, Actual, and Hide No Print settings.
- Pre-Posted
- Pre-posted transactions are future transactions that are not yet processed into the Totals file or have hit the general ledger. For example, the daily rate for tomorrow is considered pre-posted. Each day, when the nightly posting occurs, the pre-posted transactions for that day are changed to actual.
- Actual
- Actual transactions are realized and at the end of each day, they are added to the G/L totals and stats totals. Once a reservation is checked-in (in-house), only the actual charges are added to the reservation totals. For example, daily rates and activities from yesterday are actual charges. Each day, when the nightly posting occurs, the pre-posted transactions for that day are changed to actual.
- Hide No Prints
- Check to hide all No Print transactions in the grid.
Package Detail
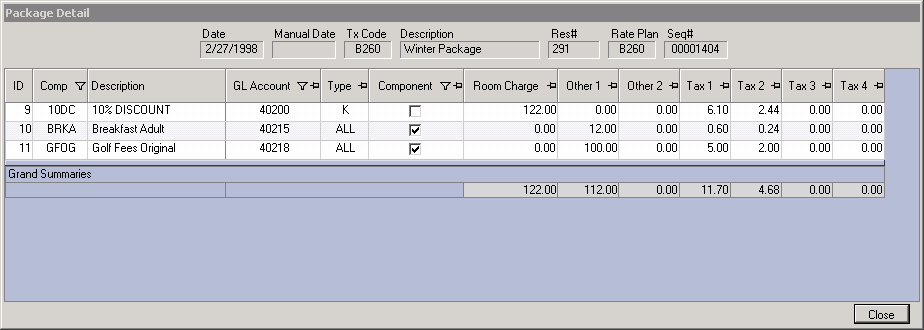
Package Detail is available for all rate plan package transactions from the folio. Right click the package transaction and click the Package Detail option, or double click the package transaction and click the Package Detail button. The package detail displays the breakdown of the package including the GL accounts for each portion of the package, component pricing, and the tax breakdown. Right click anywhere on the Package Detail to print or export the grid.
A PkgDetl.dat file is created, which stores the package information each package transaction. If the component pricing is changed, then the existing package transactions are not effected. Prior to this file, if a package component was changed, existing reservations would receive the new pricing regardless of whether the Freeze Rates program was run.
Move Balance
Select Move Balance from the Options --> Folio sub-menu to move balances between the I, A, and B folios. Review the current Folio I/A/B balances, choose which folio to move the balance from and to, and click Save. The new folio balances are displayed. The transfer creates a B2DU transaction code on the folio.
Preview or Print Folio
To preview the folio, select Preview from Options --> Folio menu. To print the folio, select Print Folio from Options --> Folio menu. Based on the reservation, the options for the folios may include: individual, a group leader, or a group member folio.
- Show Package Totals By Rate Plan on Folio (Switch 422-01)
- When set to No, the price of package components is hidden on the
guest folio. When set to Yes, rate transactions with the same rate plan and price are combined.
The rate transactions are displayed first in transaction date order, and then all other charges are displayed in transaction date order. - Individual Reservation Folio
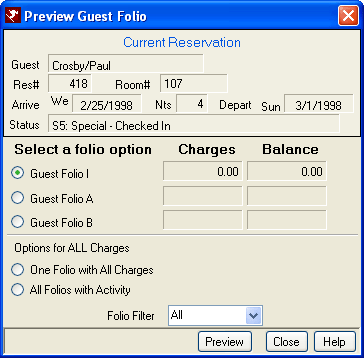
- If an individual reservation is selected, view Folio I in the grid by clicking on the Folio tab in Reservation Details. To preview the Crystal Report folio, click the Preview button on the Folio tab in Reservation Details. To print, click the Print button on the Folio tab in Reservation Details, select the appropriate parameters and click the OK button. The "Display" setting is carried to the print/preview folio dialog. For example, when viewing just Folio A charges on the folio tab, if the Print or Preview button is clicked, the default "folio option" radio button is Guest Folio A.
- Group Leader or Master Reservation Folio
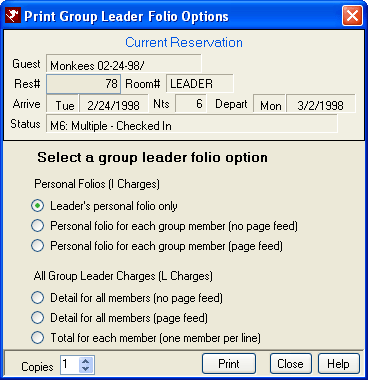
- When a Group Leader reservation is selected, choose one of the radio buttons available for the folio types and select the number of copies to send to the printer. The default setting is managed on the Reservations --> Configuration --> Folio Tab -->
Default Number of Copies.
- Group Member Folio
- When a Group Member reservation is selected, choose one of the radio buttons available for the folio types and select the number of copies to send to the printer. The Group Leader Folio displays any charges that have been or will be transferred to the Group Leader Folio. The Group Folio displays any charges that have been or will be transferred to the Group Master Folio.
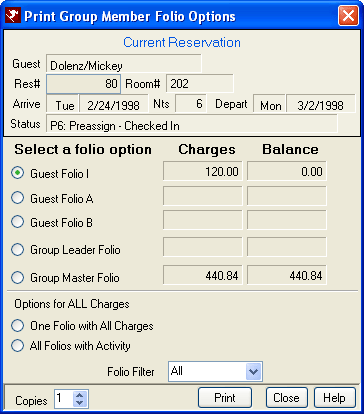
Options for ALL Charges
- One Folio with All Charges - Prints one folio with all charges together, regardless of which folio they appear.
- All Folios with Activity - Prints separate reports for each folio. The default folio for this option is Folio-ABI.rpt in the Front Desk folder. It is used to print a folio for just one folio type charge (A, B, L or M), or to print all folio types with no page feed. The folio types are grouped and sub-totaled.
- Folio Filter - The Print/Preview Folio screen not only displays different totals but also controls what prints on the folio. This allows a long term reservation to either print only the Long Term transactions through the end of the current month or to print all transactions for the entire stay. In hotel type systems were the totals are set to zero at check-in, the folio could be printed with the actual charges or all charges, which would include all future charges not yet in the totals on the reservation.
Based on the reservation selected, options for restricting which transactions are displayed and printed are:
- All transactions
- Actual transactions (no pre-post flag)
- Pre-Post transactions (not realized, only shows on the Folio tab and Charge Summary tab.)
- Long Term (Long Term reservations only)
These options change the displayed totals on the screen but do not change the reservation itself. On the folio tab, the displayed totals in the header do not change, since they are already categorized; but the transactions displayed change and the totals at the bottom of the transaction grid reflect the filter option chosen.
The Folio Filter is seen on the following RDPWin screens:
- Folio Tab
- Charge Summary Tab
- Charge Summary on the Reservation Change screen
- Cancel
- Check-in/Check-out
- Deposit/Payment
- Print/Preview Folio
The Folio Tab and Charge Summary Tab are kept in synch so that if the Actual option is chosen on the Folio tab, the Charge Summary tab is also changed to Actual.
Email Folio to Guest
- Use F3 to Find and select the reservation.
- Click the Folio tab, or select Folio from the Options.
- Click the Email option.
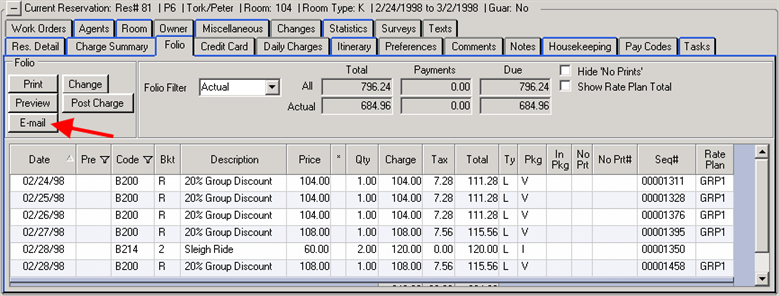
- Select the Folio to email the guest.
- If the email address has not been enter of the reservation, click the Change E-mail button.
- Click the Send E-mail button.
Click these links for Frequently Asked Questions or Troubleshooting assistance.
08/18/2011