| IRM.Net Topics | |
|---|---|
|
Install Version 3 on 2003 Server |
Customize Text, Room Descriptions, etc. |
| IRM.Net Configuration Tabs | |
|---|---|
|
Interactive Map Tab (Module T4 Required) |
Owners Tab (Module R3 Required) Reservation Priority (Module R6 Required) Reservations Tab Virtual Store Tab (Module S1 Required) |
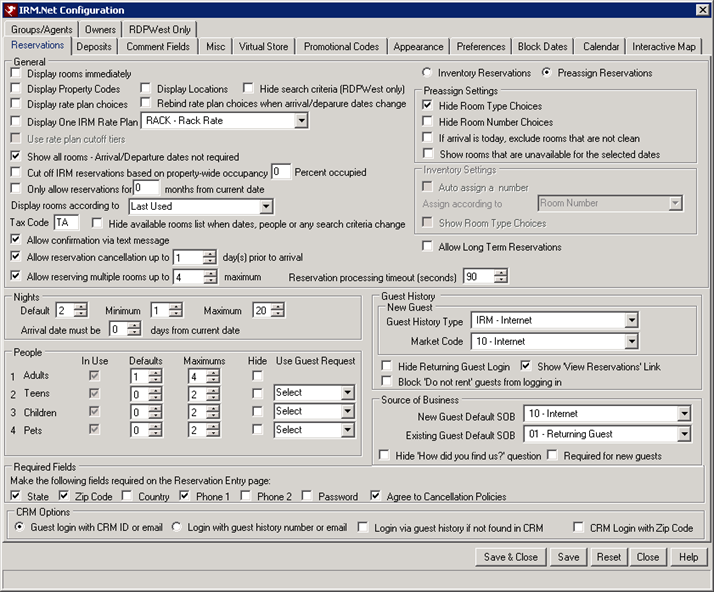
Reservations Tab
Configure which type of reservations can be made using the IRM.Net as well as the options available to the guests such as property choices, rates, dates, etc.
|
General
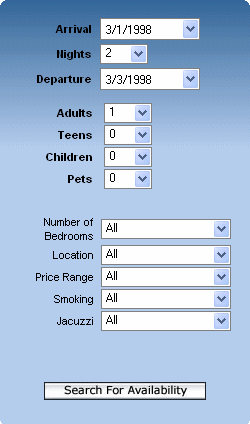
- Display Availability Immediately
- For Preassign reservations, check the Display Rooms Immediately checkbox to fill in the rooms list upon accessing IRM.Net which may or may not require dates (depending on the Show All Rooms setting). When "Show All Rooms Arrival/Departure Date Not Required" is checked, the Arrival/Departure dates drop-downs can say "Select Date" and all rooms display if no dates are selected. Dates must be selected before a reservation can be made.
For Inventory reservations, check the "Display Rooms Immediately" checkbox to fill in the rooms list upon accessing IRM.Net which may or may not require dates (depending on the Show All Unit Types setting). When "Show All Unit Types" is checked, the Arrival/Departure dates drop-downs can say "Select Date" and all room types display if no dates are selected. Dates must be selected before a reservation can be made.- Show All Types (Dates Not Required)
- When checked, the IRM.Net will display all rooms even if arrival and departures have been not been entered. Once the guest enters their dates, the room type list may change based on availability.
- Display Property Codes
- When checked, the Property Code drop-down is displayed on the left side of the IRM.Net for reservations screen and allows filtering the IRM.Net rooms by property.
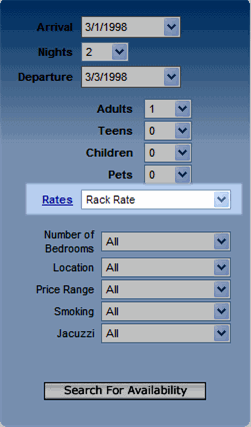
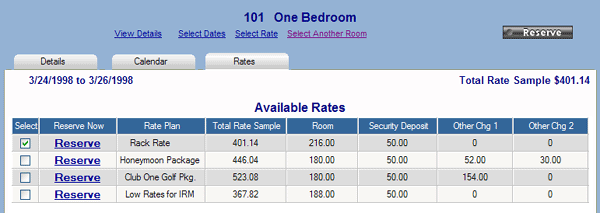
- Display Rate Plan Choices
- The Rate Plan drop-down in the search criteria section does not display by default. Check the "Display Rate Plan Choices" checkbox to display the Rate Plan drop-down on the search availability screen. Existing IRM.Net customers should check the box to enable display of rates drop-down if desired.
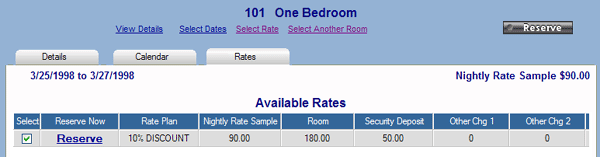
When not checked, after choosing dates and searching for availability, the available rooms displays a prominent Rates button for each room. Click the Rates button to display the available rates for the selected room/dates. Select a room by clicking on one of the Reserve links.
Display Rate Plan Choices Not Checked Display Rate Plan Choices Checked
For customers using one of RDP's themes - no action is required.
For customers using a custom theme: if the Rates button image is missing, the alternate text 'Rates' (also X) displays in the place of the button. The steps to customize this area are:
- Create a Rates button, or copy a Rates.jpg button image from one of the RDP themes to the IRMNet/App_Themes/<CustomThemeName>/Images/Buttons folder.
- Add a line for the Rates button to skin.skin (in IRMnet/App_Themes/<CustomThemeName> folder) indicating the path to the Rates button image created in Step 1.
For example:
<asp:ImageButton SkinID="ibtnRates" runat="server" ImageURL="/IRMNet/App_Themes/<CustomThemeName>/Images/Buttons/Rates.jpg" />- Rebind Rate Plan Choices When Arrival/Departure Dates Change
- When checked, the IRM.Net will only display rate plans that are valid for the arrival/departure dates selected. If the guest changes either date during the search, the IRM.Net will return only the rate plans valid for the dates and hide the invalid rates. Binding the rates checks for cut offs, min/max nights, starting day of the week, advance purchase days, blocked dates, etc. All of these criteria are checked once the Search for Availability button is selected. The Display Rate Plan Choices and the Hide Available Rooms List When Dates, People or Any Search Criteria is Changed checkboxes must be selected in order for this feature to be active.
- Display One IRM Rate Plan
- When "Display One IRM Rate Plan" is checked on the Reservations tab, only one rate displayed. Guests are not given a rate choice such as AAA discount, military discount, etc. When not checked, all applicable rates are displayed including packages.
This is a sample of what the Select Rate link displays when "Display One IRM Rate Plan" is checked:
When "Display One IRM Rate Plan is not checked, the same reservation displays like this:- Pass Rate Plan from Marketing Site to Override Configured IRM Rate
- If the IRM.Net Configuration's Reservations Tab is set to Display Only One IRM Rate Plan, this can be overridden by passing in a different rate plan from the marketing site. This can be useful if there are certain room types or rooms that must have a different rate than the rest of the inventory.
- From the marketing site, pass /IRMNet/Res/ResMain.aspx?rateplan=XXXX (replace the XXXX with the rate plan code from RDP).
- If the IRM.Net is configured to go directly to the room calendar page, pass /IRMNet/Res/RoomsCalendar.aspx?ratepaln=XXXX
- If the IRM.Net is configured to go directly to the room details page, pass /IRMNet/Res/RoomDetailspage.aspx?rateplan=XXXX. Linking to the rooms details page is recommended in the case where the rate plan should only be applied to certain rooms. This would prevent all rooms from receiving the rate.
- Use Rate Plan Cutoff Tiers
- If checked, the IRM.Net will display a different rate plan based on the occupancy percent of the property. Only the one rate available for that occupancy percent will display. For example, if the property is 20% occupied, a 30% discount rate is available. As the occupancy percent increases to 85%, the rate available is now a 10% discount. At 95% occupancy, the only rate available is RACK. The Display One IRM Rate Plan checkbox must be selected in order for this feature to be active.
- If the guest selects more than one day for the stay, the IRM.Net selects highest occupancy percent of the stay and displays the corresponding rate. For example, if the guest has selected a three night stay, the first night's occupancy percent is at 80%, the second night is 60% and the third night is 83%. The rate that displays is the rate available for the occupancy cutoff 85% percent. Only one rate for each cutoff percent should be configured. However, a promo code can be passed in and used in place of the rate plan cutoff tiers.
- The table below displays how the cutoff tiers work with the IRM.Net.
Rate Plan Cutoff Will Show with Occupancy 30DC - 30% Discount Rate Cutoff at 70% Occupancy (Set cutoff to 70) 0% - 69.99% Occupancy 25DC - 25% Discount Rate Cutoff at 75% Occupancy (Set cutoff to 75) 70% - 74.99% Occupancy 20DC - 20% Discount Rate Cutoff at 80% Occupancy (Set cutoff to 80) 75% - 79.99% Occupancy 15DC - 15% Discount Rate Cutoff at 85% Occupancy (Set cutoff to 85) 80% - 84.99% Occupancy 10DC - 10% Discount Rate Cutoff at 90% Occupancy (Set cutoff to 90) 85% - 89.99% Occupancy 5DIS - 5% Discount Rate Cutoff at 95% Occupancy (Set cutoff to 95) 90% - 94.99% Occupancy RACK - Rate Rate Cutoff at 100% (no cutoff needed for rate) 95% - 100% Occupancy - Steps to configure Rate Plan Cutoff Tiers:
- Set the IRM.Net Configuration to Display One IRM Rate Plan from the IRM.Net Configuration --> Res Tab --> check the Display One IRM Rate Plan box.
- Select the rate plan for which to display in the field next to the checkbox. Note: Rate plan cutoff tiers ignore the rate in this field and the program will select the appropriate rate plan based on the cutoffs.
- Check the Use Rate Plan Cutoff Tiers box.
- Make sure each rate that will be part of the rate plan cutoff tier is set to display on the IRM. Go to the System menu --> Rates --> Rate Plans --> Change --> select each rate plan and make sure the Display on IRM box is checked.
- Set up the cutoffs for each rate. Go to the System menu --> Rates --> Rate Plan Cutoffs. Select the first rate. Enter the percent for which the rate will be cutoff.
- Repeat for the remaining rates. See the table above for a detailed example of the set up of the rates and cutoffs.
- Hide Rooms When Rate is Not Available
- When checked, the rooms or room types will not display if the rate is not available on the IRM.Net This option is only available if the IRM.Net Configuration Switch 'Display Rate Plan Choices' or 'Display One IRM Rate Plan' is checked. If the 'Show All IRM Rates' mode, it is not possible to calculate them all to determine if none of them are available.
- Show All Rooms - Arrival/Departure Dates Not Required
- When Inventory Reservation is selected, check the "Show All Rooms - Arrival/Departure Dates Not Required" checkbox to show no rooms display and set the dates to "Select Date". When both "Display Rooms Immediately" and "Show All Rooms - Arrival/Departure Dates Not Required" are both checked, all rooms display and the dates are set to "Select Date".
- Cut Off IRM Reservations Based on Property-wide Occupancy
- Displayed only when Preassign Reservations radio button is selected, turn off the IRM booking once a certain occupancy level is achieved. For example, check this box and set to 80%. When the property occupancy is 81%, no rooms display as available. Properties that often overbook by room type and moves guests around should consider this setting.
- Hide Unavailable Unit Types
- Displayed only when Inventory Reservations radio button is selected and when not checked, only available rooms display in the IRM.Net based on travel dates. When checked, all room information can be accessed regardless of availability. When Preassign Reservations button is selected, this checkbox is replaced by Show All Rooms - Arrival/Departures Dates Not Required.
- Only Allow Reservations for "XX" Months from Current Date
- When checked and a number greater than zero is entered, reservations can only be made that many months in advance of the current system date.
- Display Rooms According to
- Indicate the order in which rooms is to be sorted. If a secondary sort is applicable, both are shown, for example: Room Type/Room Number. The rooms would be first sorted by room type, then within each room type by room number.
Primary/secondary sort choices take care of both cases. When a specific room type is selected, then the secondary sort takes over.
Preassign Mode Inventory Mode Room Type/Room Number Room Type Room Number Custom Room Type Last Used Custom Room Number Custom Room Type/Room Number Custom Room Type/Last Used
- Room Type/Room Number
- When selected (for Preassign reservations), the rooms first sorted by room type (alphabetically), then within each room type sort by room number. If the room types are 1B, 2B, 3B, then all the 1Bs, in room number order, display first and are followed by the 2Bs, in room number order.
- Room Number
- When selected, the rooms are displayed based room number sequence.
Note: When rooms are labeled using Alternate Room Name, then the order of display is in alternate room name order.- Last Used
- When selected, the rooms are displayed based the last rooms used to promote owner rotation and equalized owner revenue. Setting the drop-down to Last Used displays availability specific to room type, but sorted to show the Room Number for that Room Type that has been available the longest period of time. This allows a property to assign rooms by Room Type while using all Room Types equally. Wear and tear on rooms is spread evenly over the whole property.
Ex. Imagine three owners with three rooms.
- Owner 1 gets the first reservation in Room 1
- Owner 2 gets the second reservation in Room 2
- Owner 3 gets the third reservation in Room 3
- Owner 1 would be next on the list (last used) to receive a reservation. When Owner 1 is skipped, then Owner 2 gets the fourth reservation and Owner/Room 1 remains at the top of the list. The time-stamp field in the Availability file determines the order in the Available Rooms display.
- Custom Room Number
- Indicates use of the Manual Sequence key in the units file. The custom sequence number is configured for each room by setting the Display Sequence field on the Room Master.
- Custom Room Type/Room Number
- When selected, the display is first sorted according to the room type order specified in c:/inetpub/wwwroot/irmnet/roomtypeorder.txt, then within each room type sort by room number. The room types should be listed in the desired order separated by commas. For example:
K, Q, DD- Custom Room Type/Last Used
- When selected, the display is first sorted according to the room type order specified in c:/inetpub/wwwroot/irmnet/roomtypeorder.txt, then within each room type sort by last used (to promote owner rotation).
- Tax Code
- Set the default tax code to be assigned to IRM.Net reservations.
Also see Taxes for tax category information.- Hide Available Rooms List When Dates, People or Any Search Criteria is Changed
- When this is checked, IRM.Net guests will be required to click the Search for Availability button on the IRM.Net if dates, people or any other search criteria are changed. This switch ensures that only applicable rooms or types display for the information the guest has provided and prevents the guest from booking a room that may not meet the criteria that has been changed.
- Allow Confirmation Via Text Message
- When checked and Text Messaging is configured, the IRM.Net guest will have option to enter their mobile phone number and carrier to receive a text message after completing their reservation. See "Reservations - Text Messaging" for more information.

- Allow Reservation Cancellation Up to x Day(s) Prior to Arrival
- When checked, the IRM.Net offers the option for guests to cancel their reservations. Enter the number of days prior to arrival that the reservation can be cancelled. Only reservations that have no advanced deposits can be cancelled at this time. Guests login to the IRM.Net using their guest history ID/email or CRM ID/email and password. Their list of future reservations will appear with Cancel link next to the reservation. When the guest click the Cancel link, a dialog box appears to confirm the cancellation by clicking Yes. The reservation will display on the Res List as Cancelled.
- To enable this feature, check the Allow Reservations to be Cancelled x Days Prior to Arrival box from the Res tab of the IRM.Net Configuration. The IRM.Net must be configured to Never Take a Deposit on the Deposits tab of the IRM.Net Configuration. To access the cancel option, enable the Show View Reservations link option from the Res Tab, which will enable the My Reservation link on the ResMain.aspx page. Another way to enable is to link directly from the marketing website to /irmnet/res/reslist.aspx page.
- For complete details, see Cancel Reservations on the IRM.Net.
- Reservation Processing Timeout (Seconds)
- Set the number of seconds the IRM.Net and Protobase allow for credit card processing to complete before timing out. The default time is 90 seconds. Increasing the timeout may be necessary for properties that are using the Multiple IRM.Net Reservations feature. This feature allows up to 10 reservations to be booked at once. If the deposit policy is configured to require a deposit, each reservation booked will have a payment transaction processed. This may take extra time depending upon how many reservations are being booked at once. The system processes the credit card for each deposit on each reservation, and this may take more than 90 seconds to complete. If the system times out before all credit card payments are processed, the reservations without payments will be canceled automatically.
Nights
- Default, Minimum, and Maximum
- Set the minimum, maximum, and default number of nights allowed on an Internet reservation. The default number of nights must be greater than or equal to the minimum and less than the maximum. The minimum number of nights can be from 1 to 99, and the maximum number of nights can be from 1 to 999.
- Arrival Date Must Be "X" Days From Current Date
- If the property only accepts Internet reservations arriving a set number of days in the future, complete this field. For example, if the property requires that Internet reservations be made three days prior to arrival, set this field to "3".
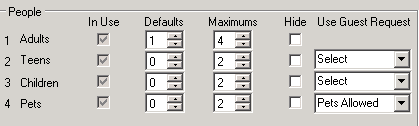
People
-
- In Use
- This read-only column shows whether each people classification is being used in RDPWin and RDP-DOS.
- Defaults and Maximums
- Set the default and maximum number of each people classification allowed on an Internet reservation.
- Hide
- Check to disable People Classifications 2, 3, and/or 4 on the IRM.Net only. People classifications can be used in RDPWin or RDP-DOS and disabled on the IRM.Net. If not in use in both RDPWin and RDP-DOS, the are not allowed on the IRM.Net either.
- Use Guest Request
- The Use Guest Request feature is designed to link one of the 9 Guest Request to a people field in order to filter out rooms based on the selection of one of the people categories. For example, People 4 is for pets. Use one of the Guest Requests as "Pets Allowed". When linked and, the guests enters a pet in People 4, only rooms that have the Guest Request for Pets Allowed will display. Only People 2-4 can be linked to a Guest Request.
- Configure the Guest Request from the IRM.Net Configuration --> Preferences tab to show as Display Only. On the Reservations tab, select the Guest Request that will apply to the appropriate People category from the Use Guest Request drop down.
- This feature is available on the ResMain.aspx (reservations page) and the SiteMap.aspx (interactive map page). If the using the Interactive Map, sites that do not allow pets will display as filtered out but can still be booked.
-
Required Fields
Check any of the following boxes to designated those fields as required on the Reservation Entry page:
- State
- When checked, the State drop-down list is required on the IRM.Net Reservation Entry page when the Country drop-down list is set to USA, Canada, or empty (assumes USA). For all other countries, the State drop-down list is still an optional field.
- Zip Code
- When checked, the Zip Code field (up to 10 digits) is required on the IRM.Net Reservation Entry page.
- Country
- When checked, the Country drop-down list is required on the IRM.Net Reservation Entry page.
- Phone 1
- When checked, the Phone1 field is required on the IRM.Net Reservation Entry page.
- Phone 2
- When checked, the Phone2 field is required on the IRM.Net Reservation Entry page.
- Password
- When checked, the Password field is required on the IRM.Net Reservation Entry page.
- Agree to Cancellation Policies
- When the "Agree to Cancellation Policies" checkbox is checked:
- A checkbox appears on the IRM.Net reservation entry screen "I have read and agree to the following cancellation policies" that must be checked before the reservation is filed; and
- The file CancellationPolicies.htm in the UserText folder is displayed below the "I agree" checkbox.
CRM Options
-
- Guest Login with CRM ID or E-mail
- When selected, guests can log into the IRM.Net to make reservations using their CRM# or E-mail address. When not selected, guests must login using their Guest History# or E-mail address.
- Login with Guest History Number or E-mail
- When selected, guests can log into the IRM.Net to make reservations using their Guest History# or E-mail address. When not selected, guests must login using their CRM# or E-mail address.
- Logon Via Guest History if Not Found in CRM
- When checked, this option allows guests to use their guest history record to login to the CRM if not CRM record is found. This checkbox is enabled on when the option Guest Login with CRM ID or Email is selected. If the CRM record is not found, the system looks for the guest history record or email. The guest information, such as address and phone will populate when the guest makes a reservation.
Inventory Settings
- Inventory Reservations
- Select the Inventory Reservations radio button to enable the Inventory Settings group box and book inventory reservation using the IRM.Net.
- Auto-assign a Room Number
- When checked, a room that best fits the guest's room type selection is automatically selected for the reservation. When not checked, the room selection must be manually made later such as at check-in or when ever the property deems appropriate.
- Assign Rooms According To...
- When Inventory Reservations and Auto Assign a Room Number are selected, the order in which rooms are auto-assigned can also be configured. Choose from the "Assign Rooms according to" drop down either room number order, last used or custom room number (which uses the custom room order specified on the room masters) The default is room number order.
Preassign Settings
- Preassign Reservations
- Select the Preassign Reservations radio button to allow reservations to be assigned a room at the time of booking.
- Hide Room Number Choices
- Enabled only when Preassign Reservations is selected, check to hide the Room Number drop-down as a selection criterion on IRM.Net preassign reservations.
- Hide Room Type Choices
- Enabled only when Inventory Reservations is selected, check to hide the Type drop-down, which is populated with room types, as a selection criterion on the IRM.Net screens.
- If Arrival Is Today, Exclude Rooms That Are Not Clean
- When checked, this setting will only show clean rooms on the IRM.Net if the guest is arriving today. The room status must be blank (blank = clean) for the rooms to display available. The Preassign Reservations radio button must be selected for the switch to be active.
- Show Rooms that are Unavailable for the Selected Dates
- When checked, the IRM.Net will display rooms that are unavailable for the dates selected. Instead of the Reserve or Rates button next to the room, a message stating 'Not Available for the Selected Dates' will display. The Rates link associated with the Reserve button will not display. If room is not available because of a minimum night requirement, too many people, or if it exceeds the maximum nights of the rate plan, then a message will display describing the reason, such as Minimum Night of 3 is Required. Unavailable rooms will display below the available rooms.
Guest History - New Guests
-
- Guest History Type
- When an Internet guest makes a reservation, the "Guest History Type" is assigned based on this field. Guest history types are stored in Table CA and are used to segment guest history for marketing purposes. For example, a mailing can be distributed to past guests based on guest history type. So, all guests who have booked through the IRM.Net can be e-mailed a newsletter alerting them of future Internet specials.
Use the following steps for adding sub-records to Table CA in RDPWin:- Go to the System main menu --> Table Maintenance.
- Select Table CA - Guest Type Validation from the Table drop-down.
- Click the Add SubRecord button.
- Enter the new SubRecord (up to six characters) and the corresponding description (up to 24 characters).
- Click Save & Close.
- Market Code
- Set the default market code used for all Internet reservations. RDP provides standard "Revenue by Market Code" reports. These reports are useful in determining the type of guest staying at the property. Once the type of guest is determined, marketing dollars can be spent in the correct areas for attracting additional business. Additional market codes can be added from the System | File Utilities submenu by selecting Table Maintenance and updating Table CF.
- Hide Returning Guest Login
- When checked, the reservation entry page does not display the fields that allow returning guests to login; nor are guests asked to create an IRM password. If a guest returns to make another reservation, the guest must enter their name and address information again and are added to guest history AGAIN.
- Allow View Reservations
- Check the box to enable the "View My Reservations" on the IRM.Net. This can also be accomplished by using table maintenance to set the 13th character to 'Y' in Table W0, SubRecord SETGH. When the guest is logged in and clicks the "View My Reservations" link, the guest's current and future reservations are displayed.
There are customizable files on the login page for guest login (in IRMNet/Custom/<server>/rdpxx/UserText):- LoginGuest.htm is at the top of the login page.
- RetGuestNumberLabel.txt to change the "Guest ID or Email" label if desired.
- ResList1.htm at the top
- ResList2.htm at the bottom
- Block 'Do Not Rent' Guests from Logging In
- When checked, any guest with their guest history record assigned as the Do Not Rent guest type will not be allowed to login and make reservations on the IRM.Net. For information on setting up a guest type that blocked by the IRM.Net, see Block Do Not Rent Guests
Source of Business
-
- New Guest Default SOB
- Set the default source of business code used for all first-time Internet guests. By default, all source of business codes Table CD are displayed. RDPWin allows SOB codes to be shown in both RDPWin and the IRM.Net or just RDPWin. Use the following steps to suppress certain codes from the list on the IRM.Net:
- Go to the System main menu --> Table Maintenance.
- Select Table CD - Source of Business Validation from the Table drop-down.
- Select the code to be suppressed in the grid.
- Click the Change SubRecord button.
- Set "Show on IRM" to N for no.
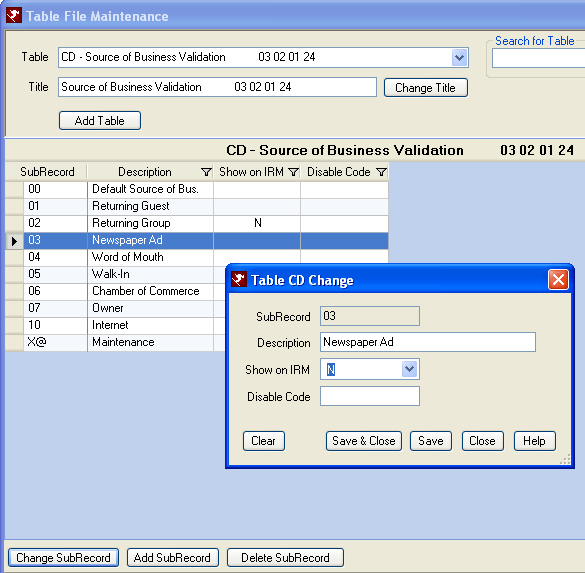
- Click Save & Close.
- Repeat for all SOB codes to be suppressed on the IRM.Net.
The initial source of business code entered by the Internet guest is transferred to the guest master record and used as the default for any subsequent reservations. - Existing Guest Default SOB
- Set the default source of business code used for all returning Internet guests. By default, all source of business codes Table CD are displayed. RDPWin allows SOB codes to be shown in both RDPWin and the IRM.Net or just RDPWin. The SOB code entered by the Internet guest is transferred to the guest master record and used as the default for any subsequent reservations.
- Hide "How did you find us?" Question
- The RDP system includes extensive Source of business reporting. The IRM.Net normally prompts the guest with "How did you find us", which correlates to an RDP source of business code. Check this box to hide the prompt from guests and automatically assign the default SOB code to all IRM.Net reservations. When not checked, the guest can select the SOB code.
- Require 'How did you find us?' for New Guests
- This checkbox requires new IRM.Net guests to select a source of business from the drop down for the question 'How did you find us?'. The Hide 'How did you find us?' checkbox must be unchecked in order for this feature to be active.
Additional Configuration
-
- Rate Specific Cancellation Policy Text
- Rate Plans can have cancellation policy text display on the IRM.Net that is specific to the rate. The .htm file should include the 4-character rate plan code followed by _CancellationPolicies. These files should reside on the IRM.Net server in c:\inetpub\wwwroot\irmnet\custom\...\UserText\RatePlans\XXX_CancellationPolicies.htm (replacing the XXXX with the rate plan code). The "Agree to Cancellation Policies" checkbox must be enabled from the Reservation Tab in the IRM.Net Configuration for this feature be to active.
- Advance Purchase Rate
- The IRM.Net can be configured to offer advance purchase rates. This features works with a discount rate plan to offer guests the opportunity to receive larger discounts for reservations booked further out from the arrival date. As the arrival date approaches, the discount amount decreases, encouraging guests to book earlier. Rates that do not meet the advance purchase criteria are automatically hidden from the guest. Other rates and package can also display on the IRM.Net at the same time. For example, if the guest books 60 days in advance, they receive a 20% discount off of RACK. If booking 30 days out, the rate is a 15% discount. A sample Advance Purchase Discount Rate is as follows:
- 60 Day Advance Purchase - 20% Discount
- 30 Day Advance Purchase - 15% Discount
- 21 Day Advance Purchase - 12% Discount
- 14 Day Advance Purchase - 10% Discount
- See Advance Purchase Rate Configuration How To for more information.
Click these links for Frequently Asked Questions or Troubleshooting assistance.
03/08/2013
© 1983-2013 Resort Data Processing, Inc. All rights reserved.