| IRM.Net Topics | |
|---|---|
|
Install Version 3 on 2003 Server |
Customize Text, Room Descriptions, etc. |
| IRM.Net Configuration Tabs | |
|---|---|
|
Interactive Map (Module T4 Required) |
Owners Tab (Module R3 Required) Reservation Priority (Module R6 Required) Virtual Store Tab (Module S1 Required) |
Interactive Map Overview - Module T4 is Required
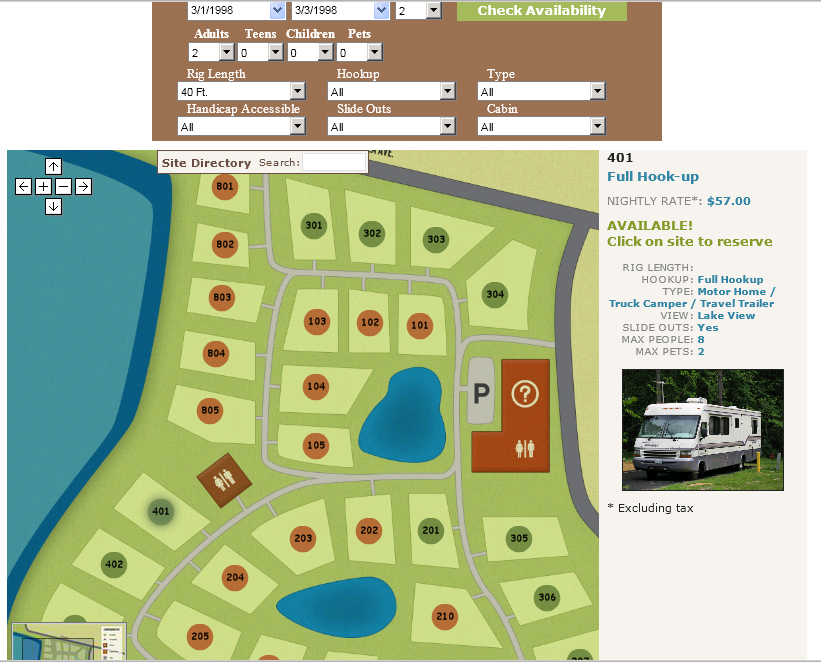
The Interactive Map features allows properties such as campgrounds to have a map integrated in to the IRM.Net. The guest enters their arrival and departure date and the interactive map will display, using "hotspots" for the room or site, if it's available. The guest can hover over the site to view a description, pictures, and the rate for the arrival date. Clicking on the site will start to the booking process with the IRM.Net.
Note: A map image of your property is required. For large properties, the map must be a Scalable Vector Graphic (SVG) file to allow for maximum zooming capabilities.
The following topics are explained on this page:
For a demonstration of the features, see RDP's Interactive Map.
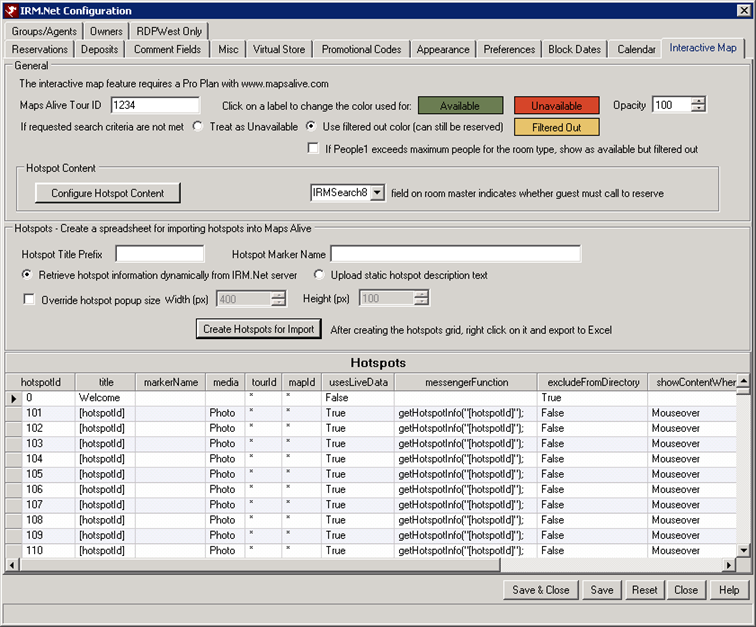
Interactive Map Tab
|
General
The Interactive map is hosted using Maps Alive. A Maps Alive Pro Plan account is required for the Interactive Map. The customer provides the map image of their property and Maps Alive program allows each site to plotted as a "hotspot."
- Tour ID
- An interactive map is referred to as Tour in Maps Alive. Each Tour is assigned a Tour ID. Enter this number in the Maps Alive Tour ID field and the IRM.Net can communicate with the map.
- Available
- Click on the Available rectangle to change the color of available sites on the map. This colors the hotspot marker on the map. The availability of the sites are based on the guest's arrival and departure date.
- Unavailable
- Click on the Unavailable rectangle to change the color of unavailable sites on the map. This colors the hotspot marker on the map. The availability of the sites are based on the guest's arrival and departure date.
- Filtered Out
- Click on the Filtered Out rectangle to change the color of sites that don't meet the guest's search criteria. The guest can select various preferences in order narrow down the site selection, displaying only the ones that meet the criteria. Guest preferences are configured on the room master and can be passed into the IRM.Net. Preferences include electrical hookup, vehicle length, view, location, etc. The IRM.Net Preferences tab controls whether the preference is available on the IRM.Net. For more information, see IRM.Net Configuration - Preferences Tab.
- Treat as Unavailable
- When this radio button is selected, the rooms that don't meet the guest's criteria display as unavailable. The guest cannot select theses sites. This is useful if the guest has made requests that cannot be accommodated, such as the vehicle length. The site will display in the same color as other unavailable sites.
- Use Filtered Out Color (Can Still be Reserved)
- When this radio button is selected, the sites that don't meet the guest's criteria display in the color select from the Filtered Out rectangle. The guest still has the option to select the site, but they are made aware, based on the color, that the site doesn't meet their requests.
- If People 1 Exceeds Maximum People for the Room Type, Show Available but Filtered Out
- When checked, the interactive map will show room types that exceed the maximum people as filtered out but available. For example, if the guests has 10 people for the reservation, room types that have a maximum of less than 10 show in the filtered out color but can still be booked. The option for Use Filtered Out Color (Can Still be Reserved) must be selected in order for this feature to be enabled. This is only applicable for the People 1 category. It does not count People 2-4. If booked, the People 1 value will be changed to the maximum for the room type (S1 Table) and customizable message will display in the reservation summary to guest. This message resides on the IRM.Net server in C:\INETPUB\WWWROOT\IRMNet\Custom\<DataServer>\RDP<xx>\UserText\MaxPeopleExceeded.htm
- Opacity
- Select the opacity of the site marker on the interactive map. 100% = solid. By default, Maps Alive automatically displays the site number over the hot spot. When the map image already has the site number, the site number would display twice, once one the map and once from Maps Alive. In this case, set the opacity to 100, which covers the site number already on the map.
Configure Hotspot Content
Click this button to select which information displays for each hotspot on the IRM.Net Interactive Map. This includes the text that displays if a site is available, the guest preferences, maximum people, descriptions for each site, and much more. The first time the button is clicked, a message stating "Initializing Default Settings" appears. Click OK to retrieve that data. This appears only once.
Content Configuration
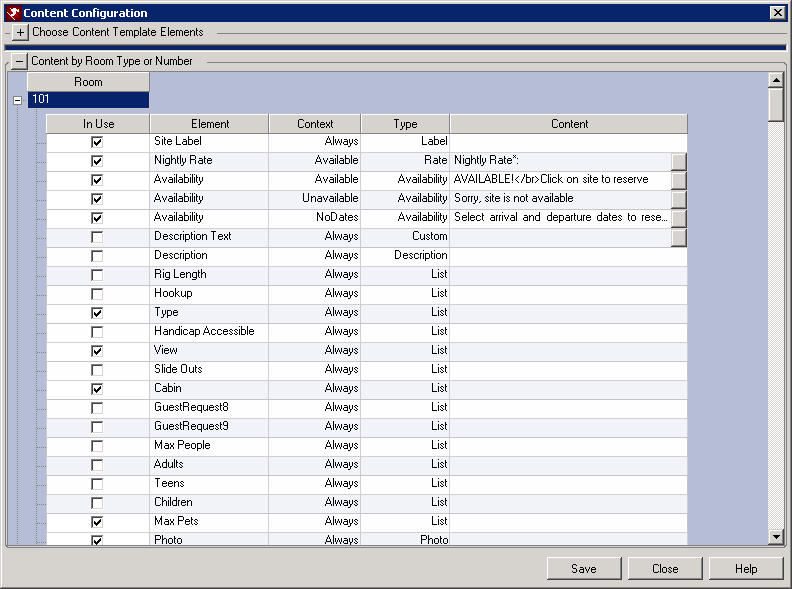
Choose content template elements from the list. These items will displays for each site when hovering over the site on the interactive map. The template settings are the default and are copied down to each site when the Propagate Changes button is clicked. However, items can be turned on and off on an individual site basis. The information in the Content Configuration is stored in the IRMCTENT file.
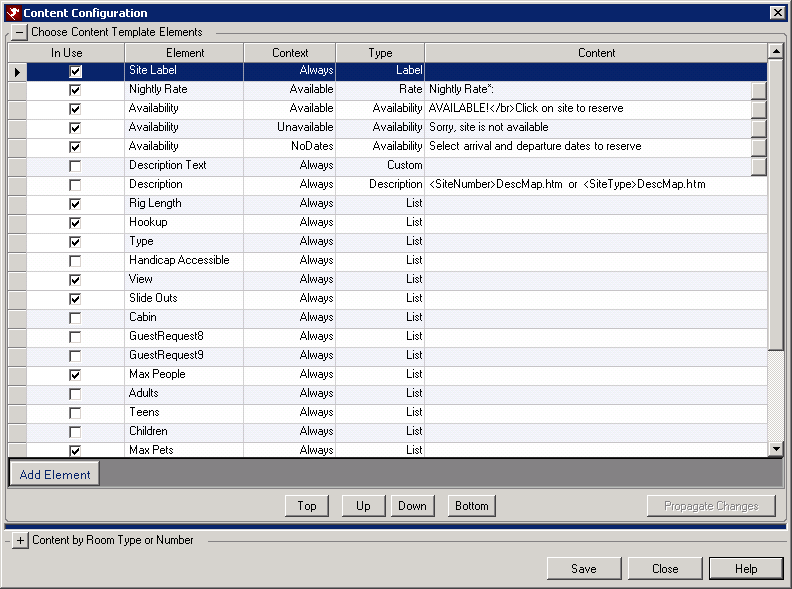
- In Use
- Check this box to turn on the element. The elements selected are part of the standard template for each site.
- Element
- The Element is the description of the data that will display for the site. Elements include the 9 guest preferences, the people categories, nightly rate, descriptions and photos of the site, etc. The element label can be changed by clicking into the field and overriding in the default text.
- Note: Elements labels with a lot of characters may display on two lines. It is recommended to keep the characters to a minimum. For example, the label "Handicap Accessible" may display on two lines. Shorten the label to "Handicap Access" to display on one line. The hotspot window width will determine of the label will fit on line. For maps with the Popup option selected as the hotspot window, the width can be changed in RDPWin. The Tiled width cannot be changed. Changing the hotspot to Tiled or Popup is done through the Maps Alive Configuration.
- New elements can be added by clicking the Add Element button. Use this to include information in the standard template for all sites for things like policies or notices for the guest.
- Context
- This field is used to determine when the element displays. The options include: Always, Available, Unavailable, or No Dates. Select the Always option for items that should display all the time regardless of whether the site is available. Use this for things like guest requests or maximum people. The Available option can be used for items such as the Nightly Rate, which should only display if the selected dates are available for that site. Select Unavailable for elements to display only when the site is not available, like the message "Sorry, site is unavailable." The No Dates option can be used if the guest has not selected an arrival and departure date for this stay. Use this to display the message "Select arrival and departure dates to reserve."
- Label
- The label field displays the type of element that is pulled from that database or created as a custom element.
- Content
- The Content field is the text that will display on the map when the guest hovers over the site. Only fields with the square edit button to the right of the text can be overridden. HTML may used in this field. However, the system does not validate the HTML code. Make sure it correct before saving.
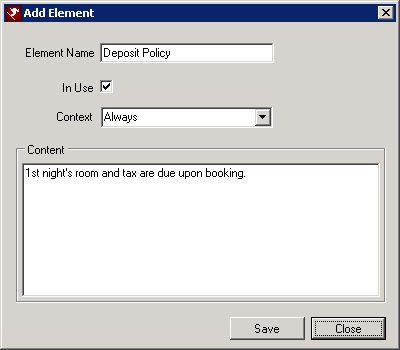
- Add Element
- Click this button add other items to display for each site. For example, add an element to inform the guest that the nightly rates does not include tax. Or add an element to let the guest know any property policies. If not using the room descriptions files from the IRM.Net, use the element to include a description of an individual site or room.
- Enter the Element Name, select then the element should display from the Context drop down. Then enter the information in the Content box.
-
- Top, Up, Down, Bottom
- Use these buttons to order the elements in the template. The order they display in grid is the order they will display on the interactive map.
- Note: all elements with the Type field set to List will display together in a list. This is not configurable. If placing an element in the middle of two list items will cause the element to display after the entire list.
- Propagate Changes
- If changes are made to the grid, click the Propagate Changes to update the template. To save the changes made click the Save button.
The table below explains the elements from the Configure Content grid.
| Element | Description |
|---|---|
| Room Label | This uses the IRM.Net Configuration --> Appearance Tab --> Label Room Each Room With settings. The options are Room Type, Room Number, Room Number & Type, or Alternate Room Name. |
| Nightly Rate | Rate from RDP for the site. This is the rate for the first night of the stay, not an average of the stay. This rates does not include tax. |
| Availability | There are three options for the Availability element, if the site is available, unavailable, or if not dates have selected by the guest. The Content is customizable. Enter the message that will display for the three scenarios. HTML may be used in this field. RDP does not check if the HTML code is valid. |
| Description | If using room description files from the IRM.Net (roomDescShort.htm), check In Use box for the Description element. If using only the guest preferences or entering a description from the Configure Content, do not check this box. |
| Photo | One photo can display per site. Images are saved on the IRM.Net server in C:\INETPUT\WWWROOT\IRMNet\Custom\<RDP Data Server>\RDP<xx>\images\Rooms folder using the site number or site type as the file name. For example, if the site number is 101, then file would 101.jpg. If the site type, PREM, should display, the file would be PREM.jpg. The images must be .JPG in order to display. |
| Guest Request 1 - 9 | Guest request configured on the each site or room master. The Element name can be changed by overriding the text in that field. If certain requests don't apply to certain sites, they can be turned off on the individual sites by expanding the Configure Content for Room Type or Number, and then unchecking the request field. For example, guest request 1 is Rig Length. This applies only to the campsite but not the cabins. Deselect this |
| Max People | Displays the maximum number of people allowed in that room or room type. This information is stored on the room master or room type in RDPWin. |
| People Categories 1 - 4 | Displays people categories configured in RDPWin under the Reservations Configuration --> People tab and many are allowed per category for each site. |
Content by Room Type or Number
Expand this section to change the template and information that will display per room. All elements selected in the template will be active by default. However, each room can be configured individually. This includes adding a text description of the room. Do so by adding an element and entering the text.
Display Site Availability Without the Option to Reserve - Field on Room Master Indicates Whether the Guest Must Call to Reserve
The interactive map can display availability of a particular site without providing the guest the option to book. Instead, it displays a message that the guest must call the property to book the site.
To configure the map to display certain sites with "Call to Reserve":
- Go to the IRM.Net Configuration --> Interactive Map tab --> Configure Hotspot Content.
- Expand Configure Content by Room Type or Number and locate the site number.
- In the Content field of the Availability, enter "Call to Reserve" or something similar to let guests know this site cannot be booked online.
- Go to the Preferences tab.
- Select the first available IRM.Net Search fields. Select the Use on IRM box, and the Display Only box.
- Enter the description as "Call or Reserve." Create a value for Yes and No.
- Go to the unit master for each site should not be booked online. Click the Preferences tab and set the "Call to Reserve" field to Yes. The default setting will allow the site to be booked online.
- Go to the IRM.Net Configuration --> Interactive Map tab --> in the Content Configuration section, select the field designated from step 5 from the Field on Room Master Indicates Whether the Guest Must Call to Reserve.
Hotspots - Create Spreadsheet for Importing Hotspots into Maps Alive
- Hotspot Title Prefix
- The Hotspot Title Prefix can be used in the front of the room or site number. For example, if the property is a campground and sites are used, the Hotspot Title Prefix could be "Site" and would display as Site 101. A Hotspot Title Prefix is not required, and therefore would display as just 101.
- Hotspot Marker Name
- The Hotspot Marker Name is for the marker used to indicates where the site is located on the map. If using the interactive map to display a change in color based on availability, the marker must be transparent. RDP will send the availability information to Maps Alive to color transparent marker based on the color selected from the Available and Unavailable rectangles above. Maps Alive offers a circle and rectangular marker. However, other markers can be created.
- To created a different marker (like the one used the RDP Interactive Map Demo), the specifications are listed below:
- Marker Type = Text
- Shape = Circle
- Style = Transparent No Fill / No Border
- Text Color = Black / Black
- Font = Arial 11 Bold
- Horizontal & Vertical Align = Center
- Text Padding = 4px
- Auto Size = yes
- Circle radius = 40px
- Note: In order for the marker to change colors, it must be transparent. Maps Alive provides many different marker symbols. However, using these will not allow the marker to change colors based on availability, because the marker is not transparent.
- Retrieve Hotspot Information Dynamically from IRM Server
- When selected, Maps Alive retrieves the IRM short description for each site. If the site number's description does not exist, it will look for the room type description. It can also display the rate for first night of the stay and whether the site is available for the selected arrival and departure dates.
- Upload Static Hotspot Description Text
- When selected, the interactive map uses the information entered directly into the Maps Alive program for each site. It does not pull information from the IRM such as the rate, description, and availability.
- Override Hotspot Popup Size
- If using Pop-ups to display the site information, the popup size can be changed. Enabling Pop-ups instead of a Tiled description is done through the Maps Alive Configuration.
Create Hotspots for Import
The grid below displays each site from the Masters --> Rooms that are set to display on the IRM. The site displayed on the interactive map follow the same rules as the rooms displayed on the IRM.Net.
- The room type must be set to display on the IRM: Masters menu --> Rooms --> Room Type Config --> select the room type --> Change --> check the Display on IRM.
- The room must not be hidden on the IRM: Masters menu --> Rooms --> Change --> select the room --> verify Hide on IRM is unchecked.
Click the Create Hotspots for Import button to generate the data in the grid. Right click the grid and select Export to Excel. Save the Excel file.
WARNING: DO NOT change the data in the columns. This the java script code needed to communicate between RDP and Maps Alive. Deleting or changing information can result in the map not working properly.
Use Guest Request and People Category Link
The Use Guest Request feature is designed to link one of the 9 Guest Request to a people field in order to filter out rooms based on the selection of one of the people categories. For example, People 4 is for pets. Use one of the Guest Requests as "Pets Allowed". When linked and, the guests enters a pet in People 4, only rooms that have the Guest Request for Pets Allowed will display. Only People 2-4 can be linked to a Guest Request.
Configure the Guest Request from the IRM.Net Configuration --> Preferences tab to show as Display Only. On the IRM.Net Configuration --> Reservations tab, select the Guest Request that will apply to the appropriate People category from the Use Guest Request drop down.
This feature is available on the ResMain.aspx (reservations page) and the SiteMap.aspx (interactive map page). If the using the Interactive Map, sites that do not allow pets will display as filtered out but can still be booked.

Interactive Map Configuration Steps
- Customer provides image of the map to be uploaded to Maps Alive.
- Customer purchases a Maps Alive Pro Plan and creates an account.
- Create Hotspots for Import from the IRM.Net menu --> Configuration --> Interactive Map tab --> click the Create Hotspots for Import button --> right click to Export to Excel --> save the Excel file.
- In Maps Alive, create a new Tour using Tour Builder.
- Name the Tour, choose the size of the tour and select Embedded in Another Page.
- Choose a color scheme to match the IRM.Net or marketing website.
- Enter a Map Name.
- Choose Tiled or Popup. Tiled requires more space for the description. Large maps may prefer to use Popup.
- Check the Enable MapZoom in order to zoom in on different locations on the map.
- Select a Tooltip Style.
- Select the option: My map is in a file located on my computer, click the Choose File button to upload the map and click the Load button.
- To import the hotspots list from RDP, go to Tour --> Import --> Content from CSV/Excel/XML --> select In a File on My Computer --> click Choose File --> select the file create in step 3 --> Import.
- Select the Marker to be used. See Hotspot Marker Name for more information.
- Plot each hotspot in the map. Note: this step must be done by the customer. RDP Support is not responsible for plotting hotspots on the map. Select Maps --> Go to Map --> select the hotspot from the bottom and place it where it is located on the map. Repeat for each hotspot.
- Publish the tour and enter the Tour ID number in RDPWin --> IRM.Net ---> Configuration --> Interactive Map tab --> Tour ID field.
- Configure any remaining fields on the Interactive Map tab.
URL to Override Tour ID Field
The Maps Alive Tour ID can be passed in using the URL. This will override the what is configured in the Tour ID field on the Interactive Map tab. The URL is: /IRMNet/Res/SiteMap.aspx?tourid=xxxxx (replace the xxxxx with the Tour ID).
Tour ID Per Property Code
Each property code can have a different Tour ID for the interactive map. When that property code is selected, just that property code's interactive map will display. To enable a different Tour ID for each property code,
- Go to the System menu --> Table Maintenance --> select the R2-Property Code Validation table.
- Select the property code and click Change Code.
- Enter the Tour ID for that property code, which is provided by Maps Alive, in the Tour ID field.
This speeds up the map display because just that property code's sites are retrieved. The Tour ID is passed into the map, not the property code. Below is a sample of the link needed for the property code.
- IRMNet/Res/SiteMap.aspx?TourID=xxxx (replace the xxxx with the Tour ID for one property code)
- IRMNet/Res/SiteMap.aspx?TourID=yyyy (replace the yyyy with the Tour ID for the other property code)
Interactive Map Customization
The interactive map can be customized and styled to match the marketing website and IRM.Net. Descriptions of the sites or site types can be added, as well as images of the site.
Site Descriptions
A description of each site or site type can be added to display on the map. If the hotspot is using the Static Text option for the description which is hosted on Maps Alive, then the description resides on the Maps Alive site. It must be updated and maintained manually on their site.
If the hotspot uses the Dynamic Text option, there are three options for descriptions. A combination of descriptions can be used and customized on an individual site basis within the Dynamic Text option.
- Short Description Files from IRM
- The description is retrieved from the short description files on the IRM server. This option is recommended if already using the IRM.Net, with all the description files in place. There is an option to use the same short description for the site or site type that is used on the IRM.Net, or create a different description file. If using this option for descriptions check the Description box in the Content Configuration template. All description files reside on the IRM.Net server in C:\INETPUB\WWWROOT\IRMNet\Custom\<RDP Data Server>\RDP<xx>\UserHtml folder.
- The description files use the site number or type followed by DescMap.htm. For example, if the site is 101, then the description file is 101DescMap.htm. If using the site type instead and the site type is PREM, then the file would be PREMDescMap.htm. The IRM.Net first looks for a room number description. If that doesn't exist, it will display the room type description.
- Add Element from Content Configuration
- This option uses an Element from the Content Configuration. Descriptions are written from the individual site by selecting the Configure Content By Room Type or Number. First add an Element for the description to the Template. If only a few of the sites will use this new element, uncheck the In Use. It can be selected on each applicable site that will use this element. Then expand the Configure Content By Room Type or Number. Select the site for which to enter the description and click on the element to enter the description text. HTML may be used but the system does not valid if it is correct.
-
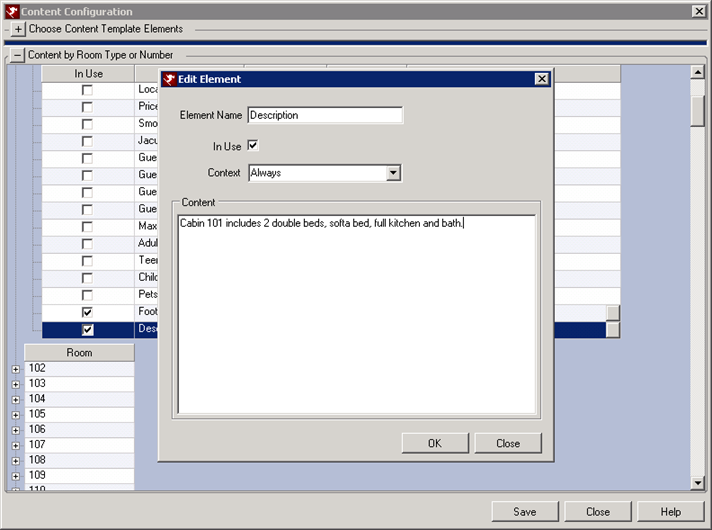
- Not all sites have to use this description element. If a site is described using the guest requests, adding text to this element is not necessary. Uncheck the box from the individual site under the Configure Content by Room Type or Number.
- Guest Requests
- This can be used if no extra description is needed and the Guest Request information will be used. To use this option, uncheck the Description element (the Description element looks for the room description files from the IRM Server) from the Template, and check the applicable the guest request elements. This option can be used in combination with the other Dynamic Text options. The guest requests will display in a list for each site.
-
Photos of Hotspots
Photos can be uploaded to each hotspot to display with the hotspot description. If the hotspot is using the Static Text option for the description which is hosted on Maps Alive, then a single photo can be uploaded into the description on Maps Alive. Both the description and photos are hosted on Maps Alive for each hotspot.
If the hotspot uses the Dynamic Text option, a single photo can display. From the Content Configuration Template, check the In Use on the Photo element. Images are saved on the IRM.Net server in C:\INETPUT\WWWROOT\IRMNet\Custom\<RDP Data Server>\RDP<xx>\images\Rooms folder using the site number or site type as the file name. For example, if the site number is 101, then file would 101.jpg. If the site type, PREM, should display, the file would be PREM.jpg. The images must be .JPG in order to display.

Styling
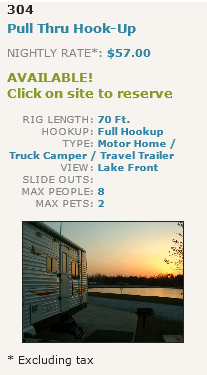
Change the look of certain areas of the map using stylesheets. The image below indicates the locations on the map that can be customized. The number next to the red arrow corresponds to the number in the table below. This table provides additional information about each item.
Note: Before making any changes, see information about how to Create a Custom Theme on the IRM.Net. If changes are made to the standard themes shipped with the IRM.Net, they will be overridden when the IRM.Net is updated.
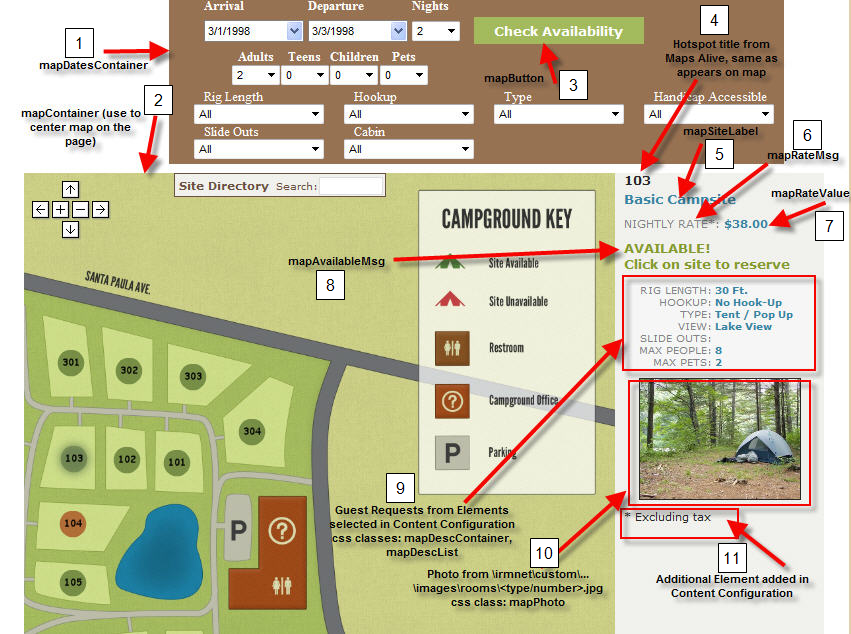
| Number on Map | Style Class Name | Location of Style | Description |
|---|---|---|---|
| 1 | mapDatesContainer | ResMain.ccs style sheet located on the IRM.Net server in C:\INETPUB\WWWROOT\IRMNet\App_Themes\<theme name> folder | Change the color, size and corners (to round the edges) of the box that contains the dates |
| 2 | mapDatesContainer (used to center on page) | ResMain.ccs style sheet located on the IRM.Net server in C:\INETPUB\WWWROOT\IRMNet\App_Themes\<theme name> folder | Position (i.e. center) the map on the page |
| 3 | mapButton | ResMain.ccs style sheet located on the IRM.Net server in C:\INETPUB\WWWROOT\IRMNet\App_Themes\<theme name> folder | Change the look of the Check Availability button |
| 4 | hotspot title from Maps Alive | The site number is exported from RDP to Maps Alive. See step 3 of Interactive Map Configuration | This is the hotspot title (i.e. site number) exported from RDP to Maps Alive |
| 5 | mapSiteLabel | ResMain.ccs style sheet located on the IRM.Net server in C:\INETPUB\WWWROOT\IRMNet\App_Themes\<theme name> folder | Change the color and font of the description of the site. Site descriptions are generated from the short description on the IRM.Net |
| 6 | mapRateMsg | ResMain.ccs style sheet located on the IRM.Net server in C:\INETPUB\WWWROOT\IRMNet\App_Themes\<theme name> folder | Change the color and font of the rate message that displays "Nightly Rate" |
| 7 | mapRateValue | ResMain.ccs style sheet located on the IRM.Net server in C:\INETPUB\WWWROOT\IRMNet\App_Themes\<theme name> folder | Change the color and font of the rate price that will display. The rate displayed is based on the RDP rate configuration |
| 8 | mapAvailableMsg | ResMain.ccs style sheet located on the IRM.Net server in C:\INETPUB\WWWROOT\IRMNet\App_Themes\<theme name> folder | Change the color and font of the Available Message |
| 9 | mapDescContainer and maDescList |
ResMain.ccs style sheet located on the IRM.Net server in C:\INETPUB\WWWROOT\IRMNet\App_Themes\<theme name> folder |
|
| 10 | mapPhoto |
Photo of the site must be saved to the IRM.Net server in C:\INETPUB\WWWROOT\IRMNet\Custom\<RDPServer>\ RDP<xx>\images\Rooms\<SiteNumber or SiteType>.jpg
Change the style of the photos from ResMain.css style sheet located on the IRM.Net server in C:\INETPUB\WWWROOT\IRMNet\App_Themes\<theme name> folder called mapPhoto |
Add the site photo and styling to the map description file. Each site or site type can display a photo. The file must be a .JGP file in order to display. For example if the site is 101, the file is 101.jpg. If the site type is to display instead and site is PREM, then the file would be PREM.jpg.
|
| 11 | Additional Element |
This is an extra element added to the template under the Content Configuration |
Add as many elements as needed, which can include policies, guest information, etc. |
Click these links for Frequently Asked Questions or Troubleshooting assistance.
01/04/2013
© 1983-2013 Resort Data Processing, Inc. All rights reserved.