- Click here for Reservation tutorials.
Overview
When the Show Detail checkbox above
the grid is checked, to detail tabs
pertaining to the selected reservation display below the grid. These tabs
are in read-only format when a guest is selected in the grid; however, the tabs
are active when accessed from an Option screen which deals with one specific
reservation such as Change. Any tabs with specific reservation
information, as well as the active tab's name, are displayed with a
colored outline. Empty tabs without reservation information do not display in a blue color.
Use Change in Options to open the selected reservation and make changes to these
tabs. Once a tab is viewed from a list such
as Arrivals, In-House, or Departures, that tab is continuously displayed in the
forefront even as the selected reservation changes.
To change any information in Reservation Details, double-click a reservation
to open the Change screen or highlight a reservation
in the grid and click Change from Options. For more information, see
Change
Reservations help. For right-click options in the grids, see
Grid Right-Click
Options.
|
RESERVATION DETAIL TABS |
|
|---|---|
| Changes | |
Res Details
Standard reservation information displays on this tab. Most of
these fields can been updated using the
Change
screen. 
- Res#
- Automatically created by the system from the New Reservation screen, the reservation number is displayed in read-only format. This number cannot be changed.
- Share Res#
- Sharewith reservations consist of a primary sharewith (original) reservation and one or more sharewiths. Sharewith reservations list the name(s) of additional guests in the room. Any reservation that is part of a sharewith displays the primary sharewith reservation number in this field in read-only format. This number cannot be changed.
- Guest#
- The guest history number is displayed if one exists on the reservation.
- CRM#
- Available when CRM record exists for the selected reservation, add or change the CRM number for a guest from the Change Res screen or on the guest history master.
- Name
- The guest name is displayed in last name/first name format. However, when entering the name, it can be entered as first name followed by the last name. The system will automatically change it to last name/first name.
- Address
- The guest's contact information is displayed including Address 1 and
2, City, State, Zip Code, and Country.
Note: To add any additional countries in RDPWin, go the System Menu -> Table Maintenance -> Table CP - Country List -> Add Country. You can search the Internet for what the ISO Country Code is for that country. - Home Phone
- The guest's personal telephone number is displayed.
- Business Phone
- The guest's business telephone number is displayed.
- Confirm To
- Only available when the Print
Confirmation checkbox is checked, this information controls the name and
address on printed confirmations as well as which e-mail address is used.
For example, right-click a reservation and select Print to print the
confirmation with the designated mailing information on the report. If
a group or a travel agent with an e-mail address is selected, the e-mail
address from that group or agent master is used. Click the
Send E-mail button to
e-mail the confirmation to the designated e-mail address. If no e-mail
address exists (which includes the group master when a group reservation is
selected), an error message displays.
The fields in the drop-down table are user definable. For example, when the Print Confirmation checkbox is selected, choose to send (e-mail) the confirmation to the Guest, Group Master (if reservation is a group reservation), or Agents 1 - 3 (enabled only if Agent(s) are assigned) for the reservation. The owner is selected on owner reservations and the guest or the owner can be selected for guest-of-owner reservations. Only one confirmation can be sent from this screen. - Guest E-mail
- Store the guest's primary e-mail address. This is the address the system uses to send confirmations as when the Send E-mail button is clicked on the Change Reservation screen. To add more than one e-mail address, separate the addresses with a semicolon.
- Hkspg Service
- See Housekeeping Service.
- Print Confirmation
- When checked, the Confirmation To field is enabled on the Change Reservation screen and allows selection from the drop-down list. Select one and only one recipient to be designated to receive e-mail confirmations. Confirmations will not automatically print if this box is checked. The user must still initiate the printing of the confirmation.
- Allow Move
- Check this box to allow the reservation to be
moved to a different room. The
system default setting is checked. If a guest has requested a specific room for
any reason, uncheck the box to disallow room moves. Changing rooms or dates DOES NOT change a
manually entered rate override. Allow Move is
not allowed for long term reservations if the R3 Condominium Owner
Accounting module is installed. Other details or requirements depend
on system settings as follows:
For condo properties, if an owner or guest of owner reservation is checked-in when room move is required, each transaction on a given guest folio can be assigned to a different owner number. As a result, if posting room and tax nightly, move a checked-in guest from room to room and the system still pays the appropriate owners. For example, assume a guest is in-house for 10 days and changes rooms on the seventh day. All transactions for the first seven days will pay the owner of the first room and the transactions for the last three days will pay the owner of the second room. Reservations may be moved as many times as needed after check-in, provided the following conditions are met:- The reservation is posted daily with Post Nightly Charges.
- From the Change screen, check the Allow Move checkbox.
- Provided that room charges are being posted nightly and not as a lump sum, room moves can be made. For example, charge a guest $650 for seven nights and post the entire stay as one transaction. Room moves after check-in are not allowed if there is only one transaction.
- The system allows any reservation to be moved after check-in when the Allow Move field is checked, including owners, guest of owners, lump sum, etc. Properties using lump sum amounts, Switch 319-04 (Always mark folios as 'Allow Move=No') should be set to Yes. This unchecks the Allow Move field at check-in on every reservation.
- If the above criteria is NOT met and a room move is necessary,
adjustments to owner revenue must be made through direct charges with a
code defined in the B7 (Owner) ledger.
For Vacation Rental System Customers using Direct Check-Out needing to change the room of a future reservation, cancel the reservation and create a new reservation in the new room number. Cancellation is required since room and tax are not posted nightly. If changing rooms for a checked-in guest, that reservation must first be checked out and a new reservation created for the new room in order for the appropriate revenues to be distributed to the appropriate owners. - Early Departure
- When a reservation is checked out prior to departure date, this box is checked.
- Guaranteed
- When checked, the reservation is considered by the property to be a
guaranteed reservation. For example, the system can be set to allow a
reservation to be marked guaranteed ONLY if there is a credit card on file
or ONLY if a deposit has been made.
Note: When "Use list for Gtd field on Res screen (Table VJ)" (Switch 427-05) is checked for Win and set to Yes, the Guar field on reservation and guest history screens is changed from a checkbox to a drop-down list. Table VJ must first be configured with guaranteed designations "yes", "no", etc., before the checkbox is changed to a drop-down box on the screens.
- VIP
- When checked, the reservation is marked as and "important" guests. Important guests are defined by property and used simply to inform users about the guest's status.
- VIP categories can be created in order to define the type of VIP. The VI Table stores the categories.
-
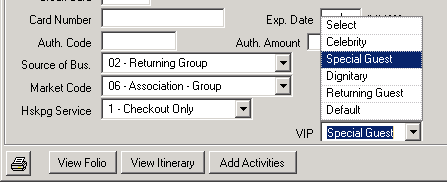
- To configure VIP categories::
- Go to the System menu --> Table Maintenance --> select the VI - VIP Validation table --> click the Display button
- Click the Add Code button.
- Enter the 1-character code in the Code field. Once records have been added to the VI table, this field will be required on each reservation. To create a default record so the VIP field will have a value, enter N in the Code field with the description of Default.
- Enter the description of the VIP category.
- In the Tape Chart Color field, click in the field and select a color.
- Arrive
- Review the date of arrival on the reservation.
- Nts
- Review the number of nights within the reservation.
- Depart
- Review the date of departure on the reservation.
- Room#
- The room number, if assigned, is displayed.
- People Categories
- Review the number of and types of people on the reservation. For more details, see Dates & People.
- Room Type
- The room type is displayed.
- Source of Business
- This user-definable list indicates how the guest learned about the property such as in-house marketing, word of mouth, returning guest, or walk-in.
- Market Code
- This user-definable field describes the type of guest such as Transient, F.I.T., Group, Corporate, Guest of Owner, etc. These codes define the type of guest staying at the property and can be used to analyze the market segments being targeted.
- Check-In (User ID and Time)
- See Check-in information in the Miscellaneous Tab section.
- Check-out (User ID and Time)
- See Check-out information in the Miscellaneous Tab section.
- Entered By
- See Entered By information in the Miscellaneous Tab section.
- Last Chg By
- See Changed By information in the Miscellaneous Tab section.
Charge Summary
This tab displays the detail of each charge for the reservation.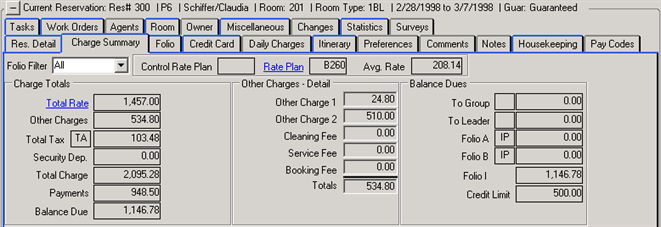
- Folio Filter
- Use the Folio Filter drop-down to display either actual or pre-posted transactions. If a Long Term reservation is selected, then the pre-posted option is changed to the Long Term option. The default setting is All. The Folio Type drop-down on both the Folio and Charge Summary tabs are synchronized, so changing one changes the other.
- Control Rate Plan
- See Control Rate Plan on Yield Mgmt screen.
- Daily Rate (*)
- When viewing future reservations, this field displays the room rate for the first night of the reservation. The "*" displays next to Rate if the Daily Rate has been overridden on any one day of the stay. If a reservation has different rates for different dates, this field is updated when the system date is rolled forward. Once checked in, this field displays the room rate for the current system date.
- Rate Plan
- Rate Plan for the current system date. If a reservation has a different rate plan for different dates, this field is updated when the system date is rolled forward. Click the link to enter or update the Rate Plan Note.
- Avg. Rate
- The system calculates the average rate by dividing the Total Rate amount by the number of nights.
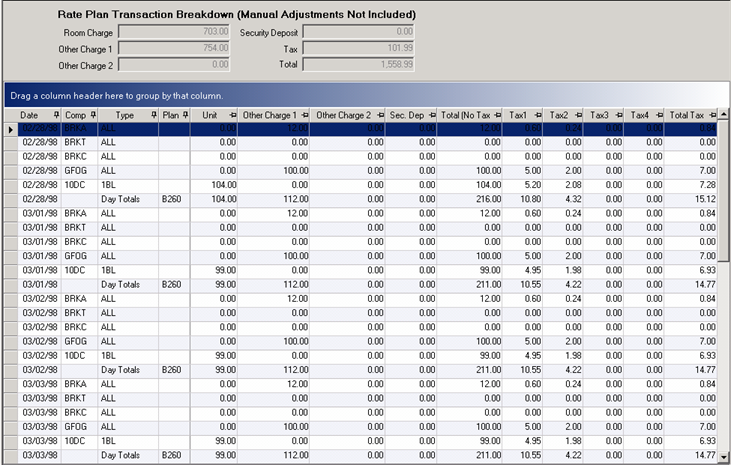
Charge Totals
- Total Rate
- The Total Rate link displays on reservations with rate plan transactions. The link shows the totals of the rate plan transactions by bucket. All package components are displayed individually in the grid with a price breakdown. The Total Rate grid shows the bucket, each of the four tax categories and totals. Manual rate adjustments are not included in the rate plan transaction breakdown.
- Other Charges
- See Other Charges for details.
- Total Tax
- Total taxes for the reservation.
- Security Deposit
- When Security Deposits are enabled on the Other Charges tab, security deposits can be taken. The amount collected from the guest is held as a liability until forfeit or refund AFTER check-out and room inspection. See Security Deposit for more details.
- Total Charge
- The balance of Total Rate, plus Other Charges, plus Total Tax.
- Paid Deposit
- When viewing this tab for a future reservation with deposit(s) received, the total amount of deposits made is displayed. Once the reservation is checked in, this field changes to the Payments field.
- Payments
- When viewing this tab for reservations after check-in with deposits (Res Types 1 through 4) or payments (Res Type 5 or higher), the total amount received is displayed.
- Balance Due
- The balance of Total Charge less Paid Deposits (Res Types 1 through 4) or Payments (Res Type 5 or higher) is displayed.
Other Charges
Miscellaneous charges used at the property's discretion.
- Other Charges 1 and 2
- The total of amounts in
the Other Charges 1 and 2 are always active in the system and display totals
for general transactions.
The pre-post flag on the charges associated with the buckets are removed at check-in. Adjustments to the bucket after check-in require posting another code. See Res Configuration and Change for more detail. - Cleaning Fee - Service Fee - Travel Insurance - Booking Fee
- In addition to "Other Charges" 1 and 2, which are used for general transactions, "Other Charges" 3 – 7 are available for more dedicated transactions assigned to only one charge code. Buckets 3 through 7 can be disabled for those properties without need. The descriptions are configurable. Only the charges that apply to the selected reservation type are shown (see Set Up).
- Totals
- The full amount of all charges listed in Other Charges 1 and 2 including any configured Other Charges 3 - 7.
Balances Due
- To Group
- If the reservation is part of a group, the group name, pay code, and the amount to be transferred to the Group are displayed. Charges for group member reservations with arrival and departure dates that differ from the Group Leader dates should be billed to the Group Master.
- To Leader
- If the reservation is part of a group, the Leader reservation number, pay code and the amount to be transferred to the Leader are displayed. If all group member reservations match the arrival and departure dates of the Group Master, the billing should always go to the Group Leader.
- Folios A, B, and I
- A folio holds descriptions and details about any charges incurred on the reservation and can be daily charges or one-time charges. Folio A and B are set to IP by default and are typically used when more than one person is on the reservation requiring separate folios. The balance of all three folios are listed separately.
- Credit Limit
- Amount pre-approved by credit card company and property for expenditures. The defaults are set in Res Configuration on the Check-in tab for guests with a credit card on file and guests without.
Folio
The Folio tab displays the total (charges), total payments, and amount
due.
These fields always display the summary information for ALL folios,
regardless of which type of folio is displayed in the grid. The Total field consists of all charges and taxes that have been
posted (not marked with * in the Pre column), and does not consider any payments
or transfers. The Payments field consists of any advanced deposits or
guest payments, and does not consider any correction entries (marked with
* in
the No Prt column). Total + Payments = Due.
Totals are also displayed for long term (Type N on the record, but Type P in the grids) reservations. The totals include all transactions from the start of the reservation to the date specified on the label
(Long Term through xx/xx/xx). Long Term is included in the Folio Filter drop-down
for long term reservations. Select this filter to display only transactions that correspond to the Long Term total.
Select any available individual folios from the Folio Type drop-down to
display charges and the summary for that type or select All to display line
items and summary information to for all types on the reservation. For
example, users can view only a group member's leader type charges, or a group
member's personal Folio I charges. The folio grid displays summary
information for Charge, Tax and Total columns below the grid.
- All Transactions Display and Print When VRS Switch 426-06 is Yes
- RDPWin's standard folio works with the
VRS Switch (426-06). If
a crystal report contains the parameter "VRSSwitch", RDPWin
automatically passes in a value of "Y" if the VRS switch is set to YES
or "N" when it is NO. Folios use this
parameter to make the decision of whether to display all charges for VRS
customers (posted and pre-posted) or to only display the posted charges
for non-VRS customers.
- Print and Preview
- Click the Preview button to preview the available Crystal Report (based on Individual Folio selected in the Reservation Configuration Folio tab) or the Print button to print that report. If a group or sharewith reservation is selected, accessing those two buttons opens the Group Member Folio Options form before previewing or printing the folio. See Printing Folios for more information.
- Change
- See Change Folio for details.
- Post Charge
- Select Post Charge from Folio Options Panel or click the button on the Folio tab to open the Post Charge form.
- Click the E-mail button to access the E-mail Folio screen. Sending a current folio to the guest by selecting folio I, A, B, or group folios.
- Folio Filter
- Select a Folio Type from the drop-downs to narrow the display to one specific folio such as "I" or Group. If System Switch 422-03 is set to "No", Folios A and B are not displayed. Only a small percentage of customers will want all folios to be activated.
- Hide No Prints
- Check to make all "No Print" transactions NOT show in the grid.
- Show Rate Plan Total
- Check the box to display only rate transactions and totals in the grid. Any activity transactions or other such charges are hidden.
- Folio Grid
- The grid displays Pre(posted), Code, Description, Charge, Tax, Total
(Charge), Type (Folio), Pkg, No Prt, and Rate Plan. Those columns marked
with a
 can be filtered, Sorting information in the columns can be accomplished by
clicking the column header. The
can be filtered, Sorting information in the columns can be accomplished by
clicking the column header. The
 and
and
 symbols can also be used, but are often hidden until column headers are
selected.
symbols can also be used, but are often hidden until column headers are
selected. - No Print Sequence Number (No Prt#)
- This column contains the "no-print offsetting transaction sequence number" and makes tracking which transaction a reversal transaction is associated with much easier. The column shows on the Folio tab, the Change/Reverse Charges screen, Change Transaction screen, and on the Folio Transactions screen (when accessed using the View Folio button on the Change Reservation screen).
- Double-Click to View Transaction Detail
- When a transaction is selected, double-click or press Enter to display complete
detail of the transaction in read-only format.
Transaction Detail Page 2 tab displays travel agent and owner information.
Credit Card
View guest credit card information, including any reservation-related
activity, in the grid. Double-click a credit
card transaction in the grid to open the Transaction Detail.
Credit card details shown above the grid are Credit Card, Card Number
and Expiration Date
(mm/yy), Authorization Code and Authorization Amount (given
by bank when the credit card is processed), and the Swiped
checkbox. 
- Credit Card, Number, and Expiration Date
- The credit card fields work together to validate the credit card number and can be changed on the Change Reservation screen. Once RDPWin is encrypted, the credit card fields are cleared of all but the last four digits of credit card number information. For more detail on how encryption affects credit card information, see Encryption, Credit Cards, and Guest History.
- Authorized Code and Amount
- If Protobase is available to the property, this information is automatically recorded when the card is swiped. If credit cards are processed manually, these fields must be completed manually as well.
- Swiped
- This box is always disabled and is checked by the system when a card is swiped (when Protobase is available).
- Display Full Credit Card Numbers
- The credit card number displays based on security settings in System | Menu Security | UI Security | Display Full Credit Card Numbers Fence Level. If a user's power level is less than the number set in security, the user only sees the last five (5) digits of a credit card number to insure personal information security. If a user's power level is equal to or greater than the fence level, all digits of credit card numbers are visible.
- Double-Click to View Transaction Detail
- Double-click a credit card transaction to open the Transaction Detail screen. The Credit Card tab displays only general information. The Transaction Detail screen displays much more information about the transaction in read-only format.
Daily Charges
View the Daily Charges for a selected reservation. When a checkbox is
checked, a charge for the selected item is posted to the folio for each day of
the reservation. Daily Charges can be unique for every property. See
daily charges configuration and
Change Res for more information.
Itinerary
When a reservation has activities booked, the grid displays the Itinerary Total for
all activities and includes general activity details: Date, Name, Activity
Vendor, Prt (print on itinerary), Ppl (number people
participating in the activity), Charge (total amount for each activity), Inactive,
Closed, and Hourly.
- Print (Itinerary)
- Click the Print button to open the form for selecting printing parameters. Select the print range, number of copies, and whether or not to collate the copies as they print. Click OK to send the print command or Cancel to abandon it.
- Preview (Itinerary)
- Click Preview to display the currently selected itinerary. The first time Preview is activated after logging onto the system, it takes more time to display than all those that follow.
- Print/Preview (Ticket)
- See print ticket help in right-click capabilities.
- Activity Detail
- Display specifics regarding the selected activity. Three tabs
are available: Details, Comments, and Notes. From this screen, click the
Transaction Detail button to view specific transaction information
regarding the activity displayed in the Activity Detail screen.
Although the sample of the Transaction
Detail screen shows folio detail, the same fields are available when
an activity is the focus.
- Activity Info
- Click to access the F4 Custom Help files, provided the file for the
selected activity exists. These files are stored in the Help folder (usually RDP\Help) as Rich Text Format (RTF)
files definable by property. The system searches for an RTF file with
the resort number and the component number as the file name. When
not found, the system searches for a file with only the component number.
When not found in either of the two previous conditions, the system uses the vendor number and searches by resort number and
then vendor number alone. If still unsuccessful, the system uses the charge
code; again using the same search options. This option is available wherever
Itinerary items are displayed in a list, including the
Add Activity form.
- Add Activity Button
- Display the Add Activities screen.
- Change Activity
- Display the Change Activity screen to add, change, delete, copy or transfer activities.
- Itinerary Total
- Displays the total amount to be charged for all activities on the selected reservation.
- Closed
- See Closed for details.
- Inactive Column
- See Inactive for details.
- In Pkg Column
- See In Pkg for details.
- Conf With Column
- Conf With displays the name of the user that was logged in when the activity was confirmed.
- Conf# Column
- Conf# displays the confirmation number when the activity was confirmed.
Preferences
This tab shows any special requests made by the guest and are based on
room
Preference settings.
Comments
Record any statement of fact or opinion on the Comments tab. There are
four standard subjects within the system: Housekeeping, Smoking, Floor, and
Airline. The remaining 13 are
user definable fields or can be used to type in
unique text.
Comment Fields 1 - 9 are copied from the reservation to the guest history
record:
- When a new reservation is made and Switch 319-07 - "Update Guest History Comments from a New Reservation" is set to Yes.
- When a sharewith is made and Switch 319-07 - "Update Guest History Comments from a New Reservation" is set to Yes.
- When Add One Room is used and Switch 319-07 - "Update Guest History Comments from a New Reservation" is set to Yes.
- During check-out when Switch 319-08 - "Update Guest History Comments During Check-out" is set to Yes.
| Comment Fields for... | Table Identification |
|---|---|
| Comments 1 through 3 | EF to EH |
| Comments 4 through 12 | E1 to E9 |
| Comments 13 through 17 | EA to EE |
Notes
Record any free-text remarks, and Save any changes. Different types of notes can be recorded by using the sub-tabs available for Res Notes, Guest History Notes, Owner Notes, and Housekeeping Notes. Having sub-tabs by category helps reduce the amount of information to search when looking for specific information in the future.
- Add Link
- When Module S7-Change Tracking is installed and User Add/Change
Button on Notes Switch 414-60 is set to Yes, notes are added using a
link which allows text and time information to be tracked on new notes.
When set to No, Notes can be changed directly on the tab using free-form
text, and no Add link is available.
Click the Add link shown above to access the Add Note form. Enter the text and save.
The timestamp and user login information is displayed with the new note allowing detailed tracking of new notes. -
- When an IRM.Net guest enters notes in the Comments box on the IRM.Net when making a reservation, these comments will display on the Notes tab of the reservation in RDPWin. The note is stamped with "Entered by IRM.Net Guest" followed by the date and time it was entered. This is designed to help the reservationist identify any requests the guest has made via the IRM.Net.

Res Notes are displayed and
changed only on the reservation.
|
Guest History Notes are displayed and
changed
on both the reservation and guest history master.
|
| Housekeeping Notes are displayed and
changed on the reservation only.
|
Group Notes are only displayed if the selected
reservation is part of a group and are displayed and changed on the
reservation and the
group master. |
Leader Notes are only displayed if the selected
reservation is part of a group and are displayed and changed on the
reservation and the
group master.
|
Housekeeping
Review the service type and cleans scheduled and forecast for each day of
the selected reservation. This tab displays regardless of having the
Enhanced Housekeeping (S2) module installed or not. The Room Number and Current Clean Status are displayed.
When the Enhanced Housekeeping [S2] is not installed, only the service drop-down
is available for review and change.
- Housekeeping Service
- Housekeeping Service displays the type of cleaning service scheduled when the reservation was made. To change the scheduled service for any type of reservation including maintenance, click Change from the Reservation Options, click the Housekeeping tab, and select a new service type from the drop-down. For more information, see Service Types.
- Housekeeping Billing
- For more information about Housekeeping Billing, see Reservation Housekeeping Billing.
- Hide No Cleans
- Check to suppress all No Cleans displayed on the Housekeeping tab of the selected reservation. This can be set by default on the Housekeeping Configuration Reservation tab.
- Clean Schedule Grid
- Future cleans show both the Default and Actual columns which are the same unless the default
clean is overridden by changing the value in the Actual column. To change
a future clean type, click the down-arrow in the Actual column in the
desired date row to select the new Actual clean type. When the boards are created
for that day (or recreated), the override clean is scheduled.
If a historical reservation is being displayed, the housekeeping information may not be available. Board history is retained for a configurable number of weeks (eight by default). If the selected reservation is prior to the retained history date cutoff, the grid on the housekeeping tab displays "No Cleans Found". Regardless of historical or current reservation selected, the current Room Status is displayed on this tab as well. -
- Default
- The Default column displays what type of clean would have been or will be scheduled based on the clean service type on the reservation.
- Actual
- The Actual column shows what really happened (for past days ) or what is really on the future schedule. The Actual column can be changed to override what would be scheduled by default. This feature is common in the VRS world: by default, schedule minimal cleaning service, but allow the ability to add a clean. Charges are not automatically posted for added cleans; however, this feature may be added later. Cleans for past days, and today if the boards are already created, are shown under the Actual column and are displayed in gray to signify they are not available for change. (If the boards have already been created for today, today’s clean type can only be changed from the Schedule screen.)
- Cleaned
- When checked, the clean has been performed.
- Housekpr
- Displays the initials of the housekeeper either assigned to or who performed the clean.
- Inspector
- Displays the name of the inspector either assigned to or who performed the inspection of the room.
- Clean Time
- See Clean Time for details.
Pay Codes
Review the scheduled pay code changes within a reservation.
For example, a guest
may arrive two days before a conference and need to pay the room and tax
themselves (IP - individual pay). Then once the conference begins, the
room and tax should be paid by the group master. The Charge Summary would
display Transfer to Group = RT (room and tax). Using RDPWin demonstration
data for Res# 335, the group master pay code is currently set to IP (individual
pay). Per the Pay Code tab, on March 3rd the pay code changes to RT so
room and tax are paid by the group master until the next scheduled pay code
change. Then on March 5th, the pay code is set to return to IP.
Table WP holds the pay code defaults for
Folio A and B. The sub-record is the
reservation type. There is no need to add sub-records for inventory (I)
or inventory timeshare owner (Q). The "P" sub-record applies to "I"
reservations and the "T" sub-record applies to the "Q" reservation type.
Note: For Vacation Rental Systems, reservations must be checked in
before pay codes can be changed. If the property is using direct
check-out, the codes on this tab are read-only.
- Group/Leader Number and Pay Code
- The group’s and leader's number and pay code are displayed. From the
Change screen, the minimum and maximum dates allowed for pay code
changes are displayed at the top. The tab is disabled and displays
a message if:
- The VRS Configuration | VRS Switches | Vacation Rental System Features (Switch 414-01) is checked;
- The reservation length is less than 2 nights;
- The departure date is less than or equal to the current system date; and
- The reservation is checked-out or cancelled.
Tasks
A task is associated with a guest reservation. For example, if Mary and
John request extra bedding, kitchen items, patio furnishings, etc., add a task
to the reservation. Select the Task tab to add, change, and view detail of
each task, including status. Guest Tasks relate directly to the guest
regardless of which room the guest was in when the task was opened or
closed. For example, if a room move is performed, any closed Tasks reflect
the room number the guest was in at the time it was closed. Any open Guest
Tasks are assigned to the new room number.
Click Add from the tab
to open the
Task (Add) screen. For future reservations, the associated reservation number is
auto-filled by the system. For In-House reservations, the reservations
number and room number are auto-filled.
Work Orders (Only available if the Work Orders & Asset Management (RZ) module is installed)
There are two sub-tabs within the Work Order tab.
- Work Orders for Room
- Work Orders for Room are considered a request filed against the room number and have no reservation number assigned. The Task box is unchecked. A work order is associated only with a room number. For example, if a television needs replacement in Room 101, add a work order to Room 101. Select the Work Order tab to add, change, and view detail of each task, including status. Work Orders relate directly to the room regardless of which guest is in the room when the work order was opened or closed. For example, if Res# 239 checks out of Room 101 and Res# 433 checks in, the work order is not affected, because it is attached to the room and is completely separate from the guest in the room.
- Res Related Work Orders
- Res Related Work Orders are a request filed against the room number but also have a reservation number assigned. Res Related Work Orders display in association with a reservation if it has a requested start date within the reservation arrival and departure date. The Task box is unchecked. Res-related work orders cannot be added to future reservations.
Click Add from the tab to open the Work Order (Add) screen. If a pre-assign reservation is selected, click the Work Orders detail tab and click Add. The room number is auto-filled by the system. If an inventory reservation is selected, an error message, "Selected reservation number has no room number" is displayed. Work Orders, whether res-related or for room, must have a room number assigned prior to adding both types of work orders.
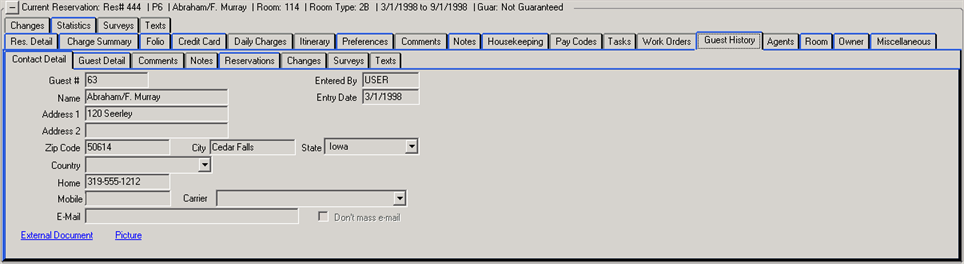
Guest History
The reservation's guest history information is displayed on the Guest History tab. This tabs includes all the tabs available from Masters menu --> Guest History. For more information, see Guest History.
Agents
When a Travel Agent is associated with a reservation, the
commission information related to any and all agents associated with the
reservation are displayed. The name of the agency displays (in
color) above the Agent Number. 
- Agent Number
- The Agent Number is unique for each agent and assigned on the Travel Agent Master.
- Owner Split
- The Owner Split field is designated on the Room Master. Since each owner can own different rooms with different agent fee splits, the split is governed at the room level. If there is a travel agent and room number on the res, the Owner Split field from the room is put into the Owner Split field for Agent1.
- Agent Code
- The Agent Code is populated with the default commission rate for assigned travel agent as assigned on the Travel Agent Master. The default code is set in the Travel Agent Master, but it can be changed on the Agents tab in the Change Reservation screen on a "by individual reservation" basis.
- Commission
- The Commission field is automatically calculated based on the room rate, number of nights, and the Agent Code. For example, if a 4-night reservation has a room rate of $80 and the Agent Code is set to 10%, the Commission is $80 x 4 x.10 or $32.
- Prededuct (Agent 1 Only)
- When a travel agent is designated on a reservation, the Prededuct checkbox is an option of payment for the agent. When checked, the agent sends the net reservation amount to the property and keeps the commission due to the agent. For example, if the total room charge on the reservation was $1,000 and the agent's commission is 10%, the agent would retain $100 as a fee and send $900 to the property. A reservation can have up to three agents, but Prededuct is only an option for Agent#1. When agent commission statements are generated and printed, these prededuct commissions appear on the statement, but are not included in any commission check that might be generated.
Room
When viewing reservations in a grid, an owner from the Owner Analysis, or a
room from the Rooms Analysis, click the Room tab to view details on the room
type and room number. The "Room Info", "Room Detail", and "Room Type
Info" facts are also available from the right-click menu when viewing
reservations, owner masters, and room masters.
- Room Detail
- Click Room Detail to view the room master for the specific room number selected in the grid.
- Room Info
- Click Room Info to view the RTF files for the specific room number selected in the grid.
- Room Type Info
- Click Room Type Info for details on the .rtf files available.
Owner
When the room on a reservation has an owner, the
Pay
Code, Owner Amount and
Contact Information from the owner master are
displayed. When viewing from the Change screen, click the Detail
button to open the Owner Detail screen and view the
owner master in read-only format.
- Owner Amount
- The Owner Amount represents the revenue to be received from the reservation. This amount is calculated using the Owner Portion on each transaction of the reservation (as shown on the Transaction Detail screen).
Miscellaneous
Fields with logon, date, and/or time information are: Entered By,
Changed By, Check-In, Check-Out. Last Long-Term Posting, Last Nightly
Posting, GDS Res#, Early Departure, Cancellation#, and Cancellation
Reason are also displayed.
- Last Long-Term Posting
- Displays the last date this guest had any long-term room charges posted. Either this box or the Last Nightly Posting box can be checked; but not both.
- Last Nightly Posting
- Displays the last date this guest had daily room charges posted. Either this box or the Last Long-Term Posting box can be checked; but not both.
- GDS Res#
- RDPWin offers a one-way interface to load new reservations and changes from the Global Distribution System (GDS) directly into the RDP database using interfaces such as InnLink and VIP. As reservations are made through the GDS, GDS reservation numbers are assigned. However, GDS reservation numbers are different than RDPWin's reservation number. This field tracks the GDS assigned reservation number.
- Cancellation # & Date
- If a reservation was cancelled, the Cancellation Number issued by the system is displayed. This field does not appear if the reservation has not been cancelled. The Cancellation Date field tracks the date the reservation was cancelled using the computer date, not the RDP system date.
- Cancellation Reason
- If a reservation was cancelled, the Cancellation Reason entered at time of cancellation is displayed. This field does not appear if the reservation has not been cancelled.
- Wait List Room Type
- For properties using RDP's Internet Reservation Module, the IRM can create a wait list reservation. On that reservation the regular room type is usually N/RWP and the Wait List Room Type field is the room type the guest prefers.
- IRM Session# and Accept
- The IRM session number is assigned by IIS (Internet Information Service) when a web session is started on the IRM. IRM Accept is a new option on the IRM that allows the customer to configure the IRM to require the guest to check a box stating the cancellation policy as been reviewed.
- VP Status/Agreement
- The Miscellaneous Tab shows the VP Status and Agreement information. This is set when a reservation is changed and AIG Travel Guard requires notification. RDPWin Monitor uses this information to change or cancel the service. The agreement number field is also shown. When Change Status equals "1", a change has occurred. When Change Status equals "2", the service has been cancelled. When there is no agreement number, RDPWin Monitor adds the service with AIG Travel Guard and ignores the status.
- SDP Status/Agreement
- The Miscellaneous Tab shows the SDP Status and Agreement information. When a change occurs, the system indicates the change by placing a "*" next to the SDP Status/Agreement field. This is set when a reservation is changed and AIG Travel Guard requires notification. RDPWin Monitor uses this information to change or cancel the service. The agreement number field is also shown. When Change Status equals "1", a change has occurred. When Change Status equals "2", the service has been cancelled. When there is no agreement number, RDPWin Monitor adds the service with AIG Travel Guard and ignores the status.
- Keys Made
- View how many keys have been made using RDP/VingCard interface.
- Entered By
- Once a reservation is entered into the system, this field displays the logon name of the user who entered the reservation into the system as well as the date and time of entry.
- Changed By
- When changes are saved on a reservation, this field displays the logon name of the user who entered the reservation into the system as well as the date and time of entry.
- Check-In (Logon, Date & Time)
- Displays the logon of the user, the date, and the time that the reservation was checked in. The computer date and time is used in these fields, not the RDP system date.
- Check-Out (Logon, Date & Time)
- Displays the logon of the user, the date, and the time that the reservation was checked out. The computer date and time is used in these fields, not the RDP system date.
- Early Departure
- This box is checked when the reservation is checked out early. The system prompts the user during the check-out process if the current date is earlier than the scheduled departure date. If the answer is yes to the prompt, this box is automatically checked by the system.
- Confirmation Sent
- The date a confirmation was sent by the RDPMonitor is displayed.
- Originating Program
- This field is blank for DOS records, set to IRM for IRM records, set to GDS for the GDS records, and to RDPWin for RDPWin records. When a confirmation is sent by the RDPWin Monitor, the originating system is recorded here.
- Re-Rent (Direct Check-Out Only)
- Available to systems with Use Direct Check-out Switch 414-01 checked, this box is automatically checked when a reservation is checked out early and the Make the room available from... option is selected during the check-out process.
- Timeshare Week Number (Timeshare Systems Only)
- When the Timeshare & Interval Ownership Module R6 is installed, the Timeshare Week Number is displayed here.
Changes
When the Change Tracking Module (S7) is installed, changes made to
reservations and some masters in RDPWin are tracked. RDP-DOS does
allow reservations to be changed; however, Change Tracking only functions
with RDPWin. Properties using both DOS and Win for reservations could
change a reservation in DOS and not see the detail when viewing the Changes
tab in RDPWin. Resort Data Processing suggests using only RDPWin for
Reservations and Front Desk functions when using the Change Tracking Module.
Change Tracking Analysis and
Summary
information is also available.
In addition to making sure to only use RDPWin for reservation changes, the
system tracks information on the user making the changes as well. Some
properties assign group logons for front desk, audit staff, accounting.
To assure the most accurate information is recorded for Change Tracking,
properties should
create and
maintain individual logons for each and every user. See
Change Tracking Overview for more
details.
- Summary View
- When the Summary View radio button is selected and a reservation is
changed using RDPWin, basic reservation and change information is
displayed on the tab. Each row in the grid represents a time when
a reservation was changed and saved. One or many changes can be
associated with a single row. Fields available on this tab
are always Date Changed (includes time), Changed By (based on logon of
user), Name, Arrive, Nts, Depart, Room, Type, Rate, Share, Leader,
Group, Folio I, and A & B when
activated.
The original reservation is always displayed at the bottom of this grid. Any changes made thereafter are displayed in order with the latest on top. The grid cannot be sorted, filtered, or reordered. For additional reporting and data manipulation, use Change Tracking Analysis and/or Change Tracking Summary.
When multiple changes are made on the same date and display the same time in the Date Changed grid, view the detail to see the actual, official time including the seconds. In the sample below, the original reservation was made on 01/18/98 at 12:00 a.m. Multiple changes were made on March 1st (reservation opened for change and saved).
- Detail
- While in Summary View, click the "View Detail" button or double-click any row to display the details on the Changes
screen. The sample screen below shows the telephone number and zip
code were both changed by User AUDIT on March 1st at 37 seconds after
11:02 a.m.
The sample screen below shows the travel agent code was updated as well as the guest's address by User AUDIT on March 1st at 16 seconds after 11:02 a.m.
- Master
- While in Summary View, click the Master button to display the
reservation information in read-only format. The information
displayed is the same as that displayed on the Change Res screen.

- Detail View
- When the Detail radio button is selected and a reservation is
changed using RDPWin, each row represents a single change regardless of
whether or not multiple changes were made during the same Change
session. The Date Changed column is always displayed, along with
the field name changed, the original and new value of that field, and
the user's logon information.
- View Detail Button
- Click to open the Changes form.
Statistics
All statistics records for each non-cancelled reservation now display on the Statistics tab of each reservation. When the tab is displayed, the system checks to see if the statistics for the reservation should be automatically reset. Conditions that require a reset are:
- When the reservation is cancelled or temporary, existing stats are removed.
- When no statistics exist and the reservation is not cancelled or temporary, stats are created.
- When statistics exist and there should be at least one row for each night of the res plus one for the departure date if not, stats are created.
If any of these conditions exist statistics are automatically reset
EXCEPT when the number of nights is greater than 31 which
displays an advisory (example: 'Statistics do not exist for this
reservation. Click 'Reset' to correct.') recommending the user to reset
manually. Totals for Room Charges and Total Charges are displayed
above the grid.
- View Detail
- Select a row and click the View Detail button or double-click a row
within the Statistics tab to view the detail. This button is not
enabled unless a row is selected.
Click these links for Frequently Asked Questions or Troubleshooting assistance.
02/15/2013
© 1983-2013 Resort Data Processing, Inc. All rights reserved.