
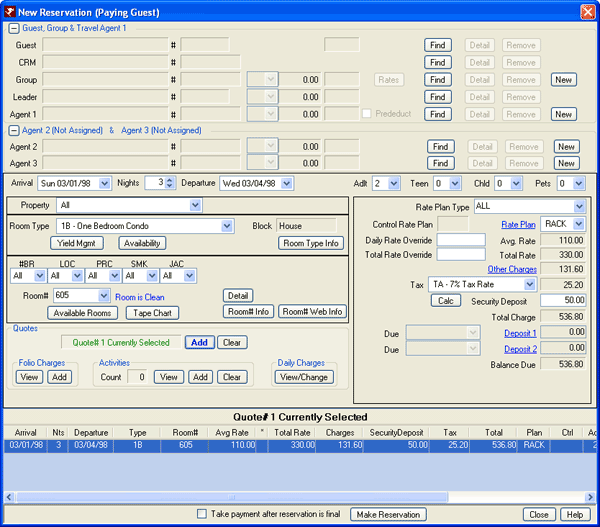
Overview
The New Reservation screen is used to enter and set basic information for
the reservation. There are numerous settings on the
New Res tab of Reservation Configuration
that affect how this screen displays. Any information provided may be
affected by the configuration settings.
Quote rates (based on Hide Quote Area) to guests and
select
the critical elements for a new reservation such as masters (group,
travel agent), dates, rooms and rates. Attach the reservation to an existing guest history
record (Guest
History & Marketing Module R4 required), group masters and leaders (Groups
& Conferences Module R2 required), or travel agents.
When the
Customer Relationship
Management (CRM) module is installed, the central CRM database can be
searched as well as the local guest history database for the individual
property. When a CRM connection is made, points can be awarded to the CRM record
for the new reservation.
The Security Deposit and Property fields are
optional based on settings: Property Code feature (Switch
422-12) and Security Deposit feature (Configure
Other Charges).
To access the screen, use the F5 New Res button in the
tool bar or select New
Reservation from the Reservations main menu or the
Navigation page. 
Reservation Types
| RESERVATION TYPES | ||
|---|---|---|
| Basic | Owners | Timeshare |
- Paying Guest Reservation (Shortcut Ctrl+P)
- Any guest reservation that will have a rate (not an owner, guest of owner, comp, or owner referral) is a paying guest. Reservations without a room number are inventory reservations (I), and those with a room number are preassign reservations (P). When Nights exceeds the maximum nights allowed for a regular reservation (Require a long term reservation for stays longer than XX days (Switches 414-66 and 414-65), the system prompts to make a long term reservation. Once the dates and rates are set, the New Reservation screen displays and the normal reservation process continues.
- Require E-mail for Pre-assign and Inventory Reservations (Switch 424-14)
- When set to Yes, an e-mail is required before saving the new reservation. Check None if the guest does not have or offer an e-mail address.
- Require Input of "Entered By" Field (Switch 219-08)
- When set to Yes, a selection must be made from the "Entered By" drop-down before saving.
- Complimentary Reservations (Shortcut Ctrl+Y)
- Make a reservation with a COMP Rate Plan (zero rate) (Res Type C).
Below is a list of Comp reservation characteristcs:
- A room can be assigned or not. There is no special letter for a Comp reservation with/without a room, it is always a C type reservation.
- The reservation defaults to the COMP rate plan and only allows this rate plan on the reservation.
- The Yield Management screen does not allow an override on the rates.
- No rate plan transactions are added to the folio.
- All other reservation functions are the same as a normal paying guest.
- Switch 416-51 can be used to not rotate owner use for comp reservations. This is on the Owner Config - General tab.
- The Tape Chart displays Comp reservations with a different color than preassign.
- Long Term Reservations (Shortcut Ctrl+L)
- Select Long Term from the Reservations | New Reservations submenu to open the Long Term Dates screen. See Long Term Reservations for detail.
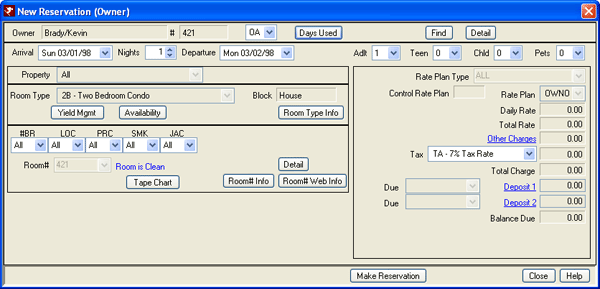
- Owner Reservation (Shortcut Ctrl+O)
- When making an owner reservation, click the Reservations menu | New Reservations submenu | Owner, and the Find Owner screen opens. Select an owner from the list to open the New Reservation (Owner) screen with the owner name and number displayed. When Switch 319-09 "Calculate Rates for Owner Reservation" is set to No, the Quote area does not display regardless of the Hide Quote configuration.
- When the owned room is part of a lock-off, the Room# field is enabled. Click the drop-down arrow to display each room number within the lock-off and select the room associated with the new reservation. For example, if Owner# 211 owns a three-bedroom unit, the Room# drop-down displays three 1BR room numbers as well as the possible 2BR room number used to make up the 3BR unit.
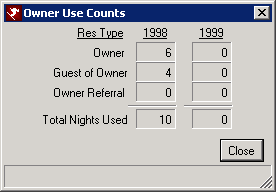
- Days Used
- Display the total
room nights used by the owner (and any owner guests) for the current
and next year. For details on what happens if the Owner has
exceeded the number of days allowed, see
Switch C1MAXNTS.
- Find
- Click the Find button in the Owner row to designate or change the owner for the new reservation.
- Detail
- Click the Detail button to view the owner master form displayed mostly in read-only format. Buttons available on owner master tabs are available.
- Guest of Owner Reservation (Shortcut Ctrl+G)
- Guest of Owner reservations require the selection of a specific owner
using the Find Owner function. Search for the appropriate owner
using Owner#, Name, E-mail, or Room#, and click the corresponding Find
button. Once selected, if the unit owned is part of a lock-off,
the Room# field is activated. Use the drop-down to select the
specific room to attach to the reservation.
If the "Available Rooms" button is selected, only rooms available for that owner are displayed. After owner selection, the Days Used button is enabled. If Switch C1MAXNTS is set to one or greater and an owner has used the same number or more nights than that number, the system displays a warning, "Owner has exceeded the maximum nights allowed. Continue with new reservation?". Select Yes to allow the reservation to be made. When the switch is set to zero or blank, the system considers this a "no limit set", so no message is displayed. If the total number of days used is displayed in red, the owner is over the allowed limit for the year. - Owner Referral Reservation (Shortcut Ctrl+R)
- Make an owner referral reservation (Res Type R). The owner referral reservation type was designed to designate the reservations that the owner of unit referred to the property. These reservations have the option to assign a different pay code to the reservation, if the property chooses to pay a higher percent to the owner for recruiting the reservation.. The following is a list of Owner Referral characteristics:
- The system prompts for an owner.
- All rates available can be selected for this reservation type.
- The Owner Use screen includes totals for Owner Referrals.
- Switch 416-52 Rotate Rooms for Owner Referral Reservations can be used to not rotate owner use (equalize rental revenue amongst owners) for owner referral reservations. This is on the Owner Config - General tab.
- The Tape Chart owner referral reservations has a separate color.
- Maintenance Reservation (Shortcut Ctrl+X)
- Maintenance
reservations block room availability for specific dates. To
designate a room "out of order" and remove it from
availability, select Maintenance from the New Reservations sub-menu in
the Reservations main menu or Navigation page.
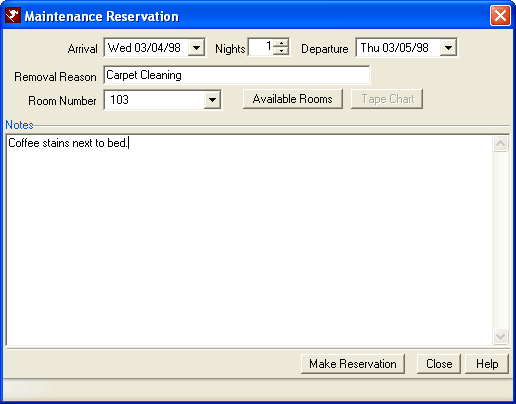
- Arrival and Departure Dates and Nights
- Enter the estimated start and end dates the room is scheduled to be "out of order" by directly typing in the date or using the drop-down arrow to access the calendar feature. Use Change Reservation to update the dates as necessary.
- Removal Reason
- Enter the reason for taking the room(s) "out of order" in the Removal Reason field. This field is required and holds up to 22 characters.
- Room Number
- Use the down-arrow to select the room number (required) from the list or enter the number directly into the field. Any room number selected from the Available Rooms screen is displayed in this field.
- Available Rooms
- Click Available Rooms to view all rooms available for specific dates/nights. If removing more than one room, check the box next to the room number.
- Make Reservation
- Click Make Reservation to file the reservation.
- Multiple Folios Reservations (Shortcut Ctrl+M)
- Multiple Folio reservations can be useful for many purposes but must
be used properly. M-type reservations should
not be used where availability is important.
Multiple reservations do not check availability, so one room could have
overlapping multiple reservations, which overbooks the room.
RDPWin and RDP-DOS use multiple reservations for group leaders. One room number is labeled "LEADER" with a Room Type of N/R (non-rental ), so all group leader reservations are attached to one room even if dates overlap. The only purpose of a group leader is to tie the guest reservations together, so they shouldn’t ever effect availability or statistics.
Another example would be a central reservation site that makes reservations regardless of availability at the remote properties. The remote properties deal with the availability and overbooking issues. In this case, the customer wanted to use Multiple reservations to allow them the freedom to always be able to make the reservation.
Please ask RDP Support for guidance when using Multiple reservations. See Make Multi-Night Res in Different Rooms for more detail. - Special Reservation (Shortcut Ctrl+S)
- Special reservations require a room number and work exactly like a pre-assigned "P" type reservation with the exception that they CANNOT be converted to an inventory reservation. This typically identifies a special guest (determined by property policy), or frequent-stay program members.
- Temporary Reservation
- A temporary reservation (Type "Z") is created when New Reservation is
accessed and remains until the Make Reservation button is clicked and
the reservation is saved from the Change Reservation screen
(final step to file the reservation). Room-type availability and
the room calendar are affected by these reservations. The temporary
reservation is abandoned when the screen is
closed without making a reservation. See
Denial Tracking for details on prompts
caused by closing without saving a reservation.
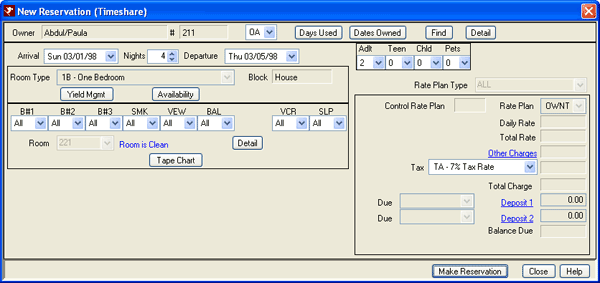
Timeshare Customers
- Timeshare Reservation
- Timeshare reservations made with only a room type are inventory
reservations (Q), while those with a room number assigned are timeshare
preassign reservations (T). The process of making a timeshare reservation is the same as making
an owner reservation with the exception of Available Rooms. Timeshare reservations can be made in rooms
other than those owned depending on property's rules and configuration, so the Available Rooms
buttons is also available.
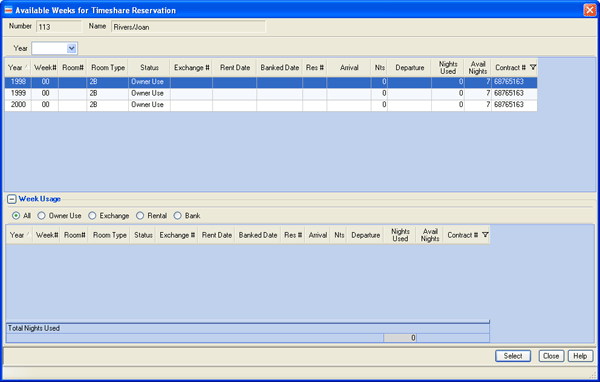
- Available Weeks for Timeshare Reservations
- When
Use
Timeshare Contract File to Create Weeks is checked in timeshare
configuration, the system displays the Available
Weeks for Timeshare Reservation screen during the New
Reservation/Timeshare process. The usage weeks/time is displayed when
an available week is selected. The weeks/time are filtered based on the
year and contract of the row selected.
- Bonus Time Reservation
- Bonus time is the use of the resort in addition to regular allocated time on a space available basis. These bonus weeks are issued directly from the resort, often issued as a signing bonus upon the purchase of a timeshare interval. The process of making a bonus time reservation is the same as making an owner reservation with the exception of the Available Rooms selection. Timeshare reservations can be made in rooms other than that owned, so the Available Rooms buttons is also available.
- Exchange Reservation
- An exchange reservation is the process of trading an interval week at one resort for an interval week at another resort or trading a specific week at the home resort for another week at the same resort. The process of making a timeshare reservation is the same as making an paying guest reservation. Timeshare reservations can be made in rooms other than that owned, so the Available Rooms buttons is also available.
Masters Display Area
There are multiple modules that affect which masters display in the top
portion of the New Reservation screen: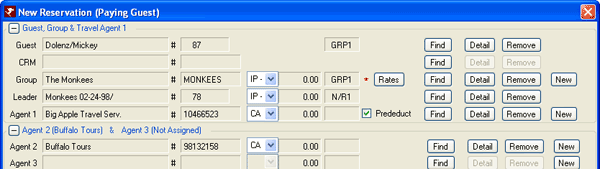
| Master Type | Description & Usage |
|---|---|
| Guest
|
When a guest history record is attached to the reservation, the guest name and number are displayed in the guest master area. See Guest History & Marketing Module R4 for more details. |
| CRM | When a CRM record is attached, the names and numbers for both the Guest and CRM records are displayed. See Customer Relationship Management for more details. |
| Group | When a Group master is attached, the group name and number as well as the designated pay code (which can be changed) are displayed. When group rates are being used, an asterisk "*" is displayed next to the group Rates button. When the group does not yet exist, click the New button in the Group row to add the group master into the system and attach the reservation. See Groups & Conferences Module R2 for more details. |
| Leader | When a Group master is attached and a leader exists, the leader name and reservation number are displayed. When the leader is a non-rental type reservation, N/R is also displayed to indicate the leader is not a real person. See Groups & Conferences Module R2 for more details. |
| Agents | Agents (1, 2 & 3) Travel Agents. When one or more travel agents are involved in booking the reservation, the agent name and ID# number as well as the commission code are displayed. |
- Collapsible Sections
- The New Reservation screen, regardless of which type of reservation is being made, has collapsible areas. This function works when the areas is empty and completed. This is simply a way to simplify the screen's appearance.
|
When the sections are collapsed, click the  icon to expand the area. Once displayed, use
the appropriate Find buttons to designate any additional
information.
icon to expand the area. Once displayed, use
the appropriate Find buttons to designate any additional
information.In the example above, both sections are collapsed. Agent 2 is designated as Buffalo Tours. In the example above, both sections are collapsed. Agent 2 and 3 are not designated. |
- Find Button
- To search for a master to link to the new reservation, click the appropriate Find button. Find buttons link to: Find Guest, Find CRM Guest, Find Group, Find Group Leader, and Find Agent.
- Detail Button
- Once any master is selected, clicking the Detail button displays the master detail screen. The information displayed here is the same as if accessing that specific master screen.
- Remove Button
- To remove any master or room information, click the Remove button. Some master fields are tied together. For instance, if removing a Leader Name from the form, the system offers the option of also removing the Group Name from the form. The CRM and Guest Name fields work in the same manner.
- Guest History or CRM (Only available if the CRM (RX) module is installed)
- The Guest History and CRM masters are coordinated. CRM only appears if module RX is installed. With the RX module installed, if a guest is chosen from guest history and that guest record has a CRM ID, the system also displays the CRM information. If the CRM is chosen first, the system searches guest history for a guest record with that CRM ID and fills it in if it exists. The Remove button for either CRM or a Guest clears both fields. For additional information, see Guest History.
- If guest history has future or past reservations, the system will prompt to view Future Reservations, Past Reservations or None when making a new reservation. This prompt only appears if a guest from guest history is added. It is not displayed if added from the Change Reservation screen.
- New (Group Master)
- Click the New button in the Group or Agent row of the masters area to open the appropriate Add form. This allows group masters and agent masters to be added directly from the New Reservation screen when the group or agent for the new res does not already exist.
- Group or Leader
- A special rate can be negotiated for the dates a group is to stay.
Some guests may elect to come before the actual group arrival date or
stay later than the group departure date. RDPWin allows a group
master to be configured to specify the rate
before the group arrival,
during the group stay,
and after the group
departure. When making the reservation, this information is
used to automatically assemble the correct rates for the guest.
The Group and Leader masters are coordinated. If a Leader Name is chosen, the Group Name is automatically updated. If a Group Name is already chosen when the Leader Find button is clicked, only Leaders for that group's master are displayed. If a group only has one leader, the Leader Name field is updated without showing a list. If the Group Name is blank when the Leader Name Find button is clicked, all future and in-house group leaders are displayed in a list. The Remove button in the group row also clears the leader information. The Remove button in the leader row also allows the removal of the group master before clearing. - Group Information
- The "Confirm Group Information" screen displays when a properly configured group master is added
to a new reservation using the Group Find button on the New Reservation
screen. A properly configured group
master has, at a minimum, a specified arrival date on the group master. At
the most, the group master can have specified arrival and departure date and
rate plans before, during, and after the group dates. Use the current reservation dates
(from the New Reservation screen) or the group’s dates (on the group master) and the either
the current rate plan or the group’s rate plans.
If the group departure date is not configured on the group master, then the group departure date shown on this screen is derived from the group arrival date plus the current number of nights on the reservation. Choosing either the current reservation dates or the group dates changes the rate plan section at the bottom.
The screen is first displayed when the group master is added using the Find button in the Group row. Choose the options appropriately and click OK. If the dates are changed after the "Confirm Group Information" screen has been used, this alerts the system that the "Confirm Group Information" screen needs to be redisplayed before adding a quote and displaying the Available Rooms or Yield Management screens. Once a Group is added, the Rates button is enabled. When group rates are being used, an asterisk "*" is displayed next to the Rates button. Once a group is added, click the Rates button to redisplay the "Confirm Group Information" screen to make additional changes to dates and rates.
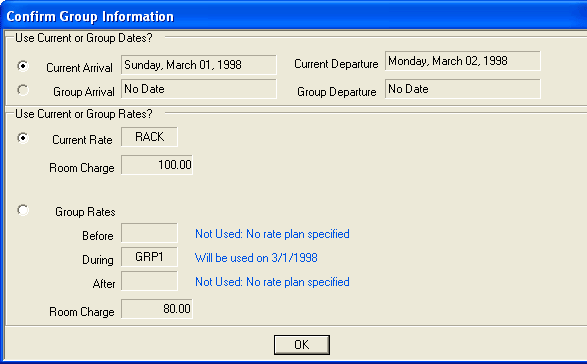
- Current Arrival and Departure
- Select "Current Arrival" to book the reservation for the dates selected on the New Reservation screen versus the arrival date on the group master. The current dates are displayed in read-only format. Return to the New Reservation screen to select a different date than current or group arrival and departure dates.
- Group Arrival and Departure
- Select "Group Arrival" to book the reservation for the dates set on the group master regardless of the dates on the New Reservation screen. The group dates are displayed in read-only format. Use the Masters | Group | Change screen to change the group dates for all group members.
- Current Rate
- Select "Current Rate" to keep the rate as set on the New Reservation screen (as displayed in read-only format).
- Room Charge for Current Rate
- The amount to be charged for the room based on "Current Rate" is displayed in read-only format. To change the current rate without accepting the Group Rates, return to the New Reservation screen. When "Make Reservation" is clicked, click Rates to adjust.
- Rates
- Select "Group Rates" to use the rates set on the group master (as displayed in read-only format). For detail on the rates displayed or to change the group rates, use Masters | Group | Change Rates.
- Room Charge for Group Rates
- The amount to be charged for the room based on "Group Rates" is displayed in read-only format. For detail on the rates displayed or to change the group rates, use Masters | Group | Change Rates.
- Owner
- When making an owner reservation from New Reservation, the Find
Owner screen opens to allow designation. Select an owner and click
Select or press <ENTER> on the keyboard. The New Reservation
(Owner) screen opens with the owner information completed based on the
results of the Find Owner screen. Click Days
Used for more information.
- Travel Agent
- Click the Find associated with the Agent 1 row in the masters area to display a list of agents. Highlight the desired agent from the list and click the Select button or press <ENTER> on the keyboard. The travel agent commission is calculated on future reservations for the total estimated amount on the reservation. During check-in, this amount is set to zero. While in-house, each time a charge is posted to the folio, the commission is recalculated.
-
- Agent 2 and 3 Assignment
- Once Travel Agent 1 has been selected, Agent 2 (Not Assigned) & Agent 3 (Not Assigned) are displayed
in blue to notify they have not yet been assigned. To assign,
click the
icon to expand the additional agent area. Once displayed, use
the appropriate Find buttons to designate any additional agents.
- Commission Code
- The commission code assigned to the selected travel agent is displayed with the master information. In this sample screen, the Big Apple Travel Service has the CA (10% Commission Rates) code on file.
- Prededuct Commission for Agent
- When making new reservations and an agent is selected, the Prededuct checkbox is displayed on the form. Check it to designate the travel agent commission as a prededuct commission. Prededuct is only available to Travel Agent 1.
- Rate Plan
- The rate plan assigned to the selected travel agent is displayed with the master information. In this sample screen, the Big Apple Travel Service has the FLYER (frequent flyer) rate on file.
- New (Agent Master)
- Click the New button in the Agent row of the masters area to open the "Add Travel Agent Master" form. This adds a new group master to the system to allow selection from the Find button on the New Reservation form.
As masters are added and if the master has a rate plan assigned, the rate plan field (just left of the Find button) updates automatically. The order of priority for rate plans from masters is:
- Group
- Agent #1
- Agent #2
- Agent #3
- Guest History
Dates and People

- Arrival
- The system sets the Arrival to the current system date by default, but it can be changed manually to either a past or future date as well. If Arrival is less than the current system date, the system prompts for confirmation before continuing. Reservations can be made up to 4 years into the future. Use the drop-down to access the system calendar or type directly into the field.
- Nights
- Select the duration of the stay. If Arrival and Departure are
completed, the Nights field is automatically determined. The
default for Nights is governed by Reservation Configuration New Res tab Initial Number of Nights.
Note: All minimum nights settings are considered when making or changing reservation dates/nights. "Sell Through" or "Minimum Night Stay" allows the system to stop a reservation from being made when the reservation is not long enough. For example, set a 3-night minimum on certain holiday weekends to avoid a situation where a guest stays for just one night and makes the room unavailable for guests wanting to stay the entire weekend.
RDPWin looks at each day of the stay (not including the departure date) and collects the highest minimum during that time frame and uses that as the minimum stay. RDP-DOS uses only Table QZ with the reservation’s arrival date. See Minimum Nights Configuration for more detail.
RDPWin has previously done "Sell Through" or a "Minimum Night Stay" as a system wide check by date (Table QZ). There is also the ability to put the minimum night stay on a room master (Switch 414-63), which is not by date. For the IRM and IRM.Net, the minimum night by room type can be configured in Table C2 and is not by date. - Departure
- The system automatically calculates the Departure Date based on the Arrival and Nights defaults. Arrival is set to the current system date by default. If the only date change is to the Departure, Nights adjusts based on the current system date. For example, if today is March 1st and Departure is changed to March 26th, Nights is updated to "25". Use the drop-down to access the system calendar or type directly into the field.
- People Categories
- The default setting for the people fields are set to Adult =1, Teen=0, Child =0, Pets=0. Use the drop-down lists to change these settings. See Configuration for more detail.
- Dates
- After the long term reservation dates and rates are set and the New Reservation screen displays, the Dates button is included on the New Reservation screen. Click to allow the dates or rates to be updated. Quotes are updated when dates and/or rate changes are saved.

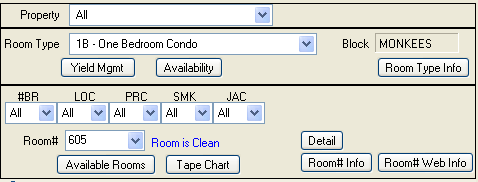
Rooms & Availability
For a simple reservation, only the Room Type and Rate Plan are required. The availability by room type can be displayed. If a
group block is chosen in the masters area, then only that group's block is
displayed.![]()
- Property
- The Property drop-down simply changes the Room Type drop-down to only display room types for the property selected. This field is only available for customers with the property feature set up.
- Room Type
- Select a configured room type from the drop-down. When the Room# field is selected, the Room Type is updated with the assigned type from the room master.
- Block
- The name of the block for the selected reservation is displayed. Paying Guest reservations are made from the House block. If a Group reservation is being made, the system prompts with "This will change the room block for this reservation. Continue?". Answering Yes changes the name displayed in this field to that of the selected group.
- Yield Management
- Click to access the Yield Management screen.
- Availability
- Click to access the Availability screen.
- Room Type Info
- Click to access the Room Type Info screen.
- Preferences
- Use the drop-downs to set the Room Preferences for the new reservation.
- Room#
- When a room number has not been assigned (inventory reservation), the drop-down is blank and Room Not Chosen is displayed. Click the Room drop-down to display all room numbers in the system. When a room number is assigned (preassign reservation), the Room Type drop-down displays the assigned room type from that room master. This field is required for maintenance and special reservations. For owner and guest of owner reservations, the room number is automatically selected based on the Owner Master and checking room availability must be accomplished using the Tape Chart button because the Available Rooms button is not offered.
- Available Rooms
- Click to access the Available Rooms screen.
- Tape Chart
- Click to access the Tape Chart.
- Remove (Not available for Owner/Guest of Owner Reservations)
- Click Remove near the Room# field to clear the selected room number. This button is disabled until a room number is specified.
- Detail (button)
- Click the Detail button near the Room# field to view the Room Master for the selected room number. This button is disabled until a room number is specified.
- Room# Info
- Click to access the Room Number Information screen for the selected room number. This button is disabled until a room number is specified.
- Room# Web Info
- Click to access the Room Web Information screen for the selected room number. This button is disabled until a room number is specified.
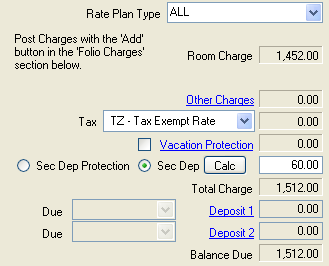
Rates & Charges
Click the link for Daily Rate,
Total Rate, Other Charges,
Tax, Due,
Deposits 1 and 2,Security Deposit,
Total Charge, and
Balance Due
for detailed information.
Note: See C1CUTOFF
for details on Rate Plan Cutoff Password information.
Note: See C1MORIDE
for details on Overbooking Password information.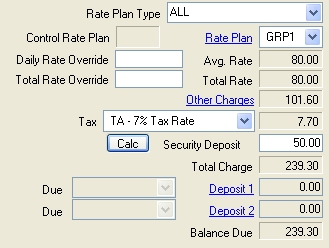
- Rate Plan Type
- Select a category of rate plan from the drop-down. Types
available are Room Only, Packages,
Best Available Rates, and
Rate Plan Patterns.
The default setting for this field is set using
Default Rate Plan Type
located on the Reservations | Configuration | New Res tab.
Note: See C1CUTOFF for details on Rate Plan Cutoff Password information. - Rate Plan (Not available for LT reservations)
- Once the dates are set, adjust the number of people, Rate Plan
(mandatory), Tax Code, and Room Type (mandatory) as needed. If a
rate is entered into Rate Override, all dates within the stay reflect
the same rate, regardless of the rate plan selected. However, a
Rate Plan must still be selected. When Rate Plan is not set
manually, the system selects the first Rate Plan in the list. See Rate
Plan for more information.
Note: See C1CUTOFF for details on Rate Plan Cutoff Password information. - Daily Rate Override (Not available for LT or Owner/Guest of Owner reservations)
- If a rate is entered into Daily Rate Override, all dates within the stay reflect the same rate, regardless of the rate plan selected. However, a Rate Plan must still be selected. Changing the Daily Rate Override or any field that affects current Daily Rate deactivates or unselects the current quote, if any. Other fields that affect the current Daily Rate are Arrival Date, Nights, Departure date, Rate Plan, Room Type, Room Number (if Switch 421-8 is set to Room Number), and People. Daily Charges, Activities, Other Charges, and Deposit fields always change the selected quote, if there is one. See Daily Rate Override for more information.
- Total Rate Override (VRS Customers Only)
- Manually enter a room rate by entering an amount into the Total Rate
Override field. This is the charge for the ENTIRE stay. The approximate
daily room rate is calculated as the Daily Rate divided by the number of
Nights. Nights can be changed after the Total Rate Override is entered
and the approximate daily room rate is recalculated. This is an
APPROXIMATE daily room rate: it may not divide exactly to add up to the
Total Rate Override amount.
Entering a Total Rate Override disables the Rate Plan Type and Rate Plan drop-downs fields and sets the rate plan to "NONE". This new rate plan is added to the system automatically when RDPWin 1.164 (or later) is started for the first time.
The Total Rate Override and the Daily Rate Override are mutually exclusive. Only one can be active at a time or both can be inactive. If the Total Rate Override field is changed, any amount in the Daily Rate Override field is deleted and vice versa.
Changing rates on the Yield Management screen is not allowed for reservations with a Total Rate Override on both the New Reservations and Change Reservations screens. If the Yield Management button is clicked when Total Rate Override is used, the system prompts with "Rate changes are not allowed on a reservation that has a Total Rate Override."
The system generates a B220 transaction on the folio for the entire amount of the total rate override. The transaction date displayed is the same as the arrival date on the reservation. This transaction has a "V" package flag, since much of the system looks for this code as the main rate code.
To exit the manual Total Rate Override mode, enter "0.00" into the field.
If the number of nights is set to 31 or more, the Total Rate Override is required. - Vacation Protection (VP)
- See Travel Services for more information.
- Security Deposit Protection (SDP)
- See Travel Services for more information.
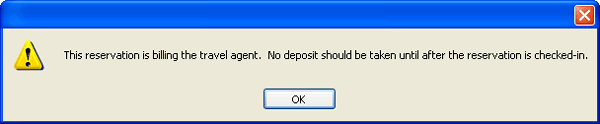
- Bill Agent
- When a reservation has an agent attached and that agent has Bill the Agent for Guest Payment Portion
checkbox checked on the agent master, then the reservation amount held
by the agent, which is billed to the agent when the agent statements are
finalized and sent, is displayed. When the new reservation is
saved, a reminder that no deposit should be taken until after the
reservation checks in displays. This same message displays if a
user tries to take a deposit prior to check-in and does not allow a
deposit to be taken.
- Deposits
- Click the "Deposit 1" or "Deposit 2" link to display the Change Deposit form. The deposit dates and amounts can be added and changed. To calculate the deposit amounts based on the property rules, click the Calculate Deposit button (only available if a deposit/payment has not been made). When a deposit/payment has been recorded, this screen displays the Paid Deposit and the "Deposit 2" fields.
- Prededuct Commission to ####
- When a reservation has an agent attached and that agent has Bill the Agent for Guest Payment Portion checkbox checked on the agent master, then the commission amount held by the agent is displayed.
- Long Reservations and Hotels
- The system looks at all months for a reservation to make sure the C3
records exist. Limits applied for non-rate and rate reservation
number of nights:
Non-Rate Reservation Limits
There are no limits on the number of nights except that it CANNOT be prior to the base date and CANNOT be past the base date + 2000 nights. Non-rate reservations include: Maintenance (Res Type X), Multiple (Res Type M), Owner (Switch 319-09 is No), Guest of Owner (Switch 319-10 is No), Bonus (Switch 319-11 is No), Exchange (Switch 319-12 is No), Timeshare (Switch 319-13 is No), Timeshare Inventory (Switch 319-14 is No), room types that begin with "N/R", and
room types that begin with "OLD".
Rate Reservation Limits
Non-VRS systems have a limit of 31 nights. VRS Systems have a limit of 150 nights. Any reservation greater than 31 nights must use the Room Charge Override. There is no daily rate calculation. Rate reservations types include Preassign (Res Type P) and Inventory (Res Type I) and anything that isn't already listed under Non-Rate Reservations. - Rent Amount (LT reservations only)
- When making long-term reservations, the dates, rooms, and rates are
set on the XX screen. Once saved, the new Reservation (Long Term:
Manual Rent) screen shows the rates section differently.
The Room Charge displays the amount to charged for the room for the entire stay. Should the duration of the stay be changed (shortened or extended), the daily rental amount is automatically pro-rated using the following formula: Rent Amount / (original) Nights * (new) nights. For example, 45-day reservation has a Rent Amount of $4,500. The guest calls to say the stay will actually be reduced to 40 days. The system calculates $4,500/45=$100 daily rate. The new duration of 40 days * $100 would change the Rent Amount to $4,000.
Quotes, Folio Charges, Activities, and Daily Charges
Use the various buttons to maintain Quote,
folio charges, activities,
and daily charges.
Quotes
When selecting a Quote and ready to make a reservation, double-click the
desired Quote row; or highlight, right-click, and choose "Restore Settings".
The selected Quote's rate plan is restored in the Make Reservation parameter
area. When a quote is requested and an identical quote exists, the
system detects the duplication displays a message.
A quote is required before clicking
"Make Reservation" unless making an Owner reservation. When no quote
exists, the system generates one for review. If quotes exist but nothing
highlighted, then either create a new quote with the existing settings or
select an existing quote from the grid before clicking the "Make
Reservation" button.
- Add
- After the rate fields are set, click the Add Quote button to add the quote to the New Reservation grid. All settings are saved. Any number of quotes can be added. If Add is clicked without changing any parameters or the same parameters have already been quoted (such as room type and duration), the system notifies with "Quote is identical to an existing quote". If a system is configured to allow Inventory reservations, a room number need not first be selected before adding a quote.
- Clear
- To delete all quotes from the grid, right-click anywhere on the grid, and click "All Quotes: Clear". Caution: Confirmation IS NOT REQUIRED before deleting all quotes at once. To delete only one quote, highlight the appropriate row, right-click, and choose "Delete Selected Row" or press the delete key. Confirmation is required before an individual quote is actually deleted.
Folio Charges
- View
- Once the rate plan and room type are set, click the View Folio button to show the detail for any selected individual quote. If the charges amount equals "0.00", they system prompts with "No folio found for this quote."
- Add
- The New Res screen has an "Add" button in the Folio Charges section to allow posting charges directly. A quote must first be added before this button can be accessed. Click Add to open the Post Charges screen. For customers with the Itinerary Module RP installed, using the Add Activity function also allows the addition of charges to the folio.
Activities Functions (Available when the Itinerary & Concierge (RP) module is installed)
- Count
- This field displays the total number of activities currently on the reservation.
- View
- Click to view the current Itinerary for the new reservation. If no
activities have been added when this button is accessed, the system
prompts with "No Activities have been added. Use the 'Add' button to
add new activities."
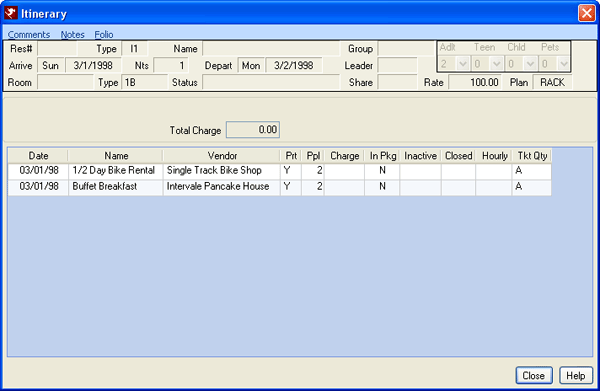
- Add
- Add any activity from a single screen, including itinerary items and folio charges. At least one quote must be added before an activity can be added. In addition to New Reservations, activities can also be added from the Reservations Options menu and the Change Reservations screen. If the Itinerary & Concierge (RP) module is not installed, the Add Activities button on Change and New Reservations is replaced by Post Charges. For information on the resulting screen, see Add Activities screen.
- Clear
- Click to delete all activities from the temporary reservation. If no activities have been added when this button is accessed, the system prompts with "No Activities have been added. Use the 'Add' button to add new activities."
Daily Charges (View/Change) (Not available for Multiple Folio reservations)
Click to the View/Change button to display the Daily Charges form and make changes if necessary. A quote is required before accessing the Daily Charges button. Save any changes to return to the New Reservations screen. The quote is automatically updated based on the new daily charges. This button is not available for Maintenance or Multiple reservations.
Make Reservation
When all the reservation information has been entered and rates are
finalized, click the Make Reservation button.
A quote is required
in order to use this button except with making an owner or guest of owner
reservation. If no quote exists, the system generates one for review. If
quotes exist but nothing highlighted, then either create a new quote with
the existing settings or select an existing quote from the grid before
clicking the "Make Reservation" button. Once the Make Reservation
button is clicked and if a guest is selected from guest history, any
Reservation Comments 1-9 from the master are transferred to the
corresponding reservation comments. These comments can be reviewed by
clicking the Comments tab on the Change Reservation screen (the final screen
before saving the new reservation).
- Take Payment Now
- When checked and after saving the reservation from the final (Change Res) screen, the Deposit/Payment screen displays. This checkbox can be turned on three different ways:
- VP & SDP: When VP or SDP is added, the guest must pay for those services immediately since AIG Travel Guard bills the property BEFORE the guest arrives. The checkbox is checked and disabled since the payment MUST be taken.
- Auto Calculation of Deposit: On the Reservation -> Configuration -> Deposits tab, there is an option to Collect When Making the Reservation when Deposit 1 is being automatically calculated. During the new reservation cycle, this can be turned off when necessary.
- Manually: Check the box manually at any time on the New Reservation screen to display the Deposit/Payment screen after saving the reservation from the final (Change Res) screen.
- Prompt for Owner Pay Code
- When "Prompt for Owner Payment code (New/Changed Reservation)"
Switch 109-09 is set to Yes, users are prompted for the owner pay code
when making any reservation type. This is useful to vacation
ownership customers that calculate rates AND pay the owner a higher
percentage. The room on the reservation must have an owner (whole or
timeshare) assigned. The prompt is presented under the following circumstances:
- The Condominium Owner Accounting (R3) module must be installed;
- The "Prompt for Owner Payment Code (New/Changed Reservation)" Switch 109-09 must be set to Y; and
- The new or changed reservation must be a Preassign reservation.
- The following settings must also be designated for particular
reservation types:
- When making an owner reservation, the "Calculate rates for owner reservation" Switch 319-09 must be set to Y.
- When making a guest of owner reservation, the "Calculate rates for guest of owner reservation" Switch 319-10 must be set to Y.
- When making a timeshare bonus time reservation, the Timeshare & Interval Ownership (R6) module must be installed and the "Calculate rates for Bonus Time owner reservation" Switch 319-11 must be set to Y.
- When making a timeshare exchange reservation, the Timeshare & Interval Ownership (R6) module must be installed and the "Calculate rates for Exchange week reservation" Switch 319-12 must be set to Y.
- When making a timeshare owner reservation, the Timeshare & Interval Ownership (R6) module must be installed and the "Calculate rates for Pre-assign Timeshare owner" Switch 319-13 must be set to Y.
- When making a timeshare inventory owner reservation, the Timeshare & Interval Ownership (R6) module must be installed and the "Calculate rates for Inventory Timeshare owner" Switch 319-13 must be set to Y.
- Make Multiple-Night Reservation in Different Rooms (Res with Room Moves)
-
- Make a Multiple Folio reservation in one of the LEADER Non-Rental rooms for the entire length of stay. Set the Leader Paycode to ZZ – All Charges.
- Write down the leader reservation number.
- Create a regular reservation for the first room number with the length of stay equaling only the time the guest will be in that room. Add the group leader reservation number as the group leader and verify that ZZ – All Charges is selected for the folio Pay Code.
- Create a second regular reservation for the second room number with the length of stay equaling only the time the guest will be in that room. Add the group leader reservation number as the group leader and verify that ZZ – All Charges is selected for the folio Pay Code.
- Check in the group leader reservation and first reservation (from Step 3 above).
- Check out the first reservation on the date of the room move (actually moving rooms, not really checking-out).
- Verify the charges have moved from the checked-out reservation to the group leader.
- Check in the second reservation on the date of the room move (actual possession of the second room).
- Check-out the second regular reservation as usual when the guest will be checking out of that room (actual checking-out date).
- Verify that the charges have moved from the checked-out reservation to the group leader.
- Checkout the Leader reservation and settle the remaining balance.
Process for Check-in and Check-out:
Shortcuts
In addition to using RDPWin's menu system, there are also keyboard
shortcuts to make creating new reservations types easier for those users
who choose to focus more on the keyboard than the mouse. An image of
the shortcuts is shown below. To use the shortcuts, simple press the
Ctrl button on the keyboard at the same time as the letter assigned to the
desired reservation type. For example, the Ctrl key together with
the letter O key accesses the New Owner Reservation screen.
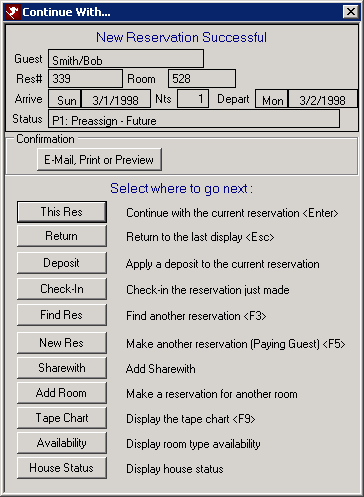
Continue With...
Once a new reservation has been saved, the system prompts with a screen
as shown below to offer navigation options. When making a guest of
owner reservation and the "CC Owner on E-Mail" box is checked on the
"Continue With..." screen, the system adds the owner's e-mail address into
the BCC field on the e-mail.
Note: After making a new
reservation with an arrival date equal to the system date (i.e. "today"),
this screen also offers a Check-In button (unless the system is running in
Direct Check-out mode - Switch 414-01 set to yes). This works for all
reservation types including maintenance reservations.
- Confirmations: E-mail, Print and Preview
- Click to e-mail, print, or preview the configured confirmation type. In the case of the New Reservation screen, the designated report on the Confirmation Settings tab for Confirmation Type = New Res is the confirmation used for this purpose.
- Select Where to go Next:
- By selecting one of the options listed in the section, the system automatically routes the user to that particular screen or function. In addition to the buttons, some have the shortcut keys next to the items so users have the option of clicking the button or using the shortcut key on the keyboard.
- The buttons include:
- This Res - Returns back to the reservation just filed in order make changes, post charges, etc.
- Return - This button returns users to the previous screen before the new reservation was started. It does not go back into the reservation detail of the reservation just filed.
- Deposit - This button opens the Deposit/Payment screen in order to take payment on the reservation.
- Check-In - Use this button if the reservation should be checked in immediately after filing. This is useful in a walk-in situation.
- Find Res - Allows users to search for a different reservation using the F3 Find option.
- New Res - This button opens the New Res screen and allows users to make a new reservation that is completely unrelated to the reservation just filed. If wanting to link the reservations together, use the Add Room button.
- Sharewith - By clicking this button, the system allows a sharewith reservation to be linked to the reservation that was just filed. Sharewith two people sharing a room but have their reservation and folio.
- Add Room - This button adds an additional room and reservation while linking the new reservation to the reservation just filed.
- Tape Chart - This button brings up the tape chart screen. Click the button or hit the F9 button on the keyboard.
- Availability - By clicking this button, the availability screen appears in order to view group blocks or room type availability.
- House Status - The House Status screen appears after clicking this button. House Status is a snapshot of the reservation activity at any given time.
-
Click these links for Frequently Asked Questions or Troubleshooting assistance.
08/20/12
© 1983-2012 Resort Data Processing, Inc. All rights reserved.