Click here for Timeshare Navigation
Click here for Owner Navigation
Module R3 Condominium Owner Accounting is Required
|
Owner Tabs |
||
|---|---|---|
| Accounts Tab
Contracts Tab (R6 Timeshare Only) Dates Owned Tab (R6 Timeshare Only) |
Owner Weeks Tab (R6 Timeshare Only) Reservations Tab
|
|
- Condominium Owner Account Module R3 required.
Tabs Available for Owners
The basic master information on all types of masters are basically the
same. Each master type has different tabs available where appropriate.
Review this list for tabs available to each master type. Click any
links for details on specific tabs. As shown in the sample below,
tabs outlined in color
hold master-specific information. In this case, the Paula Abdul
owner master has booked reservations in the system.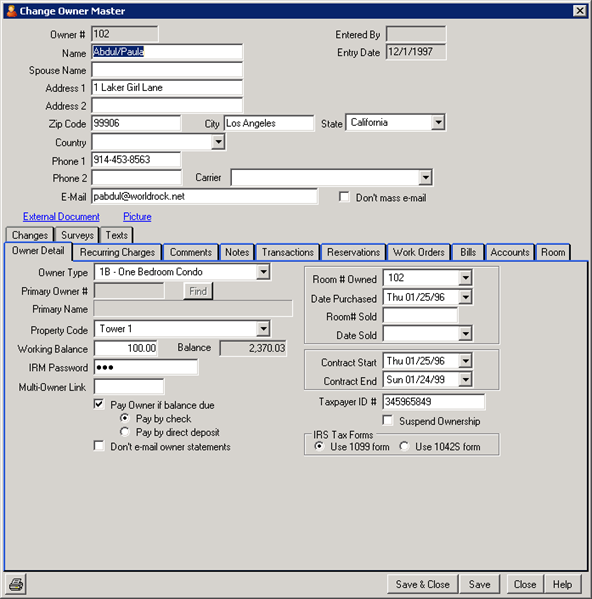
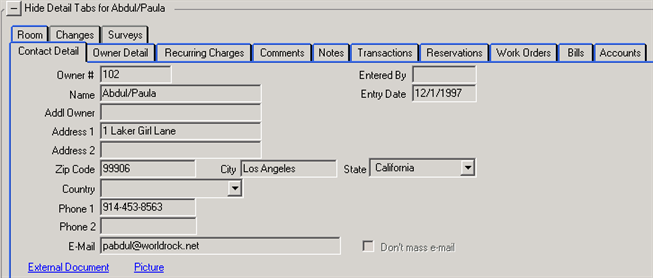
Contact Detail Tab
View all the owner's contact information in one place. This is a separate tab when viewing the Analysis grid as shown below; however when viewing Add or Change Owner screens, this information is displayed above the other tabs.
|
- Owner#
- Pay attention to the use of the terms "Room
Number" and "Owner Number" in this documentation.
- The Room Number applies to the physical room rented and are added using
Masters | Room | Add in the main menu.
- Owner numbers refer to the owner of a given room number and is what is needed on this screen. Owner numbers are added using Masters | Owners | Add from the main menu.
- The Room Number applies to the physical room rented and are added using
Masters | Room | Add in the main menu.
- Owner numbers refer to the owner of a given room number and is what is needed on this screen. Owner numbers are added using Masters | Owners | Add from the main menu.
- The Room Number applies to the physical room rented and are added using
Masters | Room | Add in the main menu.
- Owner numbers refer to the owner of a given room number and is what is needed on this screen. Owner numbers are added using Masters | Owners | Add from the main menu.
- The Room Number applies to the physical room rented and are added using
Masters | Room | Add in the main menu.
- Owner numbers refer to the owner of a given room number and is what is needed on this screen. Owner numbers are added using Masters | Owners | Add from the main menu.
- The Room Number applies to the physical room rented and are added using
Masters | Room | Add in the main menu.
- Owner numbers refer to the owner of a given room number and is what is needed on this screen. Owner numbers are added using Masters | Owners | Add from the main menu.
Room types, room numbers, owner numbers, etc. created with a "/" character cannot be displayed on the room type description page in the IRM or IRMNET. Windows does not allow certain characters to be created in a file name (i.e. / \ : * ? " < > ). - Alternate Owner #
- When Switch 425-10 is set to yes, an Alternate Owner Number field is displayed on the Owner Detail tab to assist properties with complicated owner numbers referencing location such as 101GreensDrive and 101WhitesAve. This field offers a capacity of 14 alpha-numeric characters. Once configured for EACH owner and the switch is set, the Find function can search for this field.
- Name
- Enter the owner's name, last name first, followed by a "/" and then the first name. It is critical to enter the "/" character to separate the last name from the first for sorting. Additionally, be consistent with the use of upper and lower case letters. We suggest the format "Agassi/Andre," rather than all capital letters. This format looks better on owner statements. A maximum of 24 characters is allowed, including the slash.
- Spouse Name
- For rooms owned by individuals, the system can hold a contact name for the spouse of the owner to provide a more personal touch when communicating with the owner. If rooms are owned by entities, this field could be used to hold a secondary contact name at the company.
- Address, Telephone Numbers, and E-mail Address
- Enter the owner's address, city, state, zip, country and phone number. Enter the Zip Code using any 10 alphanumeric characters prior to the City and State fields for the system to automatically fill in those fields for the user. Letters are allowed for Canadian and European addresses.
- External Documents - T2 Module Required
- This link allows external files to be attached to the owner master. Use this feature to attach detailed information about the owner. The following file types are supported: Txt, Doc, Docx, Htm, Html, Xls, Jpg, Bmp, Gif, and more. The documents can be viewed as long as the workstation has the application installed that displays that file extension.
- To attach a file, save it to \RDP\RDP<xx>\MasterDocs\Owner folder, using the owner number as the file name. For example, if the file created was for owner 103 for the RDP01 directory, the file and location would be \RDP\RDP01\MasterDocs\Owner\103.doc (the file extension will change based on the program it was created in).
- If more than document is needed for the master, enter the master number followed by 1, 2, 3, etc. For example, for owner number 101, enter the file name as 101-1, 101-2, 101-3, and a prompt appears allowing the different files to be selected.
-
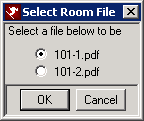
- If the file does not exist, the following error message will appear with the file path location when the link is clicked. Note: The file location will display the UNC path, however, the file can be saved to the RDP drive (usually R:\ or F:\).
-

- Pictures - T2 Module Required
- This link allows external pictures to be attached to the owner master. Use this feature to attach photos of each owner. The following file types are supported: Txt, Doc, Docx, Htm, Html, Xls, Jpg, Bmp, Gif, and more. The pictures will display as long as the workstation has the application installed that displays that file extension.
- To attach a picture, save it to the \RDP\RDP<xx>\MasterPics\Owner folder, using the owner number as the file name. For example, if the file created was for owner 103 for the RDP01 directory, the file and location would be \RDP\RDP01\MasterPics\Owner\103.jpg.
- If more than picture is needed for the master, enter the master number followed by 1, 2, 3, etc. For example, for owner number 101, enter the file name as 101-1, 101-2, 101-3, and a prompt appears allowing the different pictures to be selected.
-
- If the file does not exist, the following error message will display showing the file path location when the link is clicked. Note: The file location will display the UNC path, however, the file can be saved to the RDP drive (usually R:\ or F:\).
- Note: The External Documents and Pictures feature requires the T2 Module. For more information about this module, contact RDP Sales.
- Don't Mass E-Mail
- Check this box to indicate the owner does not wish to be included in any mass e-mails.
- Entered By
- When an owner master is added to the database, this field is stamped by the system to identify the logon name of the person who entered the information.
- Entry Date
- Identifies the date when the information was originally entered.
Owner Detail Tab
This tab provides great detail on ownership type, passwords, account balance, room information, contract information, and recurring charges.
|
- Owner Type
- The owner type should match the room type. For example, if
the owner owns a 1B (one-bedroom) unit, the owner type should be "1B".
Owner types must be defined in table C2 before they can be assigned to
either room numbers or owner numbers. Using Owners | Options | Global
Post, transactions can be posted to all owners of one owner type at the same
time. For example, if a $100 management fee is charged to all owners
of type 1B, Global Post can post all owners of 1B room types with only a few
keystrokes.
There are two special owner types, Z and OLD. Type Z is reserved for entering "secondary" owners, defined as more than one owner of the same room. Type OLD is used when an owner sells his room and the history of both the old owner and the current owner need to be maintained. The percentage of ownership is automatically set to zero. Charges may be posted directly to a secondary owner, payments may be received, and statements generated. However, all revenue from the room owned appears on the primary owner's statement. The system does not automatically divide the revenue based on an ownership percentage.
The system does not divide revenue from a single unit across multiple owners. To do this manually: -
- Create a transaction code in the B7 ledger to represent rental income for secondary owners.
- Create a rental income transfer transaction in the B7 ledger for transferring a portion of the rental income from the primary owner to the secondary owner.
- Calculate the secondary owner's share of the revenue and post the revenue transaction directly to the master. Be sure to post it as a negative number since this is a credit and not a charge.
- Post the transfer transaction directly to the primary owner for the amount of the secondary owner's rental income. This should be a positive since it is "charging" the primary owner.
- Process payments and statements for both owners normally.
- There is an owner type of "NEW" so additional owners can be entered prior to the close of escrow. When selling a room and once escrow closes, the Owner Type for the new owner should be changed to the appropriate value (such as 1B, 2B, or 3B). If Owner Type is changed to "OLD", then number in Room # Owned is moved to the Room # Sold field and the Date Sold must be completed. The Owner Analysis grid filters out "OLD" owners, but the Find allows the location of an "OLD" owner. If changing an OLD owner, the system warns this is a past owner.
- Primary Owner# and Primary Name
- The primary owner number is only available when Owner Type equals "Z"
and is used to associate a secondary owner with a primary owner record. Once selected, the "Primary
Owner #" field is enabled and allows entry. If "Primary
Owner#" is not known, then click Find to select. Once the "Primary
Owner#" is selected, the "Primary Name" is displayed.
-
To set the Owner Type to "Z", a "Z" sub-record must
be added to the C2 Table using the RDP-DOS system. When adding the
sub-record, enter "Secondary Owner" for the description and
"O" (the letter, not the number) for the Look Qualifier, and
then file the record.
- Enter the Primary Owner# field so the owner only has to log into IRM.Net one time to see statements, make payments, make reservations, for all owner numbers.
IRM.Net checks for the "Primary Owner#" when the owner logs on. This works in conjunction with the Multi-Owner Link. When "Primary Owner#" not blank, the IRM.Net fetches all the owners that have the same Primary Owner# and displays them. The following columns on the “Primary Owner” list: Owner number, Balance due, Unit #, week# and Contract #.
Using the Multi-Owner Link and Primary Owner# field together allows the IRM.Net to display the multiple ownership page where the owner can easily move between different owner numbers (of their own) to view statements and owner details. Owners can make payments on one owner account or all of their owner accounts. Making a partial payment is not possible; either pay one account or all. - Property Code
- Assign the property code for the room owned, such as Tower 1 or
Building 2. When property codes are enabled, users can sort
reports, print mailing labels, etc., by property code. For example,
if a property has three buildings, these building can be assigned property
codes A1, B1, and C1. Property codes can be assigned to owners and rooms.
Property Codes are defined in the R2 Table.
- Go to System | Table Maintenance and select R2 in the Table drop-down.
- Add sub-record 00 (zero zero) with the text Default Property Code and save. The existence of a 00 record activates the property code feature.
- Add any other property codes required for sorting, for example:
Property Code Definition 00 Code 00 must exist to activate property code feature. A1 Building A1 B1 Building B1 C1 Building C1
- Working Balance (Withhold From Revenue)
- The system can hold a trust balance unique to each owner when statements are printed and closed. For example, assume $500 is the trust amount for an owner. When statements are printed and closed, the system only generates a check to the owner for any amount over $500.
- IRM Password
- Properties can assign a password to allow owners to make reservations and access other information via the IRM. Owners must enter their unique Owner Number and password to access owner-specific information.
- Group Master
- This field is for properties that use the owner file to store club members instead of regular owners. When membership reservations are made using the owner file, the user is prompted for a group master. This field designates the default for that prompt. This field only shows when the CLUB sub-record exists in the C1 table and is governed by Switch# C1CLUB.
- Protobase Master Number
- In order to take credit card deposits with Protobase, a unique numeric identifier is needed. The owner number field cannot be used because it must numeric only; not alphanumeric. When an owner is added or changed, RDPWin automatically assigns a unique number to the master record.
- Multi-Owner Link
- Use the Multi-Owner Link field as a means of tying together multiple
owner numbers that belong to the same individual owner. Enter any
other owner numbers that should be associated with the same individual
owner. For example, when Owners 101, 105, and 109 are actually the same
owner, then all three owner masters should have "101" in the Multi-Owner
Link field.
The Multi-Owner Link field can be added to the Analysis screen using the Select Columns button.IRM.Net for Owners: When an owner logs into IRMNet/Owners using an owner number with a non-blank Multi-Owner Link, a drop-down is available to allow the owner to switch between owner numbers. The owner number, room number and/or contract number for the selected owner number are displayed in the header. In addition, both the balance due for the selected owner number and the total balance due for all linked owners are shown.
To make a payment, click the Make a Payment link. You may either pay the total balance due or the balance just for the selected owner number by choosing between the two radio buttons. If Total Balance is selected, then the total amount is charged to the credit card and a payment posted for each linked owner with a positive balance for the amount due by that owner number. If Balance for Owner xyz is selected, a payment will by taken and posted to the selected owner only. The amount can be up to the total due for the selected owner number.
After making a payment, click on 'Return to Tabs', or select another owner number from the drop down, or Log Out.
Above the Multi-Owner Linkdrop-down is an optional/customizable file MultiOwners.htm. If this file exists in the IRMNet/Custom/<dataserver>/rdp<resort>/UserText folder, the contents are displayed above the drop-down. - Owner Pays Hawaii Tax
- This checkbox displays only when the Include Tax in Gross
Revenue (B7DF) Reported to Owners (C1HAWAII) checkbox is checked
on the Owner Configuration Taxes Tab.
For State of Hawaii owners, check to signify the owner pays the room revenue taxes to the taxing authority (as opposed to the management company paying the tax). Not all owners are responsible for paying the tax. This information is included on the owner's statement.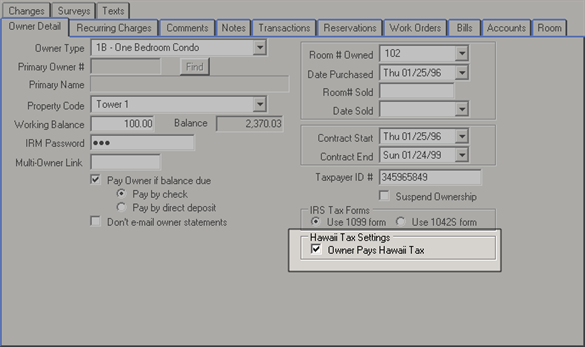
- The property collects the tax from the guest, passes it on to the owner, and the owner pays the government the tax. Other properties charge the owners a fee and then the property pays the government those taxes. When owner revenue is processed, the taxes are calculated and included on the statement. When NOT checked, the taxes are not added when owner revenue is processed for that owner.
- Canada GST Settings
- This section displays only when the Include HST Tax in Gross Revenue (B7DF)
Reported to Owners checkbox is checked on the Owner Configuration Taxes
Tab.
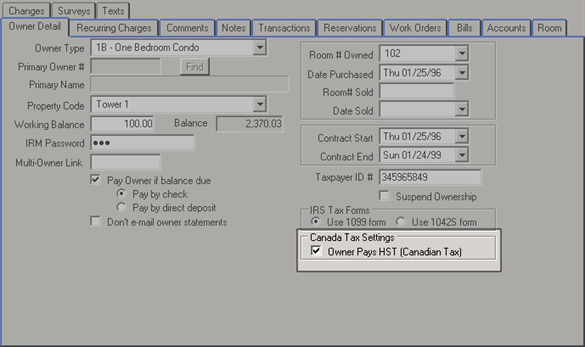
- The HST (Harmonized Sales Tax) feature for Canadian customers is turned on from the Taxes tab on the Owners Configuration screen. When checked, properties can selectively allow the passing the HST on a rental to the owner as well as adding HST on services/charges done by the property management company on the owner’s property.
- Owner Pays HST (Canadian Tax)
- When an owner did not pay the HST as part of the purchase, check the
"Owner Pays HST" box and set the "Charge Tax Code" to a rate that includes the
HST.
When rental property owners pay the HST up front (during the purchase of the
rental), then the "Owner Pays HST" box should NOT be checked and the
"Charge Tax Code" should be set to a code that does not include the HST.
Check "Owner Pays HST" to allow an owner to have the HST passed through as part of the month-end Process Revenue option. Set the "Charge Tax Code" drop-down tax rate to allow the owner to be charged HST on charges/services. - Pay Owner If Balance Due
- Select from the Pay By Check and Pay By Direct Deposit radio buttons
to indicate how the owner is paid: by check or direct deposit (wire
transfer).
When Pay By Direct Deposit is selected for any owners and statements are finalized, the system does not generate a check voucher and puts a wire transfer code (B7DA) on the owner master instead of a check voucher (B7D7) code. See Knowledge Base Article KWin0073 for more details.
When Pay By Check is selected and statements are printed and closed on the Owner Master menu, the system generates a check for the owner for any amount due. If not checked, the system does not generate a check. Most customers pay owners their share of rental income, less direct charges. However, in some cases, all income is held for a indefinite period of time. - Do Not E-mail Owner Statements
- When checked, owner statements are not e-mailed to the owners when the E-mail Owner Statements process is run for some or all owners. Properties must print and mail statements to owners with this setting checked.
- Direct Deposit - Do Not Generate a Check
- This can be used for owners that have direct deposit and do not
receive a check. When the statement is finalized for an owner with this
check box set, RDPWin will not generate a check voucher and will put a
wire transfer code (B7DA) on the owner master instead of a check voucher
(B7D7) code.
On the Owner Statement screen, if a single owner is being processed, the Finalize tab will now show the check box for Direct Deposit. This check box reflects the setting for the owner selected and is disabled so it cannot be changed. If Direct Deposit is on for the owner, the print and generate check voucher check boxes will be disabled.
For finalizing multiple owners, the Direct Deposit check box will not show, but the Direct Deposit setting for each owner will be used while finalizing. - Suspend Ownership
- When checked, the owner is unable to make reservations for whatever reason the property deems appropriate such as non-payment, etc. For timeshare properties, this also suspends the ability to add/change contracts and weeks.
- Room Number Owned
- The Room Number field on the owner master refers to the room number
owned. The system defaults this field to match the owner number. RDP
strongly suggests that owner numbers and room numbers the same; however,
when necessary, the numbers can be different.
Note: This field is not available for Timeshare properties with Configuration | General Tab | Timeshare Owners Only (No Whole Owners) (Switch 416-49) checked.
Enter the Room Number or appropriate description of the room owned, such as Room# 126 or Cabin 32. The same number may be used for the room and owner numbers. The room number stays the same, even if the owner changes because the room is sold. RDP strongly suggests that owner numbers and room numbers be the same. If Owner Type is changed to "OLD", then number in Room # Owned is moved to the Room # Sold field and the Date Sold must be completed.
When the owned room has lock-offs, the M type room number is entered in this field. - Date Purchased
- Use the calendar drop-down to select the date the room was purchased
by the selected owner.
Note: This field is not available for Timeshare properties with Configuration | General Tab | Timeshare Owners Only (No Whole Owners) (Switch 416-49) checked. - Room Number Sold
- When a room is being sold, select that room number from the drop-down
list provided. When the Owner Type is changed to "OLD",
the Room # Owned is automatically moved to the Room # Sold field and the
Date Sold must be completed.
Note: This field is not available for Timeshare properties with Configuration | General Tab | Timeshare Owners Only (No Whole Owners) (Switch 416-49) checked. - Date Sold
- Use the calendar drop-down to select the date the room was sold
by the selected owner. If Owner Type is changed to "OLD",
then number in Room # Owned is moved to the Room # Sold field and the
Date Sold must be completed. Dates will help identify when processing
revenue for old and new owners when the revenue dates should be entered in
the process revenue screen if purchase/sale is done on a mid month date.
Note: This field is not available for Timeshare properties with Configuration | General Tab | Timeshare Owners Only (No Whole Owners) (Switch 416-49) checked. - Contract Start and End Dates
- There are three reports under Owner: OwnerList-Detail-byContractDate, OwnerList-Detail-byPurchaseDate, and OwnerList-Detail-bySoldDate. All
prompt for a range of dates (either Contract Start Date, Purchase Date,
or Sold Date) and display owners within that range. Enable the "Check
Contract Dates" feature (only available if module R3 is installed).
For more information, see Reservations
Configuration NewRes tab.
Note: This field is not available for Timeshare properties with Configuration | General Tab | Timeshare Owners Only (No Whole Owners) (Switch 416-49) checked. - Taxpayer ID#
- Enter the owner's social security number or business tax identification number. The 1099s and 1042-S forms pull the taxpayer identification number from the Taxpayer ID# field on the owner master. Because customers have used Comment 1 (or perhaps 2,3,4,...) to hold the identification number in versions prior to 1.212, a utility Populate Taxpayer ID# is available to assist with updating their data. The Tax Payer ID saved on the Detail tab is masked everywhere this field is displayed (including on the Detail tab after the data is originally entered and saved) when security levels are below the requirement for review.
- Use 1099 Form
- Check "Use 1099 Form" when using a 1099 Form when printing owner tax revenue forms. The 1099 form is for owners of property in the United States living in the United States.
- Use 1042-S Form
- Check "Use 1042-S Form" when using a 1042-S Form when printing owner tax revenue forms. The 1042-S form is for owners of property in the United States, but living in another country.
- Percent Owned
- This read-only field is governed by the Room# Owned field on the
Owner Master and the Whole
Ownership flag on the Room Master. If a room number is entered into
the Room# Owned field and the Whole Ownership flag is set on the Room
Master, the percentage is set to 100%. If a room number is entered into
the Room# Owned field and the Whole Ownership flag is not set on the Room
Master, the percentage is set to 0%, since many owners can own different
percentages throughout the year. If no room number is entered, the percentage
is set to 0%.
Revenue processed is always posted to the current active owner. Any owner with a type other than Z or OLD is considered the active owner and is displayed as 100. Any type Z (secondary owner) or OLD (old owner of the room) owners is displayed as zero and never receives any reservation revenue.
Recurring Charges
Configure up to nine recurring charges for each owner. A recurring charge
is a charge that is posted to all owners at the same time, but is a different
amount for each owner. For example, a monthly management fee is
unique per owner. One owner might pay $150 per month, another $155
per month, and a third $160 per month. The system allows up to 1,000
charges per month for each owner. The recurring charge field on
the owner master should only be used for unique recurring charges per
owner.
Each Recurring charge must have an associated transaction code to indicate which
GL account revenue/liabilities handles the charges. Customize the labels
using System -> Comment Labels ->Owner
Recurring Charges when the
Type of Master drop-down
is set to Owner Recurring Charges.
| Condominium System Sample
|
| Timeshare System Sample
|
The various charge methods allowed for owners are:
-
- A specific charge to be posted to one owner.
- The same dollar amount to be posted to all owners of one owner type or all types.
- A recurring charge that is unique for each owner to be posted to all owners automatically.
Comments Tab
The twelve comment fields can be customized to the property's needs and are defined in Tables IA through IL. Common information tracked in these fields include billing arrangements, alternate contacts, and number of rooms requested. The headings for these fields can be changed to reflect the appropriate information using System | Comment Labels.
| Condominium System Sample
|
| Timeshare System Sample
|
Notes Tab
Any free text entries pertaining to the selected master are displayed in this section. Notes are typically not part of any reports, so personal, internal information can be maintained on the Notes tab.

|
- Add
- Click the Add link on the Notes tab to access the Add Note screen.
Type in free text and save to file the note on the guest history
record. The login information and date/time of save are recorded
as well.
- Change
- Click the Change link on the Notes tab to access the notes and
render the information editable. Type in free text and save to
file the updated note(s) on the guest history record. The login
information and date/time of save are recorded as well.
Transaction Tab
Display a grid with complete transaction history for the selected owner, as well as a tally of the charges for current the period. Display by Running Balance, Open Balance, or 1099 Adjustments using the radio buttons. Fields displayed in the grid are transaction date, transaction code, description, price, quantity, charge, tax, total, running balance, reservation number, work order ID, and no print.
|
|
- Post Charge
- Click the Post Charge button to open the Post Charge form.
- Change
- Click Change to access the Change/Reverse Charges form.
- Work Order Description
- The owner statement description can be different than the actual description filed on the work order. Select a work order transaction and click Work Order Description to add or change the description displayed on the owner statement.
- Reset Balances
- Click Reset Balances to read all the transactions, reset the running balance, and use the last running balance as the correct balance due. The stored balance due on the master is set to this correct balance due. The open balance transactions are retrieved and summed. If the open balance total does not match the correct balance due, then the last transaction’s open balance is adjusted. This makes the open balance, stored balance on the master, and the running balance amount on the last transaction match.
- Hide No Print
- When checked, all transactions marked in the "NoPrt" column are not displayed. When unchecked, all transactions (regardless of print status) are displayed in the grid.
- Running Balance
- Display all transactions from the last closed statement and display a running balance column instead of a open balance column. Running Balance displays a snapshot of the activity for the month.
- Open Balance
- Display all transactions with an open balance not equal to zero and display an open balance column instead of a running balance column.
- 1099 Adjustments
- Select to display all transactions created with the Change option. If Starting Date and Number of Days are enabled, then those filters are also considered before the system displays the transactions.
- Starting Date
- In read-only format unless Display All Transactions is unchecked, select a specific date range by entering the Starting Date and setting the Number of Days field. This works as a sub-filter of the Display Options. For example, select Running Balance, set the Starting Date to 01/29/98, and Number of Days to 30 to display all running balance transactions between January 29th and February 28th. With the same settings, set Number of Days to 29 to view only running balance transactions between January 29th and February 27th.
- Number of Days
- In read-only format unless Display All Transactions is unchecked, select a specific date range by entering the Starting Date and setting the Number of Days field.
- Display All Transactions
- Check to display all transactions without regard to Starting Date or Number of Days settings (time consuming). This still allows for the Running Balance, Open Balance, and 1099 Adjustment filters to be considered. When not checked, the grid can be filtered using the Starting Date and Number of Days fields.
- Aging
- Columns on the Transaction tab now include Aging for open balances detail for 1-30, 31-60, 61-90, 91-120, and greater than 120 days.
- Recent Reset
- Each time the transaction tab is displayed in any of the masters, the system does a "Recent Reset" of the balances. The process is the same as the Reset Balances button, except the running balances are reset only from the last closed statement. In this case, the running balance on the last closed statement marker (D@) is assumed to be true and the process is much quicker. This reset of balances also takes place for these masters (1) before and after a payment is taken, (2) before and after a charge is posted, and (3) before a statement is reviewed/finalized.
- No Print#
- This column contains the "no-print offsetting transaction sequence number" and makes tracking which transaction a reversal transaction is associated with much easier. This column also displays on Change Transactions and View Transactions screens.
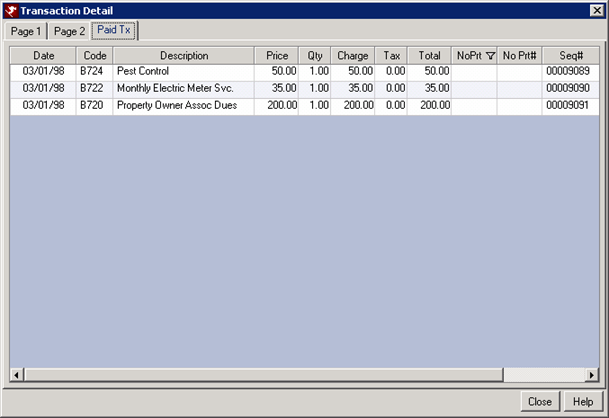
- Paid Tx Tab - Payment Cross Reference
- Double click the payment transaction, which opens the Transaction Detail window to view which transaction that payment has paid off. Collect the payment as usual, whether the payment is being auto posted to oldest open transaction, or manually posted to specific open transaction. Click the Paid Tx tab. This will show each transaction that was paid off by this payment.
-
Contracts Tab (R6 Timeshare & Interval Ownership Module Required)
View, add, change, and delete contracts. This tab is only visible when the
system is configured to use timeshare contracts (Use Timeshare Contract File to Create Weeks
is checked).
- Add Contract
- Click to access the Add Contract screen.
- Change Contract
- Select a contract from the grid and click to access the Add/Change Contracts screen.
- Delete Contract
- Select a contract and click to remove the contract from the owner master. Only expired contracts (Exp. Date is prior to the current system date) can be deleted. When a contract is entered in error, the contract must first be expired before deletion is allowed.
Reservations Tab
Display reservations on the selected group master by reservation status. Use the drop-down to select a single status (Future, In-house, Active History, Non-active History, or Cancelled) or of all active, non-cancelled reservations ("Future, In-House, and Active"). The entire history of the group is available using various status searches. Double-click any reservation in the grid to open the Change Reservation screen.
| Condominium System Sample
|
| Timeshare System Sample
|
- Res Status
- Use the drop-down to select a single status (Future, In-house, Active History, Non-active History, or Cancelled) or of all active, non-cancelled reservations ("Future, In-House, and Active"). The entire history of the group is available using various status searches.
Work Orders Tab
The Work Orders tab is only available when the RZ - Work Orders and Asset Management module is installed.
Access this tab to view, add or change work orders to the selected master.
|
For more information, see Work Orders.
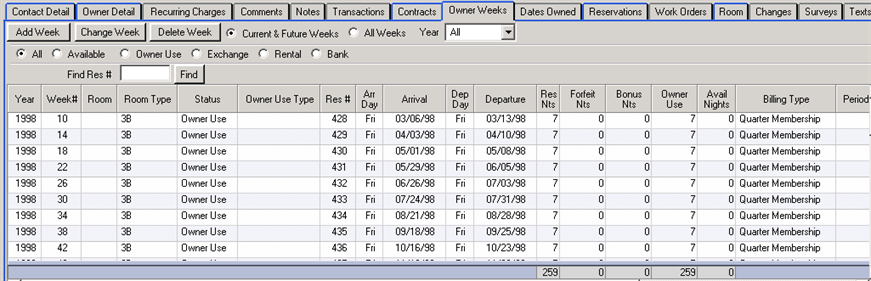
Owner Weeks Tab (R6 Timeshare & Interval Ownership Module Required)
The Owner Weeks tab is only available to systems with the R6 Timeshare & Interval Ownership Module installed. Timeshare properties list weeks owned information by owner. Add, change, or view a week by owner from this tab.
|
- Add Week
- Click to open the Add Weeks form and add a week to the selected owner.
- Change Week
- Select a week in the grid and click to open the Week Maintenance form to change a week.
- Delete Week
- Click to remove the week from the owner master. Confirmation
is required. The system also warns if future reservations exist.
If deletion is confirmed, the future reservations are NOT cancelled.
- Current & Future Weeks
- Select the Current & Future Weeks radio button to display all but historical weeks. The Year drop-down filter is also considered when not set to all.
- All Weeks
- Select the All Weeks radio button to display past, present, and future weeks. The Year drop-down filter is also considered when not set to all.
- Year
- The Year drop-down filter is used to filter the grid by showing either all or just one specific year. This filter works in conjunction with the Current Future Weeks and the All Weeks filters.
- Status Filters
- Use the All, Available, Owner Use, Exchange, Rental, and Bank radio buttons to further filter the weeks displayed in the grid.
- Room Number
- Timeshare weeks can be fixed or float. Fixed weeks give ownership to a particular room number. Float weeks give ownership for room type but have no particular room number attached.
- Week#
- The week number held by the selected owner. There are 53 weeks of the year in the timeshare industry. January 1st - 7th could be Week 1, and December 24th - 31st could be Week 52. Week 53 is assigned by the property to the maintenance week for the room. It falls wherever is necessary.
- Period
- Represents season the week falls in based on property policy. Regular, High, and Holiday weeks are used to describe the desirability (and rates) of a week. A June week at a property with a beach would most likely be a high week and have a higher purchase price.
- Fixed Week
- A "Y" indicates the week is fixed (same week available for reservation each year).
- Year
- Enter the year when use of the week is first granted. When changed and reservations exist in the cross-reference calendar, the system displays a warning before allowing the change to be saved. Timeshare weeks can be owned in various ways: annually (every year), biennially (every other year - odd or even), and triennially (every three years), quartershare (25% of every year), etc.
- Forfeit Nts
- Visible only when an Owner Res Type is configured, the Forfeit Nts column displays the number of night forfeited if the nights on the reservation are less than the owner use.
- Bonus Nts
- Visible only when an Owner Res Type is configured, the Bonus Nts column displays the number of nights on the reservation that are greater than the owner use.
- Billing Type
- The owner's Billing Type is displayed in the grid to assist properties that divide groups for various reasons such as seasonal contact. For example, when Billing Type is used to differentiate winter vs. spring and summer ownerships, use the Billing Type field on the Owner Weeks tab or the Week Maintenance screen to determine when owners can call into book weeks for the coming year.
- Find Field
- A Find field has been added to the grid to search through the weeks. Click the column header and that search field will search the weeks based on that column category. For example, to search the reservation number in the list of weeks, click the Res# column and enter the reservation number in the Find field. Note: this field does not appear unless there are 15 or more weeks in the grid.
Dates Owned Tab (R6 Timeshare & Interval Ownership Module Required)
The Dates Owned tab is only available to systems with the R6 Timeshare & Interval Ownership Module installed.
The system looks at the owner cross-reference file (generated based on the information on the Owner Weeks tab) and displays the dates owned.
|
- Change Dates
- This button is only available when contracts are disabled. Click to display the Timeshare Cross Reference Calendar. Make changes and save to return to the previous screen.
- Process Owner Weeks
- This button is only available when contracts are disabled. Click to take the information on the Owner Weeks tab, add any new weeks to the cross-reference table, and refresh the grid on the Dates Owned tab starting with the current year.
- Show Available Dates Only
- This button is only available when contracts are disabled. Check to filter the grid and show only those with "Avail" column equal to blank.
- Date
- View the date of each day within each week owned.
- Day
- Day displays the day of the week for each day of each week owned.
- Room#
- Room# displays the number on the week owned for the current year.
- Avail
- "Avail" displays a blank for available dates and B (timeshare bonus time), E (timeshare exchange), G (guest of owner), O (owner), P (preassign), S (special), T (timeshare owner), X (maintenance), or Z based on the type of reservation that is booked on the date displayed. Letters displayed in uppercase represent the arrival date, and lower case represents subsequent days within the week.
Room Tab
View details on the room type and room number of the owner's room. The "Room Info", "Room Detail", and "Room Type Info" facts are also available from the right-click menu when viewing reservations, owner masters, and room masters.
|
- Room Detail
- Click Room Detail to view the room master for the specific room number selected in the grid.
- Room Info
- Click Room Info to view the RTF files for the specific room number selected in the grid.
- Room Type Info
- Click Room Type Info for details on the .rtf files available.
- Room Web Info
- See Room Web Info for details.
- URL
- See URL for details.
Bills Tab (R3 required)
Bills are only available to systems with the R3 Condominium Owner Accounting module installed but not available when the R6 Timeshare & Interval Ownership Module is installed.
The grid displays any invoices, regardless of status, that have been entered on the vendor. This tab is also displayed on the room master for which the invoice was entered and the owner master if the room number has an assigned owner.
|
- Add Bill
- Click the Add Bill button to open the Process Bill screen and process the selected bill individually.
- Bills Change
- Double-click on any bill from the grid on the Bills tab to open the Bills (Change) screen. Make any changes nece
- Pay Now
- When the selected Bill has not been paid, use the "Pay Now" button to pay the balance to the vendor.
Select how the check is to be processed.
- Add this payment to the vendor statement and generate the check when statement is finalized. The vendor statement transactions are updated and the check generated when statements are finalized and Check Vouchers are processed.
- Generate check now and mark the check as printed (use this option if you have or will be hand writing the check). The vendor statement transactions are updated and the check is not added to the print queue. This check will never be printed by the system and must be hand written.
- Generate check now and put the check into the print queue (use this option if you want to print the check using the RDP system). The vendor statement transactions are updated and the check generated when Check Vouchers are processed.
If the Vendor Transaction Code has not been configured, the system prompts for a transaction code.
This does not change the Vendor master. Setting the transaction code from this form is a one-time setting. Use Change Vendor to set the code permanently. When the check process and the transaction is set, confirmation is required before completing the payment process. Once the bill is paid in full, the Pay Now button is disabled. Disable and restrict user access based on fence level using the "Work Order and Bill Pay Now Button" setting in the UI Security section within System | Menu Security.
Accounts Tab (R3 required)
Bills are only available to systems with the R3 Condominium Owner Accounting module installed but not available when the R6 Timeshare & Interval Ownership Module is installed.
Enter and maintain any account numbers specifically designated for owner
masters for vendor masters in the system. For example, Southern
California Gas (SCG) might supply gas to 15 rooms at a property.
If the property receives an invoice for the room or owner, enter that
account information here or on the vendor master to make processing the
billing and vendor payment much easier. The grid displays the account
number, the vendor name (master), the default amount of payment (if any),
the date of the last payment, and offers the ability to set the account
as a fixed amount (same every billing cycle) and enter details about the
accounting using the Note button on each account row.
This tab is not available when R6 Timeshare & Interval Ownership Module is
installed.
|
- Change Accounts
- Available only when viewing the tab from the Owner Analysis screen, click "Change Accounts" to display the Accounts tab on the Change Owner Master screen. Select an account. The Fixed Amount, Default Amount (when Fixed Amount is checked), and Notes can be updated.
- Add Account
- Click "Add Account" to access the Change Owner Master screen with a new row in the grid. The required fields are Account# and Vendor.
- Pay Selected Account
- Available only when viewing the tab from the Owner Analysis screen, select an account and click the "Pay Selected Account Now" button to open the Process Bill screen. A message displays when no account is selected when this button is clicked.
- Pay All Accounts
- Available only when viewing the tab from the Owner Analysis screen, click the Pay All Accounts button to open that screen and process multiple accounts for single or multiple vendors.
- Delete Account
- Available only when viewing the Accounts tab on the Change Owner Master screen, click "Delete Account" to remove an account from the owner record. Confirmation is required. Use caution. Account history will be lost upon deletion. Accounts can also be deleted by selecting an account and selecting "Delete Selected Row" from the right-click menu.
- Account#
- Enter the unique account number from an invoice received from the vendor for any or all owners. For example, RDPWin's CCS (condo/whole ownership) data files show The Gas Company has an account for Biegler/Barry. Each account number for each owner can be entered. This information auto-fills account number information in some of the billing and payment areas of the system.
- Fixed Amount
- The "Fixed Amount" column displays a checkbox. When checked, the account is billed the same amount each month and enables the ability to enter the Default Amount. When the Default Amount is not changed from 0.00, the amount is set to the first entered amount automatically during the billing process. For example: when paying a cable bill and no default is set for the fixed amount, and the first cable bill paid is $55, the default is set to $55.
- Default Amount
- When Fixed Amount is checked, enter the default invoice amount here. Since this tab is where invoice account information is entered for the first time, there is no amount history. When billing owners and/or paying vendor invoices, the most recently entered invoice amount is automatically displayed and filed here.
- Last Payment
- The Last Payment column shows the date payment was most recently applied to the selected account. This field is automatically updated during the billing process and cannot be manually changed.
- Notes
- Click the Notes button in the Notes column for a particular account row to view and add notes for that account. When Add Account is clicked and the Notes button is clicked before a new account is saved, the system prompts with "Account information must be saved before entering note information. Save now?". When Yes, the new account information is saved and the Note form displayed. When No, the system returns to the previous screen.
Changes (Module S7 Change Tracking Required)
When the Change Tracking Module (S7) is installed, changes made to
owner masters in RDPWin are tracked. RDP-DOS does
allow owner masters to be changed; however, Change Tracking only functions
with RDPWin. Properties using both DOS and Win could
change an owner in DOS and not see the detail when viewing the Changes
tab in RDPWin. Resort Data Processing suggests using only RDPWin when using the Change Tracking Module.
Change Tracking Analysis and
Summary
information is also available.
In addition to making sure to only use RDPWin for reservation changes, the
system tracks information on the user making the changes as well. Some
properties assign group logons for front desk, audit staff, accounting.
To assure the most accurate information is recorded for Change Tracking,
properties should
create and
maintain individual logons for each and every user. See
Change Tracking Overview for more
details.
- Summary View
- When the Summary View radio button is selected and an owner master is
changed using RDPWin, basic change information is
displayed on the tab. Each row in the grid represents a time when
the owner was changed and saved. One or many changes can be
associated with a single row. Fields available on this tab
are always Date Changed (includes time), Changed By (based on logon of
user), Name, Room#, Type, Balance Due and contact information.
The original owner record is always displayed at the bottom of the grid. Any changes made thereafter are displayed in order with the latest on top. The grid cannot be sorted, filtered, or reordered. For additional reporting and data manipulation, use Change Tracking Analysis and/or Change Tracking Summary. - Detail
- While in Summary View, click the Detail button to display the details on the Changes
screen. The sample screen below shows the balance due was updated
by User USER on March 1st at 02 seconds after
10:12 a.m.
- Master
- While in Summary View, click the Master button to display the
Owner Detail screen in read-only format. The information
displayed is the same as that displayed on the Change
Owner screen.
- Detail View
- When the Detail View radio button is selected and an owner master is
changed using RDPWin, each row represents a single change regardless of
whether or not multiple changes were made during the same Change
session. The Date Changed column is always displayed, along with
the field name changed, the original and new value of that field, and
the user's logon information.
When multiple changes are made on the same date and display the same time in the Date Changed grid, view the detail to see the actual, official time including the seconds. In the sample below, the original owner record was filed on 12/01/97 at 12:00 a.m. Multiple changes were made on March 1st (owner master opened for change and saved).
 |
Click these links for Frequently Asked Questions or Troubleshooting assistance.
02/12/2013
© 1983-2013 Resort Data Processing, Inc. All rights reserved.