Click here for Master Tutorials
Click here for Agents Navigation
Travel Agent Tabs | |
|---|---|
| Agent Detail | |
| Travel Agent Functions | |
|---|---|
| Add | Payment Tabs |
Tabs Available for Agents
The basic master information on all types of masters are similar. Each master type has different tabs available where appropriate.
As shown in the
sample Agent Master, tabs outlined in
color hold master-specific information. In this case, the Aladdin
Travel master has booked reservations in the system.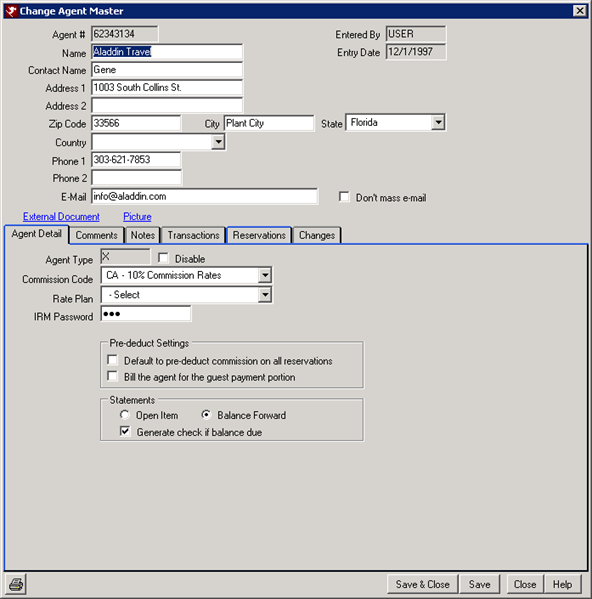
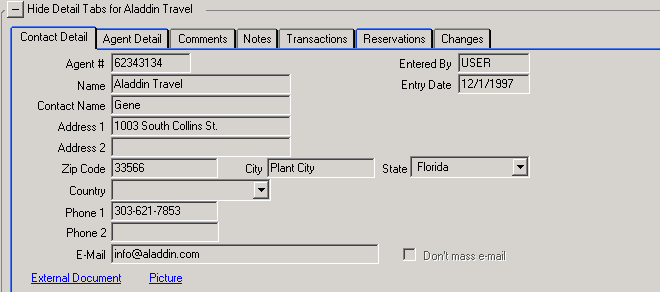
Contact Detail Tab
When viewing agents in the Analysis grid, the Contact Detail tab is available.
When viewing the Add or Change Agent screens, the Contact Detail tab is
displayed above all of the other tabs.
 |
- Agent#
- Enter or maintain the 8-alphanumeric characters representing the agent number.
- Entered By
- When an agent master is added to the database, this field is stamped by the system to identify the logon name of the user who entered the information.
- Name
- Enter the first and last name of the agent using any 24 alphanumeric characters.
- Entry Date
- When an agent master is added to the database, this field is stamped by the system to identify the system date when the information was entered.
- Address 1 and 2
- Enter the street (mailing) address of the agent using any 24 alphanumeric characters.
- City
- Enter the city where the agent is located using any 16 alphanumeric characters.
- State
- Select the state where the agent is located using the drop-down list. When the first letter of the desired state is typed in to the field directly, the system searches the CB table and displays the closest match. Once a state is displayed in this field, use the up and down arrows to scroll through the list individually without using the mouse.
- Zip
- Enter the Zip Code using any 10 alphanumeric characters prior to the City and State fields for the system to automatically fill in those fields for the user. Letters are allowed for Canadian and European addresses.
- Country
- Select the country where the agent is located using the drop-down list. When the first letter of the desired country is typed in to the field directly, the system searches and displays the closest match. Once a country is displayed in this field, use the up and down arrows to scroll through the list individually without using the mouse.
- Phone 1 and 2
- Enter the home and business telephone numbers of the agent using any 12 alphanumeric characters. Formats allowed are 800/555-1212, 800-555-1212, 8005551212, and 011945551212.
- Enter the email address of the agent using any 40 alphanumeric characters. The system recognizes that an e-mail address must contain the "@" symbol and displays an error when not entered.
- Don't Mass E-mail
- Check to allow the agent to opt out of mass e-mail marketing. Allowing this restriction abides by all current regulations for anti-SPAM.
- External Documents - T2 Module Required
- This link allows external files to be attached to the travel agent master. Use this feature to attach detailed information about the travel agent. The following file types are supported: Txt, Doc, Docx, Htm, Html, Xls, Jpg, Bmp, Gif, and more. The documents can be viewed as long as the workstation has the application installed that displays that file extension.
- To attach a file, save it to the \RDP\RDP<xx>\MasterDocs\Agent folder, using the travel agent master number as the file name. For example, if the file created was for agent Aladdin Travel with agent number 62343134 in the RDP01 directory, the file and location would be \RDP\RDP01\MasterDocs\Agent\62343134.doc (the file extension will change based on the program it was created in).
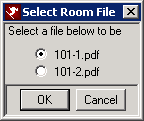
- If more than document is needed for the master, enter the master number followed by 1, 2, 3, etc. For example, for agent number 101, enter the file name as 101-1, 101-2, 101-3, and a prompt appears allowing the different files to be selected.
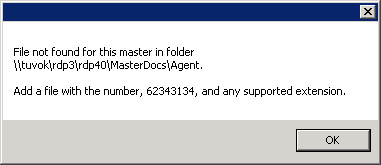
- If the file does not exist, the following error message will appear with the file path location when the link is clicked. Note: The file location will display the UNC path, however, the file can be saved to the RDP drive (usually R:\ or F:\).
- Pictures - T2 Module Required
- This link allows external pictures to be attached to the travel agent master. The following file types are supported: Txt, Doc, Docx, Htm, Html, Xls, Jpg, Bmp, Gif, and more. The pictures can be viewed as long as the workstation has the application installed that displays that file extension.
- To attach a picture, save it to the \RDP\RDP<xx>\MasterPics\Agent folder, using the travel agent number as the file name. For example, if the file created was for Aladdin Travel with the agent number 62343134 in the RDP01 directory, the file and location would be \RDP\RDP01\MasterPics\Agent\62343134.jpg.
- If more than picture is needed for the master, enter the master number followed by 1, 2, 3, etc. For example, for guest agent number 101, enter the file name as 101-1, 101-2, 101-3, and a prompt appears allowing the different pictures to be selected.
- If the file does not exist, the following error message will display showing the file path location when the link is clicked. Note: The file location will display the UNC path, however, the file can be saved to the RDP drive (usually R:\ or F:\).
- Note: The External Documents and Pictures feature requires the T2 Module. For more information about this module, contact RDP Sales.
Agent Detail Tab
 |
- Agent Type
- The default type for all travel agents is "X" and is currently a read-only field. Changes to agent type are not currently supported in RDPWin.
- Disable Checkbox
- When checked, the agent master does not display on the Find or Analysis screens to allow a more narrow search on active agents. Once disabled, an agent cannot be added to a reservation. All existing reservations with a disabled agent are unchanged.
- Commission Code
- This code determines the commission percentage an agent receives on associated reservation revenue. Set the code on the agent master to set the default commission percentage. The code can be changed on a reservation-by-reservation basis by accessing the Commission Code drop-down on the reservation screen.
Click Flat Rate for information on
entering flat commission rates for agents.
Travel agent commissions are based on the reservation charge buckets (Room, Other-1, and Other-2). Commission codes (Table C7) can be set up to pay a percentage of the total of room charge, Other Charge-1, or Other Charge-2. The commission code should start with a "C" and is two characters in length. Example: Code CA is set at 10, 0, 0, meaning 10% of the room charge, and zero for Other Charge-1 and Other Charge-2. The standard commission codes supplied with the RDP system are:- CA - 10% Commission
- CB - 5% Commission
- CC - 15% Commission
- CD - 20% Commission
- CZ - No Commission
- Rate Plan (Table Z0)
- Enter the default rate plan for the travel agent. This rate plan is used as the default rate plan for a new reservation when associated with that Agent. Change the rate plan manually using Rate Plan drop-down on the reservation.
Note: See C1CUTOFF for details on Rate Plan Cutoff Password information. - IRM Password
- When allowing travel agents to make reservations on the Internet Reservation Module (IRM), a password must be entered. Enter the password and notify the travel agent to enter both their number and password on the IRM.
Prededuct Settings
- Default to Pre-deduct Commission on All Reservations
- When checked, agents assigned as Travel Agent #1 on new or changed reservations have the Prededuct checkbox checked by default. See Prededuct on Reservations for more details.
- Bill the Agent for Guest Payment Portion
- Pre-deduct travel agents normally collect the entire amount for the
reservation from the guest, keep the agent commission, and send the
remainder to the property prior to guest arrival. When checked,
the travel agent keeps the remaining amount until the property sends a bill.
See Bill Agent for Guest Payment
Portion for more details.
At check-in, any outstanding amount is billed to the travel agent. A ) and a B6DM as a receivable on the travel agent master. When the travel agent statement is printed, the travel agent is billed in order to receive the money.
After check-in, any other charges posted to the guest must be paid for by the guest and not the travel agent.
Statements
- Generate Check if Balance Due
- When checked and when balance forward statements are closed for agents, a check voucher for the amount due to the travel agent is generated. When unchecked, the check vouchers for travel agents must be generated outside the RDP system.
- Statements
- If an agent statement should reflect the amount due at the end of the last billing period plus all new agent, select the Balance Forward radio button. The balance forward statement should be used for all travel agents. Open Item statements DO NOT generate vouchers and should not be used for travel agents. However, if an agent statement should reflect all "open" transactions (those with a balance), select the Open Item radio button.
Comments Tab
The twelve comment fields can be customized to the property's needs and
are defined in Tables KA to KL. Common information tracked in these fields include billing arrangements, alternate contacts, and number of rooms requested. The headings for these fields can be changed to reflect the appropriate information.
Depending on which master type is selected determines how many comment
fields are available.
 |
Notes Tab
Any free text entries pertaining to the selected master are displayed in this section.
- Add and Change Notes with Switch 414-60
- When Switch 414-60 Use Add/Change button on notes" is set to Yes for RDPWin,
links to Add and Change are available on the Notes tab.
- Add Note
- Click Add to open the Add Note screen, enter any text, and click Save &
Close when complete. User entry information is tracked using the S7
Change Tracking module.
- Change Note
- Click Change to open access all notes on the Notes tab and change where
necessary. Click Save &
Close when complete. User entry information is tracked using the S7
Change Tracking module.

Reservations Tab
Display a grid by "Future, In-House, and Active" reservations or by "Non-Active" reservations
using the radio buttons. The tab supplies a complete
reservation history for the selected agent. Double-click any
reservation in the grid to open the "Inquire on Reservation" screen (same as
Change Reservation but in read-only
format). Change is only allowed from this tab using the direct links
on the screen for Other Charges, Deposit 1, and Deposit 2.
 |
Transaction Tab
Display a grid with complete transaction history for the selected agent, as well as a tally of the charges for current the period. Click the Post Charge button to open the
Post Charge form or Change to access the
Change/Reverse Charges form. Fields displayed on this tab are transaction
date, transaction code, description, price, quantity, charge, tax, total,
no print, and running balance. Check the
Display All Transactions box to
display all historical transactions for the selected master (time
consuming). When not checked, filter the display by selecting a
Starting Date or the Number of Days
and click Display.
- Post Charge
- Click to open the Post Charge screen for travel agent masters.
- Change
- Click to open the Change/Reverse Charges screen for credit card masters.
- Reset Balances
- Click Reset Balances to read all the transactions, reset the running balance, and use the last running balance as the correct balance due. The stored balance due on the master is set to this correct balance due. The open balance transactions are retrieved and summed. If the open balance total does not match the correct balance due, then the last transaction’s open balance is adjusted. This makes the open balance, stored balance on the master, and the running balance amount on the last transaction match.
- Hide No Prints
- When checked, all transactions marked in the "NoPrt" column are not displayed. When unchecked, all transactions (regardless of print status) are displayed in the grid
- Starting Date
- When "Display All Transactions" is not checked, select the Starting Date and set the Number of Days field to display a range of transactions. This works as a sub-filter of the Display Options. For example, select Running Balance, set the Starting Date to 01/29/98, and Number of Days to 30 to display all running balance transactions between January 29th and February 28th. With the same settings, set Number of Days to 29 to view only running balance transactions between January 29th and February 27th.
- Number of Days
- Display transactions for a specific date range by entering the Starting Date and setting the Number of Days field.
- Display All Transactions
- Display All Transactions: Check to display all transactions without regard to Starting Date or Number of Days settings. Checking this box still allows for the Running Balance, Open Balance, and 1099 Adjustment filters to be considered.
- Aging
- Columns on the Transaction tab now include Aging for open balances detail for 1-30, 31-60, 61-90, 91-120, and greater than 120 days.
- Recent Reset
- Each time the transaction tab is displayed in any of the masters, the system does a “Recent Reset” of the balances. The process is the same as the Reset Balances button, except the running balances are reset only from the last closed statement. In this case, the running balance on the last closed statement marker (D@) is assumed to be true and the process is much quicker. This reset of balances also takes place for these masters (1) before and after a payment is taken, (2) before and after a charge is posted, and (3) before a statement is reviewed/finalized.
- No Print#
- This column contains the "no-print offsetting transaction sequence number" and makes tracking which transaction a reversal transaction is associated with much easier. This column also displays on Change Transactions and View Transactions screens.
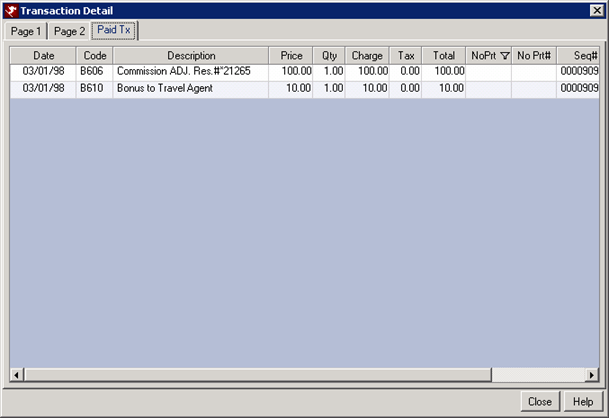
- Paid Tx Tab - Payment Cross Reference
- Double click the payment transaction, which opens the Transaction Detail window to view which transaction that payment has paid off. Collect the payment as usual, whether the payment is being auto posted to oldest open transaction, or manually posted to specific open transaction. Click the Paid Tx tab. This will show each transaction that was paid off by this payment.
Changes Tab
When the Change Tracking Module (S7) is installed, changes made to
travel agents in RDPWin are tracked.
Change Tracking Analysis and
Summary
information is also available.
The
system tracks information on the user making the changes as well. Some
properties assign group logons for front desk, audit staff, accounting.
To assure the most accurate information is recorded for Change Tracking,
properties should
create and
maintain individual logons for each and every user. See
Change Tracking Overview for more
details.
- Summary View
- When the Summary View radio button is selected and an agent master is
changed using RDPWin, basic change information is
displayed on the tab. Each row in the grid represents a time when
an agent was changed and saved. One or many changes can be
associated with a single row. Fields available on this tab
are always Date Changed (includes time), Changed By (based on logon of
user), Name, Commission Code, Rate Plan, Balance Due and contact
information.
The original agent record is always displayed at the bottom of the grid. Any changes made thereafter are displayed in order with the latest on top. The grid cannot be sorted, filtered, or reordered. For additional reporting and data manipulation, use Change Tracking Analysis and/or Change Tracking Summary.
When multiple changes are made on the same date and display the same time in the Date Changed grid, view the detail to see the actual, official time including the seconds. In the sample below, the original agent record was made on 12/01/97 at 12:00 a.m. Multiple changes were made on March 1st.
- View Detail Button
- While in Summary View, click the "View Detail" button or double-click any row to display the details on the Changes
screen. The sample screen below shows the prededuct default,
disable, commission code, and suppress mass e-mail fields were all changed
by User USER on March 1st at 53 seconds after
3:52 p.m.
The sample screen below shows the agent's default rate plan was updated User USER on March 1st at 23 seconds after 3:54 p.m.
- View Agent Button
- While in Summary View, click the "View Agent" button to display the
agent information in read-only format. The information
displayed is the same as that displayed on the
Change
Agent Master screen.
- Detail View
- When the Detail View radio button is selected and an agent is
changed using RDPWin, each row represents a single change regardless of whether or not
multiple changes were made during the same Change session. The Date Changed column
is always displayed, along with the field name changed, the original and
new value of that field, and the user's logon information. This
information is the same as displayed on the Changes screen.
Click these links for Frequently Asked Questions or Troubleshooting assistance.
06/11/2010
© 1983-2009 Resort Data Processing, Inc. All rights reserved.