Overview
Keys
Important
Tips
Notes
Related Topics
Colors
From the Start menu, go to Settings, Control Panel, Display, and select the Appearance tab. The three drop-downs available are Windows and buttons, color scheme, and font size. Any references to colors in the RDPWin help system are based on "windows and buttons" being set to "Windows XP style" and "color scheme" being set to "Default (blue)". Other Windows XP style colors available are green and silver. If Windows Classic style is chosen, the color choices are numerous. For best viewing in RDPWin, please use the Windows XP style and Default (blue) as noted above.
Date Fields and the Calendar
To change a date in a date field, there are several options available. The choices common for changing all four components (day, month, date, and year) are (1) to highlight the day/month/date/year and use the up and down-arrows to scroll to the desired month, (2) click the date field down-arrow to display the calendar feature and select a date by clicking, or (3) click the date field down-arrow to display the calendar feature and use the left and right-arrows to scroll to the appropriate date. Other options are available for changing the day, month, date, and year individually.
Month
Additional choices for changing the month in a date field are:
- Highlight the month in the field, and type in the numerical value of the month desired (such as "6" for the month of June). For instance, use the number "5" key to enter May or "1" and "2" to enter December. Should the "1" key be hit by mistake, when "2" was wanted, it's necessary to hit the "2" key twice to select February.
- Click the date field down-arrow to display the calendar feature. Click the month in the header area and use the up/down arrows on the keyboard or the mouse to select from the list of 12 months.
- Click the date field down-arrow to display the calendar feature. Click the left/right arrows of the drop-down calendar (on either side of month/year) to scroll and select from the list of 12 months.
Year
A unique choice for changing the year is to click the date field down-arrow, click on the year in the header and use the up/down arrows that appear to select the appropriate year.
Drop-down Fields
Throughout the RDPWin are "drop-down" fields. To access, click on the down-arrow and select the appropriate choices from the list provided. For example, the list for Room Type might include King, Queen, Double, or Studio.
- Sort Transaction Drop-down By Transaction Description Instead of Transaction Code (Switch 414-11)
- Drop-downs for transaction codes list the code number and description. Switch 414-11 (as titled above) sorts the transactions by Description instead of Code anywhere the transaction code drop-down is displayed (Post Charge, Work Order Vendor Masters, and Transaction Maintenance). The result requires users to type the description instead of the code. This global switch changes all transaction drop-downs for reservations and masters.
International Date Format
RDPWin supports International dates (dd/mm/yy). The date format is dependant on the workstation's "Regional Settings" found in Control Panel.
Load Screen
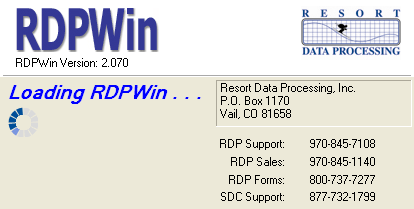
Once the RDPWin icon is clicked, a splash screen displays to assure users the system is in the progress of opening. This screen displays again after logon and password are entered and the Logon button clicked.
Logon Screen
Once RDPWin loads, users are prompted with the Logon screen. The
current RDPWin Version number is displayed as well as the Serial# and
Station# for the workstation being accessed. 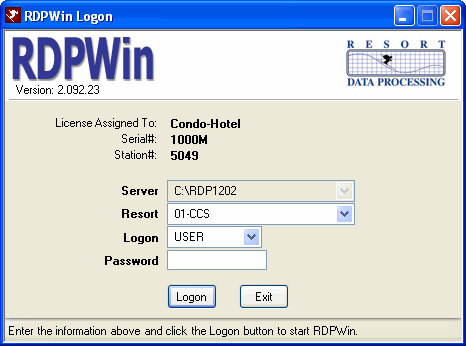
- Resort
- Select the database to be accessed during this session. Properties with multiple locations can access the database for any networked location. For example, the Hilton Hotels corporation in Los Angeles might have access to Hilton LA, Hilton Beverly Hills, Hilton Hollywood, etc.
- Logon
- Select the appropriate user identification.
- Password
- Enter the password assigned to the login entry.
Start Another RDPWin
Click Start in the main menu and select "Start Another RDPWin" to open another session of RDPWin. A unique station number from 15000 - 15999 will be assigned. Opening an additional RDPWin disables the directory switching option. To enable switching directories, close all instances of RDPWin and log in.
Menu System
The menu system is designed to reduce the number of areas to search for options within RDPWin. Hover over any module and the choices appear below in a temporary menu form. Click on the desired selection. Click on the links for more information about a particular module. To minimize or maximize the RDPWin screen, double-click the title row (Windows XP default color scheme = blue, but offers olive green and silver). In addition to using Logoff in the main menu or the  icon, users can double-click the RDPWin
 ![]() icon. The menu can be displayed above or below the toolbar, but it cannot be moved to another area of the screen.
icon. The menu can be displayed above or below the toolbar, but it cannot be moved to another area of the screen.
- Marketing and Technical Help Links
- Links in the menu system allow users easy access to RDP's marketing website regarding specific module. For example, when viewing the Owner Master Navigation page, links are available for general owner information as well as technical owner master help.
Modules
RDPWin offers many modules to customize the system for any property.
The purchased modules are installed during the original installation process
by an RDP installation specialist either onsite or via online access.
Additional modules not purchased are displayed in the lower grid to allow
the property access to additional RDPWin features.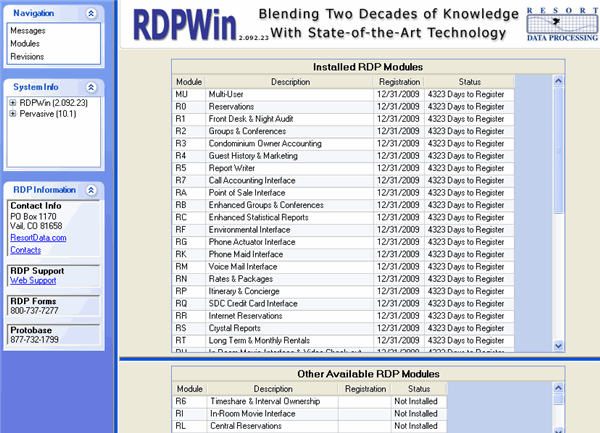
- Registration
- When RDPWin starts up, the system does the following:
- If all modules are registered, the messages control is displayed.
- If some modules are not registered but there are more than 10 days before payment is due, then the messages control is displayed.
- If any module needs to be registered within 10 days or less, the system displays the messages control AND a warning message box. RDPWin will continue to function.
- If any module requires registration prior to or on the current system date, RDPWin displays the modules along with a message box. The RDPWin main menu is disabled, and the only option is to close the main window. Call RDP Support at (970) 845-7108 immediately to register the necessary module(s).
- Installation
- Right-click on an uninstalled module and select Install. When
a module has not yet been purchased, a message similar to that shown
below is displayed:

Call RDP Support at (970) 845-7108 immediately to purchase and register the necessary module(s) and proceed with the installation.
Folio - No Prints
When the "No Prints" are out of balance, text appears on the Folio tab
with the out-of-balance amount. The Folio grid scans for that amount, and if
found, the background is changed to red to indicate the issues and the
Change button can be clicked. Similar information is shown on the
Change Transaction screen.
When the system can repair the no prints by using the "No Print Sequence
Number" field, the out-of-balance message is not shown. The system
simply repairs the problem.
When printing a Folio or checking out a guest and the No Prints are out of
balance, a prompt offers the choice of fixing the no prints (assuming the
system could not repair the problem on its own) or removing all no prints
and proceeding. When fixing the problems is selected, the Change
Transaction screen displays and the No Prints can be repaired manually.
Printing in RDPWin
- Print Existing Work Order
- From the Work Order (Change) form, click the Print option in the form's main menu. The system takes some time to access the Work Order information using Crystal Reports. Once the report is displayed in the Report Viewer, click the printer icon, select the appropriate settings, and click the OK button.
- Print Grids
- Click anywhere on the grid, right-click the mouse, select Print, select the appropriate settings for the Page Setup window, and click the OK button. Be careful selecting settings when printing grids because of the scrolling aspect offered by the grid. electing Landscape as the Print Orientation is typically the best choice. In some cases, printing an entire grid width-wise on a single piece of paper may require legal-size paper. For more manipulation capabilities, right-click and use the Export to Excel option.
- Print Screen
- From RDPWin's start screen and all other screens of the system (not including any change form being displayed), click the F2 Print option in the toolbar or use the F2 key on the keyboard.
RDPWin.exe - Data Directory Selection - Administrators
- In RDPWin, if accessing multiple resorts with the same system, change the rdpwinpath.txt file to include multiple servers and set the login window to the appropriate resort number. This minimizes user errors of going into the wrong resort. You can have two parameters on the RDPWin.exe command line:
- 1st: Station Number - If zero, the 'Station' environmental variable + 5000 is used.
- 2nd: Resort Number
RDPWin 0 2 (Station fetched from the environmental variable and resort 02)
RDPWin.UPD
RDPWin automatically runs the RDPWin.UPD file if it exists and a new version of RDPWin has been installed. The first workstation (and only the first workstation) starts a new version of RDPWin and checks the version number in table C1, sub-record WINUPD. If the version in this sub-record is not the current version of RDPWin, RDPWin runs the RDPWin.UPD file if it exists. This happens in a background program, so the normal startup of RDPWin continues for this workstation. After running the RDPWin.UPD file, all Table related XML files are removed to assure the proper table definitions are rebuilt.
Status Bar
The status bar at the bottom of the RDPWin screen displays as shown
below. When the RDPWin window is minimized, the resort number and name
are included on the Windows task bar. This helps to notify properties
when running multiple instances of RDPWin at the same time.
The table below shows how to identify the information listed in the RDPWin
Status bar:
| Version# | Station# | Serial# | Resort# | Logon ID | System Date | Shift# |
| 2.051 | 5049 | 1000M | 01-CCS | USER | 3/1/1998 | 1 |
|
|
||||||
- Resort
- Properties can have multiple databases for a single site or multiple sites. This field describes to which database the station is directed.
- Station
- Each RDP workstation should have a unique station number.
- Version
- The version number of RDPWin displays in a number of places. The most prominent location is the status bar as shown in the image above (2.051 in this case). RDP occasionally distributes version updates of RDPWin. When bugs are encountered, the first steps in rectifying the problem should be to check RDP's website for the most recent version of RDPWin. Bug fixes can be part of a version update, so it is imperative that properties use the most recent version available.
- WebEx Button
- To provide the highest level of support, RDPWin requires access to all properties' systems with WebEx. Carbon Copy and other remote tools are not supported. Click the WebEx button in the status bar for easy access when contacting support.
System Messages
The first screen displayed upon entry of RDPWin is the Welcome screen.
System and Logon Messages are displayed based on configuration and user
logons.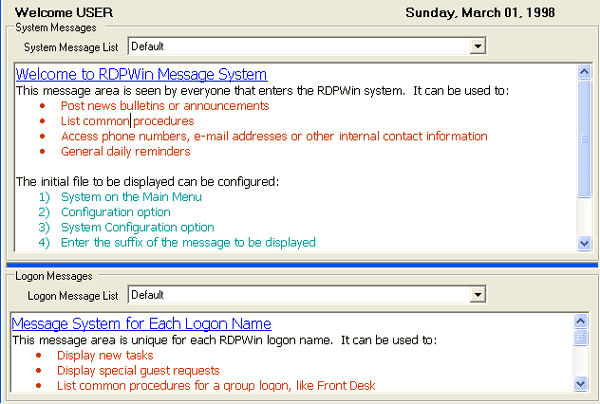
- System Messages
- These are viewed by all users logged into RDPWin. Post news bulletins, procedures, phone numbers, etc., for all to see. See Configure System Messages for details.
- Logon Messages
- Logon Messages are viewed by users with specific logons. Management can use this section to deliver messages to certain individuals or groups such as front desk, reservations, maintenance, etc.
- Printing Messages
- From the Welcome page, right-click the text area of any message to display the menu options: print, preview, and page setup. Print sends the message text to the default printer without any prompting for printer selection, formatting, etc. Select Preview to view the layout of the message before printing. From the Preview screen, click the printer icon to send the print command to the printer or close the screen, right-click again, and click the Print option. To change paper size, source, orientation, margins, or printers, select Page Setup. Once changes are complete, click the OK button (Cancel to close without saving), right-click again, and select Print.
Toolbar
Use the toolbar as a shortcut to the available options as defined below. The toolbar can be displayed with the icon and description (Example #1) or just the icons alone (Example #2).
For a complete list of all RDPWin keyboard shortcuts, See "Help Menu - Menu Shortcuts"
|

|
|

|
- F1 Help (Not included in the toolbar, but always available from ANY screen in the system)
- At any time in RDPWin, use keyboard's F1 key to access RDPWin's Help system. Click the Contents tab to displays the Table of Contents. From within RDPWin, click on any category (book) once to display that page or twice to open the category and review/access subcategories. When reviewing Help from RDP's Support website on the Internet, click just once to open the selected category and any subcategories. When a specific topic is not one of the listed categories, click the Search tab to locate all references to any word(s) entered in the search area.
- F2 Print (Not included in the toolbar, but almost available from ANY screen in the system)
- See Printing in RDPWin above.
- F3 Find Res
- Click the F3 Find Res toolbar button or use the keyboard's F3 button to access the Find Reservation screen. This works from anywhere in the system regardless of which screen is currently displayed. When the Find Res screen is closed, the system automatically displays the Reservations Navigation page.
- F4 Custom Help
- Custom Help (aka F4 to RDP-DOS users) can be viewed by anyone in the system to quickly access information such as rental car companies, restaurants, or internal procedures. The lists offered in this feature are completely definable by property. The F4 information can be printed or e-mailed from any of the configured screens. This window can stay active while using other features in RDPWin. See Custom Help for more detail.
- F5 New Res
- Click the F5 Find Res toolbar button or use the keyboard's F5 button to access the New Reservation screen for the configured reservation type.
- F6 Arrivals | F7 In-House | F8 Departures
- Click any of F6, F7, or F8 toolbar or keyboard buttons to close the currently viewed module, open Reservations, and then the selected screen. For more information on these screens, see Arrivals/In-House/Departures.
- F9 Tape Chart
- Click the F9 - Tape Chart button or use the F9 key on the keyboard to access the Tape Chart regardless of where the user is in the system.
- F12 Quick View
- The F12 Quick View allows users to inquire on information in the system without having to exit the current screen they are viewing.
- Alt+F12 - Availability
- Use the keyboard shortcut keys Alt-F12 (Alt key, F12 key) to access the Availability screen in read-only format.
- Ctrl-F12 - DDF Info
- Use the keyboard shortcut keys Ctrl-F12 (Ctrl key, F12 key) to access the DDF Info screen in read-only format.
- Lock Toolbar
- Right-click anywhere in the toolbar, regardless of buttons or icons,
and select Lock the Toolbars to stabilize the location of the toolbar.
When not locked, click and drag the vertical line at the left of the
toolbar to change the docking position of the system toolbar. The
cursor changes to an arrowed crossbar. Drag the bar to the new
location: left, right, bottom, or top of the screen. The toolbar can
also float by dragging it to any location other than the sides of the
form.

- Open/Close Toolbar
- Right-click anywhere in the RDPWin main menu and select System Toolbar to
toggle the toolbar on or off. This can also be maintained from the
System Configuration
screen.
Using Help
- Print Help Headings and Subtopics
- When viewing help from the Table of Contents, print any topic or heading and all subtopics by right-clicking and selecting Print or click the Printer icon in the Help menu. Help requires selection between: "Print the selected topic" and "Print the selected heading and all subtopics". If a heading is highlighted when the print command is given, "Print the selected topic" prints only that help page. "Print the selected heading and all subtopics" prints the entire section of help pertaining to the highlighted heading. For example, highlight CRM and click "Print the selected topic" and the system prints the page of help for the overview of the CRM. Highlight CRM and click "Print the selected heading and all subtopics" and the system prints the overall page for CRM as well as all the subtopics such as Add Guest, Find Guest, and Statements.
-
- Display (Topics)
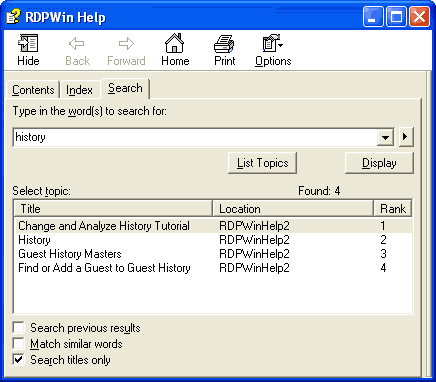
- After the "List Topics" button is clicked, highlight one of the topics in the list. Click the Display button to view that topic in the right side of the screen. This can also be accomplished by double-clicking on a topic from the list. Once the topic is displayed, the word(s) originally searched for are highlighted in the topic displayed on the right side of the screen.
- List Topics
- Click the List Topics button to display the search results for the information entered.
- Search Help
- Activate Help by selecting Help from the main menu or access it via our website at http://support.resortdata.com/RDPWin/Help/RDPWinHelp.htm. Click on the Search tab, enter the topic of choice into the "Type in the word(s) to search for" field. Search returns topics containing these words, whether they are in the body of the topic (if "Search titles only" is unchecked), or the titles only. Enter more than one word in the Search text box to make your search more specific and limit the number of results found. To narrow the choices down, use the AND/OR/NEAR/NOT parameters by clicking the right-arrow located just above the Display button.
- Search Previous Results
- Check the "Search previous results" box to add an additional parameter. For example, search for "add". Once a list of topics is displayed, check the "Search previous result" box, enter "guest" after the word "add" in the search field, and click the List Topics button. The results are now reduced based on all topics with both the words add and guest in them.
- Search Titles Only
- Check the "Search titles only" box to search only by topic title. For example, When "History" is the search parameter and the "Search titles only" box is checked, there are four topics displayed when the List Topic button is selected as shown in the above example. If you uncheck the Search titles only" box, Help lists all documents with the word "history" in it.
- Change Password
- All RDPWin users now have the ability to change their own password from Change Password option in the Help main menu. Prior to this addition to the Help menu, users would have been required to have access to the Manage Users options in the System main menu to change their password, which are often restricted by power level. All password requirements are still same.
Click these links for Frequently Asked Questions or Troubleshooting assistance.
