Click here for tutorials
Overview
Restrict RDP users from entire menus or specific menu options using Menu Security. Security is defined in the RDP system through power levels and fence levels. Both the Menu Security and Manage Users options are located in the System main menu.
Prior to instituting system security, RDP users and groups must be defined (perhaps on paper) and a security scale must be developed in order to group similar types of users into a security group. After the administrator has determined who falls into which groups based on the functions needed in order to perform each job, add the users and assign each member to the appropriate power level. After the users are created with their correct power level, some of the RDP menus may need to have the security fence level changed.
For example, front desk clerks should be grouped together and have access to certain system functions. Night auditors need to run system utilities and should have similar power levels. Supervisors should have similar access to system tables. Accounting needs access to the entire system, except for critical system tables and switches. System Administrators have access to all RDP functions.
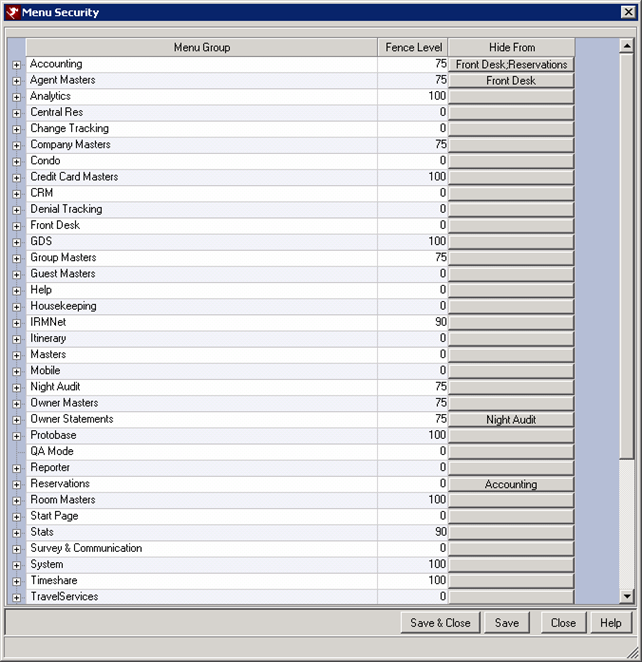
In addition to fence levels for the menu items, each can be hidden by selecting the users group in the Hide From column. This is particularly useful for menus that have a lower fence level but are not needed by a particular group. For example, the Reservations department does not need access to the Accounting menu, and the Accounting department does not need access to the Reservations menu. The Accounting menu in RDPWin has a higher Fence Level than the Reservations. With the Hide From feature, any user with the Accounting group assigned, will not see the Reservations menu
Use the following checklist in order to institute system security:
Create Security Groups
Once all users are defined, associate them into security groups based on their job responsibilities. For example, group all front desk clerks together, all auditors together, and all supervisors together. Security groups are not entered into the RDP system, they are formed d in order to organize users and assign power levels. Once groups are established, assign a power level to each, between 1 and 100. For example, assume a property organizes the following security groups:
| Group 1 - Housekeeping
Power Level = 25
Debbie |
Group 2 - Front Desk Clerks
Power Level = 50
Ron |
Group 3 - Auditors
Power Level = 75
|
Group 4 - Accounting
Power Level = 80 Sue |
Group 5 - Supervisors
Power Level = 90
|
Group 6 - System Administrator
Power Level = 100
|
Define System Users
All system users should have an individual account created. Access Manage Users from the System main menu. Note: with new PCI Compliance rules, users are only allowed to be logged into one workstation at a time. It is not recommended that generic logon be created for all front desk or housekeeping user. Each user should have his/her own login.
Restrict Menus and Options
Once users have been added, security groups created and power levels assigned, it is possible to restrict menus and options by using fence level in the Menu Security option from the System main menu. Using the example above, each front desk clerk should be granted access to the Reservations, Front Desk, Groups, Travel Agents, Housekeeping, and Guest History Master menus. Assign a fence level lower than the power level for the users. In this case, a fence level of 50 or less.
In addition to the fence level, menu items can be hidden from certain user groups. Click the Hide From column next to the menu item for a list users to hide the menu from. Each user account is assigned a user group. Use this option for when a menu's fence level is lower than a user's fence level.
Follow these steps for creating these security levels:
- Access the Menu Security. From the RDPWin main menu, select Menu Security from the System main menu. Click the
 icon to expand the Menu Group information and display Menu Items.
 - Assign Corresponding Fence Levels to Menu Items . Click into the Fence Level field and enter the desired level as determined above in the Create Security Groups section. It is necessary to delete or type over the existing level to obtain the desired outcome. Once all changes are made, click the Save button. It is not necessary to Save after each Fence Level has been set. However, when entering multiple levels during one session, saving intermittently is recommended. If a user attempts to access a function above their power level, the system prompts the user with an "Access Denied" message. Modules above a user's power level are not visible.
- Use Hide From to Select Certain Groups to Hide the Menu. Click the Hide From column next to the menu item for a list users to hide the menu from. Each user account in RDPWin is assigned a user group. Use this option for when a menu's fence level is lower than a user's fence level.
- Test Security. Log out of RDPWin and log back in as the newly entered users to view the differences and restrictions.
- Change Owner Pay Code
- When UISecurity | Change Owner Pay Code is set, the system compares the user power level to this security setting to authorize access to changing the owner pay code on a reservation. Users with menu security set to less than the Fence Level are not prompted to change the owner pay code when making new reservations for rooms with owners. Instead, the system uses the owner pay code (default) from the owner master and does not prompt at all.
- Travel Agent Commission Code
- When UI Security | Travel Agent Commission Code is set, a security fence level is assigned and required when changing the travel agent commissions on a reservation. The system compares the user power level to this security setting to authorize access to the commission code throughout the system. If a user's power level is less than the number set in security, the user sees the field in read-only mode. If a user's power level is equal to or greater than the fence level, the field can be changed.
- Show Folio No Prints
- When UI Security | "Show Folio No Print" fence level is set, users with power levels equal to or above can view the No Print transactions and the system allows filtering. If the user's power level is below the setting, the No Print transactions on the folio are not visible and cannot be filtered.
- Allow Note Changes
- Expand the UISecurity menu group to set the fence level for accessing Notes for change. RDP suggests that access to Change Notes should be reserved for upper management only. For more detail, see Change Notes.
- Early Check-out Settings
- Use the UI settings to set which and how many options are available when checking out a reservations early. Separate settings are available for changing the departure date and deleting transactions (check out early and not collect any charges for nights missed), changing the departure date and the transaction dates (check out early with new departure date while still collecting charges for nights missed), and leaving the departure and transaction dates as is (check out early without changing the departure date and still collecting charges for missed nights).
- Allow Folio Posting on Prior Date (414-08 Must be Set to Yes)
- When Switch 414-08 is set to yes, the Date field is available
accessing Post Charge from the Reservations. The Date field allows
for the entry of a date for future and in-house reservations. The
date must be from the arrival date to the departure date minus 1
day. See
chart for setting combinations.
New After 414-08 is set to Yes, a security fence level can be set. Any user with a security level equal to or higher than the fence level can post prior charges. Other users are not allowed and the date drop-down is disabled.
Click these links for Frequently Asked Questions or Troubleshooting assistance.
05/31/2011