- Click here for Work Order tutorials
(Work Orders & Asset Management (RZ) module required.)
Overview
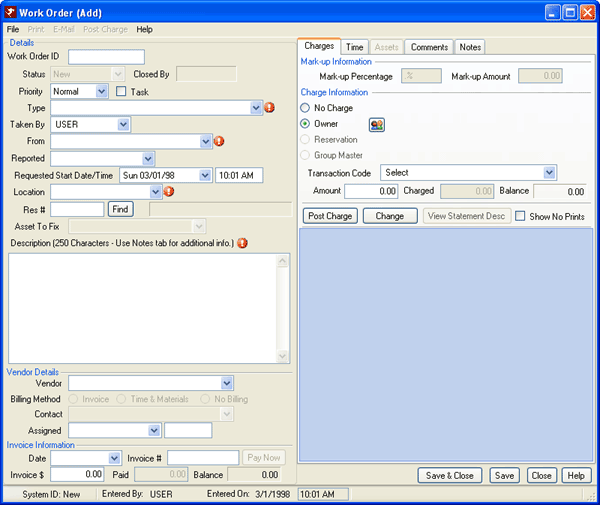
Click Add Work Order from the Work Orders main menu or Navigation page to open the "Work Order (Add)" screen. Fields required before saving is permitted are: Type, From, and Location. The Description field is required by default but can be
configured to be optional. Status is set to New and the Priority to Normal by default.
Tabs available are Details (left side of the form), Charges, Time, Assets, Comments, and Notes. Once
the work order is saved, the system assigns a
Work Order ID (or System ID if Work Order ID is not defined) and the main menu is enabled. Owner
fields are also available when the R3 Condominium Owner Accounting module is
installed (sample shown below).
Main Menu

- File
- Options available from the File menu are Save (Ctrl+S), New (F2), Save and New (F4), and Close (Ctrl+C).
- Help
- Click the Help option to open the Help system.
Send E-mail Notification
When a vendor is assigned a the work order saved, the system can be configured to notify the vendor (and or others) by e-mail. When Yes is clicked, the E-mail Notification screen opens. Fields available on this screen are Message Type, Priority, Subject, Include, Body, and Add E-mail Address. Some systems can also send work order e-mails to the owner (R3 module required).
- Message Type
- Select the kind of message to indicate how the system should send the e-mail
notice. Default options available are plain text message, plain text message with Work Order as PDF attachment, or plain text message with Work Order as Word attachment.
WARNING: When sending an e-mail notification, an option in the Message Type drop-down offers "Plain Text message with Work Order Detail as PDF attachment". PDF attachments use Crystal Reports to send the detail. When the designated report includes vendor billing information, any e-mail notice to the owner contains the billing information as well. Customers that do not care to include billing information for owner viewing should select a more general report. The report is selected on the Work Orders and Asset Management Configuration page on the Options tab and NOT on a work order by work order basis. - Priority
- The system automatically stamps the Priority from the Work Order Priority.
- Subject
- The system automatically stamps the Work Order ID and Location information from the Work Order.
- Include Work Order Description in Body
- When checked, the text in the Description field on the work order is included in the body of the e-mail notice. When the Description has been entered on the work order with sufficient detail, no further information should be necessary to explain the requirements to the vendor.
- Body
- Enter text to clarify the need for the work order. For example, the Maintenance Manager may want the Vendor/Contact to contact Ross upon arrival at the property.
- Send Copy of Work Order Notification to Owner (R3 module required)
- When checked, the owner of the room where the work order is located is
sent an exact copy of the work order notification as that sent to the vendor. If no e-mail is sent to the vendor, no e-mail can be sent to the owner.
This option is disabled if the owner has no e-mail address on the owner master. The "send copy to owner" option is not displayed if the location of the work order is for a non-rental (N/R) unit such as lobby, rest rooms, or the unit selected is not currently assigned to an owner.
WARNING: Keep in mind that the billing information is included in the work order or the e-mail text. Some properties do not want owners to know about charge information, so notice should be given some other way.
The ability to send the vendor, and therefore the owner, an e-mail is also available from the Work Order Add and Change screens using the main menu once the work order has been saved..
See Warning regarding information available in e-mailed work orders. - Add E-mail Buttons
- To send the notice to a different or additional e-mail address other than the Vendor/Contact record, click the Add E-mail button to add a row to the grid and allow entry of additional e-mail addresses.
- Send Button
- Once the form is complete, click Send to launch the e-mails to all selected addresses. Any copies designated in the Configuration Options tab are also sent at this time. Should the Vendor or Contact e-mail be invalid, copies are also deemed invalid; hence, no e-mail notice is sent. An e-mail address must be selected (checkbox) or entered to enable the Send button.
- Vendor and Contact Grids
- Vendor and Contact grids allow the selection of e-mail addresses from the Vendor/Contact records and display any e-mail address(es) on file. When contacts do not exist on a vendor master, the Contact grid is not displayed. An e-mail address must be selected (checkbox) or entered to enable the Send button. Use the Add E-mail button to enter any additional e-mail addresses. The Type field in the grid describes the e-mail address (i.e., Home, Work, Text Message to Cell Phone). The Vendor and Contact names are displayed in red. For assistance with grid capabilities, see Grids.
Save, Reset, and Close
Click here for instruction on how to Save, Reset, and Close forms.
Click these links for Frequently Asked Questions or Troubleshooting assistance.
09/02/2009
© 1983-2009 Resort Data Processing, Inc. All rights reserved.