Click here for Master Tutorials
Click here for Rooms Navigation
Room Tabs | |
|---|---|
Tabs Available for Rooms
The basic master information on all types of masters are similar. Each master type has different tabs available where appropriate. Tabs outlined in color hold master-specific information. In this case, the Room# 306 has booked reservations in the system.
Room Detail Tab
Click Room Detail to view the room master for the specific room number selected in the grid.
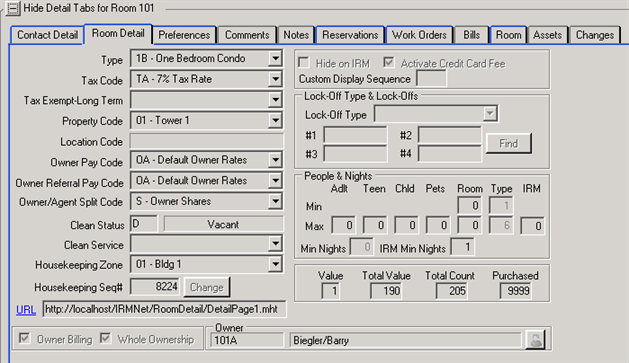 |
- Room Type
- When adding a room master, assign a room type to the room number.
Room Types must be added/maintained in Table C2
before being assigned to a room number.
Room types, room numbers, owner numbers, etc., created with a "/" character cannot be displayed on the room type description page in the IRM or IRMNET. Windows does not allow certain characters to be created in a file name (i.e. / \ : * ? " < > ).
See Lock-Off Type for additional information.
System Administrator: Use Option 090 on the System Manager menu and add or change room types in Table C2. Establishing non-rental rooms is suggested for areas of property not meant to be rented as a room night such as storage rooms, lobby, pool, common patio, etc., for use on group leader reservations and work orders. - Tax Code (Table C7)
- Select the default tax code for reservations for this room. Houses the default tax code for every reservation assigned to a particular room. The default tax code is TA. Properties with rooms in areas with different tax rates (management companies with properties in different counties or states) use Tax Code to simplify the reservation process.
Also see Taxes for tax category information. - Tax Exempt-Long Term
- On Long Term reservations (30 days or more), the tax code is set to TZ instead of TA. This is for customers who need different tax exempt codes for different units, based on location of the property (within different counties). If a code is selected in this field, it is the code used instead of TZ.
Also see Taxes for tax category information. - Property Code
- Property Codes are assigned to room types and maintained in Table C2.
- Owner Pay Code
- For each owned room, the pay code determines the revenue percentage due to the reservation. By entering the pay code on the room master, it is transferred to each reservation made in the room. This code can be changed on a reservation-by-reservation basis. This field can also be changed from the Owner tab on using the Change Reservation screen. If the Owner Billing box is not checked, this field is disabled.
- Owner Agent Split Code
- For each owned room, the Travel Agent fee split defines how the travel agent commission is to be paid. The options available are:
- P - Owner pays the entire travel agent commission.
- S - Owner and management company share the travel agent commission based upon the revenue percentage paid to the owner.
- E - Owner and management company each pay 50% of the travel agent commission regardless of the percentage of revenue paid to the owner.
- M - The management company pays the entire travel agent commission.
- OA - The travel agent commission can be split with the owner based on any room charge percent from an "O" owner pay code. The owner pay codes in the C7 - Rate Codes Table are included in the drop down. If an owner pay code is selected for the travel agent split, the owner is responsible for that percent of the travel agent commission. The commission expense will be charged to the owner when Process Revenue is completed.
- If the Owner Billing box is not checked, this field is disabled.
- Clean Status
- Displays the current clean status of the room master selected. If the room is occupied, the reservation status and number are also displayed.
- Clean Service
- When Housekeeping | Configuration Clean Service by Room Type/Room Number is checked and clean services are assigned to rooms by room type, this field can be changed for the selected Room master. When clean services are assigned to rooms by room number, that assigned clean service is displayed and can be changed for the selected Room master. This is the same service type as displayed on the Reservation tab, but applied to room types/numbers instead.
- Housekeeping Zone
- The S2 - Housekeeping Forecast & Scheduling module has the ability to assign room cleans to zones. Enter the appropriate zone for each room master. When Housekeeping boards are configured, zones (if defined appropriately) distribute the rooms to the boards. Review layout of rooms within property. Define zones by grouping room cleans that are close to each other. If set up properly, the Housekeeper's actual steps are reduced allowing for a more efficient Housekeeping Department.
- Housekeeping Sequence# and Change
- This unique read-only field holds a value between 0 and 8,000 and offers an alternate way to create the Housekeeping boards. To change this number, click the Change button to the right of the Hskpg Seq# field on the Room Detail tab. Make the changes necessary and click Save to file or Close to abandon changes and close the form. For more information, see Hskpg Configuration.
- Week Starts On (Timeshare Systems Only)
- Select from the list to indicate which day of the week the room owner should be expected to check-in. In most cases, this field is the same for all rooms and can be defaulted by setting Switch 422-15. For customers managing multiple properties or phases where ownership is sold with different owner check-in dates, then each room can specify different dates (i.e., one property checks in on Fridays and another checks in on Saturdays).
- URL
- The URL field is used to access any web page on the intranet or the internet that describes a particular room. For example, this page can exist on a marketing web site or from the IRM. The field is 126 characters in length.
Enter a web page address (i.e., www.resortdata.com/rooms/101.htm).
Once saved, click the field link "URL" to view the web page as
directed.
This field displays in many places throughout the system but can only be changed from the Room Detail tab on the Room Master.
This information is also available on the Room tab when the Room Web Info button is clicked on the Room tab. Properties can create separate documents to display room information used for local access from a work station versus one used on the property's marketing site, or create one document to be used in both places and avoid duplicate entry during the installation or updating process. - Owner Billing
- Check to enable all owner revenue features for the room, including processing owner revenue.
- Whole Ownership
- Distinguish whole ownership condominiums (those rooms owned by a single individual - non-timeshare) and those that are timeshare condominiums. This field is only used if the resort has both types of condominiums (both the R3 Condominium Owner Accounting and R6 Timeshare & Interval Ownership installed). Check this box for any wholly-owned condominiums. All other units default to unchecked. Please note when adding an owner, the "Fixed week" timeshare fields are not accessible if the "unit owned" is a whole owned condominium. Also, if the unit is owned by a fixed week timeshare owner, the "Whole Ownership" field CANNOT be checked. All fixed week timeshare owners must be removed prior to this field being checked.
- Owner Name and Number
- Both the Owner Number and the Owner Name are displayed. When an owner is designated on the room, click the button to access the Change Owner Master form. When no owner is designated, the button is disabled.
- Hide on IRM
- When checked, the system does not allow the room to be viewed or booked over the IRM.
- Activate Credit Card Fee
- When checked and C1FLAT exists in the C1 table, the data portion of that record holds the percentage of gross revenue to charge the owner. This percentage is charged for each reservation that the owner is receiving income from, regardless of whether there is a credit card payment or not. Otherwise, the system charges the percentage stored on the credit card master and only charge the owner when there is a credit card on the reservation. When not checked, no credit card fee is processed, regardless of using C1Flat or the percentage on the credit card master.
- Lock-offs
- Lock-offs are sub-rooms that can be rented independently. For example, suppose Room# 103 is a three-bedroom suite that can also be rented as three one-bedroom units (103A, 103B, and 103C) or as a two-bedroom unit and a one-bedroom unit (Room 103A and 103D. Room 103D would be equal to 103B + 103C).
- Lock-off Type - M/L/S (Master/Mid-Level/Sub-Level)
- Lock-Off Rooms consist of a Master, Mid-level, and Sub-Level units. When adding or changing room masters with lock-offs, Table LZ must be completed first (using RDP090). Table LZ contains the lock-off definitions for each room type. It is critical to correctly complete this table, and RDP Support should be contacted to insure the table and room masters are properly configured. Failure to configure these correctly could result in incorrect availability.
The Lock-Off Type field is automatically selected based on Table LZ. Changing the Room Type drop-down of a room master designated as a lock-off to a "non-lock-off" type removes the Lock-Off Type and any room number references for that room master. When adding lock-off room numbers to a room master, the lock-off rooms must also have a master defined for them for the correct room type. A room master can be saved without the lock-off room fields completed in order to add new rooms to a system, but it is imperative that upon adding each room master needed with the correct room types, that each master then be changed and the lock-off room numbers on those masters be added. - In the example below, when Room Number 103 (the master) is rented, the system also makes Rooms 103A, 103B, 103C, 103D, 103ABC, and 103CD unavailable. The room's lock-off structure must be entered into the Room Master. Once selected, the Find Room button can be used to locate a room number for #1, #2, #3, and #4 if needed.
To create the example unit, seven different unit numbers and seven different unit types are used as follows:Room # Room Type Lock-Off Type Room Value Lock-Off 1 Lock-Off 2 Lock-Off 3 Lock-Off 4 103 QUAD M 0 ABC CD 103ABC TRIPLE L 0 ABCD A B C 103CD DOUBLE L 0 ABCD C D 103A S1 S 1 ABCD ABC 103B S2 S 1 ABCD ABC 103C S3 S 1 ABCD ABC CD 103D S4 S 1 ABCD CD - Note: Notice Room 103ABC, the mid-level triple, has a lock-off chain of ABCD and A, B, C. When making a reservation for Room ABC, the system makes Room 103CD unavailable as well; because Room 103C is common to both Room 103ABC (the TRIPLE) and Room 103CD (the DOUBLE).
- #1, #2, #3, and #4
- Displays the room numbers within the lock-off. Click into any one of these fields to activate the Find Room button and browse to designate room numbers within the lock-off or type directly into the fields.
- Find Room Button
- This button is activated when clicking into one of the Lock-Off Type #1, 2, 3, or 4 fields. Click to browse and identify the room numbers within a lock-off.
- Tape Chart Sequence Number
- The Tape Chart can be sorted by room type, room number or a custom sequence. Enter a number to define where each room falls within the Tape Chart display when set to Custom. Each room master must have a defined sequence number to be included in the Tape Chart when set to display in the customized order. Any room masters without a custom setting are not displayed in the Tape Chart when the sort is set to Custom.
- Max for Ppl 1 - 4
- The system checks for the maximum people in the room first, then the
total min/max and finally the rate set will be checked.
RDPWin checks for too many people in three different ways:
- Table S1 contains a min/max for room types and/or room numbers. This min/max is a total for all people categories that are designated as part of the min/max totals. See the configuration options in Reservations | Configuration | People tab. This is a good, generic way to make sure the total in a room or room type is correct.
- The second check depends on how rate sets are entered. When the rate set for People Category 2 (Ppl2) is defined with prices for a maximum of one and the reservation has two in Ppl2, then the system displays a message that there are too many for Ppl2. This works well when packages are dependent upon the different people categories for pricing and availability.
- When Max is set for Ppl 1 - 4,
the system checks for the maximum people in the room first, then the
total min/max, and finally the rate set is checked.
To implement this:- Go to Reservations | Configuration | People Tab and check "Use Max People from Room" for the appropriate people categories.
- Go to each room master and enter the appropriate maximum for the categories enabled by Step 1.
When this feature is turned on for any of the people categories, a "Max" column is added to the Available Rooms grid using the short description for that people category. - People for Room: Min/Max
- People for Room Min/Max both fetches and updates the room record in Table S1. Set Min to indicate the minimum number of people needed in order to reserve a room number. Set Max to indicate the maximum number of people allowed in a particular room number. In a three-bedroom room number, for example, set Min to "5" and Max to "8" to allow only parties of five or more but less than eight to rent that unit.
Enter the room number as a sub-record in the S? table. This works as long as the room numbers are no more than 6 characters. Enter the room number maximum people in either the IRM or on the room master in RDPWin. These are the same numbers. If the customer has the IRM and the max is the same for the IRM and RDPWin, then this would be the place to put the max people. If both of these are set, #2 wins. - Min Nights
- Set the Min Nights on the Room Detail tab to disallow long term reservations from being put into "short-term" rental rooms. When Switch 414-63 "Use Min Nights from room" is checked on the Res | Configuration | New Res tab, the number of nights on a new reservation is compared to the room master's Min Nights setting when displaying the Available Rooms screen. This feature has been added for customers that wish to designate rooms as "long-term" rentals vs. "short-term" rentals.
- People for Type: Min/Max
- People for Type Min/Max displays the minimum and maximum number of guests in a room type configured in the S1 table in read-only format.
- Room Value
- Within lock-offs, master rooms have a value of 0 and subs have a value of 1. For example, assume Room 300 is a three-bedroom lock-off and is comprised of three one-bedroom rooms (Rooms 103, 105, and 107). Room 300 would have a Room Value of "0", while each of Rooms 103, 105, and 107 would have a Room Value of "1". If a room is not part of a lock-off, the Room Value equals "1". The current count of room masters with a Room Value of <0. Master, Mid-level, and N/R rooms have a Room Value of zero (0), so these are not counted in Total Room Value. Total Room Value affects Occupancy counts and percentages.
Occupancy: The occupied count is determined by the room value on the room master. Generally each room in the system is assigned a value of 1 but the master and mid-level lock-off rooms have a value of zero and the value is determined by the sum of the room values of the sub rooms that comprise the master/mid-level room. This count is included as
a record in the Statfile.dat table in RDP when statistics are created
during the Day End/Night Audit process. - Departure Date: If the departure date on the reservation is on or prior to the date of building statistics, then the occupied count is zero.
- Multiple Reservations: M-type (multiple) reservations always have an occupied count of zero.
- Non-rental and OLD: Rooms with a type of N/R and OLD always have an occupied count of zero.
- Sharewith Reservations: The system determines if there is/are one or more statistic records for the same room number and date for sharewith reservations. If so, then the occupied count is zero (as the original reservation increases the occupancy count by one, the count is zero for all sharewiths added to the original res). Otherwise, the occupied count is just one for sharewith reservations in the sharewith chain.
- Owner and Guest of Owner Reservations: Normally Owner, (O-Type) and Guest of Owner (G-Type) are counted as zero unless switch 420-13 (Count Owner and Guest of Owner reservations in Statistics) is YES.
- Maintenance Reservations: X-type (maintenance) reservations always have an occupied count of zero.
- Statistics Reports: All reports in the Stats folder get the occupied count from the field on the stat record or from the Totals file.
- Total Value
- Room Value is added on all rooms to get the Total Value. Masters of a lock-off are not included in this number.
- Purchased
- Displays the total number of rooms purchased from RDP. The sales price of a new system depends on the number of rooms purchased.
- Current (Number of Rooms)
- The current physical count of room masters, including Master (M), Mid-Level (L), and N/R rooms. Current Number of Rooms count towards Rooms Purchased, and cannot be higher than Rooms Purchased.
Contact Detail Tab
When viewing the list with a room selected, the rooms contact and origination information are displayed on the Contact Detail tab. The actual tab does not display when Add or Change Room screens are accessed; however, the information does display on those screens above the other tabs.
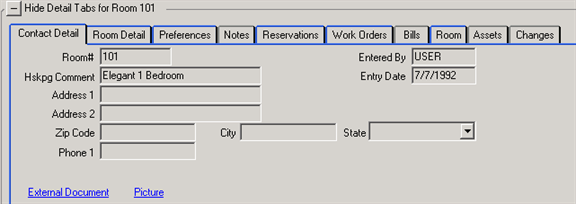 |
- Room#
- The number assigned to the room when added to the system is displayed. Room types, room numbers, owner numbers, etc., created with a "/" character cannot be displayed on the room type description page in the IRM or IRMNET. Windows does not allow certain characters to be created in a file name (i.e. / \ : * ? " < > ).
- Housekeeping Comment
- Each room within a property can have a specific comment address any unique features of that room. For example, 1BR Room 101's Housekeeping Comment could be, "Extra large windows." The room clean time for that unit would be longer than a basic 1BR's clean time due to the extended window cleaning time required.
- Address, City, State, Zip, Country
- The location information assigned to the room when added to the system is displayed. Properties with multiple locations can use this information to clarify actual location such as Phase I and II, individual rental home street addresses, or property addresses in different cities, counties, states, etc.
Enter the Zip Code using any 10 alphanumeric characters prior to the City and State fields for the system to automatically fill in those fields for the user. Letters are allowed for Canadian and European addresses. - Phone 1
- The direct telephone number for the room is displayed here.
- External Documents -T2 Module Required
- This link allows external files to be attached to the room master. Use this feature to attach a detailed description of the room master. The following file types are supported: Txt, Doc, Docx, Htm, Html, Xls, Jpg, Bmp, Gif, and more. The documents can be viewed as long as the workstation has the application installed that displays that file extension.
- To attach a file, save it to the \RDP\RDP<xx>\MasterDocs\Room folder, using the room number as the file name. For example, if the file created was for room 101 in the RDP01 directory, the file and location would be \RDP\RDP01\MasterDocs\Room\101A.doc (the file extension will change based on the program it was created in).
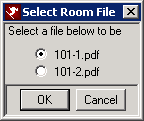
- If more than documment is needed for the master, enter the master number followed by 1, 2, 3, etc. For example, for room 101, enter the file name as 101-1, 101-2, 101-3, and a prompt appears allowing the different files to be selected.
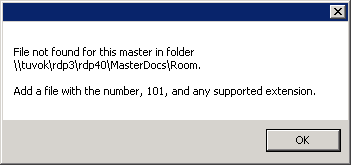
- If the file does not exist, the following error message will appear with the file path location when the link is clicked. Note: The file location will display the UNC path, however, the file can be saved to the RDP drive (usually R:\ or F:\).
- Pictures - T2 Module Required
- This link allows external pictures to be attached to the room master. The following file types are supported: Txt, Doc, Docx, Htm, Html, Xls, Jpg, Bmp, Gif, and more. The pictures can be viewed as long as the workstation has the application installed that displays that file extension.
- To attach a picture, save it to the \RDP\RDP<xx>\MasterPics\Room folder, using the room number as the file name. For example, if the file created was for room 101 in the RDP01 directory, the file and location would be \RDP\RDP01\MasterPics\Room\101A.jpg.
- If more than picture is needed for the master, enter the master number followed by 1, 2, 3, etc. For example, for room 101, enter the file name as 101-1, 101-2, 101-3, and a prompt appears allowing the different pictures to be selected.
- If the file does not exist, the following error message will display showing the file path location when the link is clicked. Note: The file location will display the UNC path, however, the file can be saved to the RDP drive (usually R:\ or F:\).
- Note: The External Documents and Pictures feature requires the T2 Module. For more information about this module, contact RDP Sales.
- Entered By
- The Logon of the user who added the room master into the system is displayed.
- Entry Date
- The date when the room master was first added into the system is displayed.
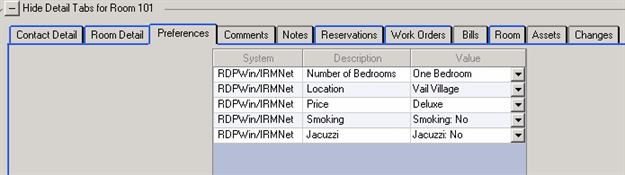
Preferences Tab
Guest preference information is tracked by the room master. As rooms are added into inventory, distinctions are noted such as 1BR, 2BR, Jacuzzi, ocean-view, etc. As guest information is entered, enter requests as appropriate. For example, John Smith requests a non-smoking room with a Jacuzzi tub. When assigning a room number to a guest reservation, inventory is searched based on the specific requests. All availability with the most matches or only rooms that match all requests can be configured to display in Reservations Configuration on the New Res tab. Track any special requests made by the guest such as number of bedrooms. For example, if a reservation is made for four guests and the guest prefers a 2BR unit instead of a 1BR with a sofa bed, set the preferences when making a new reservation.
 |
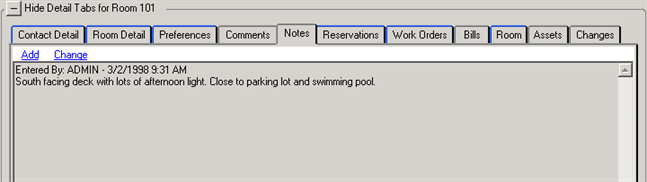
Notes Tab
Any free text entries pertaining to the selected master are displayed in this section.
 |
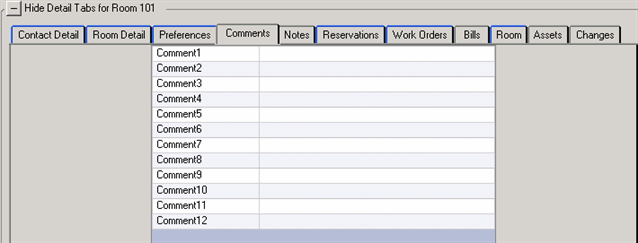
Comments Tab
Twelve comment fields are available to track additional information that does not have a standard field on the room master. Each comment field has a different length between 5 and 40 characters. To view the field lengths or to standardize the comment labels of these fields, go to System menu --> Comment Labels.
To configure the fields for standardize data in the form of a drop down, date, checkbox, etc. configure Tables IN - IX from the Table Maintenance in the System menu.
 |
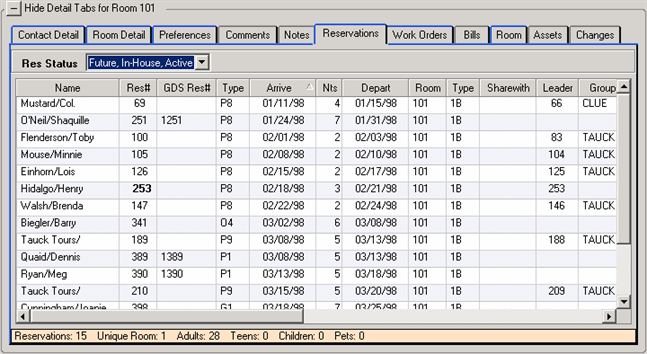
Reservations Tab
Display a grid by "Future, In-House, and Active" reservations or by "Non-Active" reservations using the radio buttons. The tab supplies a complete reservation history for the selected room. Double-click any reservation in the grid to open the "Inquire on Reservation" screen (same as Change Reservation but in read-only format).
 |
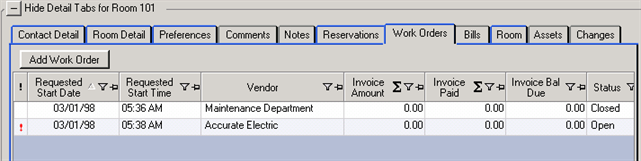
Work Orders Tab
Only available if the RZ - Work Orders and Asset Management module has been installed, view or add work orders to the room master. For more information, see Work Orders.
 |
Room Tab
View details on the room type and room number. The Room Info and Room Type Info facts are also available from the right-click menu when viewing reservations, owner masters, and room masters.
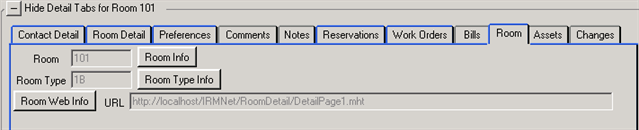 |
- Room Info
- Click Room Info to view the RTF files for the specific room number selected in the grid.
- Room Type Info
- Click Room Type Info for details on the .rtf files available.
- Room Web Info
- See Room Web Info for details.
- URL
- See URL for details. Click the Room Web Info button to view the document listed in this field. Changes to the URL can only be made on the Room Detail page of the Room Master.
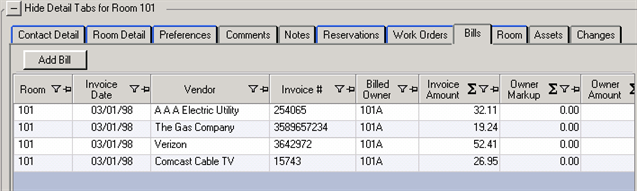
Bills Tab
See Bills for details.
 |
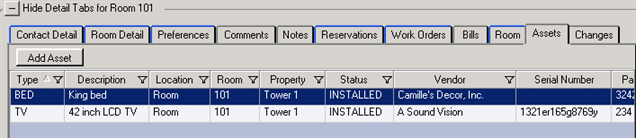
Assets Tab
This tab lists all assets for the selected room and includes an
Add Asset button for adding assets to the selected room. The Assets tab is only available if the Work Order & Asset Management module is installed.
 |
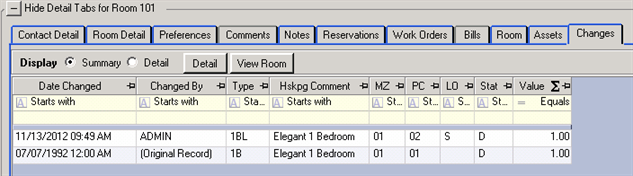
Changes
The Changes tab displays all changes made on the room master. To view the changes, the Change Tracking (S7) module must be installed. See Change Tracking for more information.
 |
Click these links for Frequently Asked Questions or Troubleshooting assistance.
12/3/2012
© 1983-2012 Resort Data Processing, Inc. All rights reserved.