- Click here for Reservation tutorials.
| Options Available Viewing Arrivals, In-House, and Departure Grids | ||
|---|---|---|
|
Deposit/Payment |
||
Overview
Deposit/Payment is available from the Options list on the left of the screen or from the Reservations | Options sub-menu. The Reservation Header displays basic information for the selected reservation. All folios are available in the form of a tab. The folio balances are shown both after the tab label and in the totals and rate area. The selected tab, with or without an amount due, is displayed with the label in blue as shown in the first example below. Any other folio tabs not selected display with the label in red.
Deposits 1 and 2
RDPWin supports two separate deposits. It has the ability to
automatically calculate the deposit dates and amounts based on rules
defined by the property. Configure the rules
and the deposit
dates and amounts are automatically be calculated when a new reservation
is made. Any deposits due when a reservation is accessed displays with the
due date(s) and a link to the Change Deposits
screen.
When the first deposit payment is
made, RDPWin checks to see if the payment is equal to the amount expected
for the requested deposit. If not, the difference of the two amounts
is added to the second requested deposit amount, if one has been requested.
The requested deposit becomes the "Paid Deposit" field. The
example below shows a reservation with a paid deposit of $1,160 and a pending
deposit due 03/03/98. The Amount field on the Folio I tab is
automatically updated based on the 2nd Deposit amount.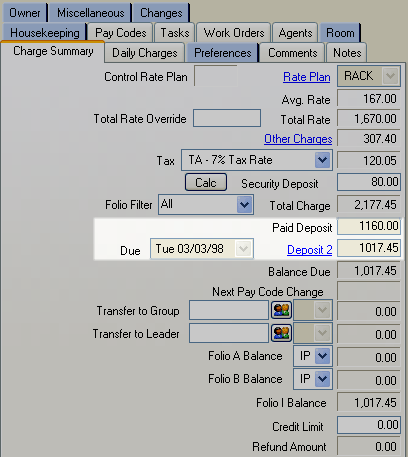
Any additional deposits are added to the Paid Deposit and deducted from the 2nd Deposit amount until it reaches zero, and then clears the due date. Upon check-in, if the Deposit 2 has not been paid in full, it is reset to zero, the due date is cleared, and the Paid Deposit field then becomes the Payment field. The deposit fields are available on future reservations only. Once checked in, they are no longer available. See Change Deposits 1 and 2 for additional information.
For example, if rules allow for two deposits. When a new reservation is made, the Payment screen (as shown below) displays two fields: Request Deposit and Request Deposit 2. If due, each also displays a date based on the configured rules. The Request Deposit field is relabeled Paid Deposit when the payment is made. The Request Deposit does not change if the full first deposit was not collected. The remaining amount of Deposit 1 is added to Request Deposit 2 and displayed with the due date when a partial deposit taken. The Request Deposit 2 field remains labeled until the full deposit amount for both 1 and 2 are received. Once completely paid or once checked in, the Request Deposit field is completely removed from view.
- Arrival Date: 8/1/2012
- Departure Date 8/8/2012
- Room Number A106
- Room Charge $700.00
- Cleaning Fee $50.00
- Service Fee $25.00
- Travel Insurance $40.00
- Security Deposit $200.00
- Tax $80.00
- Reservation Total $1095.00
- First Deposit Due 3/1/2012 $500.00
- Final Payment Due 7/1/2012 $695.00
Folio Payments
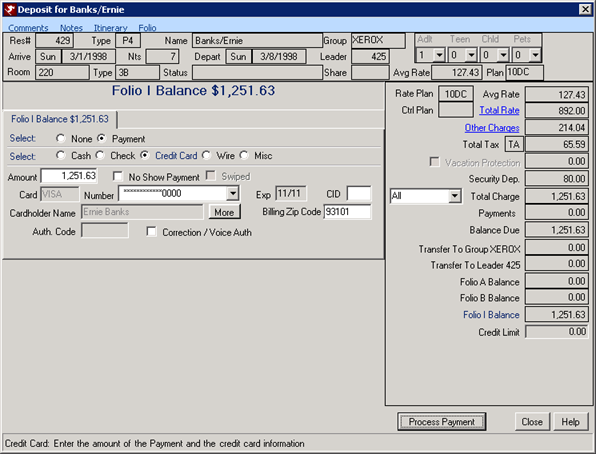
Each folio must receive payments separately. If folios A, B, and I are in use, each folio will require a payment if it has a balance due. Choose the form of payment, enter any additional information needed, and click the Process Payment button. For information on reservations checking out with a balance due, click Check-Out. The Deposit/Payment Amount must be greater than 0.00. Folios with a credit balance (a negative number) can be refunded using Refund from Options. See How To Take a Payment for more information.
Authorize Credit Card
Credit cards can be authorized while the reservation is checked in.
If credit card authorizations are needed prior to check-in, see Switch C1AUTH<5 for more information. The card is authorized when the Authorize Card button is clicked. The
authorization number is automatically populated by Protobase. If swiping is
not available, enter the number and expiration date and click
the Authorize Card button (making sure that Voice/Auth is NOT checked). If
Protobase
interface is NOT installed, Authorization must be completed manually, outside of RDP.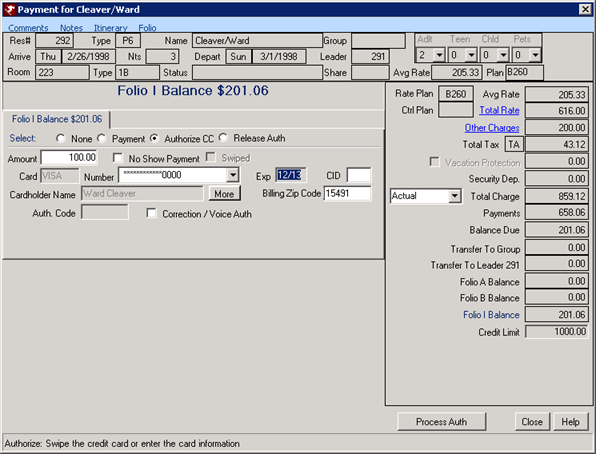
- Future Reservations
- When "Allow Credit Card Authorizations Prior to Check-in (Switch
C1AUTH<5)"
is checked on System |
Protobase Configuration,
authorizations can be taken on future reservations. The system can
automatically designate an amount to be added to the
pre-authorization amount (default amount equals the balance due when
authorizing a credit card) using Reservations | Configuration |
Check-In tab | Add to the Pre-Authorized Amount. For example, if
"Add to the pre-authorized amount" is equal to $50 and a reservation has a balance due of $100,
select Authorize Credit Card and the amount field defaults to $150. If set to a percentage such as 10% and the reservation has a balance due of $100,
the amount field defaults to $110 when Authorize Credit Card is
selected.
When Authorize Credit Card is selected, the Amount, Number, Expiration, CID, Zip Code, and Voice/Auth (No Protobase) fields are enabled. If there is a balance due, that amount plus any additional configured amount, is displayed in the Amount field. If a credit card number is already on file, that card's information is displayed in the credit card number and expiration date. The CID, and the Auth# if manually performing the authorization, must be entered by hand. If the property is using Protobase for credit card transactions, it completes the Auth# field automatically. Any of these fields can be manually overwritten. Swipe the credit card each time to receive the best credit card processing rate from the credit card processor. - Checked In/Out Reservations
- When Authorize Credit Card is selected, the Amount, Number, Expiration, CID, Zip Code, and Voice/Auth (No Protobase) fields are enabled. If there is a balance due, that amount plus any additional configured amount, is displayed in the Amount field. If a credit card number is already on file, that card's information is displayed in the credit card number and expiration date. The CID, and the Auth# if manually performing the authorization, must be entered by hand. If the property is using Protobase for credit card transactions, it completes the Auth# field automatically. Any of these fields can be manually overwritten.
Release Authorizations
The Payment screen displays any existing authorization
information below the folio/payment information and a Release Auth
(Authorization) option in the payment type area. Releasing the
Authorization using RDPWin is only available to customers using
Protobase to
process credit cards. Credit card charges and authorizations can be
processed manually, but the authorization release must be processed
through Protobase from RDPWin. Note: only certain credit card types allow the authorizations to be released.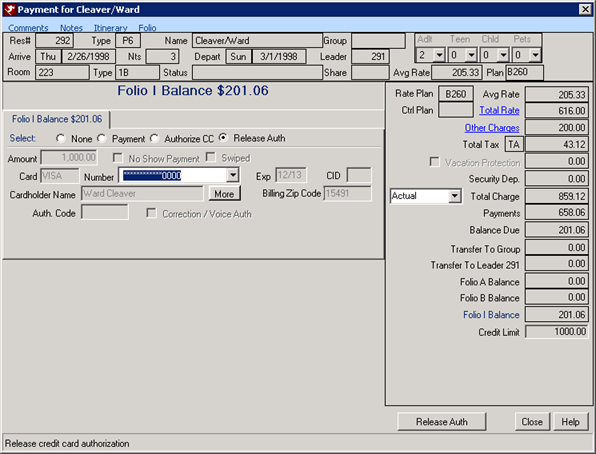
The Release Auth. option is shown in Payments and Check-out screen only when
the authorization amount on the reservation is greater than zero (0).
When taking a payment and an authorization exists, RDPWin only prompts
when a different credit card or payment method is entered. Only one
credit card is stored per reservation. When a cash or check payment is
taken NOT during the check-out or cancellation process, the system does
not prompt to release the authorization. The prompt only displays at
checkout or cancellation for cash and check payments. Use the
Deposit/Payment option to release authorizations after check-out if
necessary.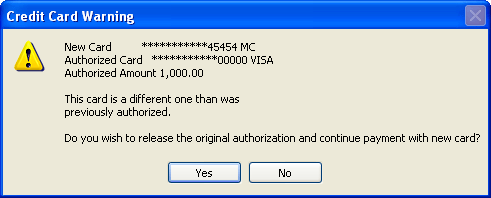
- Rules for Releasing Authorizations
- The following examples assume an authorization exists on a credit
card:
- When using Deposit/Payment to take a payment using a different credit card than originally authorized, the system prompts to release the existing authorization. When No is selected, a payment cannot be taken. Select Yes to release the authorization so the new card can be charged.
- When using Deposit/Payment to take a payment using Cash, Check, Wire, or Misc, the system does not prompt to release authorization and the payment goes through.
- When checking out a reservation and taking a payment using a different credit card than originally authorized, the system prompts to release authorization. When No is selected, a payment cannot be taken. Select Yes to release the authorization so the new payment can be taken.
- When checking out a reservation taking a payment using Cash, Check, Wire, or Misc, the system prompts to release authorization. Select No to skip releasing the authorization and process the payment. Select Yes to release the authorization and process the payment.
Close
To abandon any entries made in the Deposit/Payment screen, click the Close button. The user is returned to the previous screen.
Deposit/Payment Methods
There are several methods of accepting deposits or payments. More than one method of payment can be collected. For example, a guest may wish to pay a total balance due of $500 by paying $100 in cash and the remaining $400 on a credit card.
Cash
Select the Cash radio button and enter the Amount. The Amount text box must be changed to a number greater than zero. Click the Process Payment button. A "Payment Processed Successfully" notice is displayed when the transaction is complete. Once the OK button is selected, the user is returned to the previously displayed screen.
Display Cash Back
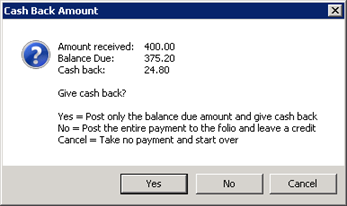
Set Switch 421-10 to Yes to display the amount due back to the guest when a cash payment is collected on a reservation, if amount is more than the balance due. Enter the cash payment on the reservation from the Payment screen.
A prompt appears during the payment process with the system prompting to display cash back, post the extra amount as a credit, or cancel the transaction. If Yes is selected from the prompt, then the system will post only the balance due and display the cash back amount. For example, if the balance is $90 and the payment amount is $100, the system will post the payment of $90 and display $10 cash back due to the guest. If No is selected from the prompt, the system will post the entire payment amount and leave a credit on the folio. If the Cancel option is selected from the prompt, no payment is taken and the user returns to the previous screen.
If the Display Cash Back and the Allow Payment by Foreign Currency (421-14) switches are set, the cash amount will display in the both the default and foreign currencies.
Check
Select the Check radio button enter the Amount and the Check# into the text box. The Amount and Check# text boxes must be changed to a number greater than zero. Any alphanumeric character can be entered into Check#. Click the Process Payment button. A "Payment Processed Successfully" notice is displayed when the transaction is complete. Once the OK button is selected, the user is returned to the previously displayed screen.
Credit Card
Select the Credit Card radio button to display the Amount, Number, Expiration, Card, CID, Zip Code, Voice/Auth (No Protobase) and Authorization# fields. If the credit card information was entered on the reservation prior to the payment, it will appear on the Payment screen. If The Total Charge field has an amount greater than zero, the Amount field is automatically populated with that amount. If the Total Charge field is zero, enter the Amount to be charged to the card. Enter the credit card Number or place the cursor in the Credit Card field and swipe the card. Enter the Expiration Date (in MMYY format). The Card (Type) is completed by RDPWin automatically, based on the credit card number Enter the CID (card Identification) number from the front or back of the card, depending on the card type. For examples of card type and location and length of CID, see below.

- No-Show Payment
- The "No-Show Payment" checkbox is available when taking a credit card payment ONLY IF Protobase is installed. When checked, a flag is sent to Protobase to indicate that the payment is for a No-Show charge. This should help eliminate lost battles with credit card companies when customers dispute the charge for not showing up and not canceling.
- Voice/Auth
- If the Protobase Credit Card module is NOT installed, check the
Voice/Auth checkbox. Use this option if the credit card did not process and a voice authorization from the credit was obtained. If Protobase processing is attempted when not installed, the system displays the Credit Card Retry Options form. Options available are "Retry current credit card", "Enter new credit card", and "Continue with no payment." Select "Enter new credit card", click Continue, check the
Voice/Auth checkbox and process the card Voice/Auth.
If the Protobase Credit Card module is installed, do not check the Voice/Auth processing box. Click the Process Payment button to open the "Process Credit Card" form. A message "Click the 'Process' Button to Process Credit Card with Protobase Bridge" is displayed and waits for the click. Once clicked, the system processes the amount or displays "Retry Options". If there is an error processing the charge, the system displays an error, "No Protobase ********." Otherwise, a "Payment Processed Successfully" notice is displayed when the transaction is complete. The Authorization Number is completed automatically if using Protobase. Once the OK button is selected, the user is returned to the reservation screen (Arrivals, In-House, or Departures). - Zip Code
- When Turn on Address Verification on All Non-swiped Credit Cards is checked on System | Configuration | Protobase, the Zip Code field is required when taking a deposit/payment a credit card. When a Zip Code exists on the guest record, the code is displayed. Click the "Use Zip Code: #####" link to update the Zip Code field with the code from the guest record or enter a new one.
- CID# Required
- When Require CID# on All Non-swiped Credit Cards is checked on System | Configuration | Protobase, the CID field is required when taking a deposit/payment using a non-swiped credit card. Requiring the CID # is a way to get a lower credit processing rate if the credit card is not present to be swiped.
Miscellaneous
This is a user defined field for accepting other types of payment such as gift certificates. Select the Misc radio button and enter the Amount and Description into the text boxes. Click the
"Process Payment" button. A "Payment Processed Successfully" notice is displayed when the transaction is complete. Once the OK button is selected, the user is returned to the previous screen.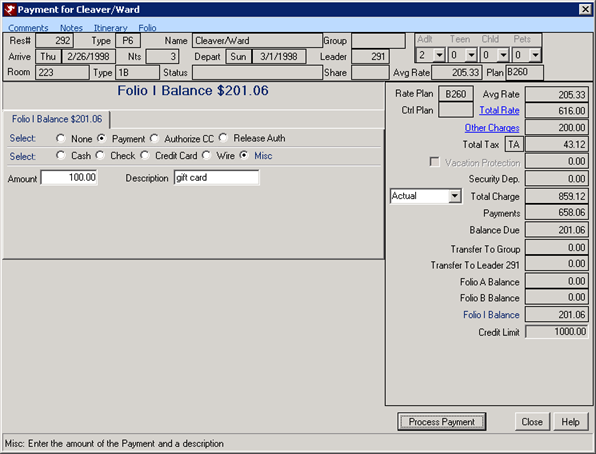
Prededuct to ####...
When a reservation has an agent attached and that agent has Bill the Agent for Guest Payment Portion
checkbox checked on the agent master and the Prededuct checkbox checked
on the reservation, then the commission amount collected and held by the agent.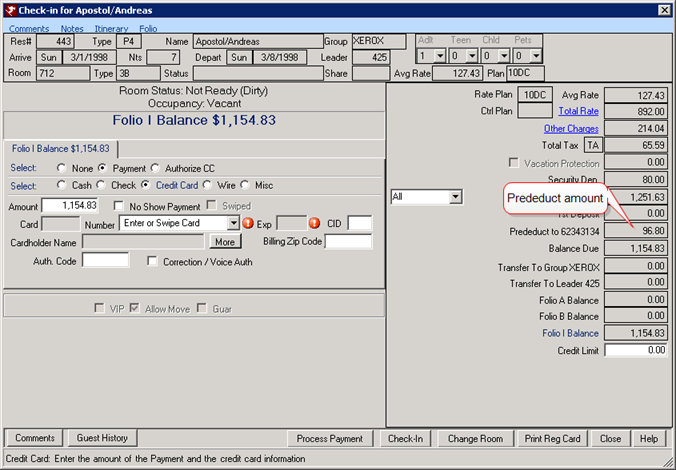
When the new reservation is
saved, a reminder that no deposit should be taken until after the
reservation checks in displays. This same message displays if a user
tries to take a deposit prior to check-in and does not allow a deposit to be
taken.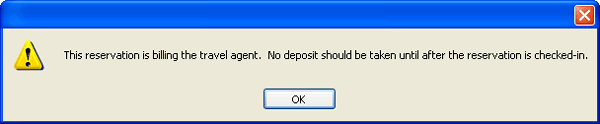
Points (Only available when Customer Relationship Management (RX) module is installed.)
When the Customer Relationship Management (RX) module is installed,
paying with points is available when
configured. Select Points
as a payment method for a reservation (uses the (DY)
transaction code for points payments).
When points are selected as the method of payment, the system checks the
guests points balance first. If the balance is greater than zero
(0), the dollar value of the points (based on the configured rules) is
displayed. Enter up to that amount as a points payment which shows
up on the folio as a DY transaction. The points are subtracted
from the guests CRM account immediately after the payment (which shows up as a ~DY under CRM).
The RDPWin Update adds the DY transactions, but the customer must assign
the G/L account manually.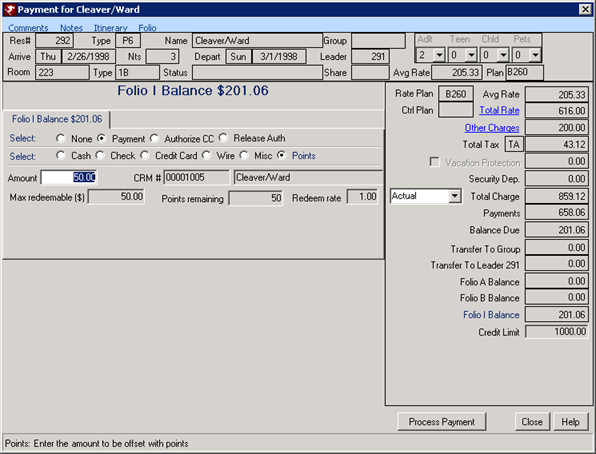
In this example, the guest does not have enough points to pay the entire
amount. A partial payment can be taken using the full amount in the
Points Remaining field and and another form of payment can be processed for
any remaining
amount due.
- Amount
- This field displays either the folio balance due or the maximum points available to the selected guest, whichever is smaller. When Points is the selected method of payment, the Amount field must be greater than "1" to allow processing.
- CRM# and Name
- The CRM # and primary contact name from the CRM record displays to allow for review and confirmation that the correct CRM# is being accessed for this payment.
- Max Redeemable
- The total number of Points Remaining multiplied by the Points Exchange Rate is displayed as currency available for redemption in read-only format. For example, if the Exchange Rate = $2 and Points Remaining = 66, then the maximum redeemable dollar amount is 132 points. If the total in this field is less than the amount due, process the payment as planned, and select Deposit from the Continue With screen to process an additional payment using a different method.
- Points Remaining
- The total number of points according to the CRM record for the selected guest is displayed in read-only format.
- Exchange Rate
- This field displays the number configured on the CRM | Configuration | Rules Tab | Exchange Rate in read-only format. If the Exchange Rate = $2 and Points Remaining = 66, then 132 points are available for redemption. Changes must be made to configuration is a different rate is desired.
Wire
Select the Wire radio button and enter the Amount into the text box. Click
the Process Payment button. A "Payment Processed Successfully" notice
is displayed when the transaction is complete. Once the OK button is
selected, the user is returned to the previously displayed screen.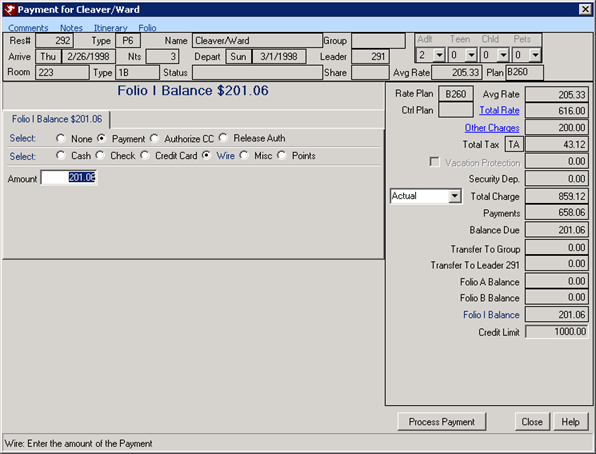
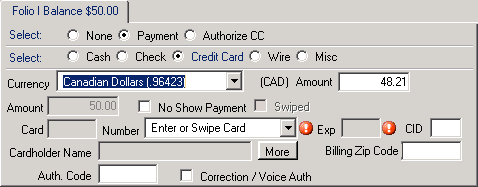
Payment in Foreign Currency
Payments in foreign currency can be collected on reservations. Set Switch 421-14 to Yes. Table US must be configured with the exchange rates between the currency the system currently uses (i.e. US Dollars, Canadian Dollars, Barbados Dollar, etc.) and the additional currencies the property accepts. This table must be updated regularly to have accurate exchange rates. The default currency should be added with 0 as the exchange rate. This is how RDP recognizes the default currency. See How To Take Payments in Foreign Currency for more information.
A drop down is available in the Payment screen that includes all currencies configured in Table US. When a currency is selected, the system multiples the payment amount by the exchange rate. The original amount before the conversion appears below for a reference, but it is inactive. The payment will display throughout the system, including on the Folio, as the original amount before the conversion in the system's default currency. Note: Only the default currency is recorded in the system.
Click these links for Frequently Asked Questions or Troubleshooting assistance.
02/05/2013
© 1983-2013 Resort Data Processing, Inc. All rights reserved.