-
- Click here for Printing Statement Tutorial
-
Click here for Master Tutorials
Click here for Groups Navigation
Balance Forward Statements
Open Item Statements
| Group Functions | |
|---|---|
| Add | Payment
Statements |
Overview
Review, print, and e-mail statements for a single or all groups. RDP recommends that the statements be printed and reviewed in detail before finalizing. Printing and reviewing statements can be done throughout the month. Once finalized, the system closes the statement.
Only two types of group masters should receive statements: (1) a company that sends employees to the property over a period of time, and (2) an entity or individual with a "house account" such as a catering/conference room use. Open Item statements display any outstanding reservations until payment is received and applied against the reservation. Balance Forward statements lump all past activity into one balance and carry it forward to the next billing period. Balance Forward statements should be used for house accounts, since there will never be any room reservations attached.
If a group statement should reflect all "open" reservations (those with a balance), select Open Item. If the statement should reflect the amount due at the end of the last billing period plus all new activity, select Balance Forward.
Balance Forward Statements
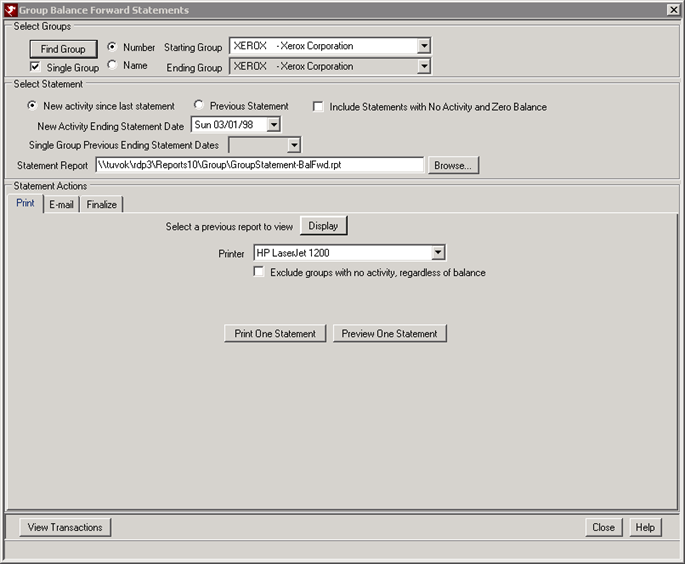
Once revenue is processed and all direct charges are posted, group statements can be printed. The Balance Forward Statement provides the balance due from the last billing period plus any new reservation activity and direct charges not marked as no-print, as well as payments from and refunds to the group. Transactions marked as non-printing (with an "*") do not print on the balance forward statement. The sum of all non-printing transactions must be zero or statements do not print at all.
Select Groups
- Find Group
- Click "Find Group" button to select a single Group from the "Group List". The selected Group name is automatically sent to the "Starting Group" field, and the "Ending Group" and Property fields are disabled.
- Single Group
- Check this box to signify the processing of only one Group statement. Once checked, the Ending Group field is disabled. The default setting is unchecked or "All Groups".
- Number or Name
- Select name to populate the Starting and Ending Group lists sorted by last name, or select Number to to populate the Starting and Ending Group lists sorted by group number.
- Starting and Ending Group
- When printing a range of statements, select from the drop-down list to signify with which Group to start and with which to end. For example, process statements for Group Numbers 123 - 428 or Dunn - Miller.
Select Statement
- Include Statements with No Activity
- Check this box to process all statements for the selected group(s) regardless of activity. Statements with credits, amounts due, and zero balances are all included. This field is always enabled.
- New Activity Since Last Statement (Only available on Balance Forward Statements screen)
- This default setting prints a statement for the selected Group(s) displaying only transactions that have a date between the last statement date and the New Activity Statement date or all new activity for a group since the last statement marker. If both "All Groups" and "Previous Statement" are selected, this field changes to "All Groups Previous Statement Date" and offers the calendar for date selection. There are two ways to select the date: (1) Either select from the Deposit Due drop-down calendar by clicking on the down arrow; or (2) select the month, day, or year and use the up/down arrows on the keyboard. The default is the current date.
- Previous Statement (Only available on Balance Forward Statements screen)
- If Single Group is chosen, the drop-down box has the dates of all previous statements for that Group master. If All Groups is chosen, the statement date can be chosen from the calendar dropdown.
- Single Group Previous Statement Dates (Only available on Balance Forward Statements screen)
- When processing statements for a single Group and Previous Statement is selected, the Single Group Previous Statement Dates field is populated with the dates of previous statements for that particular Group and allows the user to select one from the drop-down list.
- Statement Report and Browse
- Click the Browse button to search through folders to locate the appropriate home for the file. The system default is set to access the RDPNT/RDP/Reports10/Group folder.
Statement Actions
- Print Tab
- Once revenue and direct charges have been posted, statements can be printed or e-mailed. Select this tab to print statement for the selected Groups or all Groups. Group Statements cannot be printed until Group revenue has been processed.
After statements are printed, review them carefully. There are many possible errors that may have occurred and need to be corrected before printing the final copy of the statement for the customer. Possible errors include:
- Printer
- If the Print option is checked, the Printer field is enabled. Select the printer to direct the statements to from the drop-down menu. If the desired printer is not in the list, see your system administrator.
- Exclude Groups With No Activity, Regardless of Balance
- When checked, a statement will not be printed if there was no activity during the statement period, regardless of whether or not there is a balance on the group master account. This is available from the Balance Forward Statement and Open Item Statement programs.
- Print One/All Statement(s)
- Click to print statements for the selected Group(s). When Single Group is not selected and Print All, E-Mail All, or Finalize All Statements is clicked, a Result tab displays the status of the processing. When Single Group is checked, the buttons are labeled accordingly: Print One, E-Mail One, and Finalize One; and Find Group opens if a group has not yet been designated.
- Preview One Statement
- Click to display a sample of the selected report in the viewer. If no Group is selected, the Find screen displays to allow for Group selection.
- Cancel
- Once "Print All Statements" has been activated, a Cancel button appears to allow discontinuation of the action.
- Incorrect format. For example, the text "YOUR COMPANY NAME HERE" may still appear on the form. The statement forms must be modified with the report writer prior to printing.
- Incorrect ending statement date (causing some new transactions not to appear).
- Missing transactions because of incorrect use of the "*" no-print flag.
- Extra transactions because they were not marked as "no-print".
- Missing transactions because they were not posted.
- Missing payments because they were not posted.
- Once printed, reviewed, and corrected, statements must be closed or the next statement will include all activity instead of just new activity. Even if no corrections were made to the first statement, statements must be re-printed.
- E-mail Tab
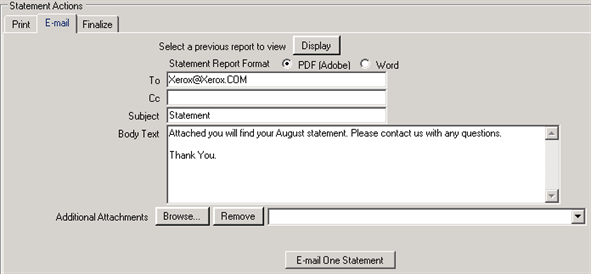
- Statements can be printed or e-mailed. Select this tab to e-mail statements for the selected Groups. This only applies to Groups that have e-mail addresses on record. Statements for Groups cannot be printed until Group revenue has been processed.
- Statement Report Format
- The Crystal Report is attached to the e-mail as either an Adobe PDF file or a Word File. PDF format is recommended, since it is better protected against changes by the guest. Crystal Reports are not exported to HTML and/or included in the body of the e-mail because web based E-Mail, like Yahoo and Hotmail, alters the HTML to be unreadable. If sending a PDF statement, the Adobe website should be referenced (www.Adobe.com) since the PDF Reader may not be installed on all computers. This is a free download available on all computer platforms.
- E-mail One/All Statement(s)
- Click to send the e-mail(s). The system displays a confirmation when the e-mail(s) have been successfully sent out. The title of this button is based on the selection above for the Single/All Group(s) radio button. If Single, then the button reads "E-mail One Statement" and if All Groups is selected, this button is titled "E-mail All Statements". When "All Groups" is selected and Print, E-Mail, or Finalize All Statements is clicked, a Result tab displays the status of the processing.
- Cancel
- Once "E-mail All Statements" has been activated, a Cancel button appears to allow discontinuation of the action.
- Additional Attachments
- In addition to emailing group statements, use the new "Additional Attachments" section of the E-mail tab to send multiple attachments to groups within the same e-mail. Enter the path to the selected document or click the Browse button to navigate to the desired report(s). Use the Remove button to deselect any additional attachments selected.
- Finalize Tab (Only available on Balance Forward Statements screen)
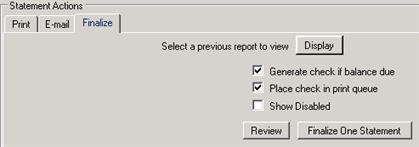
- Statements must be closed at the end of each statement period. Select this tab to close statements for the selected Groups. The statement always shows all transactions since the last time a statement was closed. After a statement is closed, no additional corrections can be made to the statement. Corrections after finalizing a balance forward statement must be made in the next period. When a balance forward statement is closed, the system generates a statement marker transaction, which defines the end of one statement and the beginning of the next. Statement markers appear as a B7D@ transaction code whenever transactions are viewed for the Group. Balance forward statements can be reprinted for any past period from one statement marker to the next.
If statements are not closed, the next statement for the group master includes all activity instead of just new activity. Even if no corrections were made to the first statement, statements must be re-printed.
- Generate Check if Balance Due
- When statements are closed and "Generate checks for any credit balance" is checked, the system looks at the Generate checks for balance due switch on the group master. When both checkboxes are checked and the group master has a negative balance, a check is generated for the total. If one of the boxes is unchecked, checks are not generated for any master even when there is a negative balance due. This switch should not be checked in order to hold a balance "on account" for the group.
- Place Check in Print Queue
- Checks are generated by the balance forward statement if the "Statements: Generate check on balance due" box is checked on the Group Master. The check queue is printed by selecting Check Vouchers from the Accounting menu. Check forms can be purchased from the RDP forms department at 1-800-RDP-PAPR (1-800-737-7277).
- Finalize One/All Statement(s)
- Once statements have been printed, reviewed, and corrected, click Finalize One/All Statements to close the statement. The system displays a confirmation when statements have been successfully processed. The title of this button is based on the selection above for the Single Group checkbox. If Single, then the button reads "Finalize One Statement". If Single Group is unchecked, this button is titled "Finalize All Statements". When "All Groups" is selected and Print, E-Mail, or Finalize All Statements is clicked, a Result tab displays the status of the processing.
- Cancel
- Once "Finalize All Statements" has been activated, a Cancel button appears to allow discontinuation of the action.
- Result Tab
- When printing, e-mailing, or finalizing all statements, the Result tab displays the status of each record. Fields in the grid are Group Number, Type, Name, Balance Due, and Status. While the records are being processed, a status bar is displayed in the bottom left corner of the form. It displays the percentage of statements processed until complete. Once the action is complete, the status bar disappears. The system displays a Status notification including the date of the statements processed and how many records were printed, e-mailed, or finalized.
View Transactions
If no Group is selected when this button is accessed, the Find Group screen opens. Once a group is selected, the Transactions form opens to allow for viewing transactions and, if necessary, posting charges. For more information, see Post Charges to Groups.
Open Item Statements
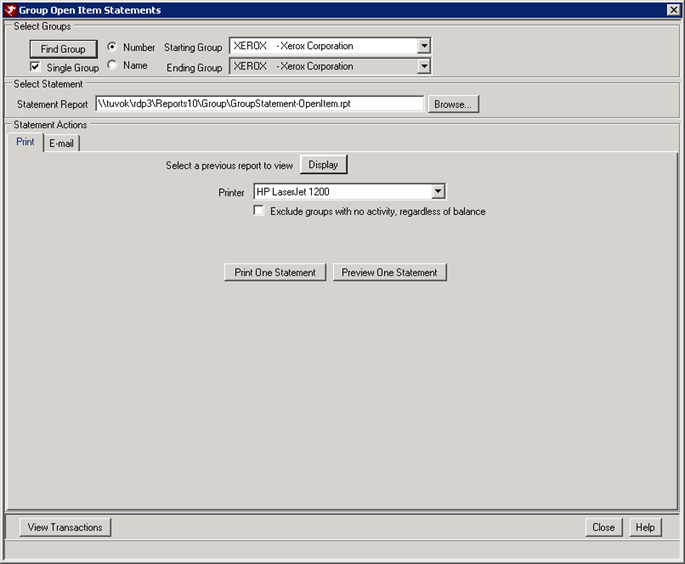
Once revenue is processed and all direct charges are posted, group statements can be printed. The Open Item Statement provides only transactions that have NOT had a payment allocated to them: hence, they're still open. The fields on the Group Open Item Statements screen are the same as those on Group Balance Forward Statement screen; however, there are not as many. For information on fields available, scroll up and review any field that DOES NOT have "(Only available on Balance Forward Statements screen)".
Tutorials
Since Owner Statements and Group Statements are similar, for more information, click Print a New Statement or Print a Previous Statement.
Save & Close, Save, and Close
Click here for instruction on how to Save and Close forms.
Click these links for Frequently Asked Questions or Troubleshooting assistance.
08/23/2011


