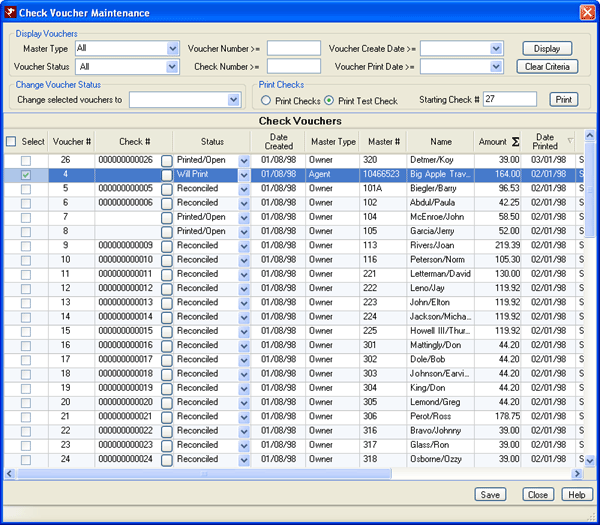
Overview
Once Work Order Vendor Invoices have been entered and processed or Owner
Revenue or Housekeeping Vendor Payables processed, use Check Voucher Maintenance
to print checks appropriately. Select a range or all checks to review
and/or print.
Display Vouchers
Select which vouchers to display. If no criteria has been entered when Display is clicked, all vouchers are displayed. Change voucher status individually within the grid or check the select box of those you want to change and choose the new voucher status from the drop-down in the "Change Voucher Status" box. Click save to commit the changes. The logical progression of check status from "Will Print" to "Printed" or "Skipped" to "Reconciled" must be followed. When moving the status backward, a warning message requires confirmation of your selection. The system DOES allow backward movement.
- Master Type
- Select the type of master to display in the grid. Only one master type can be selected at a time. Leave this field blank to display all master types in the grid.
- Voucher Status
- The progression of check status is "Will Print" to "Printed" or "Skipped/Open" to "Reconciled". Only one status can be selected at a time. Select one or leave blank to display vouchers with any status in the grid.
- Voucher Number >=
- Enter a starting voucher number to display. Click Display to show all vouchers with a voucher number greater than or equal to the specified value. This number is assigned automatically by the system in sequential order beginning with "1".
- Check Number >=
- Enter a starting check number to display. Click Display to show all vouchers with a check number greater than or equal to the specified value.
- Voucher Create Date >=
- Select the date of the transaction that caused the check voucher to be necessary. Click Display to show all vouchers with a creation date greater than or equal to the value specified will be displayed. For example, if a reservation checked out of Room 102 on 06/01/05, the revenue for Owner 102 would be realized on 06/01/05. Even if revenue is not processed until 06/30/05, the transaction date is 06/01/05 and therefore the Voucher Create Date is equal to 06/01/05.
- Voucher Print Date >=
- The system stamps this field with the current system date when check vouchers are printed. Click Display to show all vouchers with a print date greater than or equal to the specified value.
- Display Button
- Click to present the check vouchers that fall within the specifications entered.
- Clear Criteria
- If at any time entries have been made to narrow the display, click Clear Criteria to return all fields to blank.
Change Voucher Status
When check vouchers are selected in the grid, choose a new status from the "Change selected vouchers to" drop-down. Click Save to commit changes. If the newly selected status is a backward step for any of the chosen vouchers, an Override message requires confirmation for each voucher with a backward movement request. Backward steps such as Printed to Will Print are allowed with confirmation; however this is not recommended. Click No to cancel the request and change the status to a forward movement such as from Will Print to Printed.
Print Checks
To print checks, display the desired vouchers, check row selector boxes
or the Select box in the header to choose all for printing. Make sure
the Print Checks radio button is chosen, verify
the Starting Check #, and click Print. If some checks have been previously printed,
the Starting Check # field is populated with the next check number. This
can be overwritten, or if no checks have been previously printed, specify
a starting number. A prompt window allows the selection of printer
and the desired Crystal report to use as the check template (e.g., Reports10/Checks/CheckTemplate_Middle.rpt
prints check forms with check in the middle, and Reports10/Checks/CheckTemplate_Top.rpt
prints check forms with check at the top). Other formats can
be accommodated by customizing a Crystal report to fit. ONLY laser printer checks are supported, no continuous
form checks.
Check the "Use as default check format" box to save this as the
default template. If printing a check that has already been printed,
a warning message requires confirmation. The system ALLOWS reprinting
of checks with confirmation. The previously printed check status
is then relabeled "Voided".
- Print Checks
- Select the Print Checks radio button once the check vouchers in the grid are ready for printing.
- Print Test Check
- Print a sample check by choosing the Print Test Check radio button and click Print. Select a printer and the desired Crystal report to use as the check template (e.g., Reports10/Checks/CheckTemplate_Middle.rpt). Check the "Use as default check format" box to save this as the default template. Click OK to print the test check.
- Starting Check #
- When printing checks, pre-printed forms must be in the paper tray of the printer. These can be purchased from any check-printing company; however for proper alignment with RDPWin supplied check template reports, contact RDP Forms for all printing needs at (800) 737-7277. Enter the first check number from the paper form in the printer.
- Once all print options have been selected, click Print to send the command to the default printer.
Click these links for Frequently Asked Questions or Troubleshooting assistance.