Click here for Master Tutorials
Click here for Groups Navigation
| Group Functions | |
|---|---|
| Add | Payment Post Charge |
Overview
Post charges to groups. All transactions that affect groups must first be defined in the B3-Group Ledger prior to posting any charge. Transaction codes are definable by property.
See Add Transactions for
detail.
The balance due on a group can only be changed by transactions including those generated by Process Commissions, direct charges to groups, bonuses paid to group, and checks generated to the group. Any transaction applied to a group (or any other entity) increments the balance due immediately. For example, when a direct charge is posted to
a group, the system generates a B6xx transaction code and increments the balance due immediately. The balance due field on the group master is always equal to the sum of all transactions on the master.
All past posted transaction to the group are displayed in the "Posted Transactions" area.

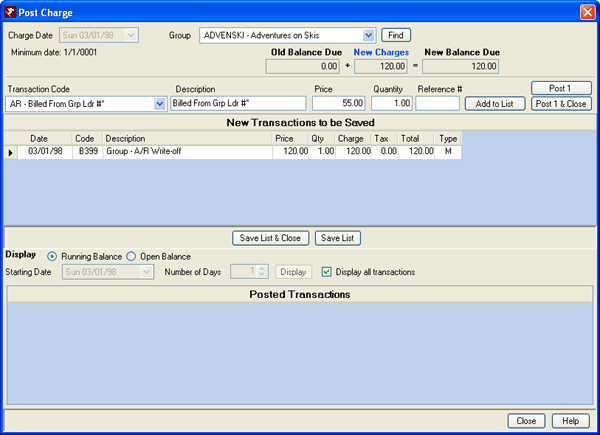
From the Group Analysis grid, select Post Charge from Navigation to open the Post Charge screen. Post Charge is also accessible by clicking Post Charge from the Masters | Groups main menu to open the Find Group screen. Enter the group name, number, or e-mail address and click the appropriate Find button. Highlight the desired group and click Select to open the Post Charge screen. Fields on this screen include: Charge Date (current system date by default), Name, Group#, Transaction Code, Description, Price (positive to charge the group and negative to "credit" the group), Quantity, Reference# as well as those listed below:
- Old Balance Due
- The total amount due from the most recently processed group statement.
- New Charges
- Any charges posted since the most recent group statement was processed.
- New Balance Due
- Any New Charges plus any outstanding amounts due from previous statements.
- Transaction Code
- Select the appropriate transaction type to be added from the drop-down list by clicking on it. The transaction description and/or price is populated into the appropriate fields if already in the system. If not, the user can enter text using the keyboard.
- Add to List
- Once the Transaction Code, Description, Price, Quantity, and Reference# are entered, click "Add to List" to display the transaction in the "New Transactions to be Saved." Any transactions in this area are not posted until the "Save & Close" button is clicked. This allows more than one transaction to be entered and held until ready to save all transactions entered. If only posting one charge, use the "Post & Close" button instead.
- 'Post 1' and 'Post 1 & Close'
- Once the Transaction Code, Description, Price, Quantity, and Reference# are entered, click "Post 1 & Close" to post the charge to the master, close the screen, and return to the previous screen. This allows a quick way to post just one transaction. If posting more than one charge to the same master, click "Add to List" instead. If posting charges to multiple masters, click the Post 1 button to file the transaction and use the Find button to select another master, etc.
- 'Save List & Close' and 'Save List'
- Once transactions exist in the list, click "Save List & Close" to file the transaction to the master, close the screen, and return to the previous screen. If posting a charge to one or more masters is needed, click "Save List" to file the transaction. The Post Charge screen remains open to allow another master to be selected using the Find button. Repeat the process until all charges are posted.
- New Transactions to Be Saved
- Transactions are held in this area until "Save List & Close" is clicked if "Add to List" is clicked after entering the transaction detail. This allows for multiple transactions to be entered and held until ready to save all.
- Display All Transactions
- When checked, all transactions show for the master. When not checked, only the last 30 days of transactions are displayed.
- Posted Transactions
- Previously saved transactions are displayed in this area based on the set grid parameters as on the Transactions tab.
Post Charges to Multiple Groups
- Find
- Select a master and select Post Charge from the Options menu. Enter
transaction information and click Post 1 to save the transaction
immediately without placing the transaction in the "to be saved" section
and keep the Post Charge screen open. This allows for multiple masters
(using the Find button) and additional charges to be posted until the
Close or Post 1 & Close buttons are clicked.
Click these links for Frequently Asked Questions or Troubleshooting assistance.
05/04/2010
© 1983-2009 Resort Data Processing, Inc. All rights reserved.