Click here for Master Tutorials
Click here for Groups Navigation
| Group Functions | |
|---|---|
| Add | Payment Refund |
Overview
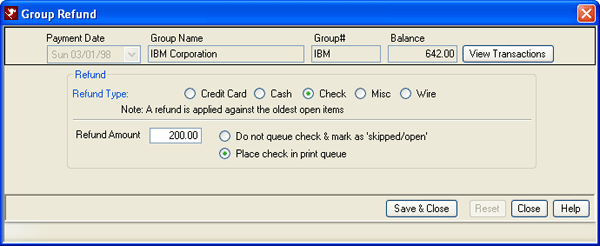
Select Refund from the Masters | Group menu to display the Find Master form. Select the appropriate group to open the Group Refund screen.
- View Transactions
- Click to open the View Transactions grid.
- Select Refund Type
- Select the refund type by clicking the down-arrow and selecting from the types available: Credit Card, Cash, Check, Misc, and Wire.
If refunding by credit card and the property does not have access to Protobase, select CCard Manual from the list. Without Protobase, refunds are processed manually. Enter the CID. Swiping the card automatically places the authorization number in the Auth# field. When refunding by wire, make a call to the banking institution(s), or properties can design a report showing all refunds by wire and process them at a later time. - Amount
- Enter the amount of the refund to be issued. By default, the value in the Balance field is automatically displayed, but the amount can be changed manually.
- Do Not Queue Check and Mark as "Skipped/Open"
- When the Refund Type is set to Check, select this refund option when the check is manually written.
- Place Check in Print Queue
- If the refund type is via check, check the "Place check in print queue" to send a command to the printer (assuming blank check forms are loaded). Alternatively, properties can design a report to track all needed manual checks and issue at a later date/time. In that case, select "Do not queue check & mark as 'skipped/open'."
Click "Save & Close" to complete the refund process. To abandon any refund request and return to the previous screen, click the Close button. A warning is displayed before closing without saving.
Click these links for Frequently Asked Questions or Troubleshooting assistance.
04/05/2010
© 1983-2009 Resort Data Processing, Inc. All rights reserved.