- Click here for a tutorial of the RDPWin Cancel Individual Res
| Options Available Viewing Arrivals, In-House, and Departure Grids | ||
|---|---|---|
|
Cancel Individual Res |
||
Cancel Individual Reservation Screen
Important: If a reservation has already been checked-in, it cannot be cancelled. Click Cancel Groups for information canceling group reservations.
Cancellation Policy
Cancelling reservations with and without a configured cancellation policy has different steps. See Res | Configuration | Cancel Tab for details on creating policy.
With Deposit
Highlight the reservation to be cancelled and click Cancel from the Options menu. If the selected reservation has a deposit on file, the cancellation screen lists all deposit transactions and any additional charges to be deducted from the deposit.
- Cancellation Number
- The system assigns a Cancellation Number from 1 - 999,999 automatically, and increments by one with each completed cancellation. When the system reaches 999,999 the numbering system will restart at 000,001. The cancellation number is different from the reservation number.
- Cancellation Reason
- The Cancellation Reason is a mandatory field. It is free text and can hold up to 20 characters.
- With switch 416-77 Display Cancellation List Drop Down set to Yes and table CL defined, the Cancellation Reason field displays a drop-down list and does not allow for free form text.
- Default Refund
- When a deposit exists on the reservation, the system calculates the amount to be refunded based on configuration and displays the amount. When a policy has not been configured, then this field displays as "0.00". Click the Reset button to set the Amount field to the default refund amount when the refund radio button is selected.
- If the None radio button is selected the full deposit can be forfeited or held on account, depending on the policy and configuration settings.
- Refund Type
- When the Refund Option is set to None, no types are displayed.
When the Refund radio button is clicked, set the refund type using the
Cash, Check, Credit Card, Wire or Misc. radio buttons.
When Cash is selected, enter the Amount. - When Check is selected, enter the Amount and check the "Place check in print
queue" box if printing checks through RDPWin. When
Check Vouchers is run, any
refund checks in the queue are included in the batch.
When Credit Card is selected and the property does not have Protobase or VRP, click the Credit Card radio button and enter the amount of the refund. Without Protobase or VRP, refunds must be manually processed. Properties with Protobase or VRP should click the Credit Card radio button to automatically process the refund. Enter the CID. Swiping the card provides the lowest processing and is recommended if possible.
When Wire is selected, funds must be wired to the guest outside of RDP through the appropriate banking institution. - Amount
- When a deposit exists on the reservation, the system automatically completes this field with the Default Refund amount. However, this field can be changed to any amount equal or less than the total amount(s) deposited on the folio. The calculation for the refund amount is figured as:
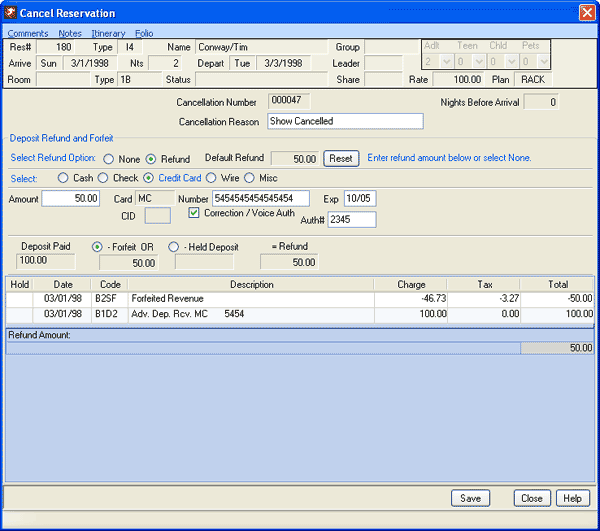
The cancel screen shows Vacation Protection and Security Deposit Protection in two areas. The Non-Refundable field includes VP, SDP and any of the Other Charges configured to be forfeited. These charges also show in the Transaction grid. When SDP is active, SDP always shows as a non-refundable charge. When VP is active, VP shows only when restricted as noted.
Note: When issuing a refund for a reservation with SDP, the SDP amount is subtracted from the refund amount prior to processing, since SDP is non-refundable.- Deposit
- When a deposit exists on the reservation, any and all deposits filed on the folio are added together and displayed in this read-only field.
- Refund
- When a deposit exists on the reservation, the system calculates
the amount to be refunded (if selected) based on those policies.
The amount to be refunded is displayed in this read-only field.
Note: When issuing a refund for a reservation with SDP, the SDP amount is subtracted from the refund amount prior to processing, since SDP is non-refundable. - Forfeit
- When a deposit exists on the reservation, the system calculates the
amount to be forfeited (if selected) based on those policies. The
amount to be forfeited is displayed in this read-only field.
For more information, see Refund Forfeited Deposits. - Held Deposit
- When Display 'Held Deposit' Option on Cancellation Screen is checked, the system holds deposits on cancelled reservation's folio. Guests can then call and make a reservation for another stay without actually the deposit or transfer the deposit to another reservation. The help deposit remains on the advanced deposit ledger and the reservation remains cancelled. These held deposits are handled using the Process Held Deposits function in the Reservations main menu to automatically forfeit deposits.
- Save Button
- Once all cancellation information has been entered, click the Save button. The system automatically does the following:
- Increase Availability by one for the dates of the cancelled reservation.
- Update the Cancellation # and Date fields (logon and date) on the Miscellaneous tab of Change Reservation screen with the user's logon information.
- Change the reservation type to Cancelled.
- Return the user to the Change Reservation screen. Once the Change Reservation screen is closed, the Arrivals list is refreshed and no longer includes the reservation just cancelled.
- Close Button
- To abandon all refund and cancellation information (before saving), click the Close button. The system will return the user to the Change Reservation screen.
Deposit Paid
- Non-Refundable (Vacation Protection/Security Deposit Protection/Other Charges)
- Forfeit OR Held Deposit (one or the other)
Refund Amount
Without Deposit
Highlight the reservation to be cancelled and click Cancel from the
Options menu. The Cancel Reservation screen opens and displays the
basic reservation information and the assigned Cancellation Number.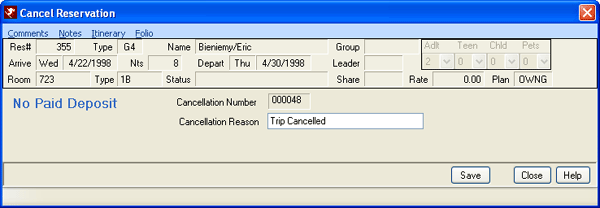
- Cancellation Number
- The system assigns a Cancellation Number from 1 - 999,999 automatically, and increments by one with each completed cancellation. When the system reaches 999,999 the numbering system will restart at 000,001. The cancellation number is different from the reservation number.
- Cancellation Reason
- The Cancellation Reason is a mandatory field. It is free text and can hold up to 20 characters.
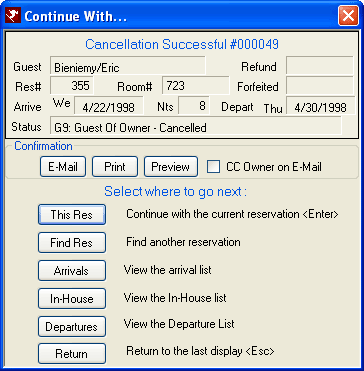
Continue With / Choose Next Option
After a reservation is cancelled, the system displays a confirmation and offers the ability to choose where to go next within the system.
- Confirmations: E-mail, Print and Preview
- Click to e-mail, print, or preview the configured confirmation type.
How to Cancel Reservations:
Cancel Individual Reservation with No Paid Deposit
- F3 Find Res to search for the reservation.
- Click Cancel from the Options panel.
- Enter Cancellation Reason (mandatory).
- Click Save button.
- The Cancel Reservation screen closes and the Continue With screen is displayed.
Refund Paid Deposit and Cancel Individual Reservation
- F3 Find Res to search for the reservation.
- Click Cancel from the Options panel.
- Enter Cancellation Reason (mandatory).
- Select the Refund radio button.
- Choose the refund type: Credit Card, Cash, Check etc.
- Enter refund Amount, if different than the default.
- If refunding by Check, then check the "Place check in print queue" box if printing checks out of RDP. If by credit card, either swipe the card or enter the Number, Expiration Date (mm/yy). When the reservation already has credit card information, confirm the card number displayed on the screen. If Miscellaneous, then enter the Amount and Description of how the refund shall be given.
- Click Save.
- Review the Cancel Reservation notice. Click Yes to continue.
- The Cancel Reservation screen closes and the Continue With screen is displayed.
Click these links for Frequently Asked Questions or Troubleshooting assistance.
02/05/2013
© 1983-2013 Resort Data Processing, Inc. All rights reserved.