For more information, review detail at:
Groups & Conferences Overview (RDP's Website)
Reservation Tutorials
| GROUP FUNCTIONS | |
|---|---|
|
Make Multiple Reservations |
|
|
Check In |
Check Out |
When to Use Group Reservations
A group can be a batch of six reservations for a small family reunion or 150 rooms for a business convention. The hierarchy for group billing is the group master, then the leader, then the group members. Click here to view samples.
- The group master is needed for any city ledger account (a
business), any group that needs a room block, any group whose reservation
will be made in a batch, or any group requiring statistical tracking.
Group masters are used on group reservations for:
- Tracking statistics (Module RC - Statistics)
- Billing through group master (city ledger)
- When using the Group Reservations menu item in RDPWin's Reservations menu (inventory or preassign - made all at once).
- When room blocks are needed
- When special rates or market codes are needed
- When all confirmations should be sent to group master
- The group leader is a component of a group master. The
group leader reservation allows group check-in, group check-out, printing a
folio prior to check-out, and true tracking of advance deposits. A
group leader is required for all group reservations; however, the leader is not
required to be a real person.
The group leader reservation defines the dates of the group reservation. All group member reservations under a leader must have common dates with the leader reservation.- When using the Group Check-in option in RDPWin's Reservations module
- When using the Group Check-out option in RDPWin's Reservations module
- When using the Group Cancel option in RDPWin's Reservations module
- When all group reservations should display together in grids
- When sharewith reservations are needed (multiple guests in one room with separate listing in front desk telephone list.
- When rooms must be added to an existing reservation
- To allow pay codes to bill group charges to group leader at check-out
- Allow detailed folio printing
- The group member is a reservation that is part of a batch but not the group leader. The transactions on a group member may be billed to the group master, group leader, or paid individually.
Group pay codes are assigned to each level of the hierarchy. If there is a group master and a leader on a reservation, RDPWin first looks to the master for payment. If it can bill the master, the process stops. When individual pay codes (IP) exist, the system looks to the leader reservation and does the same check.
Check In Group Members, Leader, and Entire Group
Important: When one or more group members have been checked in, the leader reservation cannot be cancelled. If any member checks in before the leader, the member must be designated as the new Group Leader.
Use the Check-in Option to process just one group member/leader.
The reservation number of Group Leaders and Primary Sharewith reservations
is displayed in bold in all grids to help users identify primary/leader
reservations.
Use the Check-in Option in the Group sub-menu to check in the whole group at
once, post any appropriate charges to the Leader, and prepare to check in the Leader.
The sample below shows an entire group displayed in the grid, one
reservation selected, and the Group sub-menu options.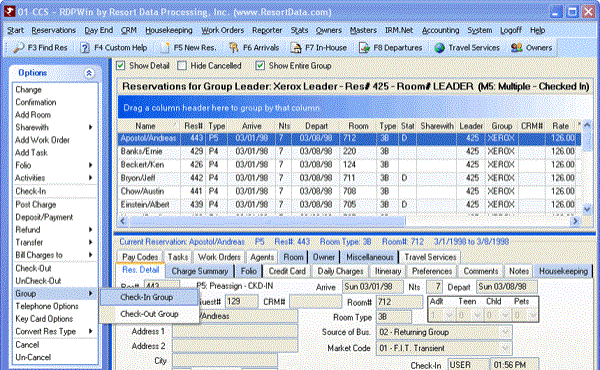
- Check In Group Members
- Select any reservation within a group and click Check-In Group from
the Group Option menu (shown above). The system prompts with:
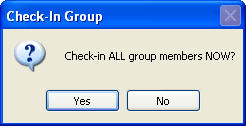
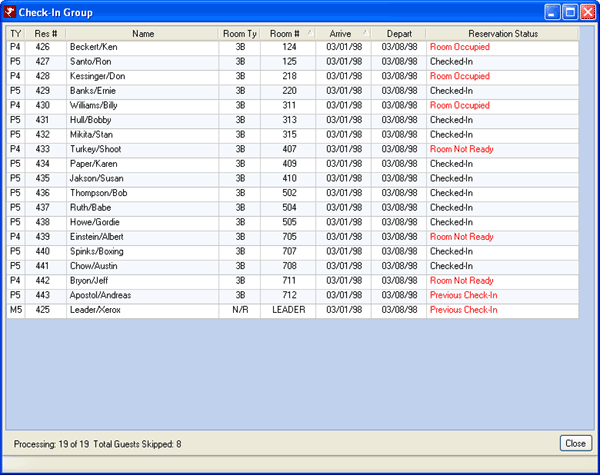
Click No to abandon the process. Click Yes to check in the entire group with few exceptions. The Check-in Group screen displays all reservations within the group and the status for each Group Member. Any reservations without room numbers assigned, assigned to unavailable rooms, or those already checked in are skipped. The reasons for skipping are noted in red in the Reservation Status column, and their type remains "4" (future). Click Close and answer yes to the "Continue with current group?" prompt to return to the grid and make any changes to the remaining arriving reservations.
- Check in Group Leader
- There is no difference between checking in a group leader or member.
- Check in Individual Members with Balance Due
- Any balance designated with a group pay code is listed next to the "Transfer To Group" field. When a balance is showing on Folio A, B, or I; the payment tabs for each folio type are enabled for accepting payment from the individual member. Credit cards can be authorized, payments taken, or select None to check in the reservation without addressing the balance due.
- Check in Individual Members with Zero Balance
- If checking in a Group Member with a zero balance, the check-in process is the same as checking in any reservation. Click the Check-In button, and the Member is checked into the system. If the assigned room is not clean, the system prompts the user with "Room is D (Dirty), OK to Check-in?" and waits for a response. No will return the user to the Check-In screen. A Yes answer prompts with "Print Registration Card?" and waits for a response. Yes prints the registration card, and checks the reservation in. A No answer checks the reservation in without printing the registration card. The Parking Permit report opens to print for the guest.
Post Charges to Leaders
Post charges to leaders in the same manner as posting charges to any reservation.
Check Out Group Members, Leader, and Entire Group
- Check Out Group Members
- If a selected reservation is part of a group, select "Check-Out
Group" from the Group submenu to check out group members, post any appropriate charges to the Leader, and prepare to check out the Leader. A
prompt "Check out all group members EXCEPT the group leader?" requires
confirmation before processing. Click Yes to post all Group Leader
Folio charges to the Group Leader's Folio I and open the Check-Out Group
Members screen. This screen lists all reservations in the group,
including the leader, and displays TY, Res#, Name, Depart, Folio M,
Folio L, Folio A, Folio B, Folio I, Reservation Status, and the Total Transferred to Leader
(already posted to the Leader's Folio I).

- Check Out Group Members with Zero Balance
- If checking out a Group Member with a zero balance, the check-out process is the same as checking out any reservation with a zero balance. Click the Check-Out button and the Member is checked out of the system. The Print Group Member Folio Options screen allows for a folio to be printed.
- Check Out Group Members with Balance Due
- Any balance due to be posted to the Group Leader is displayed in the "Transfer to Group" field. If Folio I has a balance, select the payment type and process. Once payment has been processed, click the Check-Out button. As the Group Member is checked out, the Group Leader Folio balance is transferred to the Group Leader's Folio I. All members must be checked out (i.e., balances transferred to the Leader) before the Group Leader, or the Group Leader must give permission to continue billing the Group Leader Folio after departure.
- Check Out Group Leaders
- If a Group Leader checks out before the Group Members, the system recognizes the need for additional billing to occur to the Group Leader's account and prompts with "There are other folios for this Group Leader still in-house. Continue billing charges to group leader?". If Yes, the Leader Folio balances of each member are transferred to the Group Leader who can then pay the current balance on the account and be checked out. The Group Members are allowed to continue their stay and bill charges designated to the Group Leader Folio. If No, the Leader Folio balances of each Group Member are transferred to the Group Leader and the Leader Folio pay code is changed to “IP” (Individual Pays) on each Group Member, making any future charges the responsibility of each individual member. Once the Member Leader Folio balances have been transferred, the Leader can then pay any balance due and check out of the system.
- Direct Check-Out (VRS Customers Only)
- Direct check-out is available for customers who collect total charges in advance of arrival and do not wish to check reservations in. Switch 426-06 must be set to Yes and VRS Configuration for Allow Direct Check-Out must be checked. When either Check-Out, Group Check-Out, or Mass Check-Out is selected, the system evaluates the selected reservation(s). Direct check-out is performed on any reservation that has not been checked in with a departure date equal or prior the current system date. If the selected reservation was never checked in, the reservation is checked in and immediately checked out. Any other check-out details are handled the same as if a regular check-out such as those with a balance due. There is no special button for this action. All functions are performed "behind the scenes".
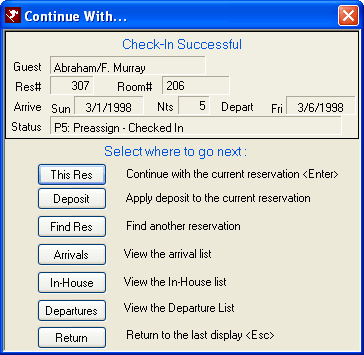
Continue With (at Check-In)
Once a reservation has been checked in, the system prompts with a screen as shown below to offer navigation options.
Continue With (at Check-0ut)
| Check-Out Group Member - Print Folio Options | Check-Out Group Leader - Continue With | Check-Out - Continue With |
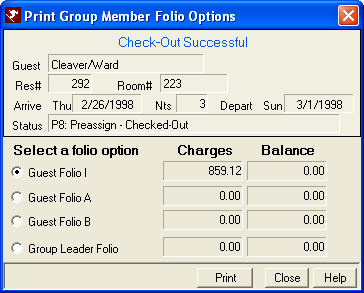
Once Check-Out is clicked for a group member, the above form is available to assist with printing multiple folios. |
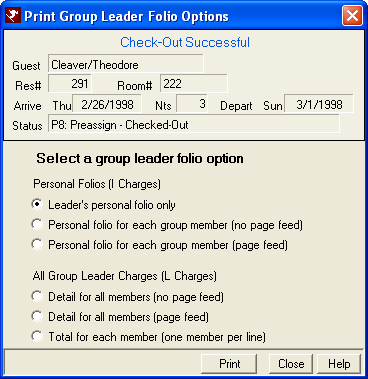
Once Check-Out is clicked for a group leader, the above form is available to assist with printing multiple folios. |
After print folio options for members and leaders, the above screen is available to offer navigation options. |
Click these links for Frequently Asked Questions or Troubleshooting assistance.
08/28/2009
© 1983-2009 Resort Data Processing, Inc. All rights reserved.