- Click here for a tutorial of the RDPWin Check-In.
| Options Available Viewing Arrivals, In-House, and Departure Grids | ||
|---|---|---|
|
Check-In |
||
| Check-in Information | |
|---|---|
| Authorize Credit Card | Late Check-in |
Overview
- While in Arrivals, highlight a future reservation and select the Check-In option, or find the reservation using F3-Find Res and select Check-In. If a future reservation is selected for check-in without today's date set as the arrival date, the system prompts, "Arrival date must be today or prior. Change the reservations dates if needed." Click OK and access the Change option to complete those changes. If an In-House or Departures reservation is selected, an error message reads, "Reservations has already been checked in."
- Notes... Switch 423-10
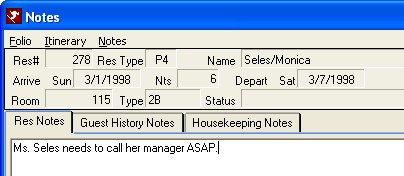
- If a reservation has any Notes and Switch 423-10 "Display F6
Notes During Check-In" is set to yes, the system displays the
Reservation and Guest History Notes to alert the user.
- Notes... Switch 424-11 and 424-12
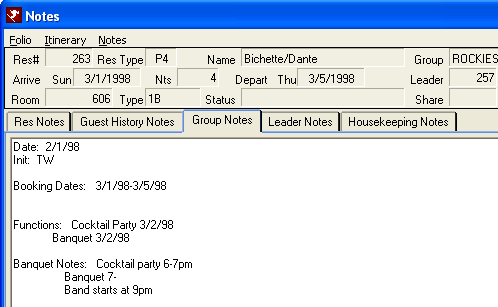
- When checking in a leader reservation, the group notes can display.
- Switch 424-11 = Yes, Group Master Notes display first
- Switch 424-12 = Yes, Group Leader Notes display first
- Both 424-11 and 424-12 = Yes, Group Master Notes display first, then the Leader Notes
-
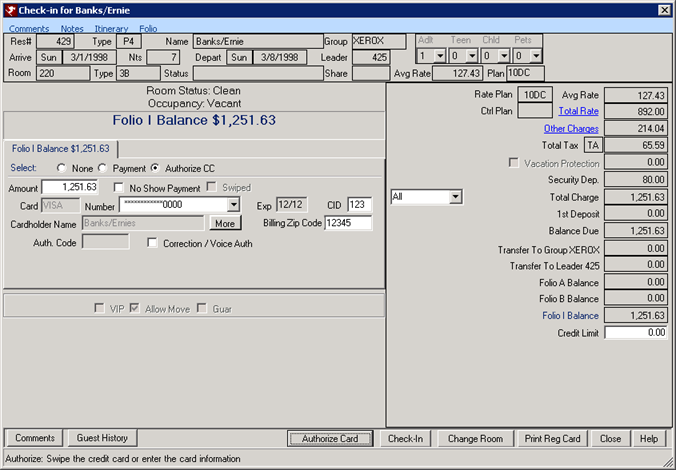
From Notes, click the Close button to open the Check-In screen. If the Reservation is an inventory reservation, the Available Rooms screen opens and requires that a room number be designated. Once the notes have been reviewed and a room number assigned, the Check-In screen opens. Deposits can be taken and credit cards authorized.
- Choose the type of payment: None, Payment, or Authorize Credit Card.
- If taking a payment, select type: Credit Card, Cash, Check, Misc., Wire, or Transfer.
- If taking a credit card payment, enter Amount, Number, Exp., CID, and Billing Zip Code. Any credit card information entered when the reservation was made is already displayed.
- If Cash, enter amount. If check enter Amount and Check#.
- If Misc, enter Amount and Description.
- If Wire, enter Amount only.
- If Transfer, enter the Amount and Res#. Use the Find button if the Res# is unknown.
- If Authorize Credit Card is selected, enter Amount, Number, Exp., CID, and Billing Zip Code. Any credit card information entered when the reservation was made is already displayed.
- Click the Process Payment or Authorize Card button at the bottom.
Assign Room Number
A room number must be assigned to an inventory reservation before check-in. Click
Available Rooms
for detailed information. The room information is filed on the
reservation as soon as the Select button is clicked (a room is assigned),
even if the Check-In process is not completed.
The Change Room button can be used from the Check-In screen to do a room move for the reservation. Select the new room number. Note: only rooms that are clean and vacant display on the Available Rooms grid.
See Room Move for more details.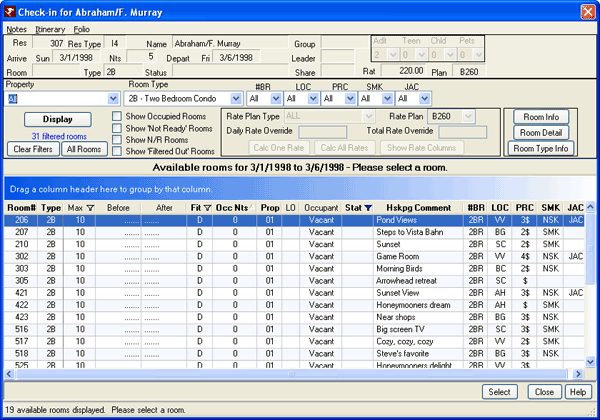
- Keep Room Number
- If the Change Room button on the Check-In screen is clicked, the Available Rooms screen reappears. Either select another room and click Select or click the Keep Room # button to return to the Check-In screen.
Check-in
- Credit Limit
- The Credit Limit is automatically calculated during the reservation process based on the configuration settings. This limit can be changed from the Check-in screen. The defaults are set in Res Configuration on the Check-in tab for guests with a credit card on file and guests without.
- Comments
- When Switch 421-06 is set to yes, the system allows Comments 8 and 14 to
displayed on the Check-in screen.
- Guest History
- Click to verify guest history (whether or not guest has stayed at the property, how many times, etc.) on the Guest Detail screen.
- Authorize Card
- Available when the Authorize Credit Card radio button is selected. The credit card authorization process is separate from the Check-In process and should be completed prior to clicking the Check-in button.
- The authorization number is automatically populated by Protobase or VRP. If swiping is not available, users should enter the number and expiration date and click the Process button (making sure that Voice/Auth is NOT checked). If the Protobase or VRP interface is not installed, Authorization must be completed manually outside of RDP.
- Process Payment
- Available when the Payment radio button is selected and the folio has a balance due at check-in. The payment process is separate from the Check-In process. When taking a payment before checking in the guest, select the Payment radio button.
- Once
payment is complete, click the Check-In button.
When the Check-In button is clicked
while the Payment, the
system displays a message to either process the payment, authorize the card, or select the None option for the payment type.
When the Payment radio button is selected, the payment type (credit card, cash, check, etc.) and amount must be entered. Based on which payment type is selected, various options are available. Cash or Wire require only the amount be entered. Credit card requires the card information and before checking in. Check requires a check number, and Misc requires a description. Transfer requires a Res# where the deposit will be transferred. Transfer sets the amount due of the original reservation to zero and moves it to the selected reservation, which subsequently increased its amount due by that amount. - Check-In
- Once payment options are addressed, click Check-in. If the property uses a key/lock system, the Request or Verify Key Cards screen displays in order make keys. See key cards for more information.
- If the reservation selected for Check-in is not
scheduled for arrival on the current date, the system displays a notice
that the dates must be changed before checking in.
- When the reservation's room number has any new or open work orders scheduled during the reservation dates, the system displays a message "Room ### has New or Open work orders scheduled between Arrival Date – Departure Date. Continue with this room?". Click yes to continue the check-in process or No to return to the Check-in screen and use the Change Room button to reassign.
- Change Room
- If for any reason the room number selected in the previous screen needs to be changed, click Change Room. Either select another room and click Select or click the Keep Room # button to return to the Check-In screen. Reasons for changing rooms might be that the room is not clean or the guest has changed his/her preferences.
- Check in Individual Reservations with Balance Due
- When Balance Due is greater than zero: a credit card can be authorized, a payment taken, or select None as the payment type and check in the reservation with a balance. Once the payment information is complete, click the Check-In button.
- Print Reg Card
- Click the Print Reg Card button to open the Print window to print the registration card. Click OK to print or Cancel to close the window and return to the Check-In screen.
Late Check-In
Late check-in is available for reservations (excluding long term) being checked-in with an arrival date prior to
the current system date. For long term reservations, the system displays a message that arrival/departure dates
must first be changed using the Change screen and saved, then return to the Check-In option to continue.
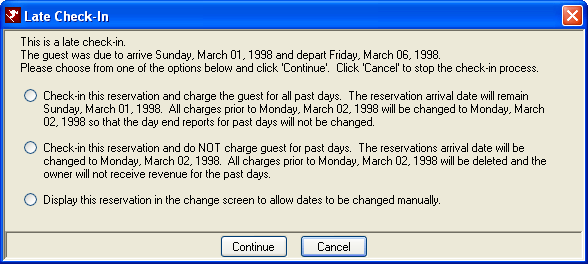
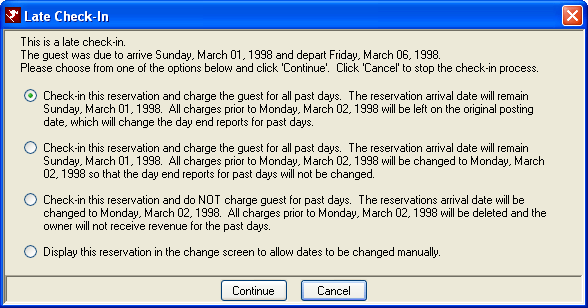
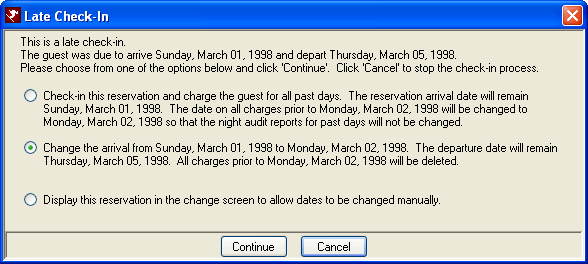
When a selected reservation has an arrival date prior to the system date when check-in is attempted, a
message displays and offers the following choices based on system type:
| Vacation Rental System Features (Switch 426-06) =Yes and Allow Prior Dates on Transactions (Switch 414-08) =No: |
|---|
 |
| Vacation Rental System Features (Switch 426-06) =Yes and Allow Prior Dates on Transactions (Switch 414-08) =Yes: |
 |
| Hotel or Condominium Systems (Switch 426-06) =No and Allow Prior Dates on Transactions (Switch 414-08) =No: |
 |
- Departure Date Prior to Current System Date. In this case, both the arrival and departure the dates must be changed to allow check-in. The system prompts to change the dates. At this point the dates can be changed or if not, the check-in is cancelled.
- Departure Date Equal to Today. At this point, two options are displayed:
- Check-in With Existing Dates. If the check-in proceeds with the departure date equal to the current system date, all charges prior to the current date are changed to the current system date with the pre-post flag removed.
- Change the Dates. The system prompts for a new arrival and departure dates.
- Departure Date Greater Than Today. At this point, three options are displayed:
- Check-in With Existing Dates. If the check-in proceeds with the departure date equal to the current system date, all charges prior to the current date are changed to the current system date with the pre-post flag removed.
- Change Arrival Date. When the reservation arrival date is changed to the current system date, all charges prior to the current system date are deleted (except deposits).
- Change the Dates. The system prompts for a new arrival and departure dates.
Mass Check-In
Check in ALL reservations scheduled to arrive on the current system date using Mass Check-In.
Configuration is required. The system displays a confirmation
prompt prior to checking in all arriving (today's date) reservations.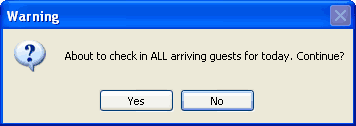
Click Yes to check-in all reservations scheduled to arrive on the current system date
with a single command with at least one exception: (1)
reservations cannot be checked in without having a room number assigned.
Optional exceptions can be configured
so reservations are not checked in based on:
(2) a reservation has a balance due to the property, (2) non-rental rooms,
(3) maintenance reservations, and (4) room clean status is occupied or dirty.
In any exception situation, the system skips over those reservations which are
indicated by a reason displayed in red under the Reservation Status column. However, all of the
"optional" exceptions can be removed by checking the
three boxes in the Configuration Check-In tab as shown below.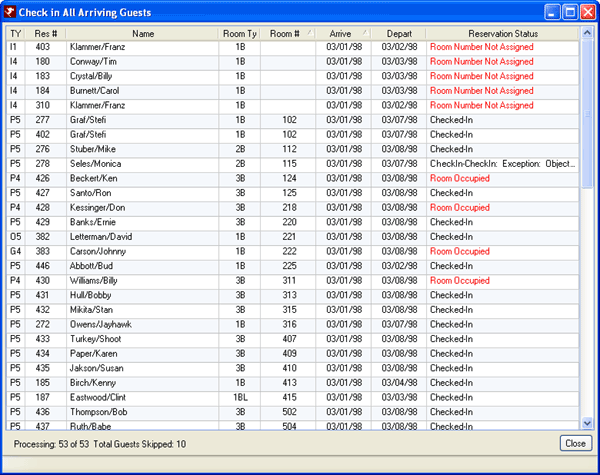
- Include Reservations with Balance Due
- When selected, the system will allow users to check in any reservation with a balance due during the Mass Check-In function.
- Include N/R Room Types in Check-In All Arrivals Option
- Some properties rent units that are not guest rooms such as golf carts or boats. When configured:
- If the N/R Room is actually a non-rental room such as a conference room, that conference room is checked in and considered occupied.
- If the N/R Room is actually a golf cart (or other such non-room item), the system will check it in and consider it in use by the guest.
- Some properties may wish to enter the room reservation as a Group Leader reservation and the N/R Room as a Group Member reservation. In that case, the system will check in the Group Leader (guest reservation) and the Group Member (check-out a golf cart for use by the Group Leader).
- Allow Reservations to be Checked In to Rooms Marked Dirty (System Setting 423-03)
- Properties using the mass check-in feature may wish to check in reservations assigned to rooms are not ready (dirty) for the guests. When configured, all reservations are checked-in, regardless of Clean Status. As guests arrive, the front desk staff will need to check the Clean Status before releasing keys to the guests. If Dirty, the staff will need to notify the guest to come back later for a key.
Continue With (at Check-In)
Once a reservation has been checked in, the system prompts with a screen as shown below to offer navigation options.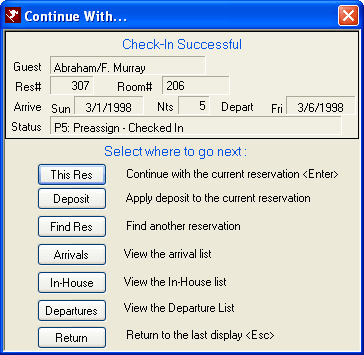
Main Menu
From the check-in screen, access the main menu for these options:
- Notes
- Click to view any notes on the reservation from the Check-In screen. Review or type additional notes, and click Close to return Check-In screen.
- Itinerary
- Click to view the Itinerary from the Check-In screen. Double-click any transaction to view the Itinerary Detail for any one item, and click Close to return to the Itinerary. Click the Close button to return to the Check-In screen.
- Folio
- To view the Folio transactions while in the Check-In screen, click Folio from the main menu in the top left corner of the screen. The Preview button displays a sample of the folio in Crystal Reports format. Click Print to send the folio to the designated (see Configuration) printer. The Close button returns the user to the Check-In screen.
Click these links for Frequently Asked Questions or Troubleshooting assistance.
02/05/2013
© 1983-2013 Resort Data Processing, Inc. All rights reserved.