- Click here for a tutorial of Add and Change Assets.
(Only available if the Work Orders & Asset Management (RZ) module is installed.)
| Accounts (R3 required) | Notes Tab |
Overview
Basic vendor information is available on tabs within the various vendor screens. Additional fields pertaining to Owners are available to properties with the R3 Condominium Owner Accounting module installed as shown in the sample below.
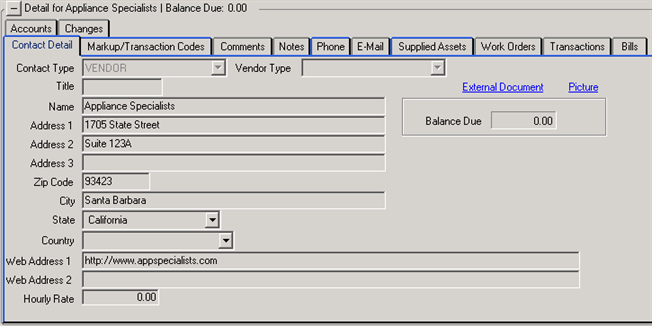
Contact Detail
All different types of contact information is displayed (i.e., mailing address and website information), as well as the vendor and contact type, and hourly rate (if any).
|
- Contact Type
- Manage the appropriate Contact Type for the vendor record.
- Vendor Type
- Manage the appropriate Vendor Type for the vendor record.
- Title
- Enter and maintain the title of the vendor such as Mr., Mrs., etc.
- Name
- Enter the vendor's company (maximum of 30 characters is allowed). The List is sorted alphabetically
- Address and Website Addresses
- Enter and maintain the vendor's physical or mailing address and any existing website addresses.
- Hourly Rate
- When adding or changing a vendor, enter the hourly rate for the vendor if available. This field is typically only used for in-house maintenance people to assist with tracking labor cost. Outside vendors send invoices and provide cost tracking information through the Charges/Payments tab.
- External Documents - T2 Module Required
- This link allows external files to be attached to the work order vendor master. Use this feature to attach detailed information about the work order vendor. The following file types are supported: Txt, Doc, Docx, Htm, Html, Xls, Jpg, Bmp, Gif, and more. The documents can be viewed as long as the workstation has the application installed that displays that file extension.
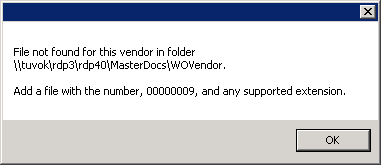
- To attach a file, save it to the \RDP\RDP<xx>\MasterDocs\WOVendor folder, using the work order vendor number as the file name. For example, if the file created was for vendor 00000009 in the RDP01 directory, the file and location would be \RDP\RDP01\MasterDocs\WOVendor\00000009.doc (the file extension will change based on the program it was created in).
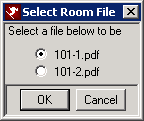
- If more than document is needed for the master, enter the master number followed by 1, 2, 3, etc. For example, for work order vendor master 101, enter the file name as 101-1, 101-2, 101-3, and a prompt appears allowing the different files to be selected.
- If the file does not exist, the following error message will appear with the file path location when the link is clicked. Note: The file location will display the UNC path, however, the file can be saved to the RDP drive (usually R:\ or F:\).
- Pictures - T2 Module Required
- This link allows external pictures to be attached to the work order vendor master. The following file types are supported: Txt, Doc, Docx, Htm, Html, Xls, Jpg, Bmp, Gif, and more. The pictures can be viewed as long as the workstation has the application installed that displays that file extension.
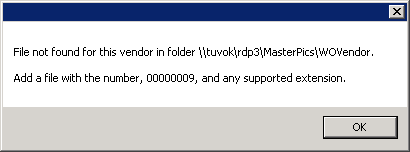
- To attach a picture, save it to the \RDP\RDP<xx>\MasterPics\WOVendor folder, using the work order vendor number as the file name. For example, if the file created was for vendor 00000009 in the RDP01 directory, the file and location would be \RDP\RDP01\MasterPics\WOVendor\000000009.jpg.
- If more than picture is needed for the master, enter the master number followed by 1, 2, 3, etc. For example, for work order vendor master 101, enter the file name as 101-1, 101-2, 101-3, and a prompt appears allowing the different pictures to be selected.
- If the file does not exist, the following error message will display showing the file path location when the link is clicked. Note: The file location will display the UNC path, however, the file can be saved to the RDP drive (usually R:\ or F:\).
- Note: The External Documents and Pictures feature requires the T2 Module. For more information about this module, contact RDP Sales.
- Balance Due
- Any amounts due the vendor are displayed. A negative number represents a credit balance. This field considers invoice amounts entered and any payments made.
- Taxpayer ID#
- Enter the tax payer identification number for the vendor. This number is used for vendor 1099s and other tax purposes.
Markup/Transaction Codes Tab
Enter and maintain the cost tracking fields for the vendor. Select the "Vendor Payment Transaction Code (Table B8)" to designate which transaction code is used by default when paying vendors for work performed. Select the "Owner Charge Transaction Code (Table B7)" (R3 required) to designate which transaction code is used by default when charging owners for a work order. Select the "Reservation Charge Transaction Code (Table B2)" to designate which transaction code is used by default when posting charges to reservations from work orders and tasks. See Invoice Mark-up for details.
|
|
-
- Billing Method - Invoice
- Set the billing method to Invoice (default setting) for vendors that send and invoice for services such as electricity or telephone access.
- Billing Method - Time & Materials
- Set the billing method to Invoice for vendors that bill for time spent and material costs used to complete the job. When using this setting, the property track the time spent and the materials used. In most cases, selection of "Time & Materials" is used by in-house maintenance staff when completing work orders and tasks.
- Billing Method - No Billing
- Set the billing method to No Billing for vendors that never bill
for services or materials. In some cases, in-house maintenance
staff may never bill for services rendered.

- Generate One Check Per Bill When Paying Vendor Bills
- When checked, the system posts one voucher record for each bill when running the "Pay All Bills" option IF the Post Vendor Payable Now checkbox is checked on the Vendor | Pay Owner Bills | Pay All Bills screen.
- When Paying Vendor...
- Select when a check is printed by default for each vendor from the Vendor Process Check screen. The three choices are:
- Generate Check Later When Statements Are Finalized
- Select this option when statements are finalized each month. The check is added to the queue and is printed only after the statement is finalized.
- Generate Check & Mark as Printed
- Select this option when checks are manually written to the vendor. The check is placed in the queue with a status of "printed" so printing never actually occurs.
- Generate Check & Put in Check Queue to Print Later
- Select this option to add the check to the queue. The check prints when Accounting | Check Vouchers is run.
- Owner Charge Transaction Code - B7 (R3 required)
- Select the transaction code to act as the default when charging any work-order-related amounts to the owner. This code can be changed on an individual basis on the work order directly.
- Owner/Group Mark-Up (R3 required)
- Enter the percentage to be used when marking up a work order invoice amount for the owner. For example, consider that Owner/Group Mark-Up is set to 10%. When an owner or a group master is billed for a work order with an invoice amount of $100, then the Amount charged is automatically calculated using the Owner/Group Mark-Up for a total of $110. For more details, see Mark-Up Amount.
- Vendor Payment Transaction Code - B8
- Select the transaction code to act as the default when posting any work-order-related amounts to the vendor. This code can be changed on an individual basis on the work order directly.
- Reservation Charge Transaction Code- B2
- Select the transaction code to act as the default when charging any work-order-related amounts to the reservation. This code can be changed on an individual basis on the work order directly.
- Reservation Mark-up
- Enter the percentage to be used when marking up a work order invoice amount charged to a reservation. For example, consider that Reservation Mark-Up is set to 10%. When a reservation is billed for a work order with an invoice amount of $200, then the Amount is automatically calculated using the Reservation Mark-Up for a total of $220. For more details, see Mark-Up Amount.
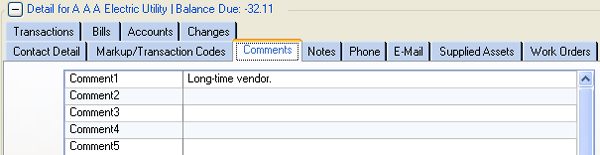
Comments Tab
Record any statement of fact or opinion on the Comments tab. There comment labels are user-definable by selecting System and Comment Labels from the main menu. Select Work Orders from the Type of Master field. Comment Fields 1 - 17 are displayed (defined in Tables O1 to OH). Enter a standard subject within the system, such as Response Time, to track important information about a particular Vendor/Contact. Using the Response Time example, one vendor's comment might be "more than 24 hours", while another might be "within 1 hour".
|
Notes Tab
Any free text entries pertaining to the selected vendor are displayed in this section.

|
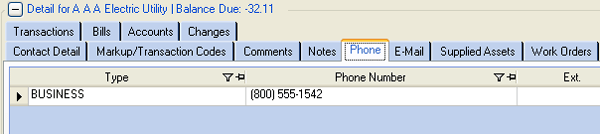
Phone Tab
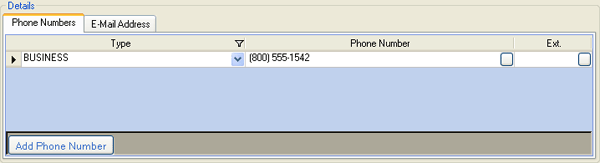
View and maintain telephone numbers for the selected vendor. Select the Type (i.e., business, home, etc.), and enter the applicable telephone and extension numbers. Add additional phone numbers using Vendor Change.
|
When viewing the Vendor Change screen, the tab offers an "Add Phone Number" button. Click this button add a row to the grid and allow for additional entries.
|
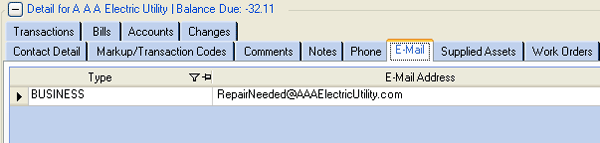
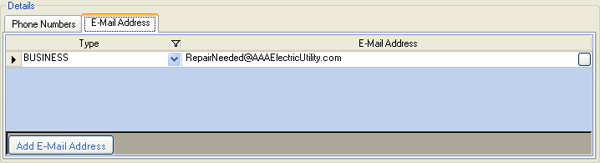
E-mail Tab
A grid is displayed with contact e-mail addresses for the selected vendor. Select the Type (i.e., business, home, etc.), and enter the applicable e-mail address. Add additional phone numbers using Vendor Change.
|
When viewing the Vendor Change screen, the tab offers an "Add E-mail Address" button. Click this button add a row to the grid and allow for additional entries.
|
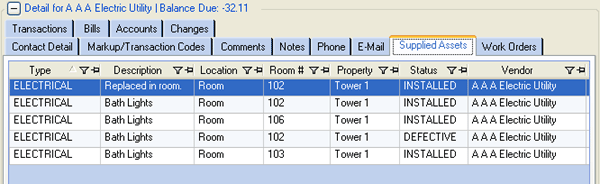
Supplied Assets Tab
The Supplied Assets tab displays a list of assets that have been furnished to the property by the selected vendor. Assets must be entered into the system and the vendor assigned before a vendor's asset displays in this grid. See Add Assets for more detail.
|
Transactions Tab
Display a grid with complete transaction history for the selected vendor as well as a balance of the charges for current the period.
|
|
- Post Charge
- Click the Post Charge button to open the Post Charge form.
- Change
- Click Change to access the Change/Reverse Transactions screen.
- Reset Balances
- Click Reset Balances to read all the transactions, reset the running balance, and use the last running balance as the correct balance due. The stored balance due on the master is set to this correct balance due. The open balance transactions are retrieved and summed. If the open balance total does not match the correct balance due, then the last transaction’s open balance is adjusted. This makes the open balance, stored balance on the master, and the running balance amount on the last transaction match.
- Hide "No Prints"
- When checked, all transactions marked in the "NoPrt" column are not displayed. When unchecked, all transactions (regardless of print status) are displayed in the grid.
- Running Balance (Current)
- Display all transactions from the last closed statement and display a running balance column instead of a open balance column. Running Balance displays a snapshot of the activity for the month.
- Running Balance (All)
- Display all transactions regardless of date and display a running balance column in the grid instead of a open balance column. Running Balance displays a snapshot of the activity since the vendor's original existence.
- Open Balance
- Display all transactions with an open balance not equal to zero and display an open balance column in the grid instead of a running balance column.
- Starting Date
- In read-only format unless Display All Transactions is not checked, select a specific date range by entering the Starting Date and setting the Number of Days field. This works as a sub-filter of the display options. For example, select Running Balance, set the Starting Date to 01/29/98, and Number of Days to 30 to display all running balance transactions between January 29th and February 28th. With the same settings, set Number of Days to 29 to view only running balance transactions between January 29th and February 27th.
- Number of Days
- In read-only format unless Display All Transactions is not checked, select a specific date range by entering the Starting Date and setting the Number of Days field.
- Display All Transactions
- Check to display all transactions without regard to Starting Date or Number of Days settings (time consuming). This still allows for the Running Balance and Open Balance filters to be considered. The Starting Date, Number of Days and Display button are disabled when checked. When not checked, the grid can be filtered using the Starting Date and Number of Days fields.
- Aging
- Columns on the Transaction tab now include Aging for open balances detail for 1-30, 31-60, 61-90, 91-120, and greater than 120 days.
- Recent Reset
- Each time the transaction tab is displayed for work order vendors, the system does a "Recent Reset" of the balances. The process is the same as the Reset Balances button, except the running balances are reset only from the last closed statement. In this case, the running balance on the last closed statement marker (D@) is assumed to be true and the process is much quicker. This reset of balances also takes place for vendors (1) before and after a payment is taken, (2) before and after a charge is posted, and (3) before a statement is reviewed/finalized.
- No Print#
- This column contains the "no-print offsetting transaction sequence number" and makes tracking which transaction a reversal transaction is associated with much easier.
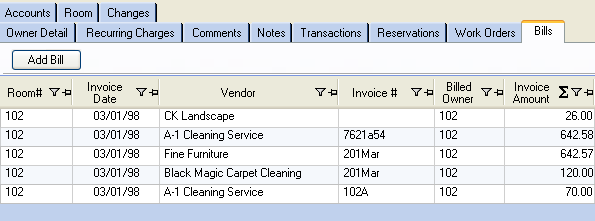
Bills Tab (R3 required)
Bills are only available to systems with the R3 Condominium Owner Accounting module installed. The grid displays any invoices, regardless of status, that have been entered on the vendor. This tab is also displayed on the room master for which the invoice was entered and the owner master if the room number has an assigned owner.
|
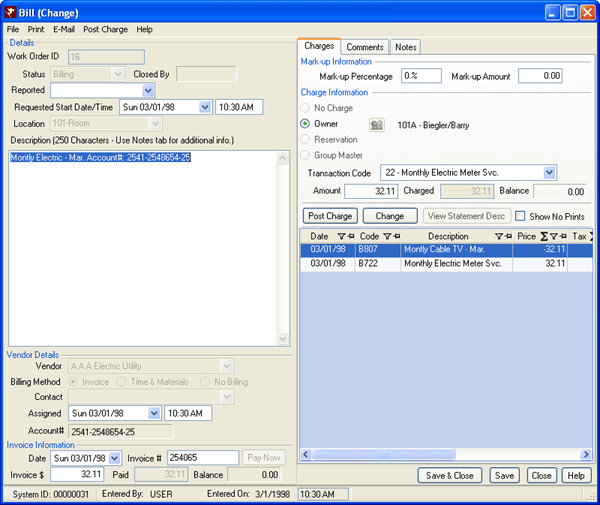
- Add Bill
- Click the Add Bill button to open the Process Bill screen and process the selected bill individually.
- Only Show Bills with Balance Due Vendor
- When checked, the grid is filtered to only display bills with a number greater or less than zero in the Invoice Balance Due column in the grid. This checkbox is only visible on the Bills tab when viewing the tabs below the List and not from the Vendors | Change screen.
- Bills Change
- Double-click on any bill from the grid on the Bills tab to open the Bills (Change) screen. Make any changes necessary and save when complete.
- Pay Now
- If the Bill has not been paid, use the Pay Now button to pay the balance to the vendor for the selected bill. From the Bills Change screen or the Work Order Change screen, click "Pay Now" to pay the balance to the vendor for the selected bill. If the Vendor Transaction Code has not been configured, the system prompts for a transaction code to be used to post the payment to the vendor. Once configured, the system requires confirmation before completing the payment process. Once the bill is paid in full, the Pay Now button is disabled. Disable and restrict user access based on fence level using the "Work Order and Bill Pay Now Button" setting in the UI Security section within System | Menu Security.
Accounts Tab (R3 required)
Enter and maintain any account numbers specifically designated by the vendor for owner or room masters. Accounts are only available to systems with the R3 Condominium Owner Accounting module installed. For example, Southern California Gas (SCG) might supply gas to 15 rooms at a property. If the property receives an invoice for a room or owner, enter that account information here to make processing the billing and vendor payment much easier. Once entered, these accounts are available in the drop-down when paying regularly scheduled bills for that vendor.

|
- Change Accounts
- Click the "Change Accounts" button to display the Accounts tab on the Vendor/Contact Information screen (in change mode). When an account is selected when "Change Accounts is clicked, that account is selected in the grid. The same results when an account is double-clicked from the List. The Room#, Fixed Amount, and Notes change updated. Save when changes are complete.
- Add Account
- Click the "Add Accounts" button to display the Accounts tab on the Vendor/Contact Information screen (in change mode) with a new row available for entry. Enter new account information for the selected vendor and save.
- Pay Selected Account Now
- Select an account and click the "Pay Selected Account Now" button to open the Process Bill screen. A message displays when no account is selected when this button is clicked.
- Pay All Accounts
- Click the Pay All Accounts button open that screen and process multiple accounts for a single or multiple vendors.
- Account#
- Enter the unique account number from any invoice received from the vendor for any or all rooms and owners. For example, RDPWin's CCS (condo/whole ownership) data files show Room 101 is owned by Biegler/Barry and Room 102 is owned by Abdul/Paula. Each account number for each room/owner can be entered here which auto-fills account number information in some of the billing and payment areas of the system.
- Room#
- Select the Room Number for the account from the drop-down list. If the room number is not in the list, then a room master must be added first. This field is not available from the Accounts tab when accessing from the Owner List.
- Owner Name
- Once the Room# is selected, the owner information is auto-filled based on the room master. This field is not available from the Accounts tab when accessing from the Owner List.
- Owner#
- Once the Room# is selected, the owner information is auto-filled based on the room master. This field is not available from the Accounts tab when accessing from the Owner List.
- Fixed Amount
- The Fixed Amount column displays a checkbox. When checked, the account is billed the same amount each month and enables the ability to enter the Default Amount. When the default amount is left blank, the default is set to the first entered amount automatically during the billing process. For example: when paying a cable bill and no default is set for the fixed amount, and the first cable bill paid is $55, the default is then set to $55.
- Default Amount
- When Fixed Amount is checked, enter the default invoice amount here. Since this tab is where invoice account information is entered for the first time, there is no amount history. When billing owners and/or paying vendor invoices, the most recently entered invoice amount is automatically displayed and filed here.
- Last Payment
- The Last Payment column shows the date payment was most recently applied to the selected account. This field is automatically updated during the billing process and cannot be manually changed.
- Notes
- Click the Notes button in the Notes column for a particular account row to view and add notes for that account. When Add Account is clicked and the Notes button is clicked before a new account is saved, the system prompts with "Account information must be saved before entering note information. Save now?". If Yes, the new account information is saved and the Note form displayed. If No, the system returns to the previous screen.
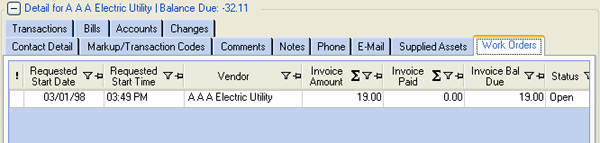
Work Orders Tab (RZ - Work Orders and Asset Management Module Required)
View and maintain any work orders or tasks assigned to the selected vendor regardless of status. Double-click any work order or task in the grid to open the Work Order or Task Change screen.
-
-
For more information, see Work Orders Navigation.
Click these links for Frequently Asked Questions or Troubleshooting assistance.
09/02/2009
© 1983-2009 Resort Data Processing, Inc. All rights reserved.