- Click here for a tutorial of Printing Statements.
-
Click here for Owner Navigation
| Owner Statements | |
|---|---|
| Canadian Statements
Date Format Email Statements Hawaiian Statements |
Finalize Statements
Folio Transactions Print Statements Process Owner Statements (Steps) |
- Condominium Owner Account Module R3 required.
Overview
Review, print, and e-mail statements for a single or all owners. RDP recommends that the statements be printed and reviewed in detail before finalizing. Printing and reviewing statements can be done throughout the month by accessing the Month End submenu of the Owners main menu. Once finalized, the system closes the statement and does not allow changes to be made for that statement period, which is why reviewing each statement prior to finalizing is so important.
Date Format
A formula for BegStatementDateDisplay is available in the OwnerRentalActivity, OwnerPayments, and OwnerDirectCharges sub-reports on all of RDPWin's standard statement reports. The statements display the dates as: "from 12/31/11 to 1/31/12.”
Folio Transactions and Owner Statements
- Owner statements are comprised of reservation revenue, less management commission and direct charges. The owner of a room is paid based on the folio transactions designate to pay owner revenue. When a transaction is posted to a folio, the system immediately calculates the new "owner amount" and places that transaction in a queue to be paid to the owner the next time owner revenue is processed. Owners are not paid on transactions posted to group masters, travel agents, or credit card masters. This section describes how reservation revenue flows from the reservation to the owner statement.
- Changing Estimated Totals on Advance Reservations
- When advance reservations are changed, such as adding or subtracting days, the system automatically recalculates the estimated total room charge.
- Pre-Posted Transaction Flag
- Transactions on advance/future reservations are considered "pre-posted," except advance deposits. A pre-posted transaction does not appear on any audit reports or in the general ledger. Pre-posted transactions on the folio are marked with a "*" in the "Pre" column of the folio. If this field is blank, the transaction has been posted on a checked-in reservation and appears on all audit reports.
- Transactions on Advance Reservations
- Reservations show totals for estimated room charge, other charge-1, other charge-2, and security deposit and all other charge. These totals are always equal to the sum of the transactions on the reservation.
Balance Forward Statements
- Once revenue is processed and all direct charges are posted, owner
statements can be printed. The Balance Forward Statement provides
the balance due from the last billing period plus any new reservation
activity and direct charges not marked as no-print, as well as payments
from and refunds to the owner. Transactions marked as non-printing
(with an "*") in the No Prt column on the owner Transaction tab do not print on the balance forward statement.
The sum of all non-printing transactions must be zero or the statement is considered out of balance and will not finalize.

Select Owners
- Find Owner Button
- Click "Find Owner" button to select a single owner from the "Owner Analysis grid". The selected owner name is automatically sent to the "Starting Owner" field, and the "Ending Owner" and Property fields are disabled.
- Owner Type
- View and process statements by specific owner type.
- Property
- View and process statements by property.
- Single Owner
- Check this box to signify the processing of only one owner statement. Once checked, the Ending Owner field is disabled. The default setting is unchecked or "All Owners".
- Number or Name
- Select name to populate the Starting and Ending Owner lists sorted by last name, or select Number to populate the Starting and Ending Owner lists sorted by owner number.
- Starting and Ending Owner
- When printing a range of statements, select from the drop down list to signify which owner to start and which to end. For example, process statements for Owner Numbers 123 - 428 or Dunn - Miller.
Select Statement
- Include N/R Owners with No Activity and Zero Balance
- N/R stands for Non-Rental, and "No Activity" means there are no transactions for the statement period. Check this box to print or e-mail statements without regard to activity or balance belonging to non-rental owners. Properties can use N/R to track owner postings, etc., even though the room is no longer rented out to the public. This field is only enabled if Include Statements with No Activity and Zero Balance is checked. The three "Include" checkboxes are disabled when processing a single owner and ignored even if the boxes are checked, AND these settings are ignored when reviewing and finalizing. These checkboxes ONLY affect e-mailing and printing.
- Include OLD Owners with No Activity and Zero Balance
- "No Activity" means there are no transactions for the statement period. Check this box to process statements without regard to activity or balance belonging to owners who do not currently own a room at the property. This option allows for the printing of owner history as well as current owners. This field is only enabled if Include Statements with No Activity and Zero Balance is checked. The three "Include" checkboxes are disabled when processing a single owner and ignored even if the boxes are checked, AND these settings are ignored when reviewing and finalizing. These checkboxes ONLY affect e-mailing and printing.
- Include Statements with No Activity and Zero Balance
- "No Activity" means there are no transactions for the statement period. Check this box to process all statements for the selected owner(s) regardless of activity and balance. Statements with credits, amounts due, and zero balances are all included. This checkbox is not checked by default. This field is only enabled (and considered) if processing more than one owner (a range). The three "Include" checkboxes are disabled when processing a single owner and ignored even if the boxes are checked, AND these settings are ignored when reviewing and finalizing. These checkboxes ONLY affect e-mailing and printing.
- New Activity Since Last Statement
- This default setting prints a statement for the selected owner(s) displaying only transactions that have a posting date between the last statement date and the "New Activity Statement" date, or all new activity for an owner since the last statement marker.
When a Single Owner and "New activity since last statement" are selected, the "Previous Ending Statement Dates" drop-down is populated with the last statement marker date, but the field is disabled.
When Owner Statements Configuration Switch 912-01 "Always Process Owner Statements on Calendar Month Only" is checked and the "New Activity Ending Statement Date" is selected, the last day of the previous month is still displayed if it has NOT been finalized. If it has been finalized, the date is changed to the RDP system date. For instance, if the system date is 3/10/98 and the statement was finalized on 2/28/98, the "New Activity Ending Statement Date" is 3/10/98. This allows the property to view the current statement during the month without waiting until the end of the month. This is available when "Process Revenue on Calendar Month Only" switch is set to yes.- Owner
- When printing a statement for a single owner, once the specific owner is selected, the Owner Number and Owner Name are displayed in these two fields. To select a different owner, click the Find Owner button and select another owner or type an owner number in the Number field.
- Previous Statement
- If Single Owner is chosen, the drop down box has the dates of all previous statements for that owner master. If All Owners is selected, the statement date can be chosen from the calendar drop down.
- Single Owner Previous Statement Dates
- When processing statements for a single owner and Previous Statement is selected, the Single Owner Previous Statement Dates field is populated with the dates of previous statements for that particular owner and allows the user to select one from the drop down list.
- Statement Report and Browse
- Click the Browse button to search through folders to locate the appropriate statement report. The system default is set to access the RDPNT/RDP/Reports10/Owner folder. RDPWin currently offers several types of owner statement reports. Statement.rpt offers basic owner statement information and Statement-SharedExspenses.rpt is used when properties and owners share expenses such as like travel agent commissions, credit card fees, etc. Hotel Software Property Management System, Motel, Condo, Vacation Rental, Resort and Canadian Statements are handled differently.
Statement Actions
- E-mail Tab
- Statements can be printed or e-mailed. Select this tab to e-mail statements for the selected owners. This only applies to owners that have e-mail addresses on the owner master. The Process Revenue needs to occur before the statement is printed.
- Cancel
- Once "E-mail All Statements" has been activated, a Cancel button appears to discontinue the e-mail.
- E-mail One/All Statement(s)
- Click E-mail All Statements to send the e-mails. The system displays a confirmation when the e-mail(s) have been successfully sent out. The title of this button is based on the selection above for the Single/All Owner(s) radio button. If Single, then the button reads "E-mail One Statement" and if All Owners is selected, this button is titled "E-mail All Statements". When "All Owners" is selected and Print, E-Mail, or Close All Statements is clicked, a Result tab displays the status of the processing.
- Select a Previous Report to View
- Once emailing has been completed, a Result tab displays the outcome in a grid (similar to the one in Process Owner Revenue). The system creates an XML report and allows the printing of that report. To view a previous E-mail report, click the "Select a previous Report to View" down-arrow to select a date/time from the list. Once chosen, click Display to view that report. This is NOT available when a single owner is selected. Each individual Print, E-mail, and Finalize tabs has a drop-down box to allow selection.
- Statement Report Format
- The Crystal Report is attached to the e-mail as either an Adobe PDF file or a Word File. PDF format is recommended, since it is better protected against changes by the recipient. Crystal Reports are not exported to HTML and/or included in the body of the e-mail because web based E-Mail, like Yahoo and Hotmail, alters the HTML to be unreadable. If sending a PDF statement, the Adobe website should be referenced (www.Adobe.com) since the PDF Reader may not be installed on all computers. This is a free download available for all operating system platforms.
- Add Owner Number to Subject
- When checked, the owner number is added to the Subject by the system when the e-mail is sent.
- Additional Attachments
- In addition to emailing owner statements, use the "Additional Attachments" section of the E-mail tab to send other attachments to owners within the same e-mail. Enter the path to the selected document or click the Browse button to navigate to the desired report(s). Use the Remove button to deselect any additional attachments selected. Attachments need to reside in the Attachments folder located in the RDP root folder. Sample folder path: R:\RDP\Attachments.
- Attach Owner Specific Files
- The Attach Owner Specific Files checkbox, when selected can be configured to send additional attachments to the owner in an e-mail along with the owner statement. Owner specific files could include the owner's utility bill, a work order notification, an invoice, etc. A new folder must be created with the statement closing date as the name using the format yyyy-mm-dd. For example, the statement closing date is March 31, 2011. The folder name should be 2011-03-31. The folder needs to reside in the Attachments folder located in the RDP root folder. Sample folder path: R:\RDP\Attachments\2011-03-31.
- Each owner specific file must have the owner number in the file name as the prefix. For example, the naming convention for attachments for owner 102 should start with "102" like 102ElectricBill.pdf or 102_GasBill.pdf. The system reads the owner number in the file name and only sends that owner those files with the applicable owner number. A new checkbox called Default for 'Attach Owner Specific Files' has been added to the Statements Tab in the Owner Configuration. When checked, the e-mailed statements automatically look for owner specific files for that statement date.
- Finalize Tab
- Statements must be closed at the end of each statement period. Select this tab to close statements for the selected owners. The statement always shows all transactions since the last time a statement was closed. After a statement is closed, no additional corrections can be made to the statement. Corrections after finalizing a balance forward statement must be made in the next period. When a balance forward statement is closed, the system generates a statement marker transaction, which defines the end of one statement and the beginning of the next. Statement markers appear as a B7D@ transaction code whenever transactions are viewed for the owner. Balance forward statements can be reprinted for any past period from one statement marker to the next.
If statements are not closed, the next statement for the owner will include all activity from the last statement marker instead of just new activity. Even if no corrections were made to the first statement, statements must be re-printed.
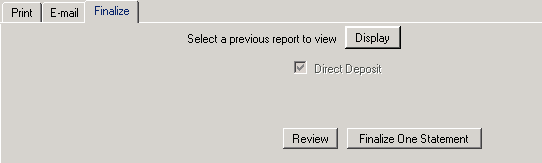
When Pay By Direct Deposit is selected on the Owner Detail tab of the owner master, the Finalize tab of Owner Statements displays the Direct Deposit checkbox checked and disabled. Instead of generating a voucher transaction on the owner account, a direct deposit transaction code will be created using the transaction code B7DA.
- Select a Previous Report to View
- Once statements have been finalized, a Result tab displays the outcome in a grid. The system creates an XML report with the ability to print the report. To view a previous Finalize report, click the "Select a previous Report to View" down-arrow to select a date/time from the list. Once chosen, click Display to view that report. This is NOT available when a single owner is selected. Each individual Print, E-mail, and Finalize tabs has a drop down box to allow selection.
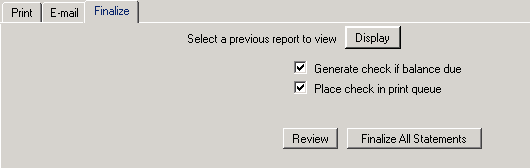
- Generate Check if Balance Due
- When statements are closed and this checkbox is checked, the system looks at the Pay Owner for Balance due checkbox on the owner master. When both checkboxes are checked and the owner master has a credit balance, a check or wire transaction is generate based on the radio button set on the owner master. If one of the boxes is unchecked, checks are not generated for any master even when there is a negative balance due. This switch should not be checked in order to hold a balance "on account" for the owner.
- Print Check From RDP
- Checks are generated by the balance forward statement if the "Statements: Generate check on balance due" box is checked on the Owner Master. Only owners with the radio button Pay by Check selected will generate the check voucher. If a check is generated, it is placed in the check queue. The check queue is printed by selecting Check Vouchers from the Accounting menu. Check forms can be purchased from the RDP forms department at 1-800-RDP-PAPR (1-800-737-7277).
- Review Button
- Once all owner statements have been printed and reviewed, access the Finalize tab and click the Review button to ensure the reservation information, charges, payments, and statement balances are correct. The results are displayed in a grid. Review the amount of the Generated Check Amount and the balances prior and after finalization. Columns available from this grid are Number (owner), Type, Name, Balance Prior to Finalization, Generated Check Amount, Balance After Finalization, Charges Since mm/dd/yy (where the date is the statement date), Current Balance, and Status. The Results tab is not available when dealing with only one owner.
- Finalize One/All Statement(s)
- Once statements have been printed, reviewed, and corrected, click Finalize One/All Statements to close the statement. The system displays a confirmation when statements have been successfully processed. The title of this button is based on the selection above for the Single Owner checkbox. If Single, then the button reads "Finalize One Statement". If Single Owner is unchecked, this button is titled "Finalize All Statements". When "All Owners" is selected and Print, E-Mail, or Finalize All Statements is clicked, a Result tab displays the status of the processing.
- Cancel
- Once "Finalize All Statements" has been activated, a Cancel button appears to allow discontinuation of the action.
- Print Tab
- Once revenue and direct charges have been posted, statements can be printed or e-mailed. Select this tab to print statement for the selected owners or all owners. Owner Statements cannot be printed until owner revenue has been processed.
After the balance forward statement is printed, review it carefully. There are many possible errors that may have occurred and need to be corrected before printing the final copy of the statement for the customer. Possible errors include:
- Cancel
- Once "Print All Statements" has been activated, a Cancel button appears to allow discontinuation of the action.
- Printer
- If the Print option is checked, the Printer field is enabled. Select the printer from the drop down in order to direct the printing. If the desired printer is not in the list, see your system administrator.
- Exclude Owners w/ E-mail Address
- When checked and "Print All Statements" is clicked, the system prints statements based on parameters set elsewhere on the form, but only for owner masters without a valid e-mail address stored on the master. Use this feature when the property's first choice is to email statements to all owners with a valid email address and print/mail statements to the remaining owner masters.
Note: When statements are printed for owners that have a value in the e-mail address field, check the address for validity. The system knows when an e-mail address is invalid.- Exclude Owners with Zero Balance, Regardless of Activity
- When checked and a previous statement is printed, the balance on the D@ transaction for that statement date is checked. When the balance is zero, the statement is not printed.
- Exclude Owners with a Credit Balance
- When checked, statements will not print when the current owner balance is less than zero. When check and a previous statement is printed, the balance on the D@ transaction for that statement date is checked. When the balance is less than zero, the statement is not printed.
- Exclude Owners with No Activity, Regardless of Balance
- Some properties might have owners that without activity, although they have a balance due to the trust money on the owner master. When "Exclude Owners with Zero Balance, Regardless of Activity" is checked, owners statements with no activity since the last D@ are not printed. Balance is not a consideration.
- Print One/All Statement(s)
- Click to print statements for the selected owner(s). When All Owners is selected and Print, E-Mail, or Close All Statements is clicked, a Result tab displays the status of the processing.
- Preview One Statement
- Click to display a sample of the selected report in the viewer. If no owner is selected, the Find screen displays to allow for owner selection.
- Preview All Statements
- Click to display all owner statements (based on selected owner(s)and statement information) in the Report Viewer (in owner number order). Use the Previous and Next buttons in the Report Viewer to navigate through the owners one at a time. There is also a Find button to go directly to any owner. Once the Find button is used, the Previous and Next buttons use the displayed owner as the new starting point. A detail button is also available to view all the owner detail (read-only).
The statement can be printed or exported to a PDF file using the standard Crystal Report Viewer buttons in the toolbar while displayed in the Report Viewer.- Select a Previous Report to View
- Once printing has been completed, a Result tab displays the outcome in a grid. The system creates an XML report with the ability to print the report. To view a previous Print report, click the "Select a previous Report to View" down-arrow to select a date/time from the list. Once chosen, click Display to view that report. This is NOT available when a single owner is selected. Each individual Print, E-mail, and Finalize tabs has a drop-down box to allow selection.
- Incorrect format. For example, the text "YOUR COMPANY NAME HERE" may still appear on the form. The statement forms must be modified with the report writer prior to printing.
- Incorrect ending statement date (causing some new transactions not to appear).
- Missing transactions because of incorrect use of the "*" no-print flag.
- Not processing owner revenue prior to generating statements.
- Extra transactions because they were not marked as "no-print".
- Missing transactions because they were not posted.
- Missing payments because they were not posted.
- Once printed, reviewed, and correct, statements must be closed or the next statement will include all activity instead of just new activity. Even if no corrections were made to the first statement, statements must be re-printed.
- Result Tab
- When printing, e-mailing, or finalizing all statements, the Result tab appears and displays the status of each record. Fields in the grid are Owner Number, Type, Name, Balance Due, and Status. Totals are also displayed. While the records are being processed, a status bar is displayed in the bottom left corner of the form. It displays the percentage of statements processed until complete. Once the action is complete, the status bar disappears. The system displays a Status notification including the date of the statements processed and how many records were printed, e-mailed, or closed.
- Email Results Sample Screen
Finalize Results Sample Screen


View Transactions
If no owner is selected when this button is accessed, the Find Owner screen opens. Once an owner is selected, the Transactions form opens to allow for viewing transactions and, if necessary, posting charges. For more information, see Post Charges to Owners.
Calculation of Net Owner Amount
- The system calculates the net owner amount on a given folio transaction
as follows:
- First, the system attaches the transaction to the folio and recalculates the total balance due on the folio. The transaction increments either the Room Charge (Bucket 0), Other Charge-1 (Bucket 1), or Other Charge-2 (Bucket 2) fields on the folio based on the "bucket number" assigned to the transaction.
- The system next looks at the room number on the folio. The system checks the Owner Billing checkbox on the Room Master/Room Detail tab to see if the room is owned. If the Owner Billing field is checked, the system continues to the next step. If Owner Billing field is not checked, the owner will not receive revenue for the transactions.
- The system looks at the owner Pay Code assigned
to the folio. The Pay Code appears on the Owner tab of the Reservation
Details.

Figure 1 - In this example, the folio is in Room Number 104 with an Owner Pay Code of OA (Default Owner Rates).
Figure 2 - The total of all transactions already posted to this folio is $556.56. (The final $94.16 transaction is pre-posted, however that column is not displayed here.)
- Owner payment codes are defined in table C7 and assigned to room
masters. Each reservation uses the owner payment code assigned to the
room master as a default, but allows an override on a reservation by reservation
basis. In this example, assume that owner payment code OA has been defined
as: OA - 65, 0, 0, signifying that the owner receives 65% of room
revenue (Bucket 0), and 0% of incidentals (Buckets 1 & 2).
The system then multiplies the owner payment code percentage for the transaction bucket times the amount of the transaction. In this example, the B200 transaction was for $408 for bucket zero (the Room Charge field) without tax. Since the owner payment code of OA for bucket 0 is 65%, the owner portion for this transaction is calculated as:
As shown in Figure 1 above, three nights at $80, two nights at $84 totaling $408 in posted room charges. Taxes and pre-posted charges are not considered when figuring the Owner Amount. The equation is calculated as $408 X 65% = $265.20 (the Owner Amount as shown in Figure 1 above.)
Hawaiian Statements
When Include Tax in Gross Revenue (B7DF) Reported to Owners (C1HAWAII) checkbox is checked in Owner Configuration, owners can be selected to pay the room revenue taxes to the taxing authority (as opposed to the management company paying the tax). Not all owners are responsible for paying the tax on an owner-by-owner basis. Use either the Statement-SharedExpensesHawaiiTax.rpt or the Statement-SharedExpensesHawaiiTax-Hide.rpt. Whether the property or the owner is responsible for paying the taxes is the determining factor for which report to select.
Shared Expenses for Canadian Owners
When Include GST Tax in Gross Revenue (B7DF)
Reported to Owners is checked in Owner Configuration, the GST (Goods and Services Tax) feature for Canadian customers
is active and properties can selectively allow the passing the GST on a rental to the
owner as well as adding GST on services/charges done by the property management
company on the owner’s property on an owner by owner basis.
The tax information is calculated and included in the statement using RDPNT\RDP\Reports10\Owner\Statement-SharedExpenseCanadaTax.rpt in the following manner:
Gross Revenue
- Mgmt fee
- Travel Agent Fee (optional)
- Credit Card Fee (optional)
= Owner Net
+ Total Tax (GST on the Gross Revenue)
- Mgmt Tax (Mgmt portion of GST)
= Owner's Final Statement Amount
The total for the owner is then the normal gross – mgmt fee and the extra GST-Mgmt
GST. All other owner shared charges (TA Fee, Credit Card fee, etc.) work the
same since the GST is calculated on the gross room revenue. The owner ends up
sending the net GST (Total – Mgmt Portion) to the government and the property
management company sends their portion of the GST to the government.
If the Owner Pays GST check box is not checked, the owner statement for that
particular owner will not show the Total Tax and Mgmt Tax columns at all.
The GST is stored on the B7DF and B7DG codes. When the Generate Totals
option is used, these taxes will be totaled to the tax 1 or tax 2 account in
table B0 depending on the C1GST2 switch setting (No = Tax 1, Yes = Tax 2).
Steps
- Select either one owner or all owners.
- Select "New activity since last statement" radio button.
- Decide on whether to include owners with no activity and check box if applicable.
- Decide on whether or not to print statements for N/R and Old owners with no activity and/or zero balance.
- Verify the "Ending Activity Statement Date".
- Confirm the correct owner statement report is selected.
- Click "Print All Statements" to print hard copies of the statements for review or click "Preview All Statements" to process and view all statements on the computer screen. Printing review statements can take a while. Confirm the printer is not needed for the next 10 minutes or so.
- Review all statements for accuracy.
- Make any necessary changes by manually posting charges to the owner for the month of the statement.
- Finalize Statements.
- Select Finalize tab under Statement Actions.
- Check "Generate Check if Balance Due".
- Check "Place Check in Print Queue".
- Click Review.
- Verify all information.
- Click "Finalize All Statements". Changes cannot be made for that statement period once finalized.
- Determine how owners are to receive
statements: e-mail or printed statements via regular mail.
Email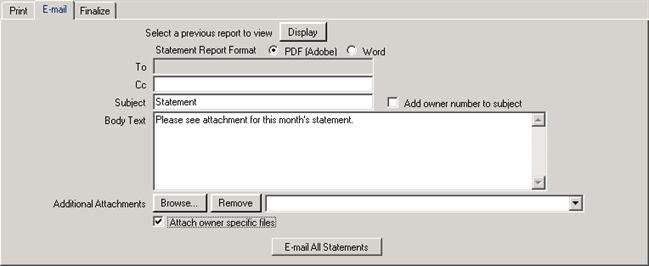
- Select Statement Report Format (PDF or Word attachment).
- Enter any carbon copy e-mail addresses (CC).
- Complete the Subject and Body Text fields.
- Select any additional attachments necessary.
- Select E-mail All Statements.
- Results are displayed in case of e-mail failure.
- Select Owner Statements to print one or all statements.
- Select the Previous Statement radio button.
- Select Statement Date.
- Select Print under statement actions.
- Select Print all statements.
- Navigate to the Accounting menu and select Check Vouchers.
- Change Master type to Owner.
- Change voucher status to "Will print".
- Click Display.
- Verify the checks displayed are the checks desired. To disallow the printing of any check in the list, change the status.
- Under Print Check, select the Print Test Check radio button.
- Load check into the printer.
- Enter a starting check number.
- Click Print.
- Verify the checks are aligned correctly.
- Select the Print Check radio button.
Tutorials
For more information, click Print a New Statement or Print a Previous Statement.
Save & Close, Save, and Close
Click here for instruction on how to Save and Close forms.
Click these links for Frequently Asked Questions or Troubleshooting assistance.
12/27/2010
© 1983-2010 Resort Data Processing, Inc. All rights reserved.