Click here for
tutorials
| TOPICS | |
|---|---|
Change Bank Status to Reconciled (Trust Accounting Customers)
- Run this utility when setting up customers to use Trust Accounting features. This utility should only be run once. A flag is set in C1CHKFIL after completion.
-
Initially, the BankStatus field on each transaction is blank. When properties use the Trust Deposits, Trust Transfers, or Reconcile Bank Accounts options within the Accounting | Trust Accounting menu, the Bank Status field on the money transactions must to be correct. When selected, a warning is displayed "***WARNING: This process should only be run if directed by RDP Support. *** You are about to change the Bank Status to 'Reconciled' on all cash transaction prior to and including a specific date. Non-active history transactions will also be changed. This process can take several minutes, continue?". Click Yes only if directed by RPD Support.
This utility prompts for a date, then changes the Bank Status field on all money transactions (meaning D0, D1, D3, etc., transaction codes) to “R” for reconciled. For example, when a property has reconciled the bank statements for 7/31/06, and the date of the earliest transaction NOT on the statement is 7/30/06. Any money taken on 7/31 is most likely not deposited until 8/1. Use "Change Bank Status to Reconciled" to change all the transactions prior to and including 7/30/06.
Change RTF Files
"Change RTF Files" calls Microsoft Word Pad to allow changes to be made to the RTF help files. RTF files are used throughout the system to offer help to the user, such as the View Info button on the Yield Management screen that displays details, including pictures if available, of the selected room type. See Custom Help for more detail changing these files.
Crystal Maintenance
Change the data connection of all Crystal Reports in a folder. The data connection is where the File.DDF file resides. On single-user systems, this is normally C:\RDPNT/RDP. On network systems, this is usually F:\RDP. To change the data connection, select the Report Folder (the Browse button is available if necessary), enter the DDF Path (the Browse button is available if necessary), and click the Change button. The Changed Files are listed in the bottom half of the screen.
For steps on how to change or verify the path, see
Path.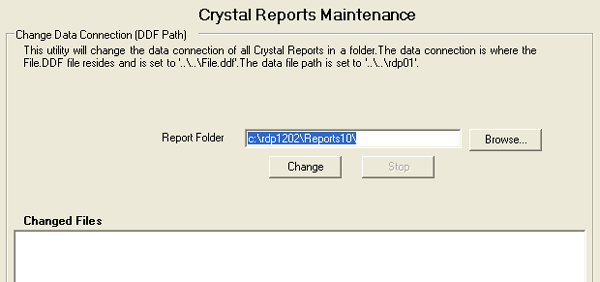
Top
DDF Information (For System Administrators)
Data Dictionary Files (DDF) describe the database
structure used by RDPWin and all other RDP systems. There are three main DDF
files: File.ddf, Field.ddf and Index.ddf. The information in File.ddf listed
in the top section of this screen displays the tables used in the RDPWin
database structure. Each table has fields which contain specific information
used in RDPWin. For example, highlight the Agents table to view all fields
used for travel agents such as Commission Code. When viewing the agent
master in RDPWin, the fields displayed on the master are stored in the
Agents.dat file.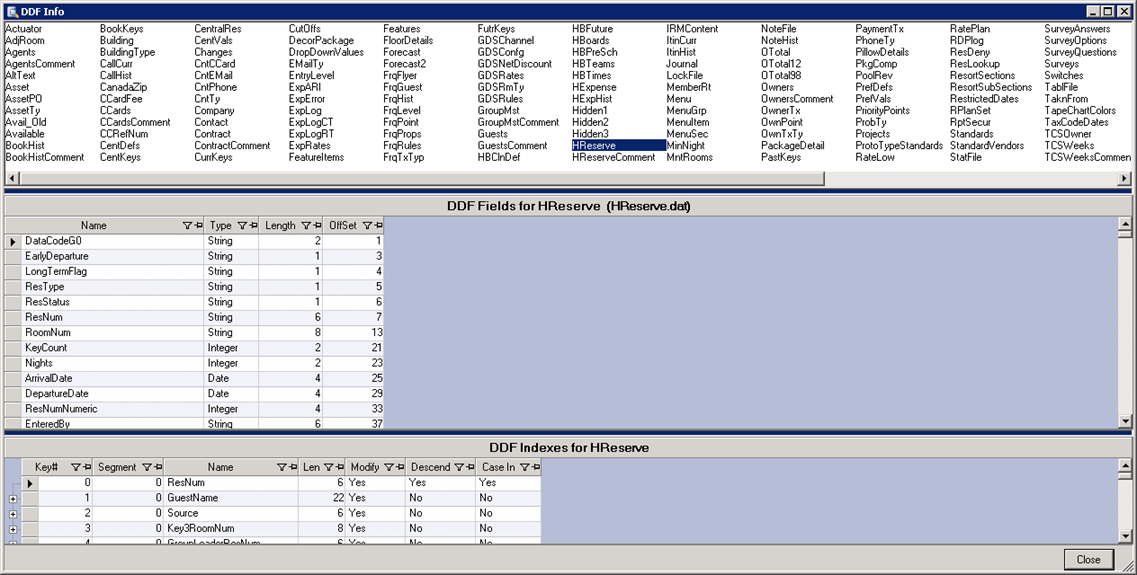
Third party software can use the DDF information to read the RDP database
and extract information for manipulation outside the RDP systems. RDP does
not support writing, changing or updating information into the RDP database
by any software, except that created by RDP.
- Field.ddf
- The information in Field.ddf is listed the middle
section of this screen and displays the fields for the selected table. To view the
fields for a selected table, click on any table in the top section of
the screen. The
details are displayed in the middle of the screen. Highlight Agents.dat to display all fields associated with travel agents. Click and drag fields to group
or reorder the
grid, and click
 to filter the columns.
 - Index.ddf
- The information in Index.ddf is listed in the bottom section of this screen and displays the indexes (or keys) for the selected table. To view the Indexes and Fields in a particular table, click on any table in the top section of the screen. The details are shown at the bottom of the screen.
Fix Beginning Balances
When selected, this utility goes through each account in the prior year's
Totals file, locates the matching account in the current year's Totals file,
and updates the beginning balance using the prior year's ending balance.
This utility should be run when beginning balances for G/L accounts do not
match the ending balances from the prior year. This should only happen when
the system roles from one year to the next.
Click Fix Beginning Balances from the System | File Utilities menu. At
the "About to fix all beginning balances based on last year's ending
balance. This process can take several minutes, continue?", click Yes.
A status displays during the process. Click OK at the "Process
Completed" message.
Import Chart of Accounts
If the general ledger is the
roadmap used to track money, then the chart of accounts represents the
interstates and highways used calculate profits. The chart serves as
the map key or index to all the accounts where transactions are recorded.
All properties can have a unique chart of accounts customized to fit
specific needs. The chart of accounts is usually set up in the order
that the accounts appear on the balance sheet. When creating a chart
of accounts, be sure to leave room between account types so new accounts can
be added as the property grows.
Click "Import Chart of Accounts" from the System | File Utilities menu.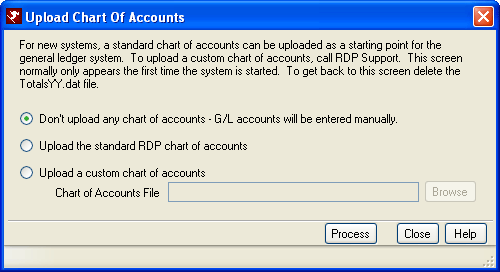
- Don't Upload any Chart of Accounts
- When selected, the standard chart of accounts that is shipped with RDPWin is not uploaded. All general ledger accounts must be entered manually.
- Upload the Standard RDP Chart of Accounts
- The RDP system comes loaded with a standard chart of accounts. Select this radio button to import that standard chart.
- Upload a Custom Chart of Accounts
- Select this radio button to enable the "Chart of Accounts File"
field to designate a customized chart. Either type in the file
path directly or click Browse to locate the appropriate existing file.
If no file is identified, an error message is displayed.
All accounts are added to the file in the same format. - Create a document and save the to the RDP root directory.
- The account number can be up to eight (8) characters in length.
- A comma separates the account number from the account description such as: 123456789,Acct.desc.
- The account description can be up to 40 characters in length.
- The first time the user logs into RDP (Win or DOS), the system prompts as shown in the screen shot above. Select the second choice "Upload with a custom chart of accounts" and enter the name of the file to be created.
- Click Process.
Recalculate Balance Due on Work Order
Only available if the Work Orders & Asset Management (RZ) module is installed, this feature is intended to assist customers who have been using the Total Cost field within work orders with tracking the billing process and is intended for customers who have had the work order module prior to version 1.114. When selected, all work orders with an amount in the Total Cost field and posted work order transactions are calculated to updated the Balance Due field. To run, select "Recalculate Balance Due on Work Orders". The system prompts with "About to recalculate the balance due on all work orders. Continue?”. Click Yes to begin the process and display the status. Once complete, the system displays a “Process Completed” message. Click the OK button.
Switches
Select Switches to view a grid that displays the Switch ID, Subcategory (filterable), Description and Current Setting. For detail on specific switches, see system administrator assistance. For customers running Production mode, not all switches are displayed in the switch list. Any switch located on a configuration screen anywhere within the system is only available from those screens. The configuration screens have logic to assure correct settings. Any seldom-used switches, such as those intended for a single customer, and old switches (no longer in use) are not visible to customers. For questions on any switch not visible, please contact RDP Support at (970) 845-7108.
- Category
- To narrow the display down to a particular category of switches, click the Category down-arrow and select an appropriate category from the list.
- Clear Search
- To return the grid to display all switches, click the Clear Search button.
- Search
- If searching for a particular switch, type in as many characters of the ID, Subcategory, or Description as possible. As characters are entered into the Search text box, the system display only Switches that match the entries. For example, should you type 212, the system displays any switches with that number in the ID, Subcategory, or Description. If "Maximum" is entered, the grid only displays switches with the word Maximum in its Description field.
- Setting
- The user can turn switches on and off using the toggle Yes/No radio buttons. Some switches have drop-down tables to select from, and others have test boxes. When Setting changes are complete, click the Save button to save all changes. Should the user wish to abandon all changes made (including column filters) and return to the previous Settings, click the Cancel button.
- Show Switches for...
- Filter the Switches grid four different ways: Show Switches for (1) RDPWin (those that affect RDPWin regardless of RDP-DOS setting), (2) RDP-DOS (those that affect RDP-DOS regardless of RDPWin setting) (3) Both (affect both RDP-DOS and Win), and (4) All (all switches regardless of what system is affected). RDPWin is the default selection. If a switch is changed in RDPWin and the checkbox is not checked for RDPWin, a warning is issued that the switch change does not affect the RDPWin product and is a RDP-DOS only switch.
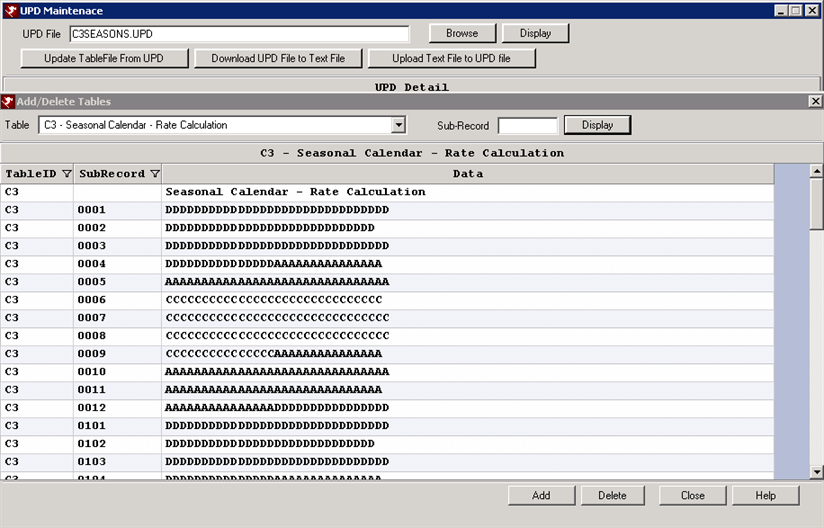
UPD Maintenance
For details on how to create, maintain or update a UPD file, see UPD Maintenance help page.
The UPD Maintenance utility is designed to create, maintain, and import UPD files. This is the RDPWin equivalent of the RDP DOS 997 option. The UPD Maintenance is a useful tool to transfer information from one directory to another, or to download a table to a text file for easy updating. For example, if the market codes from directory 01 should be uploaded into directory 02, create a UPD of this table and update the table file from the UPD. Use this feature to transfer seasons, source of business codes, or any table or subrecord from a table from directory to another.
The user must first enter the UPD file name or use the browse button to locate an existing UPD file. Once the file is entered or selected, click the Display button. If creating a new UPD, enter the file name and if it doesn't exist, it will prompt to make a new one. Then select the table for which to add to the UPD. Once the data displays in the UPD Details, it can be changed or rows can be added. Information can be uploaded or download from a text file. To update the table file with the data in the UPD, click the Update TableFile from UPD button.
Click these links for Frequently Asked Questions or Troubleshooting assistance.
04/05/2012
© 1983-2012 Resort Data Processing, Inc. All rights reserved.