| IRM.Net Topics | |
|---|---|
|
Install Version 3 on 2003 Server Install Version 3 on 2008 Server |
|
First-time Installation Steps for Version 3 on a 2008 IRM Server
Click here for 2003 server installation steps.
- Log into the IRM server as the administrator.
- Ensure the server meets with RDP's Hardware Requirements.
- SSL Certificate is required for IRM.Net Version 3.
- Secure connection (https), required to view the following pages: RESENTRY, LOGIN, MONITOR & OWNERHOME.
- Customers must add/change the following secure links to
their marketing site for Owners, Groups and travel agents.
The monitor also needs to be started with a secure link when
viewed from another computer besides the IRMNet server.
- https://irm.resortdata.com/IRMNet3/ownerhome.aspx
- https://irm.resortdata.com/IRMNet3/Login.aspx
- https://irm.resortdata.com/IRMNet3/monitor.aspx
- Install the most recent RDP-DOS update (00565 or higher as of 1/20/10).
- Install the most recent RDPWin update (3.0.1.01 or higher as of 2/22/10).
- Install Pervasive.
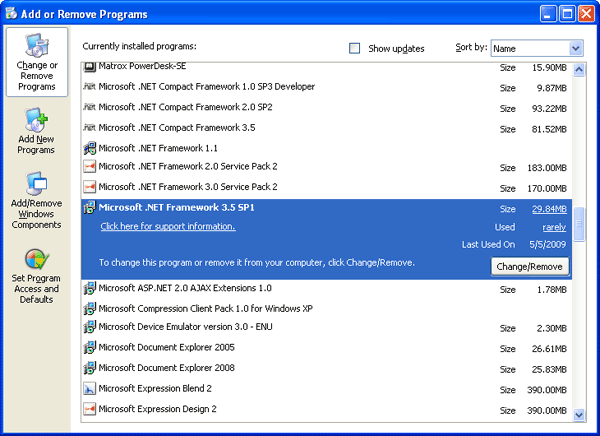
- Install .Net Framework 3.5.
Do not remove Microsoft .Net 1.1 if it exists. If .Net 3 or higher is installed it is OK, do not remove.
- Check to see if Internet Information Services 7 (IIS7) is installed. If not, have the property's IT person install it.
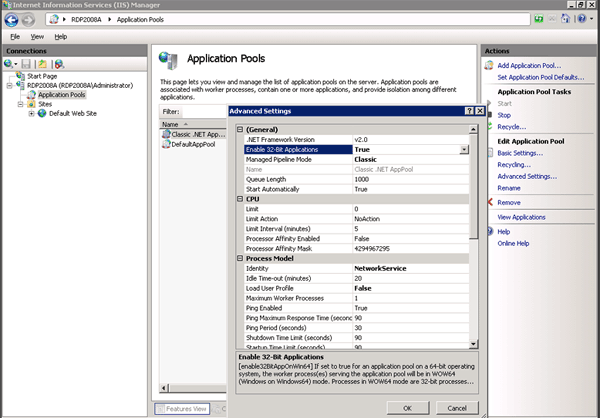
- When running a 64-bit version of Server 2008, enable 32-bit applications.
- Select Internet Information Services 7 (IIS7) from the Start/Settings/Control Panel/Administrative Tools menu.
- Expand the computer name and highlight Application Pools.
- Select Classic .Net App Pool from the list.
- Select Advanced Settings from the right side of the screen.
- Change the Enable 32-bit Applications to True.
- Create a folder called IRMSetup folder on the C drive of the IRM machine and download the IRMNet executable to this folder.
- Install the latest IRMNet update (IRMNet3.0.1.01.exe as of
2/22/10 or higher) using the included default pathways (such as c:\irmsetup\IRMNet3.0.1.01.exe).
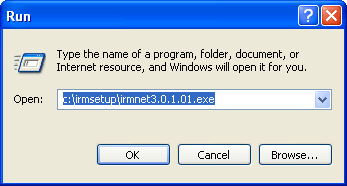
Click OK.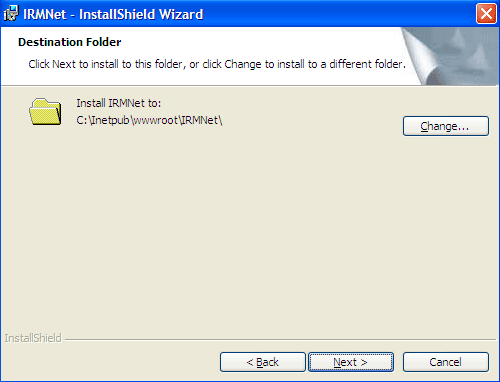
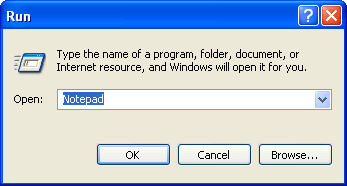
Click Next and then Finish when prompted. - Create the "IRMNetPath.txt" file. From the Start menu, select Run. Enter Notepad in the Open field, and click OK.
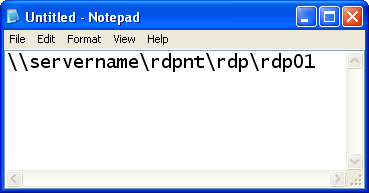
- Type in the UNC path to the dataserver and appropriate RDP directory such as RDP01. See Alternate Data Servers for information on how to use the IRM.Net with more than one data server.
Save the file as IRMNetPath.txt in the following location: "C:\Program Files x86\ResortDataProcessing\IRMNet\. It may be necessary to create the IRMNet folder.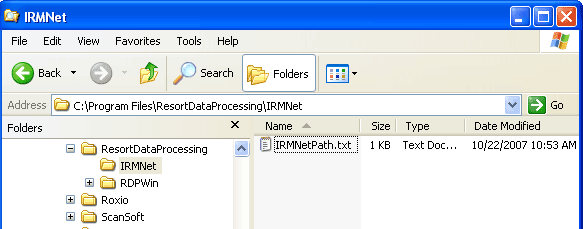
- Verify that the IRMNET and RDPWin Central Svc. applications exist and
make them Virtual Directories.
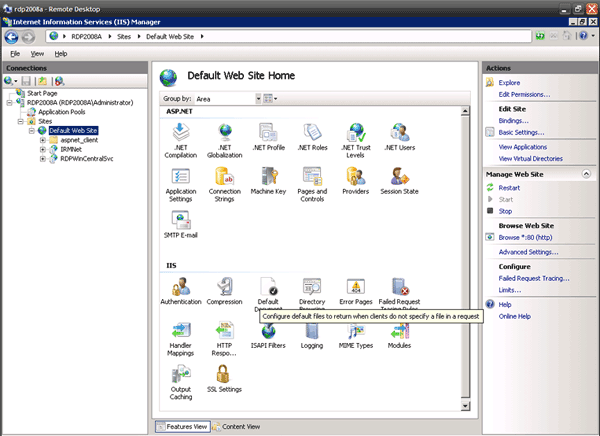
- Select Internet Information Services 7 (IIS7) from the Start/Settings/Control Panel/Administrative Tools menu.
- Expand local computer name, Sites, Default Website.
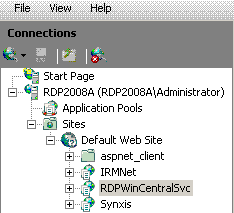
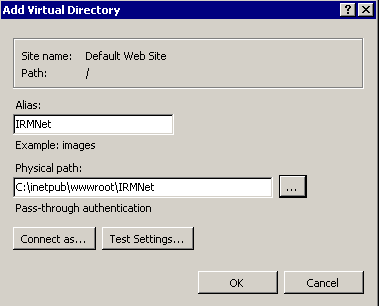
- Right-click on Default Website and select Virtual Directory.
Enter Alias as IRMNet and enter Path as
c:\inetpub\wwwroot\IRMNet.
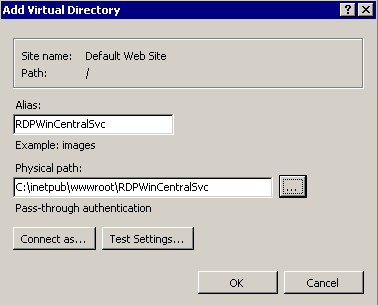
- Right click on Default Website, and select Add Virtual Directory.
Enter Alias as RDPWinCentralSvc and enter path as c:\inetpub\wwwroot\RDPWinCentralSvc.
- If they do not exist, open windows explorer and add folders IRMNet and RDPWinCentralSvc to C:\inetpub\wwwroot.
- Select Internet Information Services 7 (IIS7) from the Start/Settings/Control Panel/Administrative Tools menu.
- Right-click on the following virtual directories to confirm framework versions:
- Expand the connection.
- Expand the computer name folder.
- Expand Default Web Site.
- Right-click on the IRMNet folder and select "Convert to Application" option.
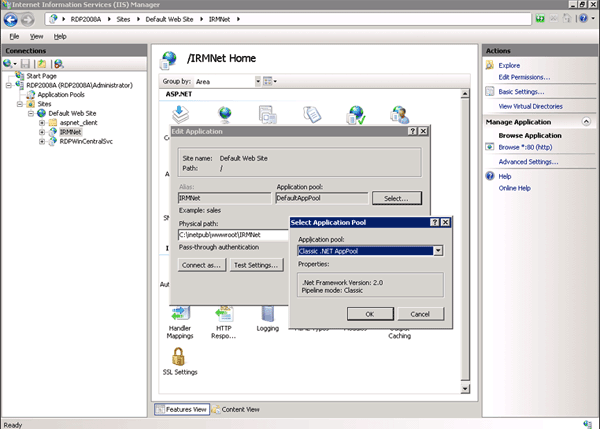
- Change the application pool to Classic .Net AppPool.
- Select Internet Information Services 7 (IIS7) from the Start/Settings/Control Panel/Administrative Tools menu.
- Expand Default Web Site and click on IRMNet.
- Select Basic Settings from the right side of the screen.
- Select Classic .Net AppPool and click the Select button.
- Expand Default Web Site and click on RDPWinCentralSvc.
- Select Basic Settings from the right side of the screen.
- Select Classic .Net AppPool and click the Select button.
- Verify that the ASP.Net user is installed.
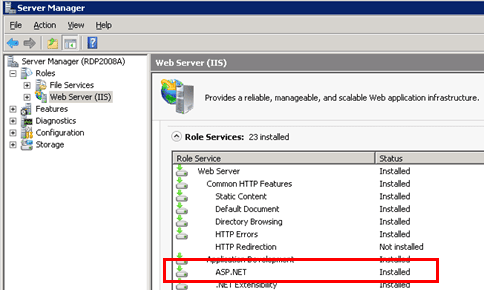
- Open Server Manager from Administrative Tools.
- Expand Roles and click on Web Server (IIS).
- On the right side of the page, scroll down to the Role Services and find ASP.NET in the list. Make sure it says Installed next to it.
- If the ASP.Net user is not installed, click the Add Role Services button to the right of the Role Services list.
- Check the ASP.NET box.
- Click the Next button and then click the Install button.
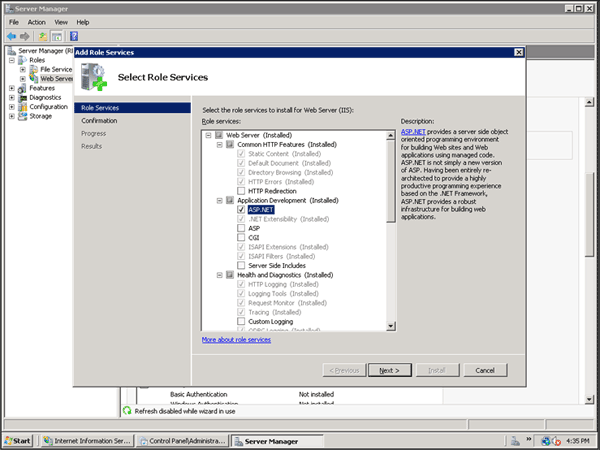
- When complete, click the Close button. You should now see Installed next to the ASP.NET role service.
- Install IIS6. (IIS 6 is required for SMTP to work)
- From the Server Manager screen, click Features on the left side of the screen. The list of installed features includes SMTP Server when already installed.
- When not installed, it must be added.
- Click the Add Features button on the right side of the screen.
- Scroll down to find SMTP Server and check the box next to it.
- You may be prompted to add other role services and features that are required for SMTP Server. If so, click the Add Required Role Services button and click Next to take all the defaults, then click Install. Installing SMTP automatically installs IIS6.
- Close.
- Configure SMTP for IIS6.
- Select Internet Information Services (IIS) 6 from the Start/Settings/Control Panel/Administrative Tools menu.
- Go to Administrator Tools/Server Manager/Configuration/Services and change SMTP to be Automatic.
- Expand the computer name and right-click the SMTP icon to get into Properties.
- On the Access tab, configure Connection and Relay to use the list below and set the group of computers to the use the first three parts of the IP address with a 0 for the fourth field. You can find this information by running ion by running ipconfig from a command prompt.
- Uncheck the box to "Allow all computers which successfully authenticate to relay, regardless of the list above" when in the relay section.
- Configure SMTP for IIS7.
- Select Internet Information Services (IIS) 7 from the Start/Settings/Control Panel/Administrative Tools menu.
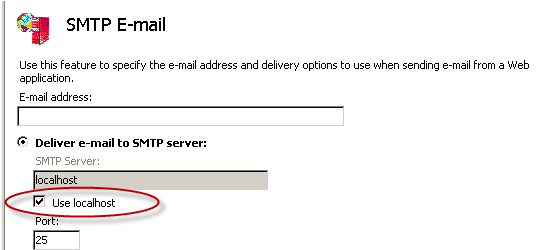
- In IIS 7, highlight the server name and select SMTP e-mail on the right side of the screen. This can only be seen if you are in Features View. If you are in Content View, right-click on the server name and select Switch to Features View.
- Double-click on the SMTP e-mail icon, and check the box to use localhost.
- Reboot the server.
- Add RDPIRM user to both IRM server and data server. Make the passwords the same. If IRM server is named "RDPIRM", then adding a username of RDPIRM cannot be used. Instead, add username "RDPIRM1".
- Give RDPIRM Full Control to RDPNT folder.
- Right-click on RDPNT folder and select Properties. Select the Sharing tab, click the Share button, and select Change Sharing Permissions. use the drop-down arrow for IRMNet and click Add. Highlight RDPIRM user and click Share, then click Done.
- Click on Security tab, Edit, Add, Advanced, Find Now and highlight IRMNet. Give IRMNet full Control.
- Right-click on Web-config, Properties and remove the read-only property from
c:\inetpub\wwwroot\IRMNet\web.config.
- Change web.config using Notepad. Find the line <System.web> near the top. Add the following text (case sensitive) directly below it:
<identity impersonate ="true" userName="RDPIRM" password="xxxxxx" />
where xxxxxx is the RDPIRM user password.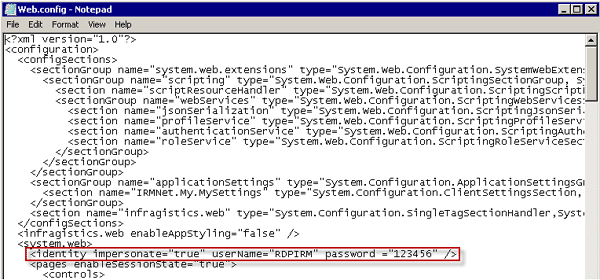
- Change web.config using Notepad. Find the line <System.web> near the top. Add the following text (case sensitive) directly below it:
- Use Windows Explorer to find
c:\windows\Microsoft.Net\Framework\v2.0.50727\Temporary ASP.Net Files folder.
- Right-click and select Properties, Security Tab, Add.
- Click the Locations button.
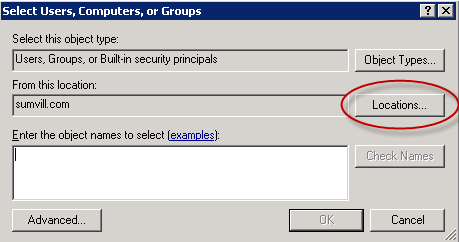
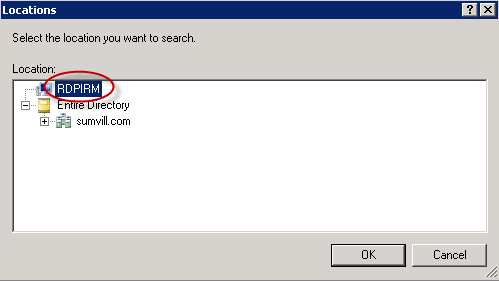
- Select the IRM computer name and click OK.
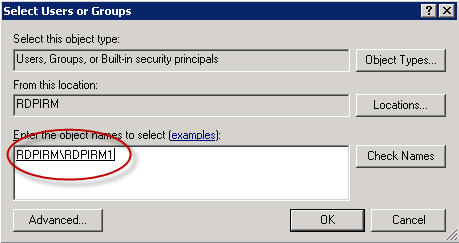
- Enter user that was assigned in Step #21 (i.e., "RDPIRM" or
"RDPIRM1") in the "Enter the object names to select" field.
Click "Check Names", then OK.
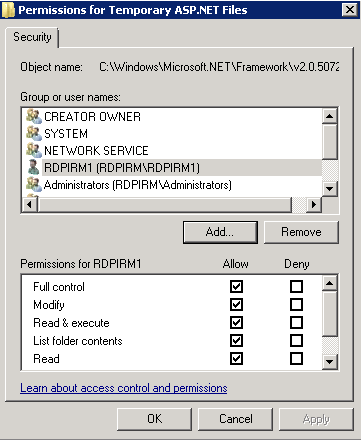
- Check the Allow checkbox for Full Control, and click OK.
- In RDPWin, change password for IRMNet to RMNet1.
- Open a web browser and go to localhost/irmnet/monitor.aspx
- Log into the monitor using the password created in Step 21 for the IRMNET user.
Configure RDPWin Monitor
- From the local, non-mapped relative drive on the data server, access c:\Program Files x86\ResortDataProcessing\RDPWin folder.
- Select Text Document from the File -> New main menu.
- Name the file "MonitorPath.txt".
- Double-click the MonitorPath.txt file to open the "MonitorPath.txt - Notepad" screen.
- Enter the correct path to be used (i.e., c:\rdpnt\rdp\rdp01).
- Select Save from the File main menu.
- From RDPWin, click Stop RDPWin Monitor (if already running).
- From RDPWin, click Start RDPWin Monitor. The first message in the RDPWin Monitor Log should display "RDPMonitor service started."
- Under Reporter -> Configuration -> Confirmation Settings tab, configure confirmations.
- Under Reporter -> Configuration -> Confirmation Associations tab, associate the New reservation type for with a confirmation to be used by RDPWin Monitor. Complete this for all possible Reservation Types.
- From System -> RDPWin Monitor -> Configuration, check the box for IRM and any other boxes that would apply.
- Follow Steps 1 - 3 of the Configure Monitor for Auto-Restart instructions found here.
Demo Mode and Secure Mode
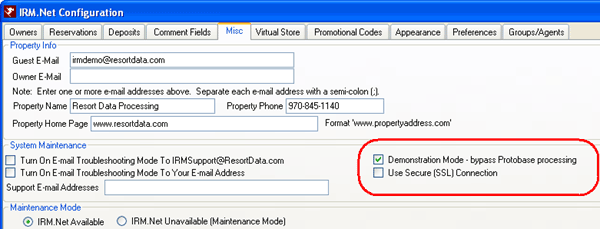
Since IRMNet requires an SSL certificate, the system assumes that this is installed and there is not a check box for this. The checkbox for Demonstration Mode is used for testing customer files. The Demonstration Mode bypasses credit card processing and the SSL certificate. The checkbox for Use Secure (SSL) Connection is used for testing an SSL certificate, and this checkbox is only available when Demonstration Mode is checked.
Troubleshooting the Installation
- If the IRM.Net does not start and the following error is displayed:
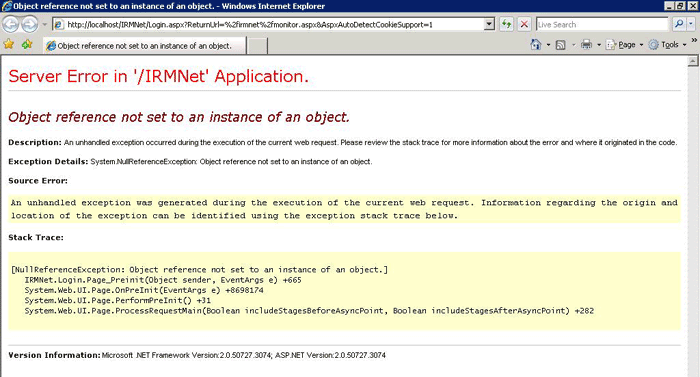
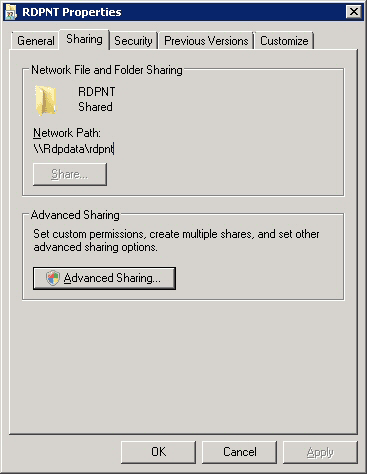
share the RDPNT folder with the IRM machine:- Log into the RDP data server.
- Use Windows Explorer to access the RDPNT directory, right-click and select Properties.
- Select the Sharing tab, and click the Advanced Sharing button.
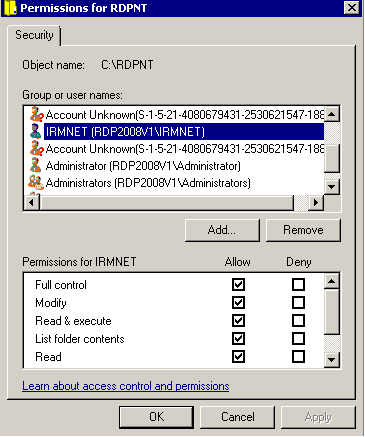
- Click the Security tab, Add, Select RDPIRM user and give RDPIRM
user Full Control.
- Open a browser and go to localhost/irmnet/monitor.aspx
- Log into the monitor using the password created in Step 21 for the IRMNET user.
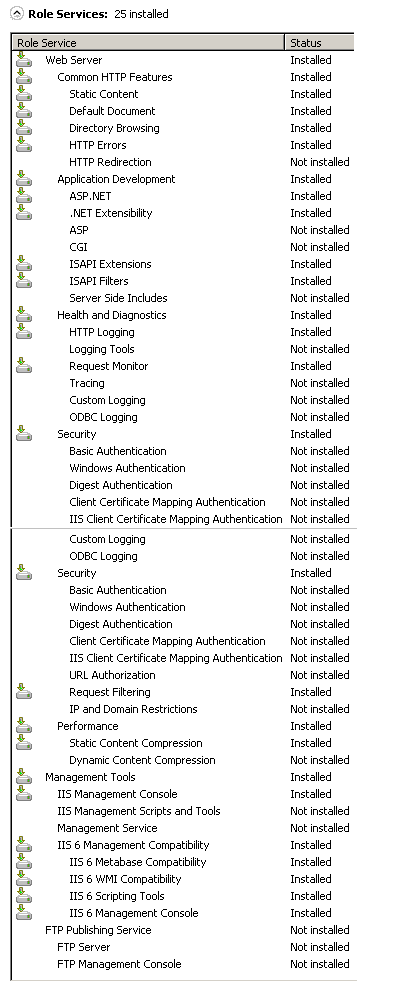
- Web Server (IIS) Roles Need to be Installed
06/03/2010
Click these links for Frequently Asked Questions or Troubleshooting assistance.
© 1983-2009 Resort Data Processing, Inc. All rights reserved.