** Refers to new or updated subjects in this tutorial.
Specific references within this tutorial to specific screen displays may differ if data/demo files have not been updated. It is advised that users get new data files before beginning a tutorial.
RDPWin's Itinerary with Batch Activities and the IRM's Virtual Store
- Add a G/L account to which activities will post.
- Add a transaction code for the activity on the B2 ledger and assign a two-digit code. The IRM's Virtual Store (not IRM.net) calculates the tax from the transaction code, so be sure to add a tax category when taxes are to be included.
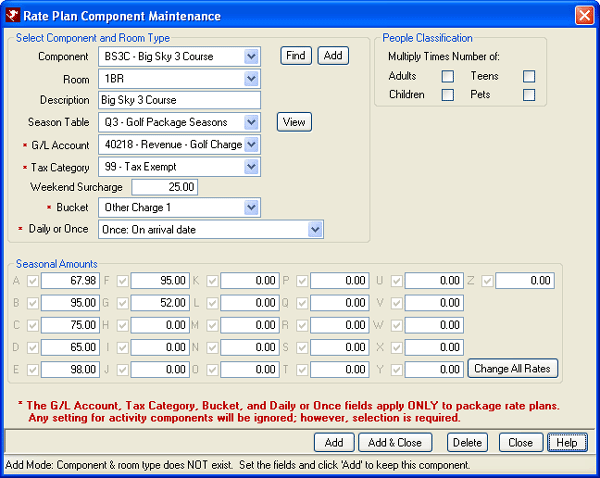
- Add the package component.
- The Component ID can be be up to four (4) characters and must include a description.

- Click OK.
- Select the new component using the Component drop-down on the Rate Plan Component Maintenance screen.

- Set the Room to "All".
- Select the appropriate season.
- Select the G/L Account created in Step 1 above.
- Select a tax category.
- Set the Bucket drop-down to "Other Charge-1".
- Select how often and when the component is placed on the reservation (typically Once on Arrival Date).
- When the component is multiplied by the number of people on the reservation, then check the appropriate people classification boxes.
- Enter the prices for the different seasons. Either change all rates to a single amount or enter according to the property's seasonal calendar.
- The Component ID can be be up to four (4) characters and must include a description.
- Add the vendor type to Table VT using RDPWin Table Maintenance / Add SubRecord.
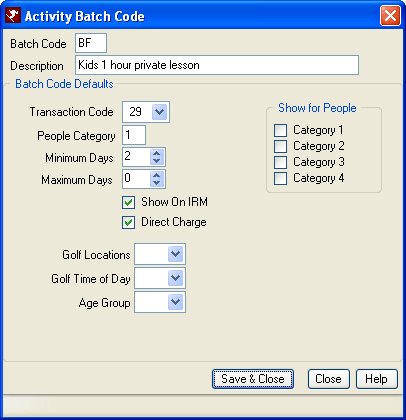
- Add the Batch Code.

The batch code serves as a header, so only the two-digit code and the description are needed. When all the information is completed, the system prompts when adding the batch item to auto-fill from the information just entered (which can save time when adding multiple batch items). - Add the Batch Item.

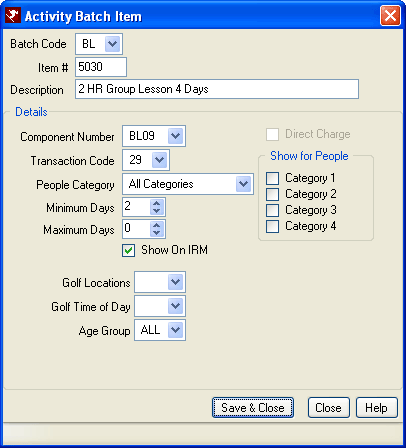
- Select the batch code created in Step 5 above from the Batch Code drop-down.
- Enter a four-digit Item# and description.
- Select the package component number created in Step 3 above from the Component Number drop-down.
- Select the transaction code created in Step 2.
- The People Category can be left blank.
- Check "Show on IRM" to allow the activity to display in IRM's virtual store.
- The "Show for People" makes the item available to only certain people classifications. Check "Category 1" for adult, "Category 2" for children, and so on.
FYI: Filters can be setup if needed by going to Reservations, Configuration, Activities Tab, and Activity Filters. The example above shows golf locations, times, and age group.
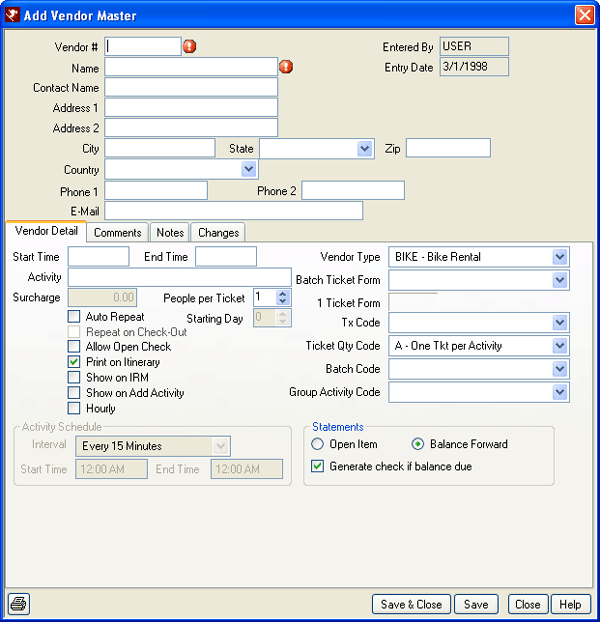
- Add the activity vendor master.

- Enter a vendor number (up to eight characters).
- Complete the contact information.
- Check "Print on Itinerary".
- Check "Show on IRM" to make the vendor visible on the IRM.
- Check "Show on Add Activity" to make the vendor visible in the list when adding activities for front desk users.
- Select the vendor type created in Step 4 using the Vendor Type drop-down.
- Select the transaction code created in Step 2 using the Tx Code drop-down.
- Select the batch code created in Step 5 using the Batch Code drop-down.
- Select from the Batch Ticket Form drop-down (a crystal report that can be created to print as a ticket).
- Select from the Ticket Quantity Code drop-down (defines how many of the tickets are created).
- Confirm that "Show on IRM" is checked to display the activity in the virtual store:
- Vendor Type (VT table)
- Vendor master
- Batch item (VP table)
The Virtual Store
- Screen #1
-
- The Category row pulls from the VT table description and displays the vendor type information
- The Description row pulls from C:\inetpub\wwwroot\IRM\UserHTML\subrecord.HTM with the "subrecord" name from the VT table for each type of vendor.
- The Picture row pulls from C:\inetpub\wwwroot\IRM\images\subrecord.jpg with the "subrecord" name also from the VT table for each type of vendor.
- Screen #2 (After selecting vendor type)
-
- The Category row pulls from the VT table description (same as the first screen).
- The Vendor row pulls from the Vendor Master name for each vendor.
- The Description row pulls from C:\inetpub\wwwroot\IRM\UserHTML\vendor#.HTM with the “vendor number” being the Vendor Number from the Vendor Master for each vendor.
- The Picture row pulls from C:\inetpub\wwwroot\IRM\images\vendor#.jpg with the “vendor #” being the Vendor Number from the Vendor Master for each vendor.
- Screen #3 (After selecting vendor)
-
- The Vendor row pulls from the Vendor Master name for each vendor.
- The Activity row pulls from the VP sub record description for each batch activity.
- The Description row pulls from C:\inetpub\wwwroot\IRM\UserHTML\subrecord.HTM with the “sub record” name from the VP table sub record for each batch activity.
- The Picture row pulls from C:\inetpub\wwwroot\IRM\images\subrecord.jpg with the “sub record” name from the VP table sub record for each batch activity.
- The Price and Tax rows calculate from the Component that was set up in RDP Win: under System| Rates| Components that is tied in with the VP batch activity sub record.
Things to Confirm and Remember
- Confirm the virtual store is turned on through the IRM monitor. Typically the “skip virtual store” option is checked in the Virtual Store section of the monitor.
- Confirm that "Show on IRM" is checked for the appropriate vendor types in the VT table or the virtual store displays nothing.
- Confirm that "Show on IRM" is checked for the appropriate vendor masters.
- Confirm that "Show on IRM" is checked in the Batch Item detail in the VP table from Step 6.
Click here for the Tutorials Index.
Click these links for Frequently Asked Questions or Troubleshooting assistance.
05/20/2010
© 1983-2009 Resort Data Processing, Inc. All rights reserved.