Overview
The Tape Chart screen has four sections: the Navigation menu (Options and Reports), the settings area, the grid, and detail tabs. The Tape Chart displays the room availability based on selected settings. Click a reservation bar in the chart to review reservation details. When scrolling the chart vertically, Tool Tips display the room type and number to show the user's location within the chart.
See also Configuration (specifically for the Tape Chart) or Owner Tape Chart (specifically for owners).
Settings
The Tape Chart display shows availability based on the settings entered
by the user.
- Start Date
- Enter the start date by clicking on the drop-down list and selecting a date from the calendar. This field is set to the previous day's date by default. There is a bold red vertical line on the tape chart to signify the current date column.
- When Tape Chart is set to display past dates, checked-out reservations are visible. Checked-out reservations cannot be room-moved from the Tape Chart. The ability to click and drag a new reservation into a past date is allowed when Yes is selected at the "The arrival date is prior to today. Continue?" prompt.
- Weeks
- Use the up and down arrows or the number keys on the keyboard to select the number of weeks to be displayed based on the Starting Date. The range can be anywhere between 1-52 weeks. The default is set in the Tape Chart Configuration.
- Property
- For resorts with more than one configured property code, a drop-down list containing all property locations or descriptions is available for selection. Click the Property drop-down arrow to select the appropriate location from the list.
- Display Rooms
- Once all the filters have been entered or selected, this button is the trigger to populate the chart.
- Color Key
- Click the Color Key link to view which colors correspond to which reservation types or statuses. Colors are configured on the Tape Chart tab of the Reservation Configuration.
-
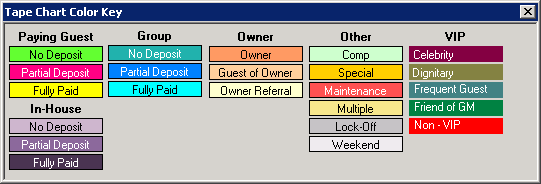
- VIP categories can be assigned different colors based on the records in the VI - VIP Validation table. For details on setting up VIP categories with different tape chart colors, see Reservation Configuration - Tape Chart.
- Today
- Should it be necessary to return to the current system date after viewing 'previous' or 'next' date groups, click the <<Today button. The alternative would be to re-enter the starting date and click the Display Blocks again.
- <Prev. and Next>
- The
buttons are tied into the 'Starting Date' and 'Weeks' entries. Once the filters have been entered and the detail reviewed, the user may wish to view the next block of weeks. For example, after reviewing 30 days worth of data, the user may want to see the next 30 days based on the same criteria entered. Clicking on Next will display this data easily. The Previous button presents the blocks previously displayed, regardless of the parameters entered. - Clear
- Click to clear the grid area. This option is also available from the Tape Chart right-click menu.
- Find Room Button and Room Number Text Field
- If the grid is clear, type the room number into the box and hit <ENTER> or click the Find Room button to display a single room in the Tape Chart. If the entered room number does not exist, a message is displayed. To view a complete list of room numbers, use the Room Analysis. If the grid already has rooms displayed when the Find Room button is clicked, the grid scrolls to that room selected without clearing the grid.
- Find Res Button
- To find a particular reservation, click on the Find Res button to open the appropriate screen.
Searching is allowed for Future, In-House, Active History, Non-Active
History, or all "Future, In-House, and Active History" reservations.
- Enter as much information as available about the desired reservation.
The system displays the nearest matches. Select from the grid and
hit <ENTER> or click Select to open the display the chart with that
reservation selected. That reservation's information displays in the detail
tabs, and the reservation highlighted in the Chart by turning the bar
blue and the numbers (dates) white. A red line is inserted at the departure date, and
the Start Date and Room Number are displayed in the Settings area.
- Change Res Button
- Click to highlight a particular reservation on the Tape Chart, then select the Change Res button in the Settings area to bring up the Change Res screen. Make and save any changes necessary, then click the Close button to return to the Tape Chart screen.
- Note: Changes are no allowed on non-active history reservations.
- Sort By Room Type
- To sort the display by room type, select the Room Type radio button. The drop-down table lists the individual types of rooms in the resort availability. The default is set to All. Click to select which room type that the tape chart should focus on, and click the Display Rooms button. If a Property code is used, only the room types in that particular property are displayed. Once a specific room type is requested, the display filters out all other room types. To return the chart to the default setting, select All from the drop-down list.
- Sort By Room#
- To sort the chart by Room#, select the Room# radio button and then the Display Rooms button. The display will sort all availability by Room# and then by Room Type. If a Property code is used, only the room numbers in that specific property are displayed.
- Sort By Custom
- Select Custom as the Sort By filter to display the rooms within the Tape Chart based on the Tape Chart Sequence Number field.
- Hide N/R Types
- When checked, all room types starting with “N/R” are not displayed on the Tape Chart, except in the case where a room type is explicitly chosen in the room type drop-down. The default for this switch can be set in the Res Configuration | Tape Chart tab or directly with Switch 414-07.
- Show Preferences
- By default, the room type, lock-off type, clean status, and room number are displayed for each room next to the chart. When checked, the guest preferences (number of bedrooms, preferred views, etc.) are also displayed. These are not the preferences of a selected reservation. These are the preferences assigned to the Room Master. See figure above.
- Available Rooms Only for Dates
- Check the box to enable the Arrival, Nights, and Departure date fields. Set those fields to the desired dates and nights selections and click Display Rooms to view rooms available for those specified parameters. The "Available Rooms Only for Dates" date fields are independent of the Start Date. For example, set Start Date to 01/25/98, check the Available Rooms Only for Dates" box, set Arrival to 01/27/98 and Nights to 2, then click Display Rooms. The Tape Chart displays the rooms available for the reservation arriving 01/27/98 for two nights as well as the two days prior to the arrival date and allows for reservationists to make a new reservation in the "best fit" possible for maximum occupancy.
- Room Move Allowed for In-house Reservations When Arrival Date is Not Changed
- Click and drag a reservation to a new date on the Tape Chart.
In-house reservations can be moved when the arrival date is not changed.
- Click on any in-house reservation and drag to an available room to
move the reservation to a new room.
-
Note: Switch X+140F9 "Security Fence Level for <F9> - Capture feature in the reservation tape chart. Users are unable to change arrival/departure dates and perform room moves" has been added. When set to a value higher than the user is assigned for security clearance, the user is restricted from performing room moves and date changes from the Tape Chart.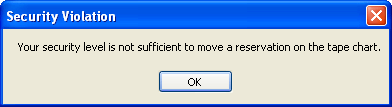
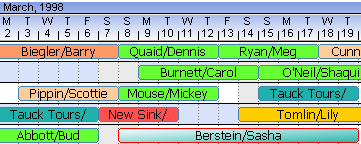
Display
The colors available by reservation type is
configurable. Groups and
Multiple reservation types display in unique colors as well. 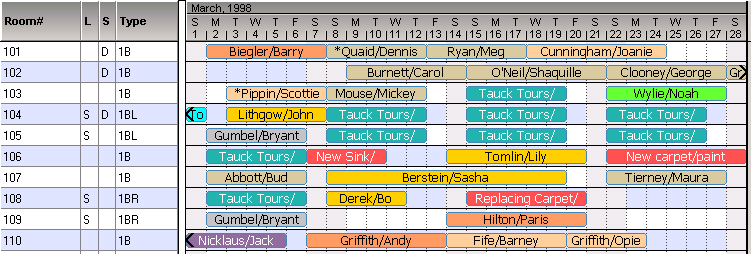
- Display Character Before Name to Show Existence of Notes
- The tape chart will show a designated character before the name on the tape chart if a note on the reservation exists. This is designed to help users identify reservations with notes without having to open the reservation. To enable this feature, set Switch 425-35 to Yes. Designate the character used before name from Switch 425-36. The default character is *, but other characters such as ~, @, !, etc. can be used. If a note is added to the reservation, the reservation on the tape chart is immediately updated with the character.
-

- Arrows in Reservation Bars
- The left arrow displays in the reservation bar if a reservation was
checked in on an earlier date than the first displayed in the chart.
The chart can only display reservations within the Start Date and Weeks
range. Using the sample image shown here, with the Tape Chart set
to display with Start Date = 3/15 and Weeks=1, the Ryan reservation is
the room until 3/18 but arrived prior to 3/15. The Cunningham
reservation is arriving on 3/18 and staying past 3/22.
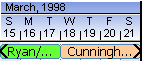
- The left and right arrows indicate the dates of the reservation extend past the view of the Tape Chart. To view those dates, click on the reservation bar to display the detail in the tabs below the chart (when expanded).
- Guest Type
- Depending on the type of system currently running (condominium, hotel, or timeshare), the following reservation type colors display by default as follows:
 No Deposit - Paying Guest
- Tape shown in lime represents a paying guest with no deposit paid.
-
 Partial Deposit - Paying Guest
 - Tape shown in magenta represents a paying guest with a partial deposit paid but with a balance due greater than 0.
-
 Fully Paid - Paying Guest
 - Tape shown in yellow represents a paying guest with fully paid deposit and no balance due.
-
 No Deposit - In-House
 - Tape shown in lavender represents an in-house guest with no deposit or payment made.
-
 Partial Deposit - In-House
 - Tape shown in plum represents an in-house guest with a partial deposit or payment made but with a balance due greater than 0.
-
 Fully Paid - In-House
 - Tape shown in charcoal represents an in-house guest with a fully paid deposit and no balance due.
-
 No Deposit - Group
 - Tape shown in teal represents a group reservation with no deposit paid.
-
 Partial Deposit - Group
 - Tape shown in blue represents a group reservation with a partial deposit paid but with a balance due greater than 0.
-
 Fully Paid - Group
 - Tape shown in aqua represents a group reservation with a fully paid deposit and no balance due.
-
 Owner
Owner - The coral colored tape represents a reservation for the owner of the unit.
-
 Guest of Owner
 - The salmon colored tape indicates the reservation belongs to a guest of the unit owner.
-
 Owner Referral
 - The vanilla colored tape represents a reservation that was referral by the unit owner.
-
 Comp
Comp - The mint colored tape represents a complimentary reservation.
-
 Special
 - The gold colored tape represents any special reservations.
-
 Maintenance
 - The red colored tape represents a room that is out or order for maintenance reasons.
-
 Multiple
 - The cream colored tape represents a multiple folio or group leader reservation.
-
 Lock-Off
 - The gray tape indicates that this room is part of a lock-off reservation. For more detail, see Lock-off Types.
-
 TCS Owner
 - The violet colored tape represents a timeshare owner reservation.
-
 Bonus
Bonus - The fuchsia colored tape represents a timeshare owner using bonus time.
-
 Exchange
 - The pink colored tape represents an exchange reservation.
-
VIP
- VIP categories are configured in the VI - VIP Validation table. Go to the System menu --> Table Maintenance --> select the VI - VIP Validation table. Enter the category and assign color. This color will override the other tape chart colors for Paying Guest reservations. Select the VIP category for the reservation on the Change Reservation screen. For details on setting up VIP categories, see VIP Configuration.
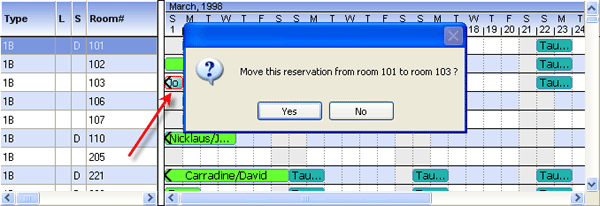
- Change Reservations Using Click & Drag
- To change rooms, (not allowed for any reservation type when
the R3 Condominium Owner Accounting module is installed) select a
specific reservation, hold the left-click button down and drag to the
desired available room.
- To change dates, click on the existing start or end date, hold the left-click button down and drag to the desired available date (left to change the arrival and right to change the departure date). Release the button to first check for minimum night restrictions in Table QZ and then open the New Reservation (Paying Guest) form.
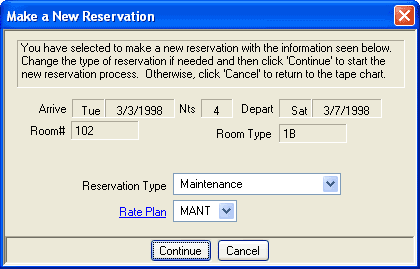
- Make New Reservation
- Left-click on the desired start date and drag through the desired end
date to add a reservation to the system from within the Tape Chart.
Release the button
to first check for minimum night restrictions in Table QZ and then open
the Make a New Reservation form. Select the Reservation Type to be
made. The Rate Plan drop-down defaults to the correct rate plan
depending on the various rate plan settings in the system, but the rate
plan can be changed. Click Continue to access the New Reservation screen for the
selected type.
When Show Multiple Folio Reservations on Tape Chart Switch 415-09 is checked in configuration, Multiple is also available for selection.
When Module R3 Condominium Owner Accounting is installed, Owner and "Guest of Owner" are available for selection.
When the R6 Timeshare & Interval Ownership module is installed and Owner | Timeshare Configuration | General Tab | Use Timeshare contract File to Create Weeks is not checked (timeshare customers not using contracts), use the Tape Chart to make a timeshare (Type T) reservation. Drag anywhere on the tape chart to access the "Make a New Reservation" screen. Set the Reservation Type to Timeshare and select a rate plan, then click Continue.
Note: The Reservation Type can be automatically set to timeshare by accessing the Reservation -> Configuration -> New Res Tab and setting the Type of Res for "F5 - New" to Timeshare (Switch 414-09). -
- Names
- Guest names are displayed on the Tape Chart reservations bars within the Tape Chart. The format is Last Name/First Name such as Maintenance or Jones, Sara . The guest's full name may not display based on length of bar (reservation span).
- People Fields
- When first entering the Tape Chart and before clicking the "Display All Rooms" button, the people fields display as Ppl1, Ppl2, Ppl3, and Ppl4. Once the "Display All Rooms" button is accessed, the fields display the user-definable names. These field titles can be customized to fit the property's demographics.
- Progress Report
- The Progress bar located in the bottom right corner of the screen shows the progress of the Tape Chart display. When the Display button is clicked, the first 20 rows quickly display as the remaining bars are being added.
- Select a Single Reservation
- Click on any reservation within the Tape Chart to display details of
that reservation in the tabs below the grid (when expanded). When a reservation is selected,
the reservation is encircled in red as shown below with Sasha Berstein.
The room type, lock-off (L), clean status (S), and Room# column information displays in color when a row is selected or specific room or reservation information is being sought, and the background color is also changed to help differentiate. When a reservation has sharewiths, the tab information allows for any reservation within the Sharewith family to be selected.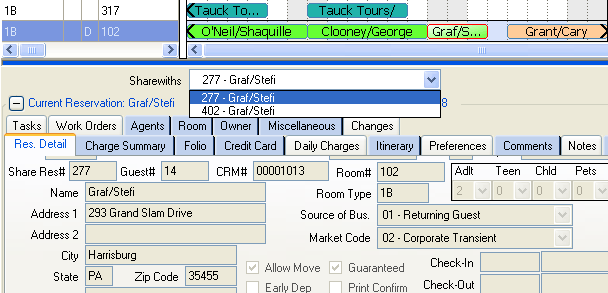
For example, Res# 277 Graf/Stefi is a sharewith reservation with Res#402 (also in the name of Graf/Stefi). - Sort Display by Columns
- There are four columns between the Navigation Panel and the Tape Chart: (Room) Type (i.e., 1B, 2B, etc.), L (Lock-off Type: M=Master, L=Mid-level, and S=Sub-level), S (Housekeeping Clean Status: D=Dirty, I=Ready to Inspect, and a blank space represents Clean), and Room# (Number). The Tape Chart is displayed based on the Room Type or Room# selections in the Settings area of the Tape Chart. (i.e., Selecting the Room# radio button in Settings will sort the Tape Chart display by Room#, and by Type when the Room Type radio button is selected.)
Double-Click
Double-Clicking%20on%20grid%20rows%20of%20each%20module%20will%20access%20different%20screens,%20depending%20on%20the%20module.%20For%20example,%20Double-Click%20functions%20can%20be%20user-specific%20and%20adapted%20in%20module%20configuration%20pages.%20DDouble-Clicking%20on%20grid%20rows%20of%20each%20module%20will%20access%20different%20screens,%20depending%20on%20the%20module.%20For%20example,%20Double-Click%20functions%20can%20be%20user-specific%20and%20adapted%20in%20module%20configuration%20pages.%20ouble-click on any reservation bar within the Tape Chart to access the Change Reservation screen. If the reservation is a sharewith, the system prompts with all reservations within the sharewith and allows for selection.
Right-click and select "Print Tape Chart". For print quality purposes, RDP recommends the print layout be set to landscape for this report. Click the Properties button, click the Basics tab, and from the Orientation section at the bottom, select Landscape and OK. Click OK to print when layout is set.
Res Detail Tabs
The tabs at the bottom of the screen show specific details for the selected reservation.
Use the
 and
and
 icons below the chart scroll bars. See Reservation Tabs for details on specific tabs. Depending on the user's setting
in the
Configuration, the display can show some or all details. Tabs
containing information are highlighted in
color. Those with no
information are displayed with a neutral color. Each time a reservation
bar is clicked in the Tape Chart, the read-only detail tabs are updated for the
selected reservation.
icons below the chart scroll bars. See Reservation Tabs for details on specific tabs. Depending on the user's setting
in the
Configuration, the display can show some or all details. Tabs
containing information are highlighted in
color. Those with no
information are displayed with a neutral color. Each time a reservation
bar is clicked in the Tape Chart, the read-only detail tabs are updated for the
selected reservation.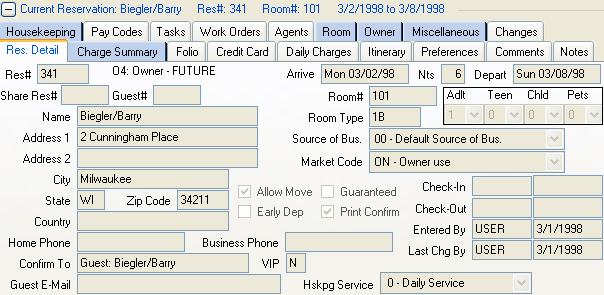
Right-Click Options
Click here for general right-click options to
view details. Right-click options available from the Tape Chart are: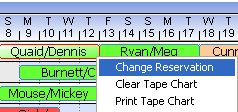
- Change Reservation
- Select and right-click any reservation bar in the grid to open the Change Reservation screen.
- Clear Tape Chart
- Remove all reservations from the grid and return to a blank chart. Enter a room number into the text box and click Find Room to view just that room (including lock-offs if associated).
- Print Tape Chart
- Send the currently displayed grid to the printer.
Click these links for Frequently Asked Questions or Troubleshooting assistance.
02/01/2013
© 1983-2013 Resort Data Processing, Inc. All rights reserved.