Click here for Housekeeping Configuration tutorials
Enhanced Housekeeping Module (S2) required.
Overview
The Housekeeping Configuration form is used to add and modify the Clean Patterns, Clean Status, Clean Types, Cost Levels, Miscellaneous, Reservations, Room Clean Times, Service Types, and Staff information used by the Housekeeping Scheduling module. If any configuration settings are directly connected to a system switch, that switch number is displayed on the Configuration screen. Configuration can be accessed using the Housekeeping main menu, the System main menu, or the Navigation page.
| HOUSEKEEPING CONFIGURATION TABS | |
|---|---|
| Clean Patterns | Room Clean Day |
| Clean Status | Room Clean Times |
| Clean Types | Service Types |
| Cost Levels | Staff |
| Miscellaneous | Transactions |
| Reservations | Zones |
Miscellaneous Tab
Configure miscellaneous Housekeeping settings that affect how
rooms are assigned to the boards, and which items are included on
the boards. Enable or Disable the use of the 'Ready to
Inspect' clean status and cost tracking, and modify the refresh
interval and history retention period.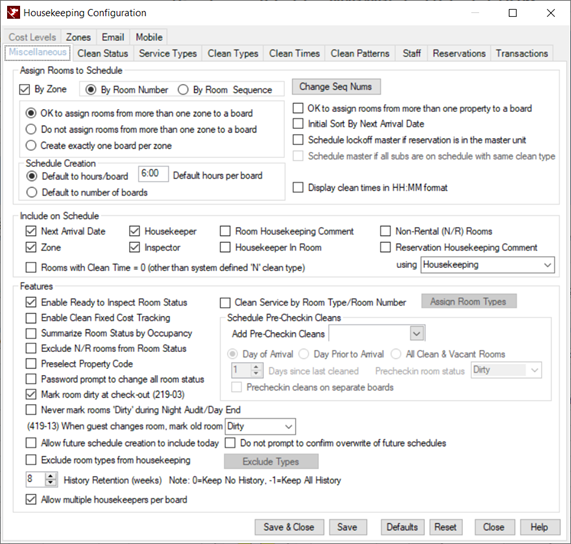
Assign Rooms to Boards
Rooms can be assigned to a board by housekeeping zone, room number, or sequence number. Boards can be created
allow rooms from multiple zones on a board, to disallow rooms from multiple zones on a board, or to create exactly one
board per zone. Once the parameters have been determined, click the Save button. To abandon any changes made
and return to the default settings, click the Reset button.
The configuration settings vary based on the Turn on Property Code
Feature (Switch 422-12).
- By Zone
- When checked, group designated zones together on a board until the hours per board is reached. If unchecked, the boards are created by either room number or sequence number, based on configuration. The zone options (below) are enabled; boards are created by zone (mixing zones to evenly distribute the cleans if "Assign More Than One Zone to a Board" is checked); and once created, the system sorts the boards by room or sequence number based on configuration. Basically, the system sorts twice: once to create the boards and once to sort the boards.
- By Room Number
- If assigning by room number, rooms are assigned in numeric/alphabetical order to a board until the hours per board is reached.
- By Room Sequence
- If the actual room numbers do not reflect the order in which rooms should be grouped for housekeeping, assign by room sequence number. Rooms are assigned to boards in numeric order according to the Room Sequence Number entered in the
Room Master. Once By Room Sequence is selected, the boards need to be recreated so the changes can be considered. If By Room Sequence is not selected, the Seq# column is not displayed on the boards. The system checks for duplicate sequence numbers (all must be unique), but it also allows one to be set back to "0", even if others are still "0". Once saved, if there are multiples rooms with a sequence number set to "0", a warning is displayed.
For example, a property has bungalow type buildings where the unit on the first floor is Room 1 and the rooms the second floor are 101 and 102. Another bungalow building has Room 2 on the first floor and Rooms 201 and 202 on the second floor, etc. Management may not want the buildings in separates zones (one alternative). When sorting by room number, the first floor rooms (the lowest numbers) are on one board and the second floor rooms on another board. Using the sequence number would keep Rooms 1, 101, and 102 together, as well as Rooms 2, 201, and 202, etc. - Change Sequence Numbers
- Click the "Change Seq Nums" button to display the Change Housekeeping Sequence form in the Rooms Masters.
- Do Not Assign Rooms From More Than One Zone to a Board
- Each board consists of rooms from a single zone until the hours per board is reached. Once a board is full, the remainder of rooms in a zone (if any) are created in the next board. Boards vary in size and clean time using this setting. For example, if the total clean time for rooms in Zone 1 is less than the requested hours per board, then that board will be short on total clean time. Rooms from another zone will not be added to the board to adjust the total clean time to match the requested hours per board.
- OK to Assign Rooms From More Than One Zone to a Board
- Check this box to group rooms together on a board until the hours per board is reached. This option allows rooms from more than one zone to be combined on a board. For example, if the total clean time for rooms in Zone 1 is less than the requested hours per board, then rooms from Zone 2 are added to the board until the hours per board is reached.
- Create Exactly One Board Per Zone
- Each board is assigned all rooms from a single zone regardless of total clean time. For example, all rooms from Zone 1 would be assigned to Board 1, all rooms from Zone 2 would be assigned to Board 2, etc. The hours per board setting is ignored and allow the total board clean time to vary greatly if this option is selected, but zones are not intermingled.
- Default Hours/ Board
- If this option is selected as the default and the housekeeping schedule is created, the hours per board is required for generating the schedule. This should be the number of hours a housekeeper cleans during a typical shift, such as 8 hours. It will calculate the number of boards needed based on the hours per board and the clean times for each room. This setting is disabled unless the Turn on Property Code Feature (Switch 422-12) is set to No and Allow Configuration of Number of Boards Per Zone is not checked. When enabled, set the number of hours per board (default setting six hours).
- Default to Number of Boards
- If this option is selected and housekeeping schedule is created, the schedule will default to Number of Boards. Enter the number of boards based on the number of schedules to create that day.
- OK to Assign Rooms From More Than One Property to a Board
- Available when Turn on Property Code Feature (Switch 422-12) is set to Yes, Boards can be created allowing rooms with different property codes to be combined on a board. Check the "OK to assign rooms from more than one property to board" to enable this feature. Also, if checked, the "Choose Properties" form does not appear after clicking Create Boards. This box is unchecked by default. This option is not available if Switch 422-12 is not active.
- Initial Sort By Next Arrival Date
- When checked, the cleans are assigned to boards based on "next
arrival date" initially and then any other assignment settings
(using zones, room numbers, or room sequence). An example might be
that Boards 1 through 3 consist of cleans arriving today and Board 4
through 6 consist of cleans arriving tomorrow and so on, giving the
housekeeping staff a clear vision of which boards must be completed
first so rooms are clean and ready for the earliest anticipated
arrivals.
This feature only affects the assignment to boards and not the order in which the cleans are displayed or listed on the boards once created. - Schedule Lockoff Master if Reservation is in the Master Unit
- When not checked, lock-off subunits are always added to the schedule. (This
is the way housekeeping has worked in the past.)
When checked, the reservation in the room determines whether the master or subunits are added to the schedule. If the reservation is made for the master – the master is added to the schedule. If the reservation(s) are for the subunits, then the subunits are added to the schedule. If there is no reservation in the room, then the subunits are added to the schedule.
For example:- Click drop-down for Add Pre Checkin Cleans & use Check In clean type.
- Keep "Day of Arrival" radio button selected.
- Keep "1 Day(s) Since last cleaned).
- Change "Precheckin room status" to Inspect.
- Click Save & Close.
- Make reservation in Room 521 for 3/1 - 3/2 for guest test. This is the master unit.
- Check in the reservation.
- Make reservation in Room 509 for 3/2 - 3/4 for guest test. This is the sub-unit.
- Close the Day to 3/2.
- Housekeeping > Schedule > Today > Create Schedule & keep defaults.
Look at Board 10. Room 521 (the master) Dirty, CleanType=Checkout, Occupancy=Checkout. The subunits should
not be on the schedule at all in this case because the reservation
is in the master unit.
When "Schedule lockoff master if reservation is in the master unit" is not checked, then both subunits 509 and 513 are on the schedule. Both are Dirty, Cleantype=Checkout, Occupancy=Checkout.
- Allow Configuration of Number of Boards Per Zone
- To view this feature, the Turn on Property Code Feature
(Switch 422-12)
must be set to No.
When this feature is checked on the Miscellaneous Tab, the housekeeping schedule supports the ability to specify the number of boards to be created for each housekeeping zone. For example, Housekeeping Zone 1 has two boards and Zone 2 has four.- Set Switch 422-12 to No.
- Check the Allow Configuration of Number of Boards Per Zone checkbox on the Housekeeping Configuration Miscellaneous Tab and Save.
- Select the Zones Tab and configure the default number of boards for each zone on the Zones tab. The default number of boards for each zone can be overridden at the time the schedule is created. The housekeeping forecast is created using the number of boards per zone if the defaults have been configured on the Zones Tab.
When today's schedule is created, the Create Schedule screen displays each zone with the associated default number of boards. If desired, override the default number of boards for any zone and click "Create Schedule".
Include on Schedule
- Any checked box includes that column from the housekeeping boards.
When unchecked, that column is not displayed. Select from:
- Next Arrival Date
- Zone
- Housekeeper
- Inspector
- Room Housekeeping Comment
- Reservation Housekeeping Comment using Comment 1 - Comment 25. Designate which comment field on the reservation is the housekeeping comment. To edit the actual comment label change, see Comment Labels
- Housekeeping in Room
- Non-rental (N/R) Rooms
- Rooms with Clean Time = 0 (Other Than System Defined "N" Clean Type)
- If a clean type 'No Service Per Gst" is defined with Clean Time
= 0, check this box to display the Clean Time = 0 cleans on Today's Schedule. No Cleans that may be
used in, for example, a Checkout Only pattern, are still hidden.
When not checked, all cleans with time of 0 are hidden.
In either case, any "0 clean time cleans" are in the hboards file but filtered out of the Schedule.
Features
Configure features within the housekeeping module.
- Enable "Ready to Inspect" Room Status
- Check or uncheck the box to enable or disable the use of the Ready to Inspect clean status. If disabled, the "Ready to Inspect" clean status is not used or included in summaries, tables, or graphs of the boards, and the Ready column does not appear in the boards when expanded. If this setting is changed, boards do not have to be recreated to see the change.
- Enable Clean Fixed Cost Tracking
- A fixed cost for each type of clean can be configured by room type and/or by room number. If the feature is enabled, this clean cost is added to the boards upon creation, retained in the housekeeping history, and also included in the housekeeping forecast. A clean cost column is added to all scheduling, history, and forecast displays, as well as to the following reports: "Forecast by Date" and "Clean Cost History by Date". By default, Clean Fixed Cost Tracking is disabled, and the value is set to zero.
- Summarize Rooms Status by Occupancy
- When checked, the Room Status screen is summarized by occupancy status upon entry. Once the system date has been rolled forward, the Schedule is also summarized by occupancy. When unchecked (default setting), Room Status displays only rental and non-rental and is much faster to display. The "Summarize by Occupancy Status" checkbox is also on the Rooms Status screen for manual changes, but it does not affect configuration settings. For a sample, see Summary. When checked, a summary by room occupancy (takes longer to calculate) is displayed. Otherwise, the simple total number of rental/non-rental rooms is displayed.
- Preselect Property Code
- This setting is only displayed when Turn on Property Code Feature (Switch 422-12) is set to Yes. When checked and upon entry to the Housekeeping area, the system requires selection of a property code before any data is retrieved and screens displayed. Optionally save the selection which is recorded by user to then be automatically selected when each user returns to the housekeeping section.
For customers who use property codes in such a way that, for example, user TOM always and only accesses Property Code 02. Once the setting is saved the first time, that property code is automatically accessed for that user each time Housekeeping is entered. Since setting this checkbox happens within the Housekeeping area of the system, click any other area of the system (Reservations, Reporter, etc.) and then back to Housekeeping for the system to recognize the configuration and display the prompt (the first time only).- Password Prompt to Change All Rooms' Status
- Check "Password Prompt to Change All Room's Status" to require user to enter appropriate password before successfully changing the status of all rooms in the schedule. Set the UI Security levels to only require a password for users with certain access levels.
- Never Mark Rooms Dirty During Night Audit/Day End
- When checked:
- Post Nightly Charges does not mark any rooms Dirty in hotel systems (DataHCS)
- Close Day does not mark any rooms Dirty for condo systems with or without direct check-out (DataCCS) and (DataVRS)
When not checked, rooms were marked Dirty during the Post Nightly Charges and Close Day processes.- When a Guest Changes Rooms, Mark Old Room... (419-13)
- When a guest changes rooms, the Clean Status is updated to the status selected from this drop-down. Selections include No Change, Dirty, and Tidy.
- Allow Future Schedule Creation to Include Today
- When checked, the minimum date allowed in the future schedule date range drop down is today. The default start date is still the next day in the future without a schedule that has been created already. If today is selected, a warning displays that today's schedule will be overridden. If any cleans have been completed or are in progress, this will result in the loss of updates to the schedule.
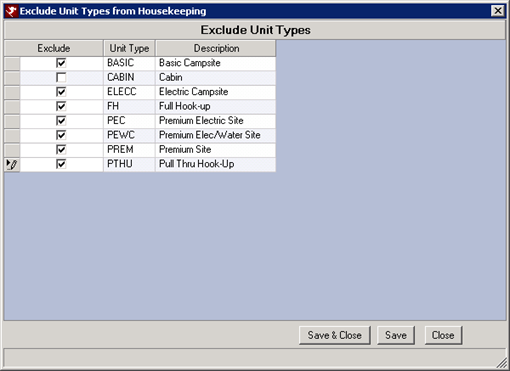
- Exclude Room Types from Housekeeping
- When checked, certain room types can be excluded from housekeeping. Click the Exclude Type button and all room types will display. Place a check in the Exclude box next to each applicable room type. These selected room types will not change to dirty upon check-out, at the close of day, or when a room move occurs. They are excluded from the housekeeping schedule and will always remain clean. Before selecting any rooms types to exclude, change all rooms within that type to clean first. This feature is particularly useful for campground properties, where most campsite do not need housekeeping.
- History Retention (Weeks)
- This setting controls how long old housekeeping boards are kept. The default setting is eight (8) weeks. Historic housekeeping boards can be retained from 1 to 52 weeks. Use a setting of -1 to retain all history. Use a setting of 0 to retain no history. The historic housekeeping boards are deleted when new boards are created.
- Allow multiple housekeepers per board
- When this setting is checked a board can have more than 1 housekeeper assigned to rooms on a single board. Prior to the addition of this switch, the housekeeper was assigned to the board and all cleans on board were assigned to that housekeeper. If a room needed to be moved to another housekeeper, a new board would need to be created, the room moved to that board and then assigned to the new housekeeper. Now the room can remain on the original board and the housekeeper assigned changed.
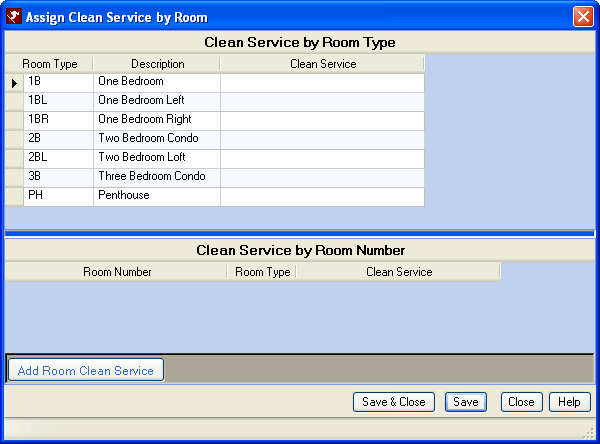
- Clean Service By Room Type/Room Number
- Clean Services can be assigned to rooms by whatever is specified in the reservation or by the associated clean service to the room type. To assign by room type/number, check the Clean Service By Room Type/Room Number box. Once checked, the "Assign Room Types" button is enabled and the system allows maintenance reservation clean service types to be changed from the Res Details Housekeeping tab. The same button can be found on the Clean Patterns tab. (Both buttons are disabled if the feature is disabled.) Of course, this feature only makes sense if the property has more than one clean service type and pattern defined.
Click "Assign Room Types" to configure which clean service type is associated with which room type.
Note: The "Assign Room Types" button is also available from the Miscellaneous tab.
All room types, descriptions, and Clean Service drop-down lists are displayed in the grid. ALL room types must have a clean service assigned. Choose a service from the Clean Service drop-down list. Once all room types have an associated clean service, click the Save button file the changes.
The default "Clean Service by Room Number" grid is optional, and allows specific rooms be treated differently. If a clean service is defined for a room number, it overrides the corresponding room type setting. Assign a clean service to an individual room number only by clicking the "Add Room Clean Service" button. Select the appropriate room number from the drop-down list. The room type is automatically completed based on the room number selected and the information in that room master. Select from the Clean Service drop-down list. When all individual room numbers have been appropriately assigned, click the Save button. To delete a clean service from a specific room, choose the blank from the Clean Service drop-down list.
Once clean services are configured, create boards (or a forecast), and the clean pattern used to assign a clean is that specified for the room number/room type. Most properties do not use this feature, but assign clean service by that specified on the reservation. As always, if nothing is specified, then the default clean service is used.
Schedule Pre-Checkin Cleans
Schedule pre-checkin cleans for day of arrival OR day prior to arrival.
- Add Pre-Checkin Cleans
- Automatically schedule a "P" pre-checkin clean on the day of check-in regardless of whether or not a guest checked out that day. Select from the drop-down to configure which clean type is to be assigned to pre-checkins. Any clean type can be selected. A pre-checkin clean can be configured if desired. When the drop-down is not set (blank by default), pre-checkin cleans are not added to the schedule. Once a clean type is selected, the other pre-checkin clean fields (listed below) are enabled.
- Day of Arrival
- When "Day of Arrival" is selected, a pre-checkin clean is scheduled for rooms with an arrival date equal to the current system date AND no other clean (such as Daily or Mid-week) is scheduled. This field is disabled until "Add Pre-checkin Cleans" has a designated clean type.
- Day Prior to Arrival
- When "Day Prior to Arrival" is selected, a pre-checkin clean is scheduled for rooms with an arrival date equal to the current system date plus one AND no other clean is scheduled. This field is disabled until "Add Pre-checkin Cleans" has a designated clean type.
- All Clean & Vacant Rooms
- Rooms are generally not on the schedule until a room is marked as dirty. Some customers may want all rooms to be included on the schedule in order for the housekeepers to enter and confirm the room is ready for a guest regardless of the clean status (clean, inspect, or dirty).
When the "All Clean & Vacant Rooms" radio button is selected, all pre-checkin cleans rooms are marked as dirty so as to be included on the schedule when created. A Clean Type of "Ready" (or the like) should be created and selected in the Add Pre-checkin Cleans drop-down and the Pre-checkin room status should be set to Dirty (sets the flag so the new clean type is part of the schedule).
To configure this situation:
- Create "Ready" clean type on the Configuration | Clean Types tab. A Ready clean can indicate the housekeeper should enter and confirm the room is ready for rental.
- Select Ready from the Add Pre-checking Cleans drop-down.
- Select the All Clean & Vacant Rooms radio button.
- Select Dirty from the Pre-checking Room Status drop-down.
- Save.
- Create today's schedule. All rooms are included on the boards regardless of clean status.
- Days Since Last Cleaned
- This setting is disabled when All Clean & Vacant Rooms is selected.
Configure the system to only schedule Pre-er of days. The clean is added to the boards when the setting is higher than the number of days since the last clean was performed. For example, when the value is set to two "2", then a pre-checkin clean is not added to schedule if the room was cleaned yesterday. This field is disabled until "Add Pre-checkin Cleans" has a designated clean type.- Pre-checkin Cleans on Separate Boards
- When checked, the system does not mix pre-checkin cleans with any other type of clean regardless of schedule configuration requirements for boards. This field is disabled until "Add Pre-checkin Cleans" has a designated clean type.
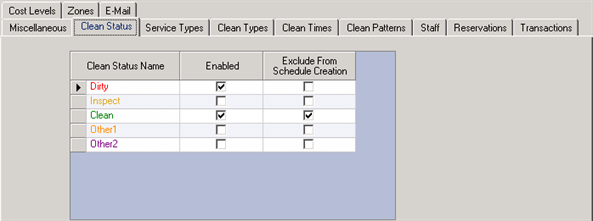
Clean Status Tab
Configure the three default and two user-definable Clean Status types available. The default clean statuses are Dirty, Ready to Inspect, and Clean. The three default Clean Status names cannot be changed; and of those three, only the Ready to Inspect status can be disabled.
|
- Enable Clean Status
- Enabling a Clean Status results in additional Clean Status columns on the boards and summary grids, as well as additional segments in the Clean Status pie and bar graphs.
- Exclude From Schedule Creation
- Check the "Exclude From Schedule Creation" box to keep rooms from being added to the schedule based on room clean status. The change does not take affect until the next time boards are created.
- Dirty
- Rooms into which a reservation was checked in are marked dirty either during the audit process or when a room move is performed.
- Inspect
- Rooms that have been cleaned by a housekeeper and deemed ready to occupy can be marked "Ready to Inspect" at the housekeepers request. This signifies the housekeeper has performed the duties assigned to that room/clean type. Once the room is inspected, the room status should be changed to Clean. Not all properties use this status. When not enabled, Dirty rooms should be marked Clean when the duties are complete.
- Clean
- Rooms that have been deemed ready to occupy can be marked "Clean" at the housekeepers request.
- Other1 and Other2
- Two additional user-definable statuses are available for use. Highlight Other1 or Other2 in the "Clean Status Name" column and type up to eight characters to configure optional clean statuses. Check the Enabled box and click Save to insure the additional status(es) are available. Configure either, both, or neither of the two user-definable Clean Statuses.
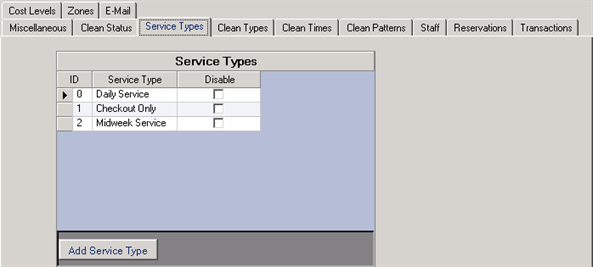
Service Types Tab
Service Types specify the cleaning service guests might receive during a
stay. Use this tab to configure the cleaning service types available.
The Clean Patterns tab associates a pattern based on Service Type to determine which pattern
is used for any given room.
Note: Newly installed systems (not upgrades for existing
customers) offer a default clean service and pattern included. Owner and Guest of Owner reservations are automatically assigned a "check-out only" clean service with associated pattern.
One service type is defined by default (Daily Service) and
associated with a cleaning pattern. As additional
service types are defined, associated cleaning patterns must also be defined. The ID associated with a Service Type is assigned sequentially and cannot be modified. Up to 10 service
types can be defined (including the default service). When disabled,
the service cannot be assigned to any new reservations; however, but should
be changed if used on any existing reservations.
See Set Default Service tutorial.
|
- Add Service Type
- To add a Service Type, click the "Add Service Type" button. The system adds a row to the list and allows the user to enter the new definition. Once the service types have been determined, click the Save button. To abandon any changes made and return to the most recently saved settings, click the Reset button.
- Disable Service Type
- If a particular Service Type is no longer desired, check the Disable checkbox. The disabled pattern is still used in assigning cleans for any existing reservations that had chosen this Service Type, but the disabled Service Type is no longer available for any future reservations.
- Housekeeping Service Type on a Reservation is Required (Switch 414-10)
- When Switch 414-10 is set to Yes, the Service Type defaults to blank ("Select") when there are no defaults set for Room Type or Room Number. This causes the Service Type drop-down on the Reservation Change screen to default to “Select”, which is NOT allowed when saving, since a valid Service Type must be chosen. This is true for all reservations except maintenance reservations. When set to No, the Service Type defaults to “0” (zero) if there are no defaults set up for Room Type or Room Number. The field is not required, so it can remain blank (which displays as "Select") in the Service Type drop-down on Reservation Change screen.
- Delete Service Type
- Right-click any configured service type and select "Delete Selected Row". The associated Clean Pattern is deleted at the same time. The default service cannot be deleted.
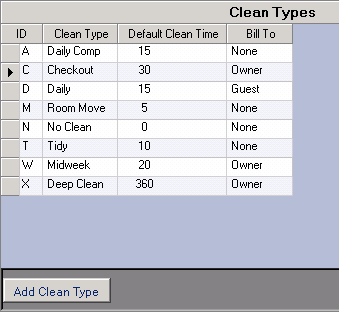
Clean Types Tab
Configure the Clean Types available for inclusion in the cleaning
patterns. See detail for PreCleans.
Clean Types define the various cleans available for assignment. Four
clean types are specified by default: Daily, Checkout, Room Move and No
Clean. These are required by the system and cannot be deleted or
modified. Unlimited types of additional cleans can be defined (i.e.,
Midweek or Tidy). The default Clean Time for a Clean Type indicates
the time that is initially configured for all Room Types/numbers for the
clean. If desired, the Clean Time for a particular Room Type or number
can be modified using the Room Clean Times tab. The various Clean
Types appear on the housekeeping schedule if they are used in a clean
pattern and the associated Service Type is assigned to a reservation.
|
- Add Clean Type
- Click the "Add Clean Type" button at the bottom of the grid to add a row to the list. Assign a unique single character, enter the Clean Type name, set the Default Clean Time, and if Fixed Cost is enabled, enter the fixed cost amount. Once the clean types have been determined, click the Save button. To abandon any changes made and return to the most recently saved settings, click the Reset button.
- Delete Clean Type
- If a particular Clean Type is no longer needed, select the row and use the Delete key on the keyboard.
- Pre-Checkin "P" Clean Type
- If a property plans to assign PreCleans to the Boards, the PreClean "P" type must be configured first. A pre-checkin clean is performed on a room on the day a guest is scheduled to check in. For example, a checkout might include changing linens, emptying trash, and cleaning the bathrooms. A pre-checkin clean might include cleaning the sliding glass doors, TV screen, and dusting silk flowers. Once configured, set "Add Pre-Checkin Cleans to Schedule" to PreClean. Go to the Schedule and create the Boards. When boards are created, a pre-checkin clean is added to the schedule if, (1) a the PreClean type is configured for pre-checkins, and (2) a room has an arrival today but no departure. If there was a departure, then the clean from the departing reservation’s clean service type is assigned (most likely Checkout). If a pre-checkin clean is added to the schedule and the room was already marked as clean, it is set back to dirty, so that it can be tracked when the clean is completed.
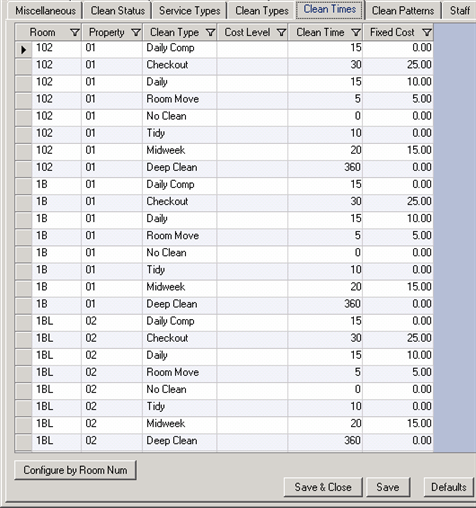
Room Clean Times
Configure cleaning times for each Clean Type by Room Type and/or Room Number. A cleaning time must be defined per Clean Type for every Room Type. When a new Clean Type is added, the Clean Time is propagated to each Room Type using the default Clean Time indicated. Clean Times can be modified for particular Room Types or Number as needed. Separate Clean Times and information can be specified for individual units by selecting the room number from the drop-down list and choosing 'Add Room'. Settings defined for a specific room can be removed by selecting the room number and choosing 'Delete Room'. Room Type Clean Times can be modified, but not deleted. Room Cleans with a clean time equal to zero are not displayed in the schedule or printed boards, but they are displayed when historical information is accessed.
|
- Add Room Clean Times
- To add a configured Clean Time for a room, choose the "Configure By Room Num" button on the Room Clean Times tab, select a room in the Choose drop-down list, and click the "Add/Change Clean Defn" button. Upon return to the Room Clean Times grid, the definitions for the selected room are no longer displayed.
- Configure by Room Number
- The Clean Times are set by Room Type by default. If an individual room has a longer clean time than that assigned to the room type (perhaps Room 101, a 1B type unit, takes 10 minutes longer to clean than any other 1B unit), use the "Configure by Room Num" function to adjust the clean time for that room only. Select a room in the Choose drop-down list, and select the "Add/Change Clean Defn" button. The "Housekeeping Add Room Clean Defn" window displays the Room Number, Type, Clean Type, Cost Level, Clean Time, and Fixed Cost. If Fixed Cost Tracking is disabled on the Miscellaneous tab, the Cost columns are disabled in this grid. Change the times as needed, and click the Save button. To abandon any changes made and return to the most recently saved settings, click the Reset button.
- Delete Room Clean Times
- To delete the configured Clean Times for a room, choose the Configure By Room button on the Room Clean Times tab. Select a room from the Choose drop-down list, and click the "Delete Clean Defn" button. The system prompts with "OK to remove clean definitions for Room #?". If yes, the deletion is confirmed. Click the OK and the Close button to return to the Configuration page.
Room Clean Day Tab
When Switch C1HABIT is set to yes,
the Room Clean Day tab is visible and allows configuration of which day of
the week each room is to be cleaned. Log off is required before the
tab displays. When the Clean Patterns tab is accessed and a pattern
selected, the Use clean day of the week
checkbox determines if the configured day of the week is to be used or not
with this pattern. Select the day of the week using the Clean Day
drop-down. This can be used with some clean patterns and not others.
The Clean Day specifies the first clean must be at least so many days from
check-in. For example when Use clean
day of the week is set to "2", if a guest checks in on a Monday and the
room has a Clean Day of Tuesday, the room is not on the schedule until the
following Tuesday of the next week.
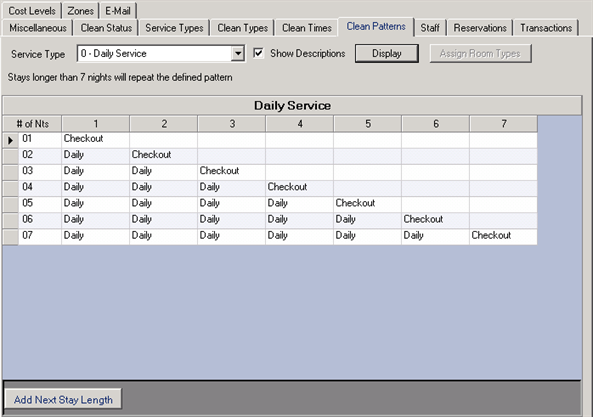
Clean Patterns Tab
Configure the clean patterns for clean services.
|
Note: Newly installed systems (not upgrades for existing customers) offer a default clean service and pattern included. Owner and Guest of Owner reservations are automatically assigned a "check-out only" clean service with associated pattern.
- Add Next Stay Length
- Displayed once a Service Type is selected and Display is clicked, click to add an additional row to the selected Clean Pattern in the grid. The "# of Nts" column is automatically completed by the system with the next appropriate number. Select a Clean Type for each column by hovering until the drop-down arrow appears: then click. Once all columns for the new stay length are complete, click Save or Save & Close to file the record.
- Add or Change Clean Pattern
- A minimum of 1- and 2-night stays must be defined. A Clean Pattern is defined for each cleaning Service Type and identifies the type of clean to be performed after each night of a guest's stay. To define or modify a clean pattern, first choose the associated Service Type from the drop-down list. Click 'Display' for a grid indicating the pattern of cleans for various stay lengths. The first column lists the length of stay, and the remaining columns indicate the respective nights of the stay. Each cell can be modified using the drop-down list to select configured Clean Types. The Show Descriptions checkbox determines whether the full Clean Type names or single character IDs appear in the drop-down lists. Once the clean pattern has been determined, click the Save button. To abandon any changes made and return to the most recently saved settings, click the Reset button.
- Assign Room Types
- If "Clean Service by Room Type/Room Number" is checked on the
Miscellaneous tab in Configuration, cleans are assigned to boards
based on reservation room type rather than the Service Type selected
on the Housekeeping tab of the reservation. If the option is not
checked, this button is disabled.
See Assign Room Types for details. - Default Settings
- By default, one clean pattern for the Default Service is configured to perform Daily cleans after every night of the stay except upon departure, when a Checkout clean is performed. If the Daily Hskpg checkbox is unchecked, the Default Service assigns a Checkout Clean to the departure date and No Clean to all remaining days.
- Repeat Pattern
- If a reservation's stay is longer than defined in the clean pattern, the pattern is repeated as follows:
- If the longest stay defined is 7 nights and a reservation is for 10 nights, the clean pattern for nights 1-6 of the 7 night definition is used, followed by nights 1-4 of the 4 night definition.
- If a reservation is for 20 nights, the clean pattern for nights 1-6 of the 7 night definition is repeated 3 times (18 nights), followed by nights 1-2 of the 2 night definition.
- As many stay lengths as required may be defined to establish the desired cleaning pattern.
- Stay length rows can be deleted by highlighting the row and hitting the Delete key on the keyboard.
- Stay length rows can only be deleted from the end of the grid, not out of the middle.
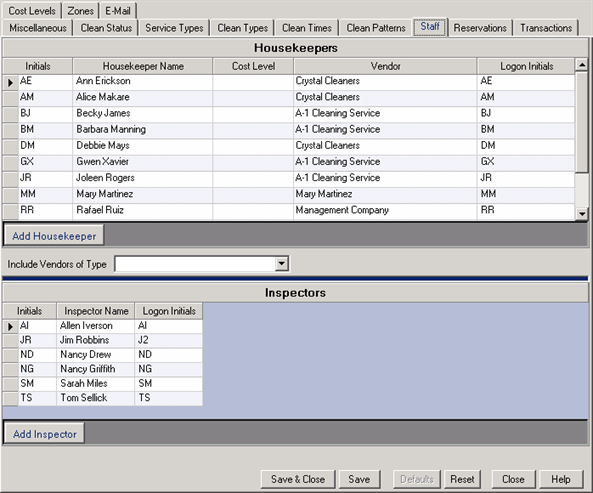
Staff
Before staff can individually be assigned to boards, the housekeepers and inspectors tables must be configured.
|
- Add Staff
- Click the 'Add Housekeeper' or 'Add Inspector' button at the bottom of the respective grid. A new row is added to the bottom of the table. The '*' to the left of the ID column in the blue grid area indicates the row has not been saved yet. Enter the specifics into each of the columns, moving from one column to another by clicking or using <Tab> on the keyboard. Once the staff has been entered, click the Save button. To abandon any changes made and return to the most recently saved setting, click the Reset button.
- Delete Staff
- Click the blue grid area to the left of the ID column to select a row and use the delete key on the keyboard. There is no warning before the system deletes a row from either grid. However, if the Save button has not been clicked, the deleted rows can be regained using the Reset button.
Housekeepers' Grid
The grid columns can be sorted alphabetically using the
 and
and
 filters in the header. Columns can be reordered by clicking on the column header and dragging to a new location.
- Cost Level = Track the cost level per housekeeper based on levels defined on Cost Levels tab. If Clean Fixed Cost Tracking is not enabled on the Miscellaneous tab, this column is disabled.
- Hourly Rate = Pay rate per hour for individual Housekeeper (optional). When entering rates under $10, a zero must be entered first. For example, a rate of 8.50 must be entered as 0850. This is a reference field only and unless included in a custom report, no calculations are based on this field.
- Housekeeper Name = Housekeeper's name (mandatory). As long as the initials are different, two housekeepers can be entered with identical names.
- Initials = Housekeeper's initials (mandatory and up to six characters). If two housekeepers have identical initials, a numeric value can be added to differentiate. For example, Jennifer Mason (JM) and Joseph Michaels (JM2).
Inspectors Grid
The grid columns can be sorted alphabetically using the
and
filters in the header. Columns can be reordered by clicking on the column header and dragging to a new location.
- Cost Level = Tracks the cost level per housekeeper based on levels defined on Cost Levels tab. If Clean Fixed Cost Tracking is not enabled on the Miscellaneous tab, this column is disabled.
- Hourly Rate = Pay rate per hour for individual Housekeeper (optional). When entering rates under $10, a zero must be entered first. For example, a rate of 8.50 must be entered as 0850. This is a reference field only and unless included in a custom report, no calculations are based on this field.
- Initials = Inspector's initials (mandatory and up to six characters). If two inspectors have identical initials, a numeric value can be added to differentiate. For example, Jennifer Mason (JM) and Joseph Michaels (JM2).
- Inspector Name = Inspector's name. As long as the initials are different, two inspectors can be entered with identical names.
Reservations
Configure which housekeeping Service Type is assigned to each type of reservation when created (defined in Table DQ). For example, create a new service type and configure a pattern. A NoClean service is a good example for viewing the difference from the default service. Configure Owner reservations to get the NoClean service. Make a new Owner reservation, and the NoClean service is assigned and the grid is filled out accordingly.

|
- Allow Override of Clean Service By Room Type
- Only visible if the Clean Service By Room Type/Room Number is checked on the Miscellaneous tab, select a clean service type for the owner and guest of owner reservation types. When an owner reservation is made, the owner reservation service type overrides whatever the room type/number service would have been. Leave the other reservation types blank – if a clean service is selected for them all, then all clean services for all reservation types are overridden; and in effect, not using your room type/number settings at all.
- Hide Days with No Clean Scheduled
- Check to suppress all No Cleans displayed on the Housekeeping tab of a reservation. This can be accomplished on a reservation-by-reservation basis by checking the "Hide No Cleans" box at the bottom of that tab. This box is unchecked by default.
- Number of Future Days to Display
- Limit the number of days of a reservation’s cleans are shown on the reservation Housekeeping tab. Set the "Number of future days to display" (default is set to 15 days) using the up and down-arrows. When viewing the Housekeeping tab in Res Details, New Res, or Change screens, the number of cleans displayed is limited to the number set in this field.
- Number of Past Days to Display
- Limit the number of days of a reservation’s cleans are shown on the reservation Housekeeping tab. Set the "Number of past days to display" (default is set to 5 days) using the up and down-arrows. When viewing the Housekeeping tab in Res Details, New Res, or Change screens, the number of cleans displayed is limited to the number set in this field.
- Schedule Maintenance Reservation Cleans
- Only the last day of a maintenance reservation is scheduled for a clean by default (Departure Date Only is checked). To assign all days of a maintenance reservation a clean, check the "All Days" radio button. If using a clean type and service defined as a spring clean (deep clean such as curtains, carpets, and cupboards), define a Service Type "Spring Clean", a Clean Type "Spring Clean", and a Clean Pattern for a one and two-day stay (patterns for longer stays are repeated). When a maintenance reservation is made and the clean type equals "Spring Clean", each day of the reservation, regardless of length, is assigned the "Spring Clean" type.
- To account for maintenance reservations where only the last day is scheduled for a clean, choose a default clean service for the maintenance reservations that has a pattern of no clean for every day but the last. If a pattern like this is not yet created, create one.
Transactions
|
|
- Housekeeping Vendor Type
- Select the default vendor type to be used when processing vendor payables. This drop-down list is governed by the Work Orders Vendor Type.
- Vendor Payable Transaction Code
- Select the default transaction code to be used when processing vendor payables. This drop-down list is governed by the B8 table.
- Statement Report
- Either enter the default report to be used when processing vendor payables or click the Browse button to select from the Reporter folders and report list.
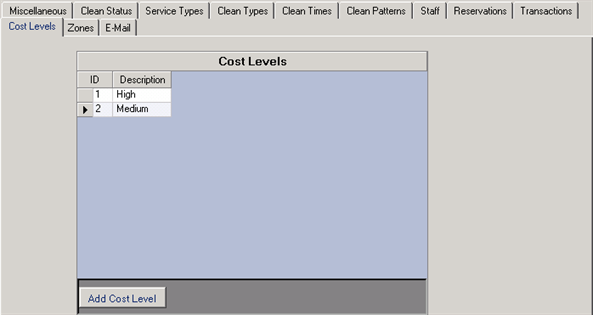
Cost Levels Tab
The Fixed Cost Tracking feature on the Miscellaneous tab must be enabled for the Cost Levels Tab to display. Rather than (or in addition to) an hourly rate, housekeepers can be assigned a cost level. Clean costs are configured for each room type/number, clean type, and cost level. When a specific housekeeper is assigned to a board, the clean times and costs are determined based on the housekeeper's level. Upon creation of the boards (prior to housekeeper assignment), the clean times/costs defined for the blank cost level are used, then recalculated once the housekeeper level is known.
|
- Add a Cost Level
- Click the "Add Cost Level" button to add a row to the grid. The "*" to the left of the ID column indicates newly added rows have not yet been saved. Enter the ID and description. Once the cost levels are determined, click the Save button. To abandon any changes made and return to the most recently saved settings, click the Reset button.
- Delete a Cost Level
- Select a row and use the delete key on the keyboard or right-click and select "Delete Selected Row" from the menu. Confirmation is required before the system performs the deletion. Any changes made prior to saving can be reset to original settings using the Reset button. For example, when a Cost Level for assistant supervisor is configured and accidentally deleted, the Reset button returns the assistant supervisor setting.
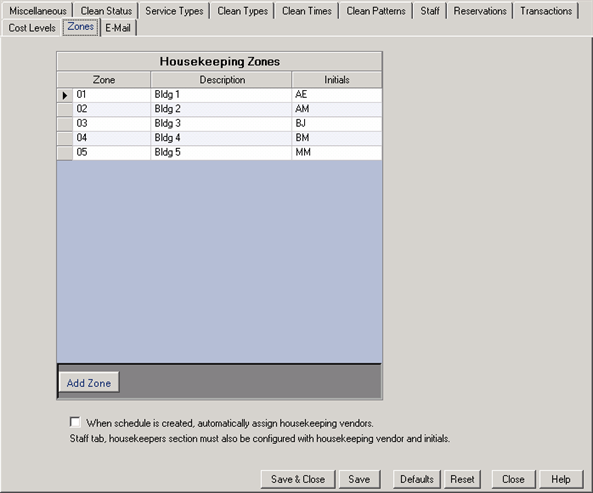
Zones
The Zones tab enables the Housekeeping zones to be configured and maintained.
|
When "Turn on Property Code Feature (Switch
422-12) is set to No, the Allow
Configuration of Number of Boards Per Zone feature is enabled on the
Miscellaneous tab. Use the Add Zone button to create zones with
configurable descriptions and number of boards. Zones can be
maintained from this tab or by accessing
System | Table Maintenance
for Table MM.
Defaults
- Choosing the Defaults button returns all Service Types, Clean Types, Room Clean Times and Clean Patterns to default settings as listed below. They are inter-related and cannot be reset independently. By resetting system defaults, all changes made to Service Types, Clean Types, Room Clean Times and Clean Patterns are overwritten. The Staff tab is not affected by the Defaults button. A warning is displayed before completing this process.
- Assign rooms to boards by zone.
- Allow multiple zones per board.
- Average hours per board = 6 hours.
- Include next arrival date, zone, housekeepers, and inspectors on boards.
- Enable Ready to Inspect Room Status and Clean Fixed Cost Tracking.
- Refresh interval = 5 minutes, and History Retention = 8 weeks.
- Defined and enabled clean statuses are Dirty, Inspect, and Clean. Clean rooms are excluded when boards are created.
- Service Type = Default Service.
- Defined clean types are Checkout, Daily, Room Move, and No Clean.
- Room Clean Times: Checkout=30 min., Daily = 15 min., Room Move = 5 min., and No Clean = 0 minutes.
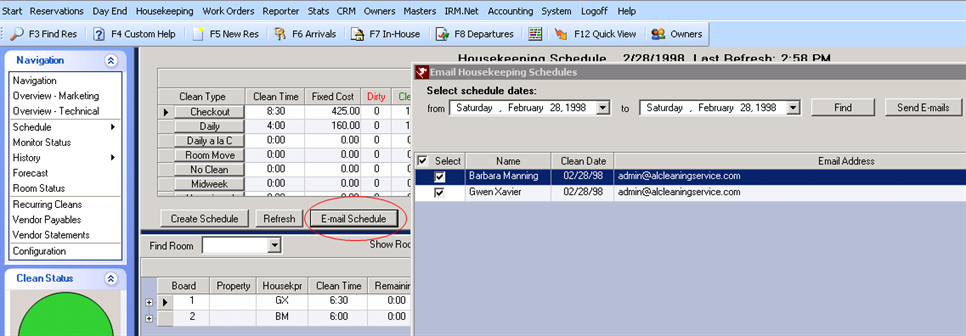
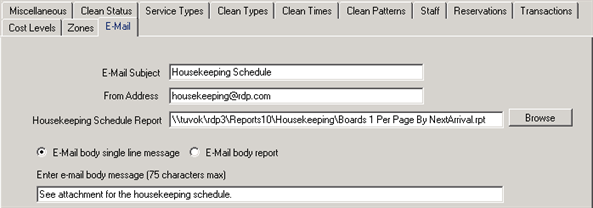
Email - Requires the Housekeeping Billing Module (SZ)
The Email configures the housekeeping boards or scheduled to be emailed to the vendor. Both today and future boards can be emailed. From the Housekeeping Schedule screen, click the Email Schedule button. Select the date range of schedules and which vendors to send schedule, then click the Send Email button. The boards must be assigned to assigned to a housekeeper before they can be emailed. The email address is entered on the vendor master and the housekeeper is assigned a vendor. Precheck-in cleans are included on the boards.
|
|
- Email Subject
- Enter the subject of the email schedule. The date of the schedule being email is automatically added to the subject.
- From Address
- Enter the email address from which the schedule will be sent. This is also the email address that the vendor can reply to once the schedule email is received.
- Housekeeping Schedule Report
- Browse to and select the housekeeping schedule report that will attached to the email sent to the vendors. This is a Crystal Report that should include the beginning date, ending date and housekeeper as parameters.
- Email Body Single Line Message
- Select this radio button to a enter a single line message in the body of the schedule email to vendors. When selected, enter the subject in the line below in Enter Email Body Message. This message can be up to 75 characters.
- Email Body Report
- Select this radio to specify a Crystal Report to included in the body of the email. By using a Crystal Report, specific info including the housekeeper's name can automatically populated into the message that is sent. When selected, enter or browse to the Crystal Report in the line below. This report should contain no parameters.