Click here for tutorials
Review Knowledge Base Article K000131
Overview
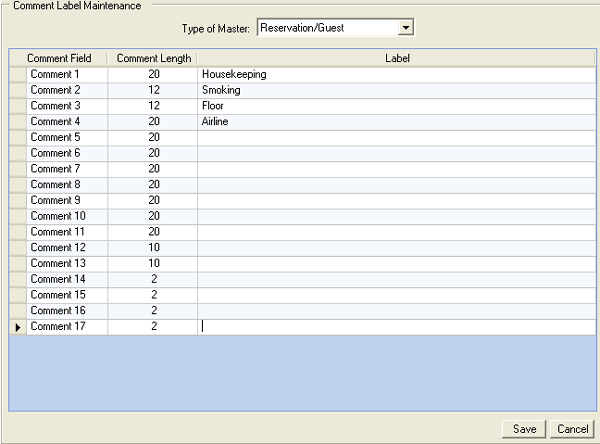
Comment Label can be customized in RDPWin from the System main menu. Standardizing the data that should be entered in the comment field reduces keystrokes and offers the ability to print reports based on a certain comment field. To modify the Comment labels go to System | Comment Labels
Comment labels can be customized for the following masters:
- Credit Card
- CRM
- Group
- Room
- Owner
- Owner Recurring Charges
- Reservation/Guest
- Travel Agent
- Vendor/Itinerary
- Work Order
- Work Order Vendor
- Assets
- Contacts

Custom Comment Tables
Each comment field can be designated to have specific information available for selection from a drop down. By standardizing the data in each field, it will allows the reservation to quickly and easily select one of the options in the comment field. For example, Comment 4 is used for the airline the guest will be using. Enter the options in the corresponding comment table, which creates a drop down on the comment field on the reservation. Listed in the table below are the comment tables and the corresponding comment field.
To view the other comment master tables, see Comments.
| Comment Field | Table | Length | Comment Field | Table | Length |
|---|---|---|---|---|---|
| Comment-1 | EF | 20 | Comment-10 | E7 | 20 |
| Comment-2 | EG | 12 | Comment-11 | E8 | 20 |
| Comment-3 | EH | 12 | Comment-12 | E9 | 10 |
| Comment-4 | E1 | 20 | Comment-13 | EA | 10 |
| Comment-5 | E2 | 20 | Comment-14 | EB | 2 |
| Comment-6 | E3 | 20 | Comment-15 | EC | 2 |
| Comment-7 | E4 | 20 | Comment-16 | ED | 2 |
| Comment-8 | E5 | 20 | Comment-17 | EE | 2 |
| Comment-9 | E6 | 20 |
To Configure Comment Tables with Drop Downs:
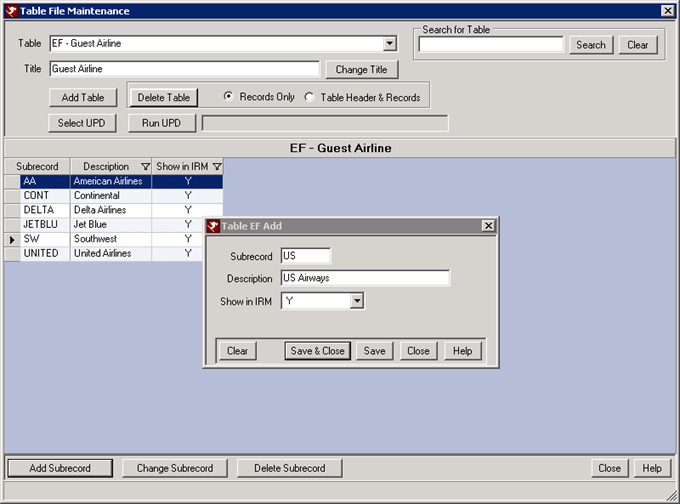
- In RDPWin, go to the System main menu --> Table Maintenance.
- Click the Select Table drop down to determine if a comment table has already been added for a certain comment field. If it does not exist, click the Add Table button.
- Enter the correct "E" table using the list above to determine which to use based on the comment number. For example, add table EG if creating a drop down for comment 2. The comment will be labeled Guest Airline.
- Click the Add Subrecord button.
- Enter the subrecord, up to 6 characters, and the description. If this comment should available on the IRM, select Y.
- Repeat for the remain subrecords.

- Type of Master
- Select the file for which changes to comments labels are needed. When Reservation/Guest is selected, remember only some of the Comments configured are available both on the reservation and the guest history master. Comments 1-9 on a reservation also display as Comments 1 - 9 on the guest history master. However, only Comments 10 - 17 follow the reservation. Use Comments 1 - 9 to record information useful to the guest during any stay Comments 10 - 17 to record pertaining only to the specific reservation. For example, Comment 9 could read "always travels with pets" and Comment 10 could read "traveling with two dogs".
- Comment Field
- This description merely describes which label by row. It cannot be changed. To change the label of a comment, enter it into the Label column.
- Comment Length
- Since each comment field varies in size, use the Comment Length column to review the field capacities and determine where to assign each comment label. This field DOES NOT represent how long the label is, but it DOES represent how long the actual comment field is.
- Label
- Use the "Label" column to enter or change the label for the corresponding comment field.
- Cancel Button
- Cancels any changes that have been made to the comment labels and retrieve the values that have been previously saved, refreshing the comment list.
- Save Button
- Save changes that have been made to the comment label (only available once a change is made to a label).
Click these links for Frequently Asked Questions or Troubleshooting assistance.
11/13/2012
© 1983-2012 Resort Data Processing, Inc. All rights reserved.