Configure Itinerary with Activities and the IRM's Virtual Store
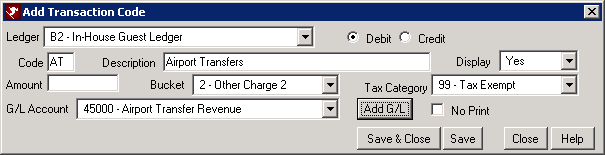
- Add a transaction code for the activity on the B2 ledger and assign a two-digit code.
- In RDPWin, go to the Accounting main menu --> Transactions --> Add.
- Select B2-In House Guest Ledger from the Ledger drop down.
- Enter the 2-digit code for the activity transaction in the Code field. Note: the transaction cannot start with the letters 'D' or 'S,' as these are system designated letters.
- Enter the transaction description in the Description field.
- In the Bucket field, select the correct Charge from the drop down. The bucket controls whether or not the owners or travel agents receive revenue for the transaction. If it is set to 0-Room Charge, the owner and agent will receive revenue. If it is set to 1-Other Charge 1 or 2-Other Charge 2, the revenue disbursement will be based on the settings in the C7-Rate Codes Table. Click C7 Table for more information.
- Select the tax from the Tax Category field. The IRM Classic Virtual Store (not IRM.Net) calculates the tax from the transaction code, so be sure to add a tax category when taxes are to be included.
- Select the correct G/L Account. If the G/L does not exist, click the Add G/L Account button.
- Save & Close.
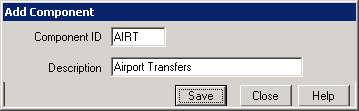
- Create the activity component.
- In RDPWin, go to the System main menu --> Rates submenu --> Components --> Add.
- Enter the 4-character component code in the Component ID field. This code can be alpha numeric but must contain 4 characters.
- Enter the description of the component in the Description field.
- Click Save.
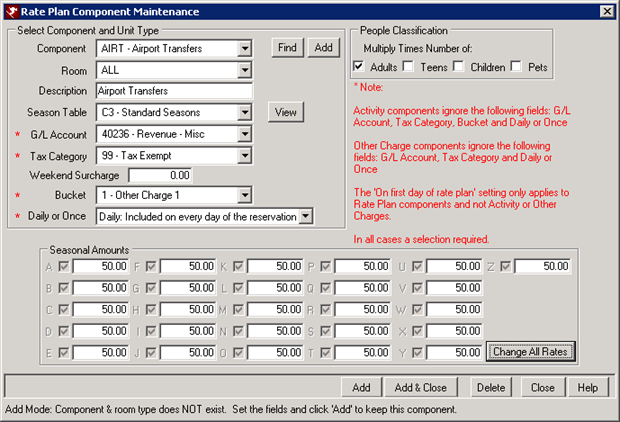
- Select the room or type from the Room drop down. Choose 'ALL' if the component pricing is the same regardless of the room/type.
- Select the season table for the component in the Season Table drop down.
- Enter a G/L Account, Tax Category, Bucket, Daily or Once. Note: Activity Components ignore these fields. The tax, G/L, and bucket will be picked up from the transaction code.
- Enter the seasonal amounts in the applicable seasons fields. Click the View button next to the Season Table field to view seasonal letters used. If the prices do not change based on season, click the Change All Rate button and enter the amount.
- Click Add & Close.
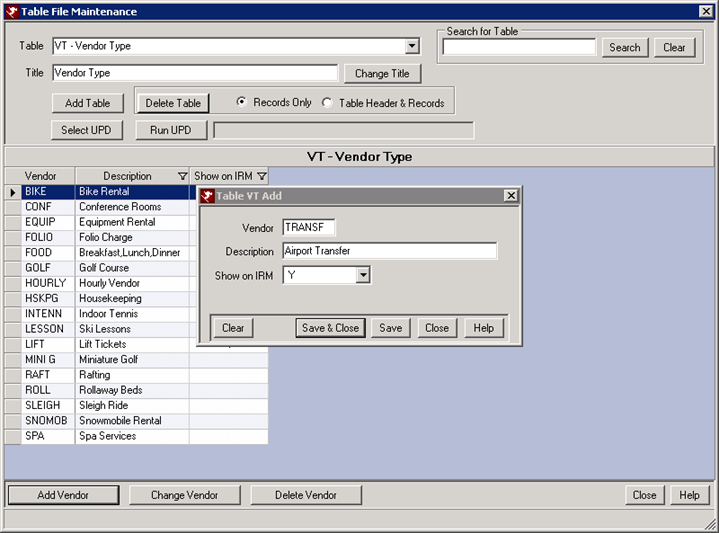
- Add the vendor type to Table VT using RDPWin Table Maintenance.
- In RDPWin, go to the System main menu --> Table Maintenance.
- Select table VT - Vendor Type.
- Click the Add Vendor button.
- Enter a 6-character record in the Vendor field.
- Enter the description of the vendor type in the Description field.
- Select Y or N to Show on IRM. This will allow guests to add this activity from the Virtual Store at the time of the reservation booking. Note: a blank record in this field = N.
- Save & Close.
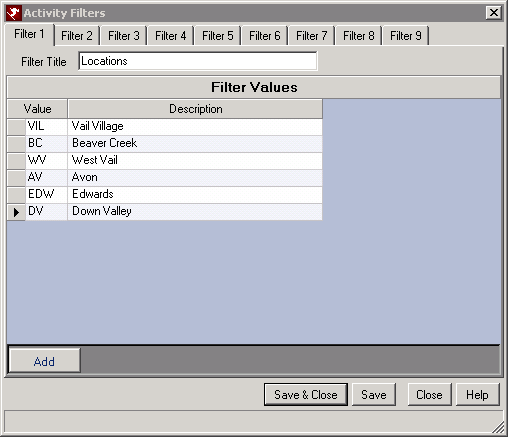
- Set up Activity Filters. Activity filters can be used to narrow down the activity selection. Examples of activity filters can include, location, price point, cuisine type (for restaurants), age group, etc. Activity filter are not required, but can be helpful if several activities exist.
- In RDPWin, go to the Reservations main menu --> Configuration --> Activities Tab.
- Click the Activities Filter link.
- Enter the description of the filter in the Filter Title field.
- Click the Add button.
- Enter the 3-character or less Value, followed by the full description.
- Once all values have been completed for this filter, click Save.
- If more filter types are desired, click the next filter tab and repeat steps c-f.
- Click Save.
- Add the Batch Code.
- In RDPWin, go to the Reservations main menu --> Configuration --> Activities Tab.
- Click the Batch Activities link.
- Click the Add Batch Code button.
- Enter a 2-character batch code. The batch code links the activities to the vendor. It also serves as a header, so only the 2-character code and the description are needed. When all the information is completed, the system prompts when adding the batch item to auto-fill from the information just entered.
- Save & Close.
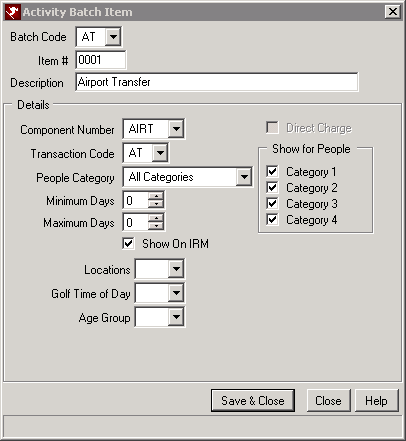
- Add the Batch Item.
- Select the batch code created in Step 5 above from the Batch Code drop-down.
- Enter a four-digit Item# and description. It is recommended to start with code 0001. This will allow for 9999 batch items (activities).
- Select the component number created in Step 2 above from the Component Number drop-down.
- Select the transaction code created in Step 1.
- Select the People Category from the drop down. This field multiplies the activity rate by the number of people in the reservation's people category for the specific people categories selected for the activity.
- Check Show on IRM to allow the activity to display in IRM's Virtual Store.
- The Show for People makes the item available to only certain people classifications. Check the appropriate people category if the activity should be available for that classification. For example, if the activity is only available for Adults, check the Category 1 field.
- Set any applicable filters.
- Save & Close.
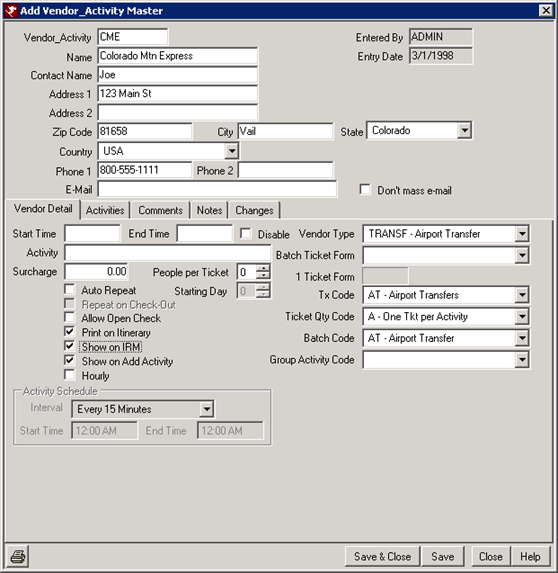
- Add the activity vendor master.
- In RDPWin, go to the Masters main menu --> Activity Vendors --> Add.
- Enter a vendor number (up to eight alpha-numeric characters).
- Complete the contact information.
- If the vendor has certain hours or start and end times for the activities, enter those in the Start Time and End Time fields.
- In the Activity field, enter the description of the activity or service the vendor provides.
- If the vendor will include a surcharge for activities, enter the Surcharge amount. This will add an additional amount to each activity entered on the reservation.
- If printing tickets for this vendor from RDPWin, select the number of People Per Ticket.
- If the activity should repeat on each day of the reservation, check the Auto Repeat box. Once the activity has been added on the first, it will automatically repeat the activity for the remaining days of the stay. Check the Repeat on Check-out if the activity is included on the guest's check-out day. If the first day of the activity is different than the check-in day, enter which day it should start in the Starting Day field.
- If the vendor is providing an asset to the guest that must be tracked at the front desk, such as bike rental or tennis equipment, check the Open Check box. If the activity is complete and the guest has not returned the asset, the system will prompt letting the user know that the asset has not been returned.
- Check Print on Itinerary. If not checked, the vendor or activities will not print on the guest's itinerary.
- Check Show on IRM to make the vendor visible on the IRM Virtual Store.
- Check Show on Add Activity. If not checked, the vendor or their activities will not show on the Add Activities screen on the reservation.
- If the vendor is providing an hourly service, check the Hourly box. This activates the Hourly Scheduling of the activities.
- Select the vendor type created in Step 3 using the Vendor Type drop down.
- If the vendor has a customized ticket to print, select that from the Batch Form Code drop down. For details on creating a customized ticket, see How to Create Activity Ticket.
- Select the transaction code created in Step 1 using the Tx Code drop down.
- Select the batch code created in Step 5 using the Batch Code drop down.
- If printing tickets from RDPWin, select from the Batch Ticket Form drop down. A Crystal Report that can be created to print as a ticket.
- If printing tickets from RDPWin, select from the Ticket Quantity Code drop down. This defines how many of the tickets are created for the vendor.
- Click Save & Close.
Direct Cost Activities
To track the direct cost of the activities sold along with the profit or markup, configure the activities using the COST component. See "How To - Configure Direct Cost Activities"
The Virtual Store
Confirm that Show on IRM is checked to display the activity in the virtual store:
- Vendor Type (VT table)
- Vendor master
- Batch item (VP table)
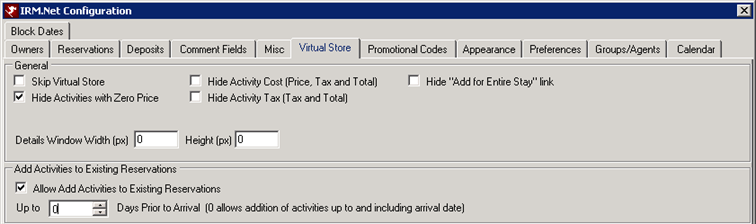
To turn on the Virtual Store for the IRM.Net:
- In RDPWin, go to the IRM.Net main menu --> Configuration --> Virtual Store tab.
- Uncheck the Skip Virtual Store box.
- Select any optional configuration for the Virtual Store from this tab.
- IRM.Net Virtual Store Screen #1
-
- The Category row pulls from the VT table description and displays the vendor type information
- The Description row pulls from C:\inetpub\wwwroot\IRMNet\Custom\<RDP Data Server>\<RDPxx>\UserHTML\VirtualStore\subrecord.HTM with the subrecord name from the VT table for each type of vendor.
- The Picture row pulls from C:\inetpub\wwwroot\IRMNet\Custom\<RDP Data Server>\<RDPxx>\Images\VirtualStore\subrecord.jpg with the subrecord name also from the VT table for each type of vendor.
- IRM.Net Virtual Store Screen #2 (After selecting vendor type)
-
- The Category row pulls from the VT table description (same as the first screen).
- The Vendor row pulls from the Vendor Master name for each vendor.
- The Description row pulls from C:\inetpub\wwwroot\IRMNet\Custom\<RDP Data Server>\<RDPxx>\UserHTML\VirtualStore\vendor#.HTM with the vendor number being the Vendor Number from the Vendor Master for each vendor.
- The Picture row pulls from C:\inetpub\wwwroot\IRMNet\Custom\<RDP Data Server>\<RDPxx>\Images\VirtualStore\vendor#.jpg with the vendor # being the Vendor Number from the Vendor Master for each vendor.
- IRM.Net Virtual Store Screen #3 (After selecting vendor)
-
- The Vendor row pulls from the Vendor Master name for each vendor.
- The Activity row pulls from the VP sub record description for each batch activity.
- The Description row pulls from C:\inetpub\wwwroot\IRMNet\Custom\<RDP Data Server>\<RDPxx>\UserHTML\VirtualStoresubrecord.HTM with the subrecord name from the VP table sub record for each batch activity.
- The Picture row pulls from C:\inetpub\wwwroot\IRMNet\Custom\<RDP Data Server>\<RDPxx>\Images\VirtualStore\subrecord.jpg with the sub record name from the VP table sub record for each batch activity.
- The Price and Tax rows calculate from the Component that was set up in RDPWin: under System --> Rates --> Components that is tied in with the VP batch activity sub record.
Things to Confirm
- Confirm the virtual store is turned on through the IRM Configuration. Typically the Skip Virtual Store option is checked in the IRM.Net Configuration --> Virtual Store tab.
- Confirm that Show on IRM is checked for the appropriate vendor types in the VT table or the virtual store displays nothing.
- Confirm that Show on IRM is checked for the appropriate vendor masters.
- Confirm that Show on IRM is checked in the Batch Item detail in the VP table from Step 6.
Add Virtual Store Activities to Existing Reservations
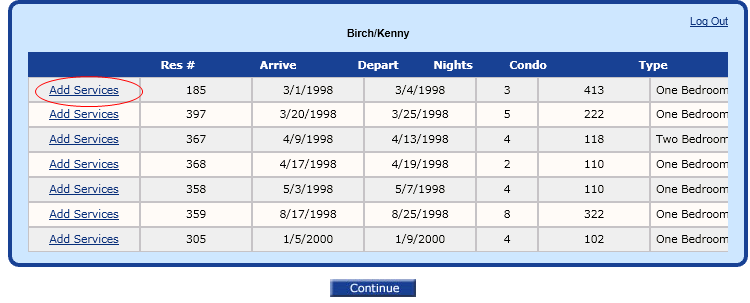
Activities can be added to existing reservations on the IRM.Net. The guest must login to their account from the My Reservations link. Once logged in, their list of reservations displays with a link to Add Services. This returns the guest to Virtual Store to activities. To enable this feature:
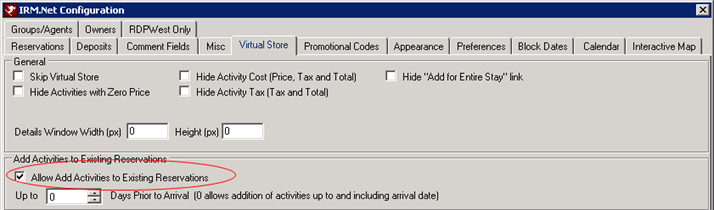
- In RDPWin, go to the IRM.Net menu --> Configuration --> Virtual Store tab.
- Check the box Allow Add Activities to Existing Res.
- Enter the number of days prior to arrival activities can be added. If activities can be added up until the arrival date, enter 0.
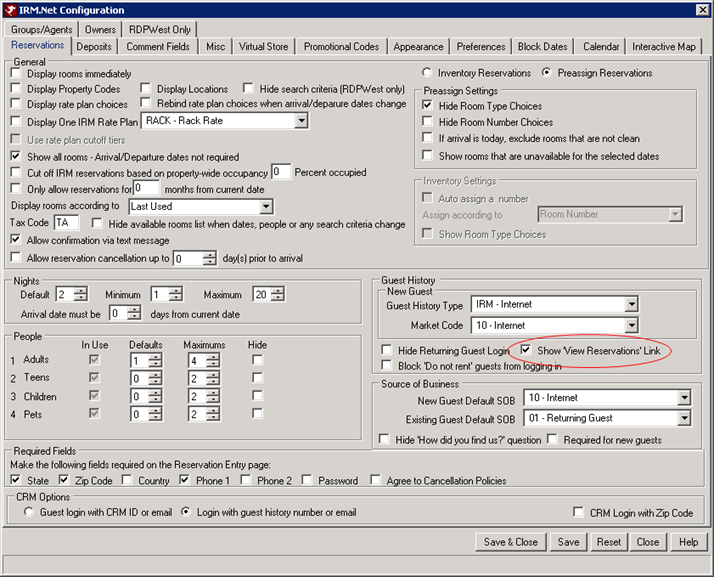
- Click the Reservations tab.
- Check the box under the Guest History Section to Show 'View Reservations' Link.
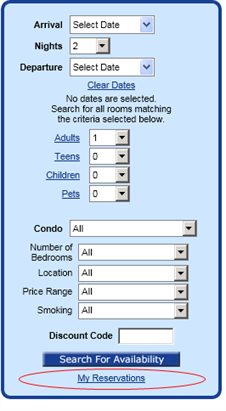
- Browse to the IRM.Net. Click the My Reservations link under the date entry section.
- Once the guest logs in to their account, click the Add Services link next to the appropriate reservation. This will direct the guest to the Virtual Store to add activities. Note: if the IRM.Net is configured to take a deposit on Virtual Store items, the system does not collect a payment when activities are added to existing reservations. If a payment is needed, this must be done manually through RDPWin.
Click here for the How To Index.
Click these links for Frequently Asked Questions or Troubleshooting assistance.
Last Updated 5/22/2012