Click here for Master Tutorials
Click here for Agents Navigation
| Travel Agent Functions | |
|---|---|
| Add Change Transactions | Payment |
Change Agent Master Transactions
Select an Agent in Analysis and click Change Transactions in Navigation
or click Change Transactions from the Masters | Agent menu to display the
Find Agent form. This screen can also be
accessed by clicking the Change button on the Transaction tab or double-clicking
the agent record and clicking the Change button on the Transactions tab.
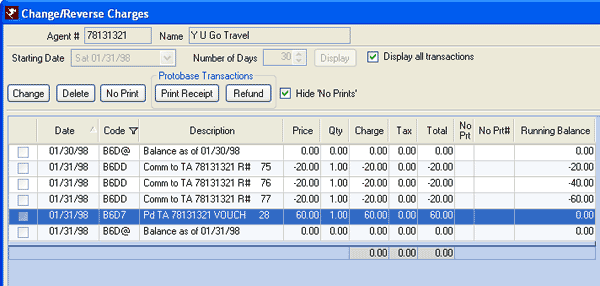
The Change/Reverse Charges
screen displays all transactions for the selected Agent. The Agent
number and name are displayed at the top of the screen.
- Change
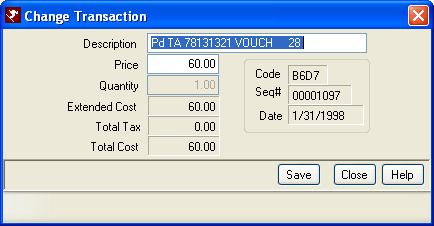
- Check the box of the transaction to be changed and click Change to open
the Change Transaction screen to update the Description and/or Price. This screen also displays
(in read-only format) Quantity, Extended
Cost, Total Cost, Code (Transaction Code), Seq #, and Date (posted).

- Delete
- Check the box of the transaction to be changed and click Delete.
If these reversed transactions should not be printed on statements, check
the original and reversal transactions and click the No Print button.
Use the checkboxes next to the Date column to select transactions and update the selected total. When multiple transactions are selected and an option clicked such as Change or Delete, the system first determines if the selected option can be performed on all transactions. If not, a screen is displayed with a list of all the selected transactions and a status next to each indicating which can and cannot be performed. If unable to perform, a warning with an explanation is displayed. If all selected transactions are marked as Not Allowed, the ability to authorize continuation is disabled. The only enabled choice is No. If allowed, select the Yes button. The system performs the selected option on the transactions that have the status of OK. - No Print
- Manually mark selected transactions as "No Print".
The total is displayed in the lower left corner of the form and must be
at zero for this option to work. This button works as a toggle switch.
If the transaction(s) selected are already set to "No Print"
when this button is accessed, the "No Print" column is unselected.
When an Agent transaction is changed or deleted, RDPWin automatically adds "No Print" flags on any transaction reversal caused by a deletion or a change when the posting date is the same as the transaction date.
If the transaction date being changed or deleted is prior to the current system date, RDPWin prompts to use either the system date or the transaction date. When the transaction date is selected, transactions are marked as "no print". If the system date is selected, the "No Print" flag is not set. Because the statement ending-date could be between these dates, and if the transactions were no printed, the "No Print Transactions" for the statement would be out of balance.
If the transaction date being changed or deleted is the current system date, the transactions are marked as "No Print". - Print Receipt
- Click the Print Receipt button when an Protobase credit card transaction is selected to send a command to the printer to print the receipt.
- Refund
- Click the Refund button when an Protobase credit card transaction is selected. The system processes a refund transaction through Protobase and posts a refund transaction to the reservation.
- Hide 'No Prints'
- When checked, transactions marked with the no print flag are not displayed in the grid.
Click these links for Frequently Asked Questions or Troubleshooting assistance.
04/05/2010
© 1983-2009 Resort Data Processing, Inc. All rights reserved.