| IRM.Net Topics | |
|---|---|
|
Install Version 3 on 2003 Server |
Customize Text, Room Descriptions, etc. |
| IRM.Net Configuration Tabs | |
|---|---|
|
Interactive Map Tab (Module T4 Required) |
Owners Tab (Module R3 Required) Preferences Tab Reservation Priority (Module R6 Required) Virtual Store Tab (Module S1 Required) |
Preferences Tab
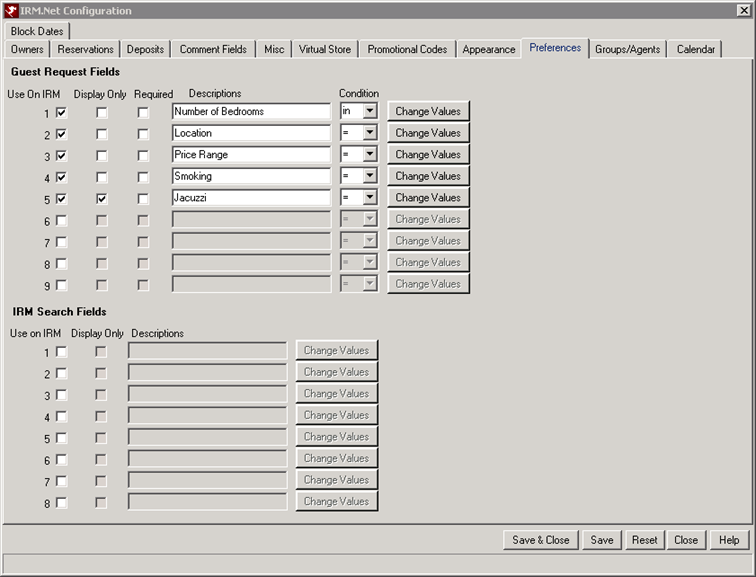
Guest Request Fields
Customize RDPWin's existing guest preferences for use and display in IRM.Net. Preferences can help narrow down the room selection after a guest enters a preference value. Only rooms that meet that preference criteria will display. Since guest preference must still work with RDPWin's room master and preferences, preference # 1 on the IRM must relate to preference #1 in RDPWin. Eight new IRM Only Search Fields have been added for properties needing to utilize more than the original nine.
|
- Guest Request Fields
- The Guest Request Fields work in conjunction with the guest preferences defined in RDPWin Reservation Configuration, Preferences Tab. These fields must be the same, but the descriptions of the field or values can be different. For example, RDPWin's Preference #1 is called Number of Bedrooms. The description for the IRM could be Number of Sleeping Rooms. To activate each preference, check the Use on IRM box.
- Display Only
- Check this box if the guest preference will not have values for the guest to select, but rather just display the data in that preference field. The Display Only is useful if information about the room should be shown to the guest.
- Required
- The Required checkbox makes it mandatory that the guest select data from the drop down before continuing with the reservation. It is recommended that the IRM.Net be set to NOT Display Room Immediately in order for data to be entered in the preference field before the IRM retrieves available rooms.
- Description
- Enter the description information or heading of the preference. Up to 20 characters can be entered for each preference.
- Condition
- The IRM.Net supports new operators in the Condition drop down for the Guest Request Fields. Rooms are assigned a value for each defined preference. The operators are:
- > (greater than)
- >= (greater than or equal to)
- < (less than)
- <= (less than or equal to)
- in (the selected value is anywhere in the preference)
- With the "in" operator, the guest can enter a value such as '3' and all units with a '3' like '235,' '23,' or '35' in that preference field will display.
- Change Values
- The Change Values button allows the choices for each preference to be entered. These are all the possible options that will be assigned to the room.
- IRM Search Field
- These are eight additional fields that can be used for the guest requests. These fields only pertain to the IRM and are not used in RDPWin Reservations. However, they must still be defined on the room master preferences tab. These preferences work the same as the Guest Request Fields except that they cannot be required, nor have the Condition field available.
- Use Preference by Room Type Definitions
- IRM.Net supports guest preferences by room type which can be used as selection criteria when searching availability. To configure these preferences, the Inventory Reservations radio button must first be selected on the Reservations tab, then click the Preferences tab to configure the room type preferences.
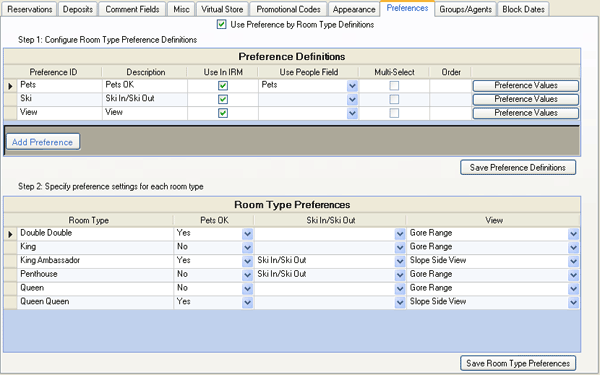
- Define up to 20 preferences specifying a preference ID (up to 6 characters) and description (up to 20 characters). The description is used to label the Preference drop-down in IRM.Net.
- Check the 'Use in IRM' checkbox to enable the preference. When unchecked, the preference is defined but not used in IRM.Net.
- Click the "Save Preference Definitions" button to file the information.
- Click the "Preference Values" button in each row to configure the possible values for each preference.
- In the "Room Type Preferences" grid, use the drop-downs to select the preference values that apply to each room type, then click "Save Room Type Preferences".
- Special Case for Pets:
One preference can be configured for special handling by choosing from the "Use People Field" drop-down in the Preference Definitions grid. If a "people" field is selected, then this preference is enforced using the associated people field count.
For example, configure a PETS/Pets OK preference and select the 'Pets' people field from the "Use People Field" drop-down. The values for the PETS preference should be Y/Yes and N/No - either a room type allows pets or it does not. For each room type, select either Yes or No as to whether pets are allowed. In IRM.Net, when the number of pets selected from the Pets people field is greater than zero, then only room types where pets are allowed are displayed. When the pet count is zero, then the PetsOK drop-down is respected and allows a guest to select room types where pets have not been allowed.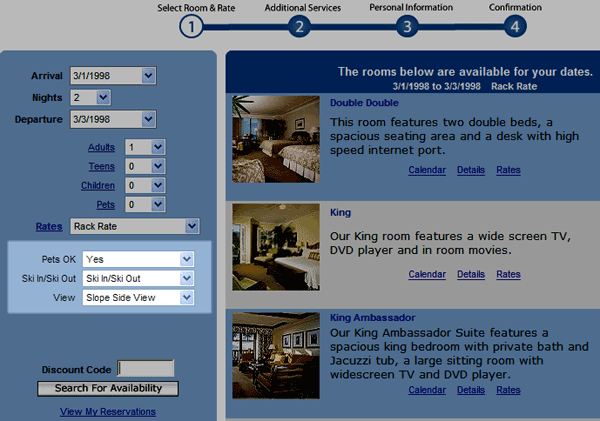
- Use on IRM
- Check to activate a preference on the IRM.Net. When not checked, the guest preference might be available in RDPWin (when checked on the Res/Config/Pref tab), but preference is not displayed on the IRM.Net. Only the last-defined preference can be deactivated. Any existing preference can be changed.
- Descriptions
- Maintain the description that displays as the label above the drop-down lists on screens throughout the system. Any combination of letters, numbers, and symbols is allowed.
- Change Values
- Once the Descriptions and Conditions are selected for a newly added or to change an existing preference, click "Change Values" to open the Guest Preferences screen. Click "Add Choice" to add a row to the grid and enter value and description information. Click OK when entry is complete to return to the Preferences tab.
Click these links for Frequently Asked Questions or Troubleshooting assistance.
01/28/2011