| IRM.Net Configuration Tabs | |
|---|---|
|
Analytics Tab Interactive Map Tab (Module T4 Required) |
Multiple Resorts Tab Owners Tab (Module R3 Required) OwnerNg Tab Reservation Priority (Module R6 Required) Reservations Tab Virtual Store Tab (Module S1 Required) |
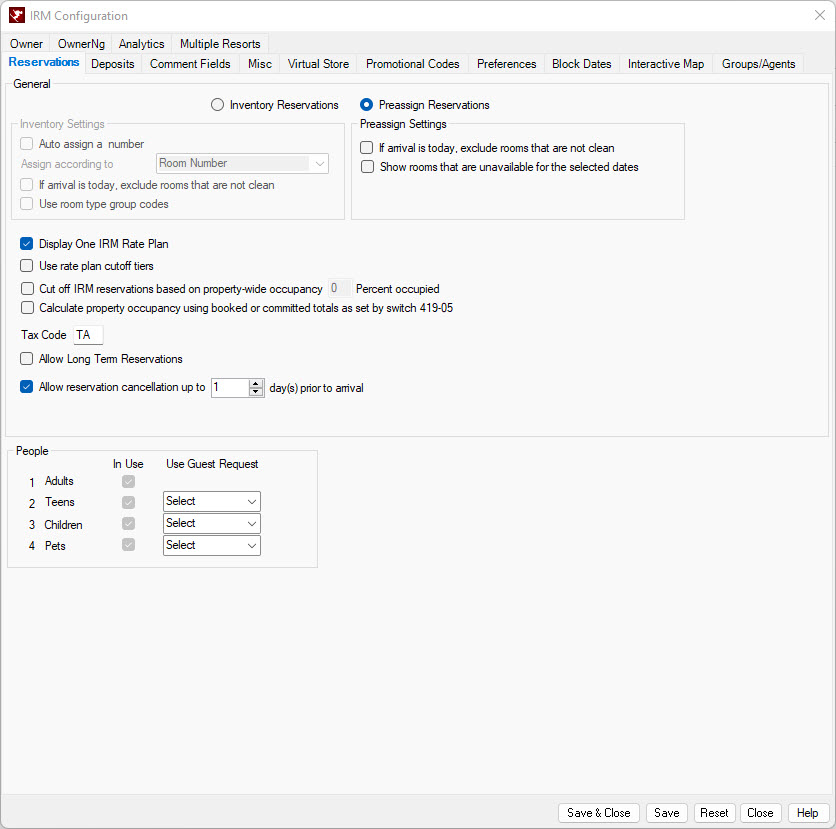
Reservations Tab
|
General
Inventory Settings
- Inventory Reservations
- Select the Inventory Reservations radio button to enable the Inventory Settings, which will display availablity by room type. If changing from the Preassign Reservations radio button, click Save & Close and then come back to the Reservations tab in order to access the Inventory Settings.
- Auto-assign a Room Number
- When checked, a room that best fits the guest's room type selection is automatically selected for the reservation. When not checked, the room number must be manually assigned at a later time such as at check-in or when ever the property deems appropriate.
- Assign Rooms According To...
- When Inventory Reservations and Auto Assign a Room Number are selected, the order in which rooms are auto-assigned can also be configured. Choose from the "Assign Rooms according to" drop down either room number order, last used, manual sequence (which uses the custom display sequence specified on the room masters) or occupied nights . The default is room number order.
- If Arrival is today, exclude rooms that are not clean
- Use room type group codes
Preassign Settings
- Preassign Reservations
- Select the Preassign Reservations radio button to allow reservations to be assigned a room at the time of booking.
- Hide Room Number Choices
- Enabled only when Preassign Reservations is selected, check to hide the Room Number drop-down as a selection criterion on IRM.Net preassign reservations.
- Hide Room Type Choices
- Enabled only when Inventory Reservations is selected, check to hide the Type drop-down, which is populated with room types, as a selection criterion on the IRM.Net screens.
- If Arrival Is Today, Exclude Rooms That Are Not Clean
- When checked, this setting will only show clean rooms on the IRM.Net if the guest is arriving today. The room status must be blank (blank = clean) for the rooms to display available. The Preassign Reservations radio button must be selected for the switch to be active.
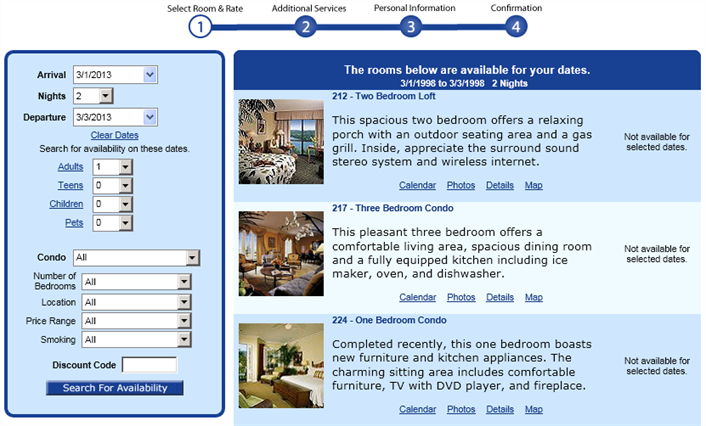
- Show Rooms that are Unavailable for the Selected Dates
- When checked, the IRM.Net will display rooms that are unavailable for the dates selected. Instead of the Reserve or Rates button next to the room, a message stating 'Not Available for the Selected Dates' will display. The Rates link associated with the Reserve button will not display. If room is not available because of a minimum night requirement, too many people, or if it exceeds the maximum nights of the rate plan, then a message will display describing the reason, such as Minimum Night of 3 is Required. Unavailable rooms will display below the available rooms.
- Display One IRM Rate Plan
- When "Display One IRM Rate Plan" is checked on the Reservations tab, only one rate displayed. Guests are not given a rate choice such as AAA discount, military discount, etc. When not checked, all applicable rates are displayed including packages.
This is a sample of what the Select Rate link displays when "Display One IRM Rate Plan" is checked:
When "Display One IRM Rate Plan is not checked, the same reservation displays like this:- Pass Rate Plan from Marketing Site to Override Configured IRM Rate
- If the IRM.Net Configuration's Reservations Tab is set to Display Only One IRM Rate Plan, this can be overridden by passing in a different rate plan from the marketing site. This can be useful if there are certain room types or rooms that must have a different rate than the rest of the inventory.
- From the marketing site, pass /IRMNet/Res/ResMain.aspx?rateplan=XXXX (replace the XXXX with the rate plan code from RDP).
- If the IRM.Net is configured to go directly to the room calendar page, pass /IRMNet/Res/RoomsCalendar.aspx?ratepaln=XXXX
- If the IRM.Net is configured to go directly to the room details page, pass /IRMNet/Res/RoomDetailspage.aspx?rateplan=XXXX. Linking to the rooms details page is recommended in the case where the rate plan should only be applied to certain rooms. This would prevent all rooms from receiving the rate.
- Use Rate Plan Cutoff Tiers
- If checked, the IRM.Net will display a different rate plan based on the occupancy percent of the property. Only the one rate available for that occupancy percent will display. For example, if the property is 20% occupied, a 30% discount rate is available. As the occupancy percent increases to 85%, the rate available is now a 10% discount. At 95% occupancy, the only rate available is RACK. The Display One IRM Rate Plan checkbox must be selected in order for this feature to be active.
- If the guest selects more than one day for the stay, the IRM.Net selects highest occupancy percent of the stay and displays the corresponding rate. For example, if the guest has selected a three night stay, the first night's occupancy percent is at 80%, the second night is 60% and the third night is 83%. The rate that displays is the rate available for the occupancy cutoff 85% percent. Only one rate for each cutoff percent should be configured. However, a promo code can be passed in and used in place of the rate plan cutoff tiers.
- The table below displays how the cutoff tiers work with the IRM.Net.
Rate Plan Cutoff Will Show with Occupancy 30DC - 30% Discount Rate Cutoff at 70% Occupancy (Set cutoff to 70) 0% - 69.99% Occupancy 25DC - 25% Discount Rate Cutoff at 75% Occupancy (Set cutoff to 75) 70% - 74.99% Occupancy 20DC - 20% Discount Rate Cutoff at 80% Occupancy (Set cutoff to 80) 75% - 79.99% Occupancy 15DC - 15% Discount Rate Cutoff at 85% Occupancy (Set cutoff to 85) 80% - 84.99% Occupancy 10DC - 10% Discount Rate Cutoff at 90% Occupancy (Set cutoff to 90) 85% - 89.99% Occupancy 5DIS - 5% Discount Rate Cutoff at 95% Occupancy (Set cutoff to 95) 90% - 94.99% Occupancy RACK - Rate Rate Cutoff at 100% (no cutoff needed for rate) 95% - 100% Occupancy - Steps to configure Rate Plan Cutoff Tiers:
- Set the IRM.Net Configuration to Display One IRM Rate Plan from the IRM.Net Configuration --> Res Tab --> check the Display One IRM Rate Plan box.
- Select the rate plan for which to display in the field next to the checkbox. Note: Rate plan cutoff tiers ignore the rate in this field and the program will select the appropriate rate plan based on the cutoffs.
- Check the Use Rate Plan Cutoff Tiers box.
- Make sure each rate that will be part of the rate plan cutoff tier is set to display on the IRM. Go to the System menu --> Rates --> Rate Plans --> Change --> select each rate plan and make sure the Display on IRM box is checked.
- Set up the cutoffs for each rate. Go to the System menu --> Rates --> Rate Plan Cutoffs. Select the first rate. Enter the percent for which the rate will be cutoff.
- Repeat for the remaining rates. See the table above for a detailed example of the set up of the rates and cutoffs.
- Cut Off IRM Reservations Based on Property-wide Occupancy
- Displayed only when Preassign Reservations radio button is selected, turn off the IRM booking once a certain occupancy level is achieved. For example, check this box and set to 80%. When the property occupancy is 81%, no rooms display as available. Properties that often overbook by room type and moves guests around should consider this setting.
- Assign according to
- Indicate the order in which rooms is to be sorted. If a secondary sort is applicable, both are shown, for example: Room Type/Room Number. The rooms would be first sorted by room type, then within each room type by room number.
Primary/secondary sort choices take care of both cases. When a specific room type is selected, then the secondary sort takes over.
Preassign Mode Inventory Mode Room Type/Room Number Room Type Room Number Custom Room Type Last Used Custom Room Number Custom Room Type/Room Number Custom Room Type/Last Used
- Room Type/Room Number
- When selected (for Preassign reservations), the rooms first sorted by room type (alphabetically), then within each room type sort by room number. If the room types are 1B, 2B, 3B, then all the 1Bs, in room number order, display first and are followed by the 2Bs, in room number order.
- Room Number
- When selected, the rooms are displayed based room number sequence.
Note: When rooms are labeled using Alternate Room Name, then the order of display is in alternate room name order.- Last Used
- When selected, the rooms are displayed based the last rooms used to promote owner rotation and equalized owner revenue. Setting the drop-down to Last Used displays availability specific to room type, but sorted to show the Room Number for that Room Type that has been available the longest period of time. This allows a property to assign rooms by Room Type while using all Room Types equally. Wear and tear on rooms is spread evenly over the whole property.
Ex. Imagine three owners with three rooms.
- Owner 1 gets the first reservation in Room 1
- Owner 2 gets the second reservation in Room 2
- Owner 3 gets the third reservation in Room 3
- Owner 1 would be next on the list (last used) to receive a reservation. When Owner 1 is skipped, then Owner 2 gets the fourth reservation and Owner/Room 1 remains at the top of the list. The time-stamp field in the Availability file determines the order in the Available Rooms display.
- Custom Room Number
- Indicates use of the Manual Sequence key in the units file. The custom sequence number is configured for each room by setting the Display Sequence field on the Room Master.
- Custom Room Type/Room Number
- When selected, the display is first sorted according to the room type order specified in c:/inetpub/wwwroot/irmnet/roomtypeorder.txt, then within each room type sort by room number. The room types should be listed in the desired order separated by commas. For example:
K, Q, DD- Custom Room Type/Last Used
- When selected, the display is first sorted according to the room type order specified in c:/inetpub/wwwroot/irmnet/roomtypeorder.txt, then within each room type sort by last used (to promote owner rotation).
- Tax Code
- Set the default tax code to be assigned to IRM.Net reservations.
Also see Taxes for tax category information.- Allow Reservation Cancellation Up to x Day(s) Prior to Arrival
- When checked, the IRM.Net offers the option for guests to cancel their reservations. Enter the number of days prior to arrival that the reservation can be cancelled. Only reservations that have no advanced deposits can be cancelled at this time. Guests login to the IRM.Net using their guest history ID/email or CRM ID/email and password. Their list of future reservations will appear with Cancel link next to the reservation. When the guest click the Cancel link, a dialog box appears to confirm the cancellation by clicking Yes. The reservation will display on the Res List as Cancelled.
- To enable this feature, check the Allow Reservations to be Cancelled x Days Prior to Arrival box from the Res tab of the IRM.Net Configuration. The IRM.Net must be configured to Never Take a Deposit on the Deposits tab of the IRM.Net Configuration. To access the cancel option, enable the Show View Reservations link option from the Res Tab, which will enable the My Reservation link on the ResMain.aspx page. Another way to enable is to link directly from the marketing website to /irmnet/res/reslist.aspx page.
- For complete details, see Cancel Reservations on the IRM.Net.
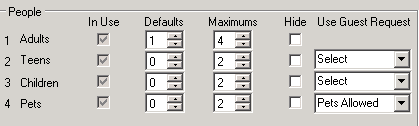
People
-
- In Use
- This read-only column shows whether each people classification is being used in RDPWin and RDP-DOS.
- Defaults and Maximums
- Set the default and maximum number of each people classification allowed on an Internet reservation.
- Hide
- Check to disable People Classifications 2, 3, and/or 4 on the IRM.Net only. People classifications can be used in RDPWin or RDP-DOS and disabled on the IRM.Net. If not in use in both RDPWin and RDP-DOS, the are not allowed on the IRM.Net either.
- Use Guest Request
- The Use Guest Request feature is designed to link one of the 9 Guest Request to a people field in order to filter out rooms based on the selection of one of the people categories. For example, People 4 is for pets. Use one of the Guest Requests as "Pets Allowed". When linked and, the guests enters a pet in People 4, only rooms that have the Guest Request for Pets Allowed will display. Only People 2-4 can be linked to a Guest Request.
- Configure the Guest Request from the IRM.Net Configuration --> Preferences tab to show as Display Only. On the Reservations tab, select the Guest Request that will apply to the appropriate People category from the Use Guest Request drop down.
- This feature is available on the ResMain.aspx (reservations page) and the SiteMap.aspx (interactive map page). If the using the Interactive Map, sites that do not allow pets will display as filtered out but can still be booked.
-