- Click here for Work Orders & Asset Management Tutorials.
(Work Orders & Asset Management (RZ) module required.)
|
Tabs When Viewing Monitor |
Tabs When Viewing Add or Change Screen |
|---|---|
| Charges/Payments Tab | Add Main Menu and
Change Main Menu Details Tab (Always displayed on left) |
Overview
The basic work order and task information is available on tabs within the Work Order and Asset Management module. Tab titles are different when viewing work orders using the Monitor versus those on the Add or Change screens. Additional fields pertaining to Owners are available to properties with the R3 Condominium Owner Accounting module installed as shown in the sample below.
Top
Details Tab
The Monitor Details tab (shown here) displays differently than the Add or Change screen's Details tab.
Monitor Details Tab

- SYS ID
- The first work order created within the system is assigned System ID 00000001, and thereafter increments by one. During initial creation, the System ID is "New" until the work order is saved.
- Priority
- Used to indicate the importance of a work order, the priority of the work order is passed on to the e-mail notification. The default value is set to Normal. When set to High, the e-mail notice is upgraded to a high priority as well.
- Task
- Check to change the work order to a task such as "deliver roll-away". Tasks follow the guest in the event of room moves. Work Orders follow the room regardless of guest occupancy such as "fix broken window". Reservations CAN be assigned to a work order for tracking purposes without changing the designation to task. The only way to change a work order as a task is to check this box.
- Type
- This mandatory field is categorizes the work order, such as broken item, electrical, or plumbing.
- Taken By
- Identify the person who took the initial request. When a guest calls the front desk to report a burnt-out light bulb, select front desk from the list. Entry of free text is not allowed.
- From
- Identify the person from whom the request was taken. When a housekeeper calls maintenance to report a power problem with an outlet, the selection would be Housekeeping. Entry of free text is not allowed.
- Res #
- A work order must contain either the reservation number or location (room number) of the item must be entered. Entering a reservation number identifies the guest name who reported the request. If a guest calls to report a broken or disabled item, click the Find button, enter the last name of the guest, and select the appropriate reservation from the list. The Guest field is automatically filled with the name based on the reservation selected. Should there not be a reservation to link to the work order, selecting a room number in the Location field negates the requirement for completing the Res# field.
Reservations CAN be assigned to a work order for tracking purposes without changing the designation to task. Assign a reservation number to a work order for future use. In the event a guest books a future reservation and requests a different room or an "upgrade" due to past work order requests from a previous stay, management can review and consider the details during the next reservation request. For example Jane stays in Florida during June and the A/C breaks numerous times during her stay. If Jane is booked in the same room and requests a change, the records are on file for review. - Guest Name
- This read-only field displays the name of the guest when a Res# has been assigned.
- Reported
- Indicate at what point in the reservation process the work order request was reported (i.e., check-in, check-out, or during stay). A selection from the list must be made; no free text may be entered.
- Location
- A work order must contain either the reservation number or location (room number) of the item must be entered. The drop-down contains room numbers or descriptions and definable by property. Location is auto-populated with the room number when the request is associated with a reservation. When not associated with a reservation, the drop-down allows the value to be keyed in. As the text is entered, the system auto-completes with the closest match to the "entered" information. Should there be a reservation linked to the work order, entering the Res# negates the requirement for completing the Location field.
- Asset to Fix
- Once a location has been selected, the "Asset to Fix" drop-down is populated with the assets available in that room. Assets must be entered into the system for this to be functional. Select an asset from this list so the system can track how many times that asset is associated with a work order request. This allows maintenance and management to identify faulty or costly items. For more information, see Assets Tab.
- Entered By
- Displayed in the status bar at the very bottom of the screen, the system stamps this read-only field with the user's logon.
- Description
- Enter free text with detail of the request. Request Type and Location offer the category and room number of the item, but not specifically which item or what the problem might be. This field is optional when Description on Work Order is Optional is checked in Configuration.
Add/Change Details Tab

When adding or changing work orders, the fields displayed in the Details tab with the Monitor grid are available with additional information and in a different layout for the sake of displaying maximum information to the user all at once.
- Status
- Track the status of the work order. The system defaults this field to "New" when creating a work order and updates to "Open" once a vendor is assigned. When a Completion Date/Time is entered, the status automatically changes to "Closed." Task status is updated to "Cancelled" when a reservation is cancelled or a room move is performed. When viewing the Monitor, both work orders and tasks are displayed.
- Closed By
- When Status is changed from Open to Closed, the system stamps the Closed By and "Completion Date/Time" fields based on the user logon and current system date/time. A password may be required before closing a work order, depending on configuration.
- Requested Start Date/Time
- When linked to a future reservation, the date field is stamped with the arrival date and the time field is left blank. When linked to an in-house reservation or Location, the fields are stamped with the current system date and time. When the current system date is after the departure date of a linked reservation, the RDP current system date is used. These fields can be edited to have a different Start Date/Time as long as it is on or after the Assigned Date and Time. These fields can be cleared left blank and are not mandatory.
- If the work order is a task, the system prompts to select the arrival date of the reservation for the Requested Start Date field instead of it remaining on the system date. This is useful if the task is not to be completed until the guest arrives. If No is selected from the prompt, the Request Start date is the system date, but that can changed by clicking on the drop down to change it from the calendar.
- Work Order ID
- When Display Work Order ID is checked in Configuration, this 12-digit alphanumeric field tracks the work order request identification which is definable by property. This is one of two possible ways to identify a work order. When blank, the system populates this field with the System ID when the work order is saved.
- Market Code
- When Show Market Code is checked in Configuration, the Market Code field is also available.
Vendor Details and Invoice Information
- Vendor
- A vendor is an in-house or outside company called to repair or replace an asset (regardless of whether or not the asset is listed in the system). Select a Vendor from the drop-down list to assign the work order to a vendor. If a vendor is assigned when Save or Save & Close is selected, and if configuration for Prompt for E-mail Notification is set to yes, then users have the option of sending e-mails to vendors, contacts, owners, etc.
If a Location Asset was selected, then the Asset Vendor populates with the name of the vendor that originally supplied the asset. Once the Assign button is clicked, that same vendor name is populated into the Vendor field. However, this is easily changed by using the drop-down list to select an alternative. The Vendor field holds the name of the vendor who will service the asset, regardless of whether or not they supplied the asset to the property originally. The list of Vendors must have been entered into the system for this field to function properly. - Billing Method
- Set or update the method in which the vendor has submitted a request for payment. Options are Invoice, Time & Materials, or No Billing.
- The available fields are based on the Billing Method as shown in each of these tables:
-
Date (of Invoice) Manually enter the date of the invoice. Invoice Number Manually enter the invoice number from the paper invoice. Pay Now Click to pay the balance of the invoice amount to the vendor (entered on the work order). If the Vendor Transaction Code has not been configured on the contact record, the system prompts for a transaction code to be used to post the payment to the vendor. Once configured, the system requires confirmation before completing the payment process. Once the work order has been paid in full, the Pay Now button is disabled. Disable and restrict user access based on fence level using the "Work Order and Bill Pay Now Button" setting in the UISecurity section within System | Menu Security. Vendor Process Check When the Billing Method is set to Invoice when the Pay Now in the Vendor Details section is clicked, the Vendor Process Check form opens. Once selection is made, click Process to continue with paying the invoice or Cancel to return to the "Work Order Change" screen. If the "Generate One Check Per Bill When Paying Vendor Bills" option has been selected on the vendor, the system creates one check voucher record per bill marked for processing depending on the option selected on the "Vendor Process Check" Form. Amount (of Invoice) Manually enter the total amount due for the work performed from the paper invoice. Once payables are processed, this number cannot be changed. Paid (To Vendor) This read-only field displays the total amount of payments processed since the last time Process Payables was completed. Balance (Due Vendor) This read-only field displays the calculation of Invoice Information Amount less Invoice Information Paid. Once the invoice has been paid in full, this field equals "0.00".
-
Time Spent Represents the actual time spent to complete the work order. When Time Spent is entered in the grid, this field displays the calculation of time spent based on those entries. Labor Cost Labor Cost is calculated by multiplying the Hourly Rate and Time Spent. For example, when Time Spent = 2.5 hours and Hourly Rate = $55, then Labor Cost = $137.50. Assets Cost When Assets are added into the system, the cost can be entered but is not required. If the Asset includes cost information, that amount is displayed here. Total Cost Total Cost is calculated by adding the Labor Cost and Assets Cost. For example, if Labor Cost = $178.50 and Assets Cost = $52.00, then Total Cost = $230.50. No Billing Select "No Billing" as the Billing Method located in the Vendor Details. Select "No Billing" when the vendor will not bill the property for the work order. - Contact
- Once the vendor name is selected, the associated contacts of that vendor are available in this drop-down list. This name represents the specific person at the vendor (company) to contact regarding the asset.
- Assigned (Date/Time)
- The system stamps the current system date/time to record when the Assigned button is clicked. However, the date/time can be overwritten or cleared at any time and are not mandatory.
Cost/Charge Summary Tab
When viewing work orders/tasks in the Monitor, the Cost/Charge Summary tab displays basic information as well as vendor cost and charge summary information. 
- Status
- See Status for details.
- Billing Method
- See Billing Method for details.
- Location
- See Location for details.
- Res#
- See Res# for details.
- Guest Name
- See Guest Name for details.
- Description
- See Des for details.
Vendor Cost Summary
- Vendor
- Review the read-only display of the vendor master name.
Date Review the read-only display of the date selected when paying the bill. Amount Review the read-only amount charged when the payable was posted to the owner. Amount Paid Review the read-only amount paid to the vendor when the payable was posted to the owner. Invoices can be charged to the owner before paying the vendor. See Post Vendor Payable Now for more detail. Balance Due The balance represents the Amount less the Amount Paid.
Time Spent See Time Spent for details. Available only for work orders and tasks with Billing Method set to Time & Materials, Labor Cost Displayed only for Work Orders and Tasks with Billing Method set to Time & Materials, this read-only field displays the cost of labor for this specific work order or task stored on the Time tab. Asset Cost Displayed only for Work Orders and Tasks with Billing Method set to Time & Materials, this read-only field displays the cost of the asset used (stored on the Asset tab) to complete this specific work order or task. Total Review the read-only vendor cost calculated by adding the Labor Cost and Asset Cost. - Account#
- Displayed only for bills, review the read-only display of the account entered when paying the bill.
Charge Summary
- Charge To
- Review the read-only display of the owner master name to be charged for the work order.
- Markup%
- Review the read-only display of the mark-up percentage applied to the invoice based on the vendor master. For example, consider that "Owner/Group Mark-Up" is set to 10%. When an owner or a group master is billed for a work order with an invoice amount of $100, then the Charge Information Amount is calculated automatically using the Owner/Group Mark-Up for a total of $110.
- Markup Amount
- The mark-up percentage is configured on the Vendor master. The system calculates the mark-up amount based on that percentage (Invoice Information Amount x Mark-Up Percentage = Mark-Up Amount. Billing Information Amount = Invoice Information Amount + Mark-Up Amount.). For example, if the Invoice Information Amount is $50 and Mark-Up Percentage is 10%, then the Billing Information Amount displays $55. The calculation is as follows: ($50 x 10% = $5) + $50. Changing the mark-up percentage, mark-up amount or the charge amount updates the appropriate fields to reflect the changes.
- Amount
- Review the read-only display of the invoice amount as entered when posted to the owner.
- Amount Charged
- Review the read-only display of the amount charged which is equal to the invoice amount plus any mark-up. See Charge Amount for details.
- Balance to be Charged
- The read-only amount displayed represents the Amount less the Amount Charged.
Charges Tab
The Charges tab is available when viewing a work order or task on the Add or Change screen. The tab allows charges to be posted and changed and mark-up information to be maintained. Post charges or change existing transactions on the selected work order for reservations, owners (R3 required), groups leaders, and group masters. Posting charges for a work order allows a property to pass on fees for repair or replacement items as needed.
Mark-up Information
- Mark-Up Percentage
- See mark-up percentage for details.
- Mark-Up Amount
- For details, see Mark-Up Amount.
Charge Information
- Select the responsible party to be charged for the work order (if any): "No Charge", Reservation, Owner (R3 required), and "Group Master". Which radio buttons are available depends on the type of work order selected:
- When Task is checked in the Details area, No Charge, Reservation, and Owner (R3 required) are available. When the selected reservation is part of a group, then Group Master is available.
- When Task is not checked and a Res# is not assigned, the Reservation and "Group Master" options are disabled.
- When a Res# is assigned, the guest name and group master name (if applicable) are displayed across from the Reservation and "Group Master" radio buttons.
- Once a location is selected, the Owner information for the selected room is displayed. If the owner for the location is not the correct owner to be charged for this work order or if the location selected does not have an owner, use the
 button to select another and to display an * next to the owner number and name to indicate that the selected owner is not the current owner of the selected location on the work order
 - Charges can only be posted once. Once posted, the Task checkbox, Res#, and Location fields are disabled.
-
- No Charge
- When selected, all fields are disabled and the "Post Charge" button is disabled.
- Transaction Code
- The transaction code drop-down displays the available codes based on the selected recipient (Owner when R3 installed, Reservation, Group) of the charge. This defaults to the transaction code specified on the vendor when one exists.
- Amount
- The Amount field is automatically updated when the Invoice Information Amount is entered. The equation is Invoice$ x Billing Mark-Up (configured on vendor master) = Mark-Up Amount. Invoice$ + Mark-Up Amount = Charge Information Amount. For example, if Invoice$ is $500 and the mark-up is 20%, then Invoice$ 500 + Billing Mark-Up Amount $100 = Charge Information Amount $600.
- Charged
- This field represents the full amount that has been allocated to those outside the property including any amounts charged to reservations and owners (R3 required). The process of getting an amount in this field is to post a charge, enter the invoice information on either the Details tab or the Enter Invoice Amount screen, and then process the payables. Once payables are processed, the Charged information displays here.
- Balance
- This amount represents the Charge Information Amount less the Charge Information Charged.
Post Charge
- Click the Post Charge button to add a transaction to the Charges tab.
Change Button
See Change Folio for details.
View Statement Description (R3 Required)
Select a transaction and click View Statement Description to open the Notes screen and review or change the transaction description to be printed on the owner statement. This allows the property to record information on the work order and have a separate, more official description for the owner statement.
Show No Prints
Check to display any transactions marked as "no print" in the Charges grid.
Charges/Payments Tab
The "Charges/Payments" tab displays invoice and billing information and a history of payments for the selected work order. Charges can be posted and payments received for a work order to: reservations, groups leaders, owners (R3 required), and group masters. Posting charges for a work order allows a property to pass on fees for repair or replacement items as needed.
When a charge is posted to an individual reservation, the reservation number is displayed in the Res# column. When posting to a group master reservation, the group name is displayed in the Group# column (actually letters, not numbers). When posting to a group member or leader reservation, the group name is displayed in the Group# column and the Res# of the leader is also completed. When posting to a group master reservation, only the Group# field is filled in.

Invoice Information
Billing Information
These fields are labeled as Charge Information on the Charges tab when viewing work orders from the Change screen; however, the fields and values are the same.
- Amount
- See Amount for details.
- Billed
- See Billed for details.
- Balance
- See Balance for more details.
- Post Charge
- Click the Post Charge button to add a transaction.
- Change
- Click the "Change" button to open the Change/Reverse Charges screen and update a transaction. This screen works the same for work orders and tasks as reservations.
- View Statement Desc (R3 required)
- See View Statement Desc for details.
- Show No Prints
- See Show No Prints for details.
Time Tab
The Monitor Time tab displays differently than the Add or Change screen's Time tab.
Monitor Time Tab
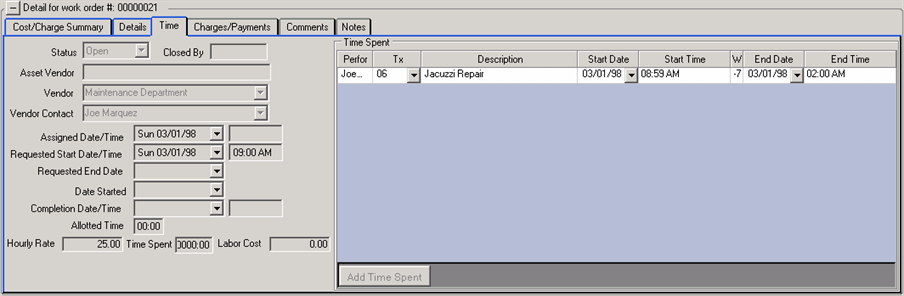
- Status
- See Status for details.
- Closed By
- See Closed By for details.
- Asset Vendor
- Review the name of the vendor that supplied the asset to the property.
- Vendor
- See Vendor for details.
- Vendor Contact
- See Vendor Contact for details.
- Assigned Date/Time
- See Assigned Date/Time for details.
- Requested Start Date/Time
- See Requested Start Date/Time for details.
- Requested End Date
- The system stamps the current date and time when the vendor is assigned to the work order. It can be overwritten with any date and time on or after the Requested Start Date/Time allowing a work order to be started on one date and completed on another. When linked to a future res, the Time field is left blank. If linked to an in-house res or Location, it is stamped with the current system time. It can be edited to have a future Start Time but not earlier than the Assigned Time.
- Date Started
- Record the date the work order was started. This date must be on or after the Assigned Date/Time.
- Completion Date/Time
- The system stamps the current system date/time when the Status is changed to "Closed" to reflect when work officially completed. Once the work order is saved, this date cannot be changed. This field is not typically addressed during the Add process.
- Allotted Time
- The time given to complete the work order (perhaps by management).
- Hourly Rate
- Enter the hourly rate for the vendor for this specific work order or task. When the selected vendor has an hourly rate on the vendor master, that rate is displayed by default. The rate can be changed for this specific work order or task. See Hourly Rate for details.
- Time Spent
- See Time Spent for details. This total only reflects time spent that has been entered using Add Time Spent.
- Labor Cost
- See Labor Cost for details.
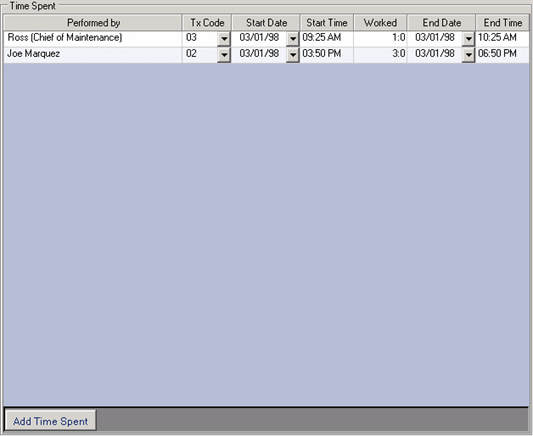
Time Spent Grid
The Time tab is read-only when viewing the Monitor. Each row of dates/times added to the grid are calculated, and a total count of hours/minutes spent on the work order is displayed in the Time Spent field. There can be multiple entries in the Time Spent grid based on how many times maintenance and/or vendors visited the location to perform work.
- Add Time Spent
- Add a row to the Time Spent grid.
- Performed By
- This field tracks the vendor contact that performed the work.
- Tx Code
- Enter the transaction code to be posted to vendor master account on the B8-Work Order Vendor ledger for the work completed. If the transaction code has a value other than zero in the amount field, this will be calculated as the hourly rate. Otherwise, if left as zero, the hourly rate can be entered on the vendor or individual work order.
- Description
- The Description field, by default, displays the description of the transaction code if one is selected for the time spent. This field can be overridden by clicking onto the description and entering the new information.
- Start Date
- The date the work began for the work order.
- Start Time
- The time of day the work began for the work order.
- Worked
- Enter the amount if time that was spent on this work order in the Worked field. Otherwise, it is calculated based on the start time and end time fields.
- End Date
- Review the date work was completed for the work order.
- End Time
- The time of day the work was completed for the work order.
Add/Change Time Tab
When adding or changing work orders, the Time tab does not display as many fields as when viewing the Monitor. Most of the missing information is displayed on other tabs. See Monitor Time Tab for details on fields displayed on the Time tab from the Add/Change screens.
Comments Tab
The Comments tab allows the tracking of additional information about the work order. User fields can be customized for consistency of input. For more information about this, see Comments. This tab displays the same information when viewing from the Monitor, Add, or Change screens.
These comment fields are defined in Tables NJ to JZ.
Notes Tab
The Notes tab allows the keying of additional free text regarding the work order. This tab displays the same information when viewing from the Monitor, Add, or Change screens.
Assets Tab
The Assets tab is not visible for any vendor with Billing Method set to Invoice. For any vendor with Billing Method set to Time & Materials and Work Order (Change) is accessed, the Assets tab displays all assets currently in the Location designated on the work order. If an assigned asset needs replacement or must be removed temporarily from the location, check the Replace box in the "Installed" section.
- Replace
- The Assets Installed grid displays all assets in the location of the selected work order. When an asset requires replacement, check the Replace box to identify the asset for removal and open the "Replace Property Asset" screen as shown here. Highlight the replacement asset, set the Replacement Status, enter any desired text in the Reason for Replacing Asset, and click Select. The newly selected asset is added to the location and the asset that was checked for replacement is removed from inventory. When the desired replacement asset does not exist in the location, click "New Asset" to open the Add Asset form.
- Add Inventory Asset
- Click "Add Inventory Asset" and select from the Asset List to include an additional asset at the location without replacing an existing asset. Highlight the desired asset and click Select. The newly added asset is then displayed in the Assets Installed grid. When the desired replacement asset does not exist in the location, click "New Asset" to open the Add Asset form. Once added to inventory, then add the asset to the location on the work order.
Send E-mail Notification
When Prompt to Send E-mail is checked in Configuration,
AND when a Vendor is assigned, AND Save is clicked from Add or Change; the system prompts to send a notice by e-mail to the Vendor/Contact. Click No to return to the previous screen. Click Yes to open the E-mail Notification screen. 
- Message Type
- Select what type of e-mail to send to the Vendor/Contact. Default options available are plain text message, plain text message with Work Order as PDF attachment, or plain text message with Work Order as Word attachment. WARNING: When sending an e-mail notification, an option in the Message Type drop-down offers "Plain Text message with Work Order Detail as PDF attachment". PDF attachments use Crystal Reports to send the detail. If the designated report includes vendor billing information, it is included in the notice to the owner. If customers do not wish owners to receive vendor billing information, a report with no vendor billing information must be selected. This report is selected on the Work Orders and Asset Management Configuration page on the Options tab and not on a work order by work order basis.
- Priority
- The system stamps the Priority field with the Work Order Priority level from the work order.
- Subject
- The system stamps the Work Order ID and Location information from the work order.
- Include Work Order Description in Body
- Check to display the Work Order Description in the body of the e-mail message. If the Description has been recorded with sufficient information, no further information should be necessary to explain the need for the work order and what tools or other assets might be needed. For example, e-mail a work order notice to an outside vendor with the description as "bathroom sink faucet Model# 5ksas3562 needs gasket replacement." The vendor then knows to bring a very specific part as well as any basic plumbing tools. This can greatly cut down on any delay to close the work order.
- Body
- Add any additional detail necessary to clarify the request is displayed. For example, the maintenance manager may want the outside vendor to contact Ross in the onsite maintenance room upon arrival at the property. Type helpful text into the Body. If the Include Work Order Description in Body box is checked, the Description is displayed in the body as well.
- Send Copy of Work Order Notification to Owner (R3 required)
- Check "Send copy of work order notification to owner" to send the room owner an exact copy of the work order notification sent to the vendor. When no e-mail is sent to the vendor, no e-mail can be sent to the owner. This option is disabled if the owner has no e-mail address on the owner master. The "send copy to owner" option is not displayed when the location of the work order is for a non-rental (NR) room such as the lobby, rest rooms, or when room has no designated owner. If properties do not want owners to know about charge information, billing information should not be included in the work order or the e-mail text. This is also available from the Add and Change main menu under E-mail after a work order has been saved. See Warning regarding information available in e-mailed work orders.
- Vendor and Contact Grids
- Vendor and Contact grids allow the selection of e-mail addresses from the Vendor/Contact masters and display any e-mail address(es) on file. When Vendor masters do not have designated Contacts, the Contact grid is not displayed. An e-mail address must be selected (checkbox) or entered to enable the Send button. Use the "Add E-mail" button to enter any additional e-mail addresses. The Type field in the grid describes the e-mail address (i.e., Home, Work, Text Message to Cell Phone). The Vendor and Contact names are displayed in red. For assistance with grid capabilities, see Grids.
- Add E-mail Buttons
- To send the notice to a different or additional e-mail address than in the Vendor/Contact record, click the Add E-mail button to add a row to the grid and allow entry of more information.
- Send Button
- When all fields have been completed, click the Send button to launch the e-mails to all selected addresses. Any copies designated in the Configuration Options tab are also be sent at this time. Should the Vendor or Contact E-mail not be valid, the copies are not sent either.
Click these links for Frequently Asked Questions or Troubleshooting assistance.
05/18/2012
© 1983-2012 Resort Data Processing, Inc. All rights reserved.