Click here for Group Reservations How To>
Click here for Groups Navigation
| Group Functions | |
|---|---|
| Add | Payment |
Overview
Select Add from the Masters | Groups main menu, or click Add from the Group Masters Navigation page or Navigation. Assign a unique number (up to 8 alphanumeric characters). Do not use spaces in the number for any of the masters. Reports do not sort properly if master numbers have spaces. Most properties use abbreviations of the group name to represent the group number. Throughout the system, the group can be accessed by the name or number.
Use the group name or number to separate true groups from corporate or city ledger billing accounts by number. For example, all true groups
can be alpha abbreviations, while corporate/city ledger accounts are numeric. Group master number and name are the only two mandatory fields
for adding a group master. The remaining fields described below are optional.
To make a reservation that allows several guests to be checked into the same
room on Reservations | New Reservations |
Multiple Folio to
Add Group Leader in Room “LEADER”. See
Group Reservations for more detail on
making preassign and inventory group reservations.
Tabs available when adding a group master are:
Group Detail, Comments, and Notes.
- Print

- When viewing the Change form in Activity Vendors, click the printer icon to print the screen as displayed (including the tab displayed and active).
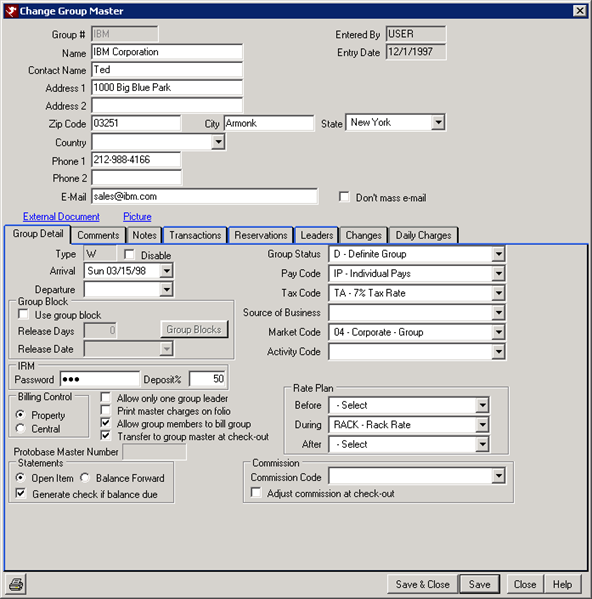
- Group Number
- Assign a unique identification number for the new group (up to eight (8) alphanumeric
characters). This field is required.
Note: System Administrators should establish the policy for assigning group names and numbers. DO NOT uses spaces in the Group Number for ease in running reports by group master number. - Name
- Assign the name of the group using any 24 alphanumeric characters. This field is required.
- Contact Name
- Enter the name of a specific person to contact within the group using any 24 alphanumeric characters (i.e., Georgia Jeffries).
- Address 1 and 2
- Enter the street address of the group using any 24 alphanumeric characters.
- City
- Enter the city of the group using any 16 alphanumeric characters.
- State
- Select the state of the group using the drop-down list. When the first letter of the desired state is typed in to the field directly, the system searches the table for states beginning with that letter and displays the first closest match. Once a state is displayed in this field, use the up and down arrows to scroll through the list individually without using the mouse. The list is stored on the CB table.
- Zip
- Enter the zip code of the group using any 10 alphanumeric characters. Letters are allowed for Canadian and European addresses.
- Country
- Select the country of the group using the drop-down list. When the first letter of the desired state is typed in to the field directly, the system searches the table for countries beginning with that letter and displays the first closest match. Once a country is displayed in this field, use the up and down arrows to scroll through the list individually without using the mouse.
- Phone 1 and 2
- Enter the telephone numbers of the group using any 12 alphanumeric characters. Formats allowed are 800/555-1212, 800-555-1212, 8005551212, and 011945551212. Consider using Phone 1 for individual groups and Phone 2 for agencies to help standardize the information in group master files.
- Enter the email address of the group using any 40 alphanumeric characters. The system recognizes that an e-mail address must contain the "@" symbol and displays an error if not entered.
- Don't Mass E-mail
- Check this box to mark the group as one that does not wish to be included in e-mail marketing sent using the Reporter | Email | Groups function.
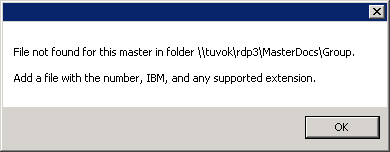
- External Documents
- This link allows external files to be attached to the group master. Use this feature to attach detailed information about the group. The following file types are supported: Txt, Doc, Docx, Htm, Html, Xls, Jpg, Bmp, Gif, and more. The documents can be viewed as long as the workstation has the application installed that displays that file extension.
- To attach a file, save it to the \RDP\MasterDocs\Group folder, using the group master number as the file name. For example, if the file created was for the group IBM, the file and location would be \RDP\MasterDocs\Group\IBM.doc (the file extension will change based on the program it was created in).
- If the file does not exist, the following error message will appear with the file path location when the link is clicked. Note: The file location will display the UNC path, however, the file can be saved to the RDP drive (usually R:\ or F:\).
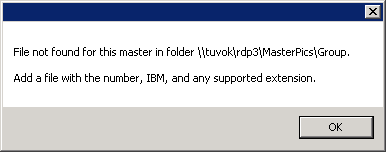
- Picture
- This link allows external pictures to be attached to the group master. The following file types are supported: Txt, Doc, Docx, Htm, Html, Xls, Jpg, Bmp, Gif, and more. The pictures can be viewed as long as the workstation has the application installed that displays that file extension.
- To attach a picture, save it to the \RDP\MasterPics\Group folder, using the group master number as the file name. For example, if the file created was for the group IBM, the file and location would be \RDP\MasterPics\Group\IBM.jpg.
- If the file does not exist, the following error message will display showing the file path location when the link is clicked. Note: The file location will display the UNC path, however, the file can be saved to the RDP drive (usually R:\ or F:\).
Click these links for Frequently Asked Questions or Troubleshooting assistance.
04/05/2010
© 1983-2009 Resort Data Processing, Inc. All rights reserved.