- Click here for Vendor List.
- Click here for a Vendor Tutorials.
- R3 Condominium Owner Accounting module required.
- Not available when R6 Timeshare module is installed.
Overview
A bill is a continuing expense to owners or management company such as electricity, water, sewer, etc. Bills are not created by a work order. Work orders are billed; utilities and services are billed. Enter and process for utility-type bills paid regularly. Regardless of paying one or multiple bills, the selected bills for the vendor are paid and transactions posted to the owner. Use the Vendor Process Check screen, which follows both the Pay All Bills and Pay a Bill screens, to actually put the check in the queue.
This process is designed to handle bills that are typically received for
services not performed by the property management company (regularly
outsourced work or utilities delivered). Perhaps the landscape is
maintained by "George's Lawns" on a monthly basis and submits regular bills.
Utility bills are received monthly for gas, electricity, telephone, cable,
etc. These bills arrive regularly, might be the same amount each time,
and do not require tracking of the work performed (work orders).
There are two ways to process bills within the system:
- Work Orders.
The first process is designed to handle invoices submitted for work
performed within the maintenance realm of the property management company.
For example, an oven stops heating. The property maintenance team determines
that a licensed contractor must perform the work. That contractor completes
the work and submits an invoice for payment.
- Add work order.
- Assign (open) work order.
- Perform work.
- Use the Charges/Payments tab to enter and track vendor and owner invoices.
- Enter invoice details using Enter Vendor Invoice Amount Information.
- Process payables using Process Vendor Payables.
- Charge owners for work performed using Charge for Work Orders.
- Enter bills for utility-type invoices paid
regularly such as electricity, gas, landscaping, and pest control. The second process is designed to handle invoices typically
received for services not performed by the property management company
(regularly outsourced work or utilities delivered). Perhaps the landscape is
maintained by "George's Lawns" on a monthly basis and submits regular
invoices. Utility bills are received monthly for gas, electricity,
telephone, cable, etc. These invoices arrive regularly, could be the same
amount each time, and do not require tracking of the work performed as a
work order would.
- Process bills using Pay All Bills or Pay a Bill (single).
Pay All Bills
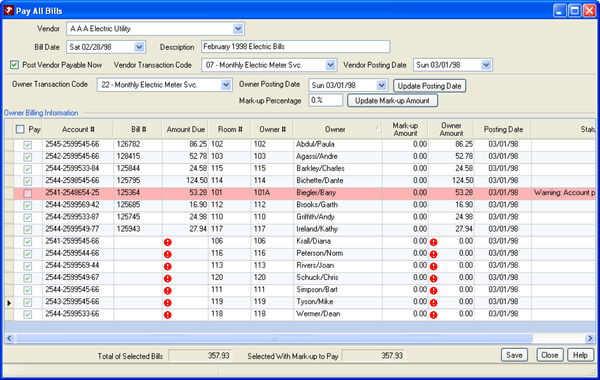
Process bills not tied to work orders from a single vendor for multiple owners (recurring or repetitive bills). Click to display the "Pay All Accounts" screen which allows filtering and displays all owner account information for the selected vendor. Some or all bills can be paid.
- Vendor
- Select the vendor from whom the bill to be entered is from. Only Work Order Vendors are available from this drop-down. Activity vendors are no included in this process. This field is required.
- Bill Date
- Set to today's date by default, enter the date of the bill received or click the down-arrow to select it from the calendar feature.
- Description
- Enter text to describe the reason for the bill. Since this same description appears on every owner statement, enter information that is considered acceptable by all owners such as "Electric Bill for January".
- Post Vendor Payable Now
- When checked, the system posts all payables in this batch at the same time as billing the owners for the billed amount. Check this box if bills are paid BEFORE receiving the funds from the owner.
- Vendor Transaction Code
- Each vendor can have a default Vendor Payment Transaction Code (B8) stored on the vendor record. The system uses this default as the transaction code when billing owners. Once the vendor is selected on the Pay a Bill screen and a Vendor Transaction Code is set on that vendor, the default code is auto-selected. This code can be changed if necessary. When not designated on the vendor, select one from the drop-down. If "Sort Transaction Drop-Down By Transaction Description Instead of Transaction Code" (Switch 414-11) is checked, type in the first letter of the code name and the system searches the list provided in the drop-down. This field is required.
- Vendor Posting Date
- When "Post Vendor Payable Now" is checked, this field is enabled and displays the current RDP system date by default. The posting date is the date shown on the transaction in the G/L account. This can be useful when bills are received/paid before a month-end but not processed until the following month. Changing the date allows the transaction to be included in the proper month's statements. Change the date using the calendar feature for any date after to the last finalized statement date for the selected vendor. If prior to the last date the vendor statement was finalized, an error indicator displays next to the date field. Hover the mouse over the indicator to display the error detail.
- Owner Transaction Code
- Each vendor can have a default Owner Transaction Code (B7) stored on the vendor record. The system uses this default as the transaction code when billing owners. Once the vendor is selected on the Pay a Bill screen and an Owner Transaction Code is set on that vendor, the default code is auto-selected. This code can be changed if necessary. When not designated on the vendor, select one from the drop-down. If "Sort Transaction Drop-Down By Transaction Description Instead of Transaction Code" (Switch 414-11) is checked, type in the first letter of the code name and the system searches the list provided in the drop-down. This field is required.
- Owner Posting Date
- To change the posting dates for all owners in the grid, use the "Owner Posting Date" drop-down to enter the new date and press the Tab key or click "Update Posting Date". The system requires confirmation "Update all owner posting dates with MM/DD/YY" (with MM=month, DD=day, and YY=year). Click yes to updated all owner posting dates with the new date.
- Mark-up Percentage
- Each owner can have a default Owner/Group Mark-up stored on the vendor record. The system uses this default as the mark-up percentage code when billing owners. Once the vendor is selected and a mark-up is set on that vendor, the default percentage is auto-selected. This percentage can be changed if necessary. This percentage of mark-up is applied to the Bill Amount when entered. To change the mark-up for all accounts selected in the grid, enter the percentage rate here and click "Update Mark-up Amount" to update the grid.
- Owner Billing Information Grid
- This grid displays columns for multiple owner accounts ready to be billed. Select a vendor to display all accounts for that vendor in the "Owner Bill Information" grid. For example, enter the account information for each owner with individual bill detail. All owners (rows) in the grid are billed the amount entered when Save is clicked. For details on each specific field, click Account#, Bill#, Bill Amount, Room#, Owner#, and Owner Amount.
- Pay
- The Pay column checkbox is checked by default when added the account information. If an account is selected that has already been billed on the current RDP system date, the row is highlighted in red and the Pay column is unchecked.
- Status
- The status displays "Warning: Account processed today". To process the account again, check the Pay checkbox in that row and the row returns to the default color. It still displays the status message. Once all accounts have been added for processing, click the Save button and the Status column displays processing formation as each bill is processed.
Pay a Bill (Single)
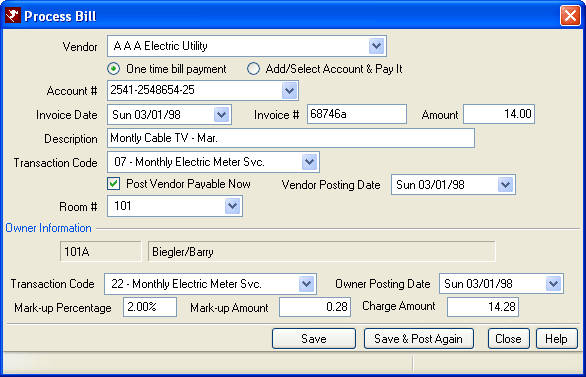
Process a single bill from a single vendor for a single owner not tied to a work order (recurring or repetitive bills).
- Vendor
- See Vendor for details.
- One-time Bill Payment
- Select to pay the bill just one time.
- Add/Select Account & Pay It
- Select "Add/Select Account & Pay It" to either enter a new account number not already in the system or select from the drop-down list. The Account# field is required in this case. Any new account numbers entered are saved on the vendor for future use on the Vendor Accounts tab.
- Account Number
- Enter the unique account number from the vendor's bill. If the Vendor or Owner master already has the account number filed, then Account# can be selected from the drop-down by clicking the down-arrow. For example, when Owner Jim Jackson has a "Power Company" account number saved on the vendor record, and "Power Company" is selected in the vendor field, Mr. Jackson's account number is available in the drop-down. When an account number is entered manually, that account number is saved on the selected vendor and owner records. This field is required.
The system warns to prevent the accidental processing of an account more than once on the same date. When the account has already been processed on the RDP system date when the Save button is clicked, a warning displays "Account ######### has already been processed today. Continue with posting?". Answer Yes to post the charges as requested or No to return to the Process Bill screen and make changes. - Bill Date
- See Bill Date for details.
- Bill Number
- Enter the identification number of the bill assigned by the Vendor.
- Bill Amount
- Enter the total due as indicated on the bill received. This field is required.
- Description
- Enter text to describe the reason for the bill. Be as specific as possible, since this is printed on statements. For example, enter "Electric Bill for January for Room 102".
- Transaction Code
- Select the appropriate code from the drop-down. The code can be manually typed in or the first digits can be entered so the system can auto-complete it. If "Sort Transaction Drop-Down By Transaction Description Instead of Transaction Code" (Switch 414-11) is checked, type in the first letter of the code name and the system searches the list provided in the drop-down. This field is required.
- Post Vendor Payable Now
- When checked, the system posts a transaction to the vendor at the same time as posting a transaction to the owner for the bill. Check this box if bills are paid BEFORE receiving the funds from the owner.
- Vendor Posting Date
- See Vendor Posting Date for details.
- Room Number
- Select the room number owned from the drop-down. Once selected, the owner information (if any) is displayed. This field is required.
- Owner Posting Date
- When "Post Vendor Payable Now" is checked, this field is enabled and displays the current RDP system date by default. The posting date is the date shown on the transaction in the G/L account. This can be useful if bills are received/paid before a month-end but not processed until the following month. Changing the date would allow the transaction to be included in the proper month's statements. Change the date using the calendar feature for any date after to the last finalized statement date for the selected vendor. If prior to the last date the vendor statement was finalized, an error indicator displays next to the date field. Hover the mouse over the indicator to display the error detail.
- Mark-up Percentage
- See Mark-up Percentage for details.
- Mark-up Amount
- This amount represents the Bill Amount multiplied by the Mark-up Percentage. A Bill in the amount of $200 with a Mark-up Percentage of 3% displays the Mark-up Amount as $6.
- Owner Amount
- The Owner Amount is equal to the Bill Amount plus the Mark-up Amount. For example, if Vendor Bob's bills are all marked up 3% when billing owners, and Vendor Bob sends Owner Jim Jackson a bill for $200, then the Owner Amount is $206 ($200 * 3%=$6) + $200. See Mark-up for details.
Save, Reset, and Close
Click here for instruction on how to Save, Reset, and Close forms.
- Save & Post Again
- The "Save & Post Again" is intended for use in situations when a vendor is billing an owner for multiple items and the property wants the detail to be displayed on the owner statement. When clicked, the entered information is saved and then the following fields are cleared for additional posting: amount, description, owner information transaction code, and charge amount.
Vendor Process Check
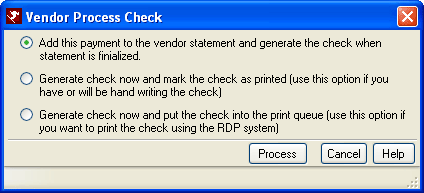
If the "Post Vendor Payables Now" checkbox is checked, the system prompts with the "Vendor Process Check" form. The default setting is based on the
When Paying Vendor setting on each vendor. The Vendor Process Check form has three options to select from and the selected option is based on the default option selected on the vendor. Whether or not the check voucher is printed at this time is based on the selection made.
-
- Add This Payment to the Vendor Statement and Generate the Check When the Statement Is Finalized
- Select this option when statements are finalized each month. The check is added to the queue and is printed only after the statement is finalized.
- Generate Check Now and Mark the Check as Printed
- Select this option when checks are manually written to the vendor. The check is placed in the queue with a status of "printed" so printing never actually occurs.
- Generate Check Now and Put the Check into the Check Queue
- Select this option to add the check to the queue. The check prints when Accounting | Check Vouchers is run.
Click these links for Frequently Asked Questions or Troubleshooting assistance.
04/15/2009
© 1983-2009 Resort Data Processing, Inc. All rights reserved.