** Refers to new or updated subjects in this tutorial.
Specific references within this tutorial to specific screen displays may differ if data/demo files have not been updated. At the login screen, be sure to select the CCS demo files from the Resort drop-down. It is important to access the System |Configuration | Vacation Rental System and confirm that Switch 426-06 (Vacation Rental System Features) is unchecked. If checked, uncheck the box, log out, and log back in so the changed can take effect.
For the purpose of this tutorial, the conference room activity vendor must be configured, the activity batch items and codes must be defined, components added, and activities scheduled.Change Activity Vendor CONFRM
Both the Itinerary & Concierge module (R6) and the Activity Availability for Itinerary & Virtual Store (S6) modules are required to work with hourly activities.
- Select Change from the Masters | Activity Vendors submenu.
- Enter CONFRM in the Name field and click the associated Find button.
- Change the name to Conf. Rm. Rentals.
- Confirm that Tx Code is set to 11 - Conference Room Rental and Batch Code is CR - Conference Rooms.

- Save & Close.
Add Components
In order to have multiple conference rooms with different rates during for each room and season, add rate components.
- From the System | Rates submenu, select Components | Add.
- Enter the Component ID as CF01 and the Description as Conf. Rm. 1.
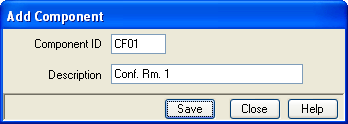
- Save.
- From the System | Rates submenu, select Components | Change.
- Set Room Type/# to ALL and the Description to Conf. Rm. 1.
- Set Season Table to C3 - Standard Seasons.
- Set the G/L Account to 40211 Revenue - Conference Room Rental (Guests) so all revenue generated by the conference rooms is directed to the revenue account specifically for the conference rental income.
- Set the Tax Category to 01 - Standard Taxes since this rental is charged taxes as any other room rental. Taxes are calculated based on the Transaction Code assigned to the Activity: not the assigned Component. Either add a tax component to the PK table or use the Tax Category on the Transaction Code Maintenance screen to assign tax to a batched activity.
- Enter the Weekend Surcharge of $300 so weekend bookings have a greater rate than weekdays.
- Set the Bucket to Other Charge 1.
- Set Daily or Once to Daily.
- Click the Change All Rates button and set the rates for all seasons to $1,000 for each defined season and click OK.
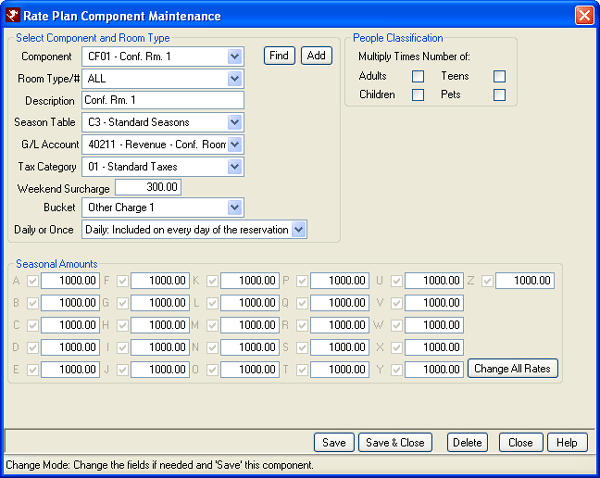
- Click Save to file the component, but do not close the screen.
- While still on the Component Maintenance screen, click the Add button and repeat Steps 2 - 13 for Conf. Rm. 2 - 5 making changes only for the Component (ID#s CF02, CF03, etc.), Description (Conf. Rm. 2, Conf. Rm. 3, etc.), and Seasonal Amounts fields. Set the seasonal amounts for Conf. Rm. 4 to $1,800 and for Conf. Rm. 5 to $2,300.
- Save & Close.
Configure Activity Vendors
- From the Reservations main menu, select Configuration.
- Select the Activities tab.
- Click the Activity Filters link and select the Filter 4 tab.
- Set the Filter Title to Conference Rooms.
- Click the Add button.
- Set the Value to C01 and enter the Description as "Conf. Rm. 1 (Capacity 50)".
- Repeat this steps for Nos. 2 and 3.
- Enter C04 for Conf. Rm. 1-2 (Capacity 100). Conference Room 4 is a combination of Rooms 1 and 2.
- Enter C05 for Conf. Rm. 1-3 (Capacity 150). Conference Room 5 is a combination of Rooms 1 through 3.
- Save & Close.
Add Batch Codes and Activity Items
- From the Reservations Configuration menu, select the Activities tab.
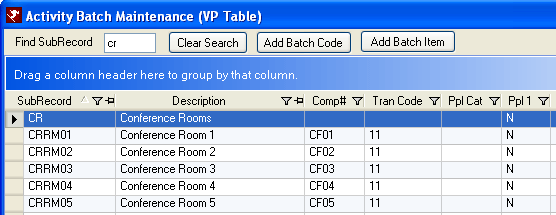
- Click the Batch Activities link to open the Activity Batch Maintenance (VP Table) screen.
- Click the Add Batch Code button.
- Enter the Batch Code as CR and Description as Conference Room.
- Set the Component Number to something appropriate. For purposes of this tutorial, set the number to RM01 (CR for Conference Room and RM01 for Room 1).
- As set in RDPWin's demo files, set the Transaction Code to 11 Conference Room Rentals.
- Set the Conference Rooms field to C01. This connects the pricing on the component to the activity.
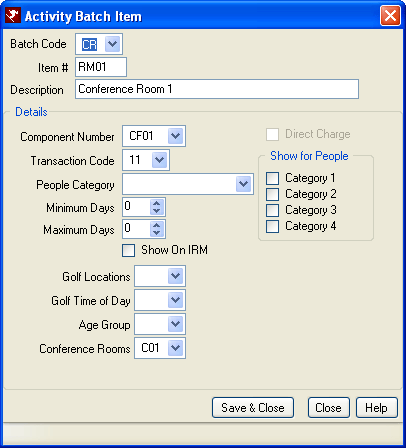
- Save & Close.
- Repeat Steps 3 - 8 for each of the five conference rooms.
Add Conference Room Rental to Existing Reservation
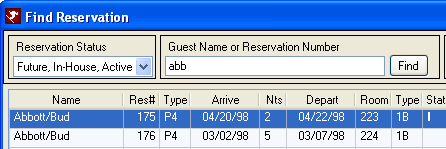
- From the Reservations main menu, click Find or click the F3 Find Res button from the toolbar or the F3 button on the keyboard.
- Enter Abb in the Guest Name or Reservation Number field and click the associated Find button.
- Select "Abbott/Bud" Res# 175 Arriving 4/20/99.
- With Res#175 selected in the grid, click Add from the Options | Activities submenu.
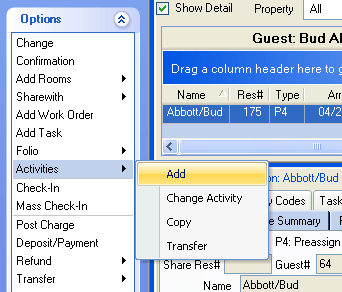
- Set the Conference Room drop-down to C01, then click Display. Since an hourly vendor exists, the system displays all Conference Room #1s available for the dates of the reservation (including the arrival and departure date).
- Select the Conference Room 1 from Vendor Conf. Rm. Rentals (not Conf. - Eagle-Vail Room) for April 20th, then click Add Activity.
- When Prompt for "Include in Package" When Adding a New Activity is checked in configuration, the system prompts as requested. When Yes is selected, the fee for the conference room is ignored and only the room rate is charged. The system offers this to allow reservationists to create packages "on the fly" without having to start the process over and change the rate on the reservation. Select No.
Note: Whether or not the Add Activity Detail screen displays is based on the Disable the "Add Activity Detail" Screen When Adding an Activity setting in configuration.
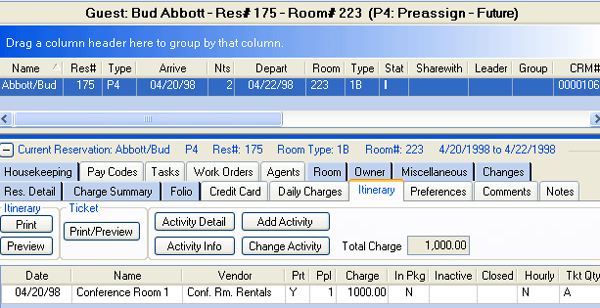
- Save & Close.
- The system should return to the reservation selected in the grid. Click the Itinerary tab to view the conference room rental for April 20th.
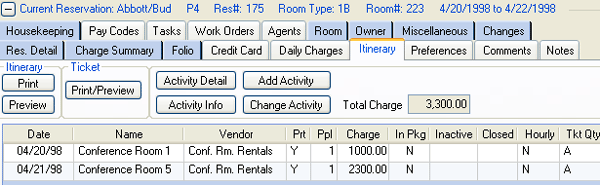
- Click the Add Activity button and add use Steps 5 - 9 to add Conference Room 5 for the 2nd day of the reservation.
Click here for the Tutorials Index.
Click these links for Frequently Asked Questions or Troubleshooting assistance.
04/15/2009
© 1983-2009 Resort Data Processing, Inc. All rights reserved.