Click here for How To Configure Activities
Click here for Activity Vendors Navigation
| Activity Vendor Functions | |
|---|---|
Activity Vendor Tabs | |
|---|---|
Tabs Available for Activity Vendors
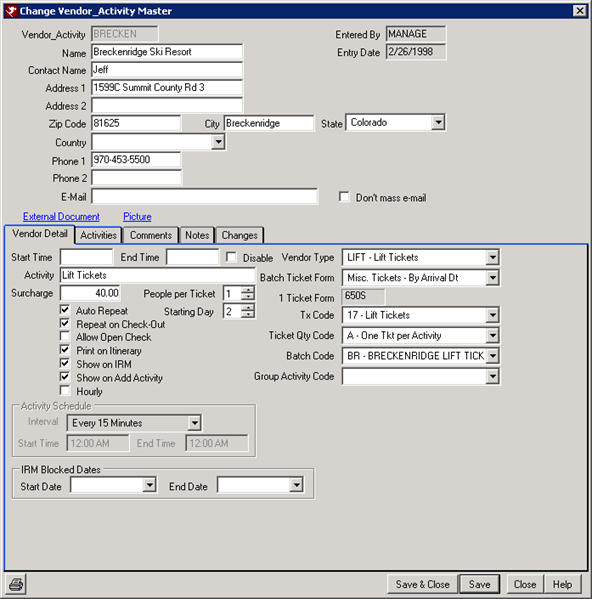
The basic master information on all types of masters are similar. Each master type has different tabs available where appropriate. As shown in the sample Activity Vendor Master, tabs outlined in color hold master-specific information. When viewing a single activity vendor on a screen such as Change or Delete, the Contact Detail tab information is displayed above the other tabs and does not hold tab form as shown in this example.
Contact Detail
When viewing activity vendors in the Analysis screen, the Contact Detail page displays the vendor number, contact information, and original entry information. When viewing a single activity vendor from a screen such as Change or Delete, the Contact Detail tab is not displayed. Instead, detail fields are displayed above the remaining tabs as shown above in the sample Change screen.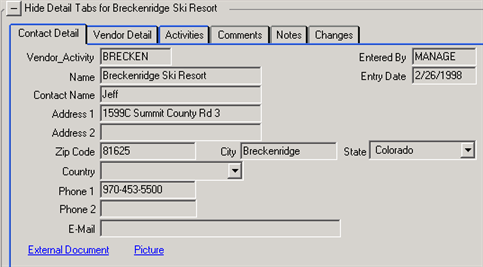
- Vendor Number
- The Vendor Number is an eight-character alphanumeric field that uniquely identifies each Vendor. Prior to adding activities to a guest or group leader, the Vendor Number must be entered. Once a Vendor Number has been assigned, it CANNOT be changed.
- Name
- Enter the name of the activity vendor using any 24 alphanumeric characters (such as AAA Bike Rentals).
- Contact Name
- Enter the name of a specific person to contact within the activity vendor company using any 24 alphanumeric characters (i.e., Georgia Ramsen).
- Address 1 and 2
- Enter the street address of the activity vendor using any 24 alphanumeric characters.
- Zip
- Enter the Zip Code using any 10 alphanumeric characters prior to the City and State fields for the system to automatically fill in those fields for the user. Letters are allowed for Canadian and European addresses.
- City
- Enter the city where the activity vendor is located using any 16 alphanumeric characters.
- State
- Select the state where the activity vendor is located using the drop-down list. When the first letter of the desired state is typed in to the field directly, the system searches the table for states beginning with that letter and displays the first closest match. Once a state is displayed in this field, use the up and down arrows to scroll through the grid individually without using the mouse. The list is stored on the CB table.
- Country
- Select the country where the activity vendor is located using the drop-down list. When the first letter of the desired state is typed in to the field directly, the system searches the table for countries beginning with that letter and displays the first closest match. Once a country is displayed in this field, use the up and down arrows to scroll through the grid individually without using the mouse.
- Phone 1 and 2
- Enter the telephone numbers of the activity vendor using any 12 alphanumeric characters. Formats allowed are 800/555-1212, 800-555-1212, 8005551212, and 011945551212. Consider using Phone 1 for individual contacts and Phone 2 for the vendor's main number to help standardize the information in activity vendor master files.
- Enter the email address of the activity vendor using any 40 alphanumeric characters. The system recognizes that an e-mail address must contain the "@" symbol and displays an error if not entered.
- Don't Mass E-mail
- When selected, the vendor will not be included on any mass e-mails sent from RDPWin.
- External Documents - T2 Module Required
- This link allows external files to be attached to the activity vendor master. Use this feature to attachdetailed information about the activity vendor. The following file types are supported: Txt, Doc, Docx, Htm, Html, Xls, Jpg, Bmp, Gif, and more. The documents can be viewed as long as the workstation has the application installed that displays that file extension.
- To attach a file, save it to the \RDP\RDP<xx>\MasterDocs\Vendor_Activity folder, using the room number as the file name. For example, if the file created was for Copper Mountain in the RDP01 directory, the file and location would be \RDP\RDP01\MasterDocs\Vendor_Activity\Copper.doc (the file extension will change based on the program it was created in).
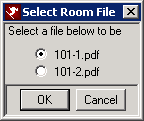
- If more than document is needed for the master, enter the master number followed by 1, 2, 3, etc. For example, for activity vendor number 101, enter the file name as 101-1, 101-2, 101-3, and a prompt appears allowing the different pictures to be selected.
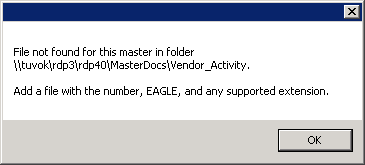
- If the file does not exist, the following error message will appear with the file path location when the link is clicked. Note: The file location will display the UNC path, however, the file can be saved to the RDP drive (usually R:\ or F:\).
- Pictures - T2 Module Required
- This link allows external pictures to be attached to the activity vendor master. The following file types are supported: Txt, Doc, Docx, Htm, Html, Xls, Jpg, Bmp, Gif, and more. The pictures can be viewed as long as the workstation has the application installed that displays that file extension.
- To attach a picture, save it to the \RDP\RDP<xx>\MasterPics\Vendor_Activity folder, using the activity vendor number as the file name. For example, if the file created was for Copper Mountain in the RDP01 directory, the file and location would be \RDP\RDP01\MasterPics\Vendor_Activity\Copper.jpg.
- If more than picture is needed for the master, enter the master number followed by 1, 2, 3, etc. For example, for activity vendor master 101, enter the file name as 101-1, 101-2, 101-3, and a prompt appears allowing the different pictures to be selected.
- If the file does not exist, the following error message will display showing the file path location when the link is clicked. Note: The file location will display the UNC path, however, the file can be saved to the RDP drive (usually R:\ or F:\).
- Note: The External Documents and Pictures feature requires the T2 Module. For more information about this module, contact RDP Sales.
- Entered By
- When an activity vendor master is added to the database, this field is stamped by the system to identify the logon name of the person who entered the information.
- Entry Date
- When an activity vendor master is added to the database, this field is stamped by the system to identify the system date when the information was entered.
Vendor Detail Tab
When viewing activity vendors in Analysis, the Vendor Detail tab includeds
the start and end time of business hours, the Activity type, schedule
information, ticket and tax code information, and allows various settings to
be turned on and off.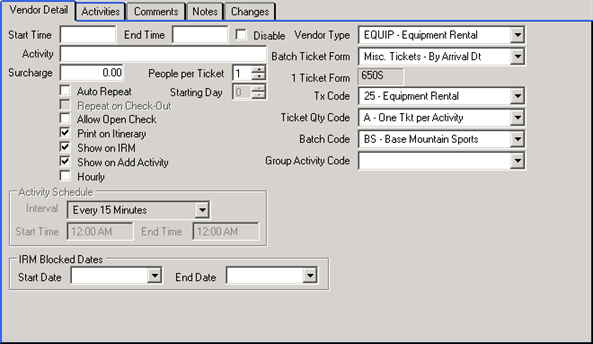
- Start and End Time
- Activity start and end times for once-per-day activities are stored on the activity vendor master and transferred to each new guest activity. Each time a vendor/activity is accessed in the Itinerary, the start time and end time defaults are auto-filled by the activity vendor records. For example, if a guest rents a golf cart for the day, the default start/end times are auto-filled by the system. "Dead Zones" are displayed in grey when viewing the Schedule for an Hourly Activity Vendor. Dead zones are areas on the Schedule where activities that cannot be placed.
- Activity
- Enter a description of the activity such as lift tickets, round of golf, or sleigh ride.
- Surcharge
- How much is activity for this vendor? This becomes the default amount. The amount can be changed on the guest's itinerary field.
- People per Ticket
- An activity on a guest itinerary prints a ticket for one or more individuals. For example, the concierge frequently makes dinner reservations as part of the Honeymoon Package component "dinner for two". People per Ticket for this activity would be "2". An adult ski lift ticket would be set to "1". The value for "people per ticket" is transferred from the vendor master to the guest activity record and can be overridden as needed.
When an activity is added to a reservation from an activity vendor with the People Per Ticket field set to zero, the Add Activity screen requires the entry of the number of people per ticket before saving the activity to the reservation. This feature should be used in situations when the activity vendor has no limit on the number of people per ticket and want to require the reservationists to enter the correct number of people per ticket when adding a new activity to a reservation. - Auto Repeat, Starting Day, and Repeat on Check-Out
- These fields are used together to control activities that are included on each day of a reservation. For example, if a package includes breakfast, lunch, and dinner every day during the guest's stay, three separate vendors could be created. The system automatically repeats this activity starting with the day after arrival (start day = 2). Breakfast would be repeated on Check-Out, since breakfast would be included on the departure date.
Lunch and dinner would also be set to auto-repeat for each day of the reservation. However, the starting day would be set to one, since they are included on the arrival day, but not the departure day. - Starting Day
- See above.
- Repeat on Check-Out
- See above.
- Allow Open/Close Check
- This checkbox is used for activities that include a guest receiving an asset for activity, such as renting a bike. Properties want to make sure that the activity asset has been returned before check-out. Checking the Allow Open/Close checkbox prompts if an asset has not been returned to the Vendor at check-out. This function requires that the Vendor change the activity status to Closed once an asset has been returned.
- Print on Itinerary
- When this box is checked, the selected Vendor defaults to printing on the Itinerary. If the Print on Itinerary box is not checked on the Vendor master, the Vendor and its activities do not print on the Itinerary. This box can be unchecked on an individual activity basis from the Reservations Activities Change screen.
- Show on IRM
- Check to display the selected Vendor on the Virtual Store of the IRM or IRM.Net.
- Show on Add Activity
- Unchecked by default, this option is used to indicate whether or not to show this vendor's activities on the Add Activity screen. For customers that want all vendors to show, use the Change All feature in RDPWin | System --> Change All to change the ShowOnAddActivitiy fields in the Vendor's record to a checkmark.
- Hourly (Based on Actual Availability and Activity Availability for Itinerary & Virtual Store)
- Module RP Itinerary & Concierge is necessary to work with activities.
To include hourly activities with regular activities, the S6 module Activity
Availability for Itinerary & Virtual Store module is also required.
- When the hourly checkbox is selected, the Activity Schedule is enabled for setup. If checked, the system displays the Hourly Activity screen with time slots to select the activity and time available. For example, Chuck's Bike Rental is set up on the Vendor Master with the Hourly box checked. Each time Check's Bike RRental is selected, then the Hourly Activity screen displays and requires the selection of an available time slot. If no time slots are available during a particular time, the system does not allow the activity to be reserved.
- Activity Schedule
- Activities can be restricted or not. Restrict rental hours to business hours and set rental intervals to restrict the length of activities.
- Interval
- The Interval is used to set the minimum interval an activity can be scheduled. Select a scheduling interval from the drop-down list. An activity can be scheduled anytime though out the day (minimum of every 15 minutes of every hour) provided that the time bar meets the Interval requirement set on the Hourly Activity Vendor. The Interval controls the minimum length of an activity and the increments that the activity can be extended.
- For example, set the interval for an Hourly Activity Vendor to "Every 2 hours". When adding an activity from that vendor, it must be at least two hours. It could be extended beyond two hours. This works in conjunction with the Activity Schedule Start Time and End Time set on the Vendor Detail tab of an Hourly Activity Vendor. When the Activity Schedule Start Time is 9 AM, the End Time is 5 PM, and the Interval is set to "Every 2 Hours," then activities can be scheduled for two hours beginning at 9 AM. A bike could be rented at 9AM. for a minimum of two hours (ending at 11 AM) or at 10 AM (ending at 12 PM). However, a bike could not be rented at 4 PM, because the two-hour minimum would end at 6 PM (after the 5 PM Hourly Activity Vendor End Time).
- When the Interval is set to "Every 30 Minutes", the Hourly Activity Vendor can have one activity starting at 8 AM and another at 8:30 AM (based on the Activity Schedule Start Time set to 8 AM or earlier). It could also be scheduled for 8:15 AM to 8:45 AM.
- Start and End Time
- The schedule start and end times are used to setup the time an activity can be scheduled. For example, if bikes can only be rented between the hours of 7 a.m. and 7 p.m., then Start equals 07:00 AM, and End equals 07:00 PM. These fields are tied to the Activity Schedule Interval. Using the bike rental example, rentals can be scheduled starting at 07:00 a.m. every 15 minutes until 07:00 p.m. Start and End Times must be in whole hour format.
- IRM Block Dates
- Activity vendors can be blocked from the IRM.Net Virtual Store for specified dates. If the Show on IRM box is checked, then the Start Date and End Date fields are activated for the IRM Blocked Dates. Configure the date range for which the vendor will not show on the Virtual Store page. If the reservation stay dates are within, overlap, or span the vendor's blocked dates, then that vendor will excluded from the Virtual Store Vendors drop down or image pick list.
- Vendor Type
- The Vendor Type is a six-character alphanumeric field that categorized vendors, such as golf, dinner, etc. Prior to assigning vendor types, they must first be defined in Table VT. To access Table VT, go to the System main menu --> Table Maintenance --> select Table VT from the drop down.
- Batch Ticket Form
- A ticket voucher can be printed for every activity. This field controls which ticket form prints for the Vendor. Each Vendor can have a different form, if required.
- One Ticket Form
- Displays the number of the Batch Ticket Form. The letter "S" represents "single". Table HR defines the ticket form.
- Transaction Code (Tx)
- Enter the transaction code for the activity which is posted to the reservation via the itinerary. The actual amount posted is the Surcharge Amount.
- Ticket Quantity Code
- This field controls whether one ticket is printed per activity or per person. Default settings are as follows:
- A - One Ticket per Activity (not for each person on the activity)
- P - One Ticket per Person (each person on the activity)
- X - No Ticket Printing for this Vendor
- For example, four people staying in two rooms wish to schedule a foursome at a golf course. A setting of "A-One Ticket Per Activity" prints only one ticket that reads "Golf for four at the Greens." P - One Ticket per Person prints four tickets, such as "Golf for one at the Greens." X does not print any tickets at all.
- Batch Code
- See Batch Code in Reservation Configuration help for details.
- Group Activity Code
- The Group Activity Code is for the Virtual Store in the IRM. The VG table defines the valid Activity Codes. There is a Group Activity Code on the Vendor master and an Activity Code on the Group master. When a group reservation is being made on the IRM and if the group master has an activity code, only the vendors with the corresponding Group Activity code are displayed in the Virtual Store on the IRM.
- Statements
- If a vendor statement should reflect all open activities/itineraries (those with a balance), select the Open Item radio button. If the statement should reflect the amount due at the end of the last billing period plus all new activity, select the Balance Forward radio button.
Activities Tab
View activities scheduled on reservations for the selected activity vendor. Use
the Start/End dates and Current/Historic filters to display specific
activity details. This example shows all activities currently
scheduled on future, in-house, or active history reservations for
Breckenridge Ski Resort regardless of date (no date filters set). 
- Ticket Print/Preview
- See Print Ticket for information.
- Activity Detail
- See Activity Detail for the selected activity in the grid on a specific reservation.
- Activity Info
- View the Activity Info (when existing) for an activity within the Custom Help F4 system.
- Start and End Date
- Set the optional Start/End dates and click the Redisplay
 button to apply the date
filter to the grid. When using the date filters, there are three
possible settings:
button to apply the date
filter to the grid. When using the date filters, there are three
possible settings:- Start Only – Show all activities equal to and in the future of the start date.
Using the same activity vendor as above, set the Start filter to
03/03/98 to display any and all currently scheduled activities for
Breckenridge Ski Resort from 03/03/98. Any activities scheduled on
future, in-house, or active history reservations months into the future
would display with this setting.
- End Only – Show all activities equal to and prior to the end date.
Again using the same activity vendor as above, set the End filter to
03/05/98 to display any and all currently scheduled activities for
Breckenridge Ski Resort through 03/05/98. Any and all activities
scheduled on future, in-house, or active history reservations through
03/05/98 would display with this setting.
- Start and End – Show all activities from the start date to the end date inclusive.
This example shows the date filters are set to show scheduled activities
for Breckenridge Ski Resort between 03/01/98 and 03/02/98. Only
currently scheduled activities for future, in-house, or active history
reservations between the two date filters would display with this
setting.
- Start Only – Show all activities equal to and in the future of the start date.
Using the same activity vendor as above, set the Start filter to
03/03/98 to display any and all currently scheduled activities for
Breckenridge Ski Resort from 03/03/98. Any activities scheduled on
future, in-house, or active history reservations months into the future
would display with this setting.
- Redisplay
- Click this button to refresh the grid with the applied date filters. The grid does not automatically refresh.
- Total Price
- View the total charges for any and all activities on the selected vendor regardless of the grid filters. The grid can be filtered to show activities for one date, several dates, or all scheduled activities; but the total always displays the overall charges for all scheduled activities on the selected vendor.
- Current
- Select the Current radio button (default setting) to display all activities associated with future, in-house and active history reservations.
- Historic
- Select the Historic radio button to display only activities on non-active reservations.
- Right-click Menu
- In addition to the basic right-click menu options, select from Activity Detail, Activity Info, Print Ticket, or notes.
- Double-click Menu
- Double-click any row in the grid or click "Activity Detail" to view the Activity Detail screen for a specific reservation.
Comments Tab
The twelve comment fields can be customized to the property's needs and
are defined in Tables LA to LR. Common information tracked in these fields include billing arrangements, alternate contacts, and number of rooms requested. The headings for these fields can be changed to reflect the appropriate information. Depending on which master type is selected determines how many comment fields are available.
Notes Tab
Any free text entries pertaining to the selected master are displayed in this section.
- Add and Change Notes with Switch 414-60
- When Switch 414-60 Use Add/Change button on notes" is set to Yes for RDPWin,
links to Add and Change are available on the Notes tab.
- Add Note
- Click Add to open the Add Note screen, enter any text, and click Save &
Close when complete. User entry information is tracked using the S7
Change Tracking module.
- Change Note
- Click Change to open access all notes on the Notes tab and change where
necessary. Click Save &
Close when complete. User entry information is tracked using the S7
Change Tracking module.

Changes Tab
When the Change Tracking Module (S7) is installed, changes made to
activity vendors in RDPWin are tracked.
Change Tracking Analysis and
Summary
information is also available.
The
system tracks information on the user making the changes as well. Some
properties assign group logons for front desk, audit staff, accounting.
To assure the most accurate information is recorded for Change Tracking,
properties should
create and
maintain individual logons for each and every user. See
Change Tracking Overview for more
details.
- Summary View
- When the Summary View radio button is selected and an activity vendor is
changed using RDPWin, basic change information is
displayed on the tab. Each row in the grid represents a time when
an activity vendor was changed and saved. One or many changes can be
associated with a single row. Fields available on this tab
are always Date Changed (includes time), Changed By (based on logon of
user), Name, Vendor#, Type, contact information and Hourly.
The original vendor record is always displayed at the bottom of the grid. Any changes made thereafter are displayed in order with the latest on top. The grid cannot be sorted, filtered, or reordered. For additional reporting and data manipulation, use Change Tracking Analysis and/or Change Tracking Summary.
When multiple changes are made on the same date and display the same time in the Date Changed grid, view the detail to see the actual, official time including the seconds. In the sample below, the original activity vendor record was made on 02/26/98 at 12:00 a.m. Multiple changes were made on March 1st.
- View Detail Button
- While in Summary View, click the "View Detail" button or double-click any row to display the details on the Changes
screen. The sample screen below shows the telephone number,
hourly, activity start and end times, schedule interval, and closed default were
all changed by User USER on March 1st at 54 seconds after
2:06 p.m.
The sample screen below shows the activity surcharge amount was updated User USER on March 1st at 35 seconds after 2:15 p.m.
- View Act. Vendor Button
- While in Summary View, click the "View Act. Vendor" button to display the
vendor information in read-only format. The information
displayed is the same as that displayed on the Change
Vendor Master screen.
- Detail View
- When the Detail View radio button is selected and an activity vendor is
changed using RDPWin, each row represents a single change regardless of whether or not
multiple changes were made during the same Change session. The Date Changed column
is always displayed, along with the field name changed, the original and
new value of that field, and the user's logon information. This
information is the same as displayed on the Changes screen.
Click these links for Frequently Asked Questions or Troubleshooting assistance.
04/14/2011