- Click here for CRMWeb Navigation
- (Customer Relationship Management (RX) module required.)
Overview
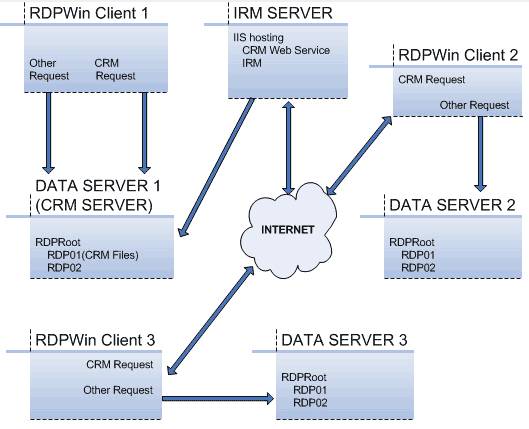
The illustration below describes the remote CRM environment: multiple properties remotely sharing a central CRM database. The IRM server hosts the CRM web service, which accesses the data server designated as the CRM server for CRM requests. Requests for all other RDP data are performed at the data server where the RDPWin client is logged in. Any client logged into the data server which is hosting the CRM data (Data Server 1 below), accesses CRM directly bypassing the web service. This is the same as the non-remote CRM environment.
Configure the CRM Web Service on the IRM Server and the CRM data server:
CRMWeb is installed on the IRM (Internet Reservation Module) web server or any web server that can access the RDP data server. Use the following steps for installation.
- Install Microsoft .Net Framework 2.0. Important Note: DO NOT UNINSTALL Microsoft .Net Framework 1.1.
- Install the CRMWebxxx.exe setup program (CRMWeb 1.006 or later) on the CRM web server. This installs both the RDPWinCentral web service and the CRMWeb site.
- On both the CRM web server and the CRM data server, set the ASPNET user-password to the same value. Add user ASPNET if it does not already exist.
- On the web server, use Notepad to modify c:\Windows\Microsoft.Net\Framework\<version>\Config\machine.config.
- Find the <processModel> section. Change the following:
the lines userName="machine" and for both .Net 1.1 and
2.0 to:
- Change userName="machine" to "ASPNET"
- Change password="AutoGenerate" to match the password set in Step 3 above.
- Also in machine.config in the <protocols> section, add (or uncomment)
the GET and POST protocols as:
- <add name="httpPost"/>
- <add name="httpGet"/>
- Find <processmodel>. Add userName="ASPNET" and set password (example "rdp123456") to match the password set in Step 3 above (the N in userName must be uppercase). The finished tag will look as follows: <processModel autoConfig="true" userName="ASPNET" password="rdp123456" />.
- Use IIS manager to enable anonymous access for both the CRM and RDPWinCentralSvc virtual directories. Right-click on the virtual directory, Properties, Directory Security tab, "Edit" anonymous access button. Check the Anonymous access box and the Integrated Windows authentication box. Leave the anonymous user name and password as IUSR_xxxx, with Allow IIS to control password checked. Make sure this is done for the aspnet_client and ig_common directories also.
- Right-click on the CRM virtual directory, select Properties, and the ASP.NET tab. Select .Net 2.0. Make sure this is done for the aspnet_client, ig_common, and RDPWinCentralSvc directories as well.
- If it does not exist, create the file c:\Program Files\ResortDataProcessing\CRMWeb\CRMPath.txt on the web server. The first line should be the path to the CRM data server. For example \\picard\rdp1202\rdp01\. This is always set to the rdp01 directory where the CRM files reside and should not be a mapped drive path.
- Restart IIS. If the ASPNET user password has been changed, use Task Manager to stop the ASPNet process on both the web server and data server. Click the Processes tab and end the aspnet_wp.exe process.
CRM Data Server
- On the CRM data server, verify that the ASPNET user:
- Password is the same value as set on the web server;
- Is enabled (no red X); and
- Has full control permissions to the RDP root folder
- On CRM data server, if the ASPNET password on the data server has been changed, use Task Manager to end the aspnet_wp.exe process.
- On CRM data server, confirm the RDP root has proper permissions and that they propagate to lower directories (Stat 94 = permissions issues).
- On CRM data server, access the CRM -> Configuration ->Properties tab. Add the Serial Number, Property Name, Data Path, and Server Name for each remote data server.
- On CRM data server, browse from the Internet to http://IRMServer/RDPWinCentralSvc/CRMWebSvc.asmx. This verifies that the web service is accessible. A list of service methods are displayed if all is well.
CRMWeb Configuration Steps
Properties using the CRMWeb should also complete the following steps:
- Use RDPWin to access the CRM - Configuration page and click
the CRMWeb tab.
- From the Admin sub-tab, configure the "Default Guest Password".
- From the E-mail Settings sub tab, configure the e-mail and SMTP server information.
- From the Forgot Password tab, configure the necessary message settings.
- Add a guest record to the CRM using RDPWin to test logging into CRMWeb.
- Test the CRMWeb URLs: local host and the URL which the property
uses to access the CRM (probably the registered domain name). Test
the following:
- http://localhost/CRM/admin.aspx
- http://localhost/CRM (defaults to logon.aspx)
- http://irm.resortdata.com/CRM (for example, irm.resortdata.com)
Configure RDPWin Clients
See documentation for CRM Configuration Remote Server tab.
Backing Out:
If it is necessary to return the ASPNET user to its original state:
- On the IRM Server, run aspnet_regiis /i.
- Modify the machine.config file to return to the original lines: userName="machine" & password="AutoGenerate".
- Reboot.
- On the CRM data server, run aspnet_regiis /i and reboot.
Remote Access
See CRMWeb Configuration for detail on providing guest access via the Internet.
Update the CRMWeb
Prior to updating to a new version of CRMWeb, the following steps must be followed:
- Uninstall prior CRMWeb version.
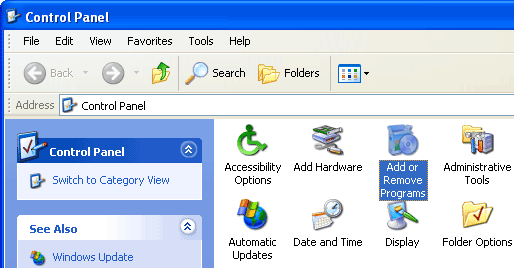
- Select Control Panel from the Start | Settings menu.
- Double-click Add or Remove Programs
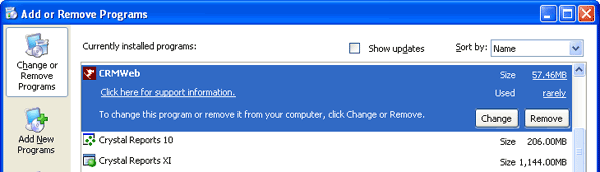
- Select IRMNet from the list of programs and click the Remove
button.
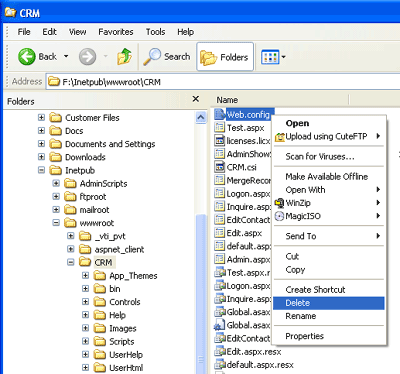
- Select Windows Explorer from the Start |
Programs | Accessories submenu. Navigate to
c:\inetpub\wwwroot\IRMNet\bin folder, right-click, and click Delete.
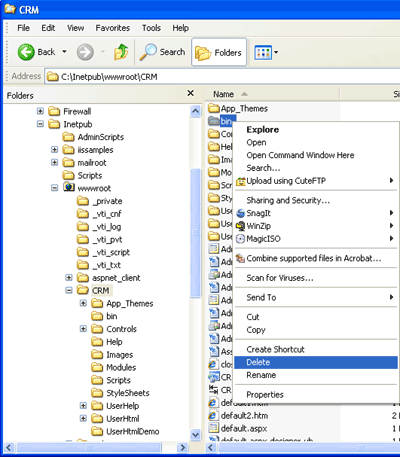
- Select Windows Explorer from the Start |
Programs | Accessories submenu. Navigate to
c:\inetpub\wwwroot\CRM folder, right-click the web.config file, and click Delete.
- Reinstall the CRMWeb using the steps above.
For more details, see CRMWeb Set-up.
Click these links for Frequently Asked Questions
or Troubleshooting assistance.
04/05/2010
© 1983-2009 Resort Data Processing, Inc. All rights reserved.