- Click here for IRM.net Navigation
IRM.net Installation Steps for IIS Version 6 Users
- All IIS Version 6.x users must complete the steps listed here. Version 5.x users click here
- Select Internet Information Services (IIS) from the Start/Settings/Control Panel/Administrative Tools menu. Right-click on the
"Web Sites" folder, select Properties, select the Service tab, and verify that "Run WWW service in IIS 5.0 isolation mode" is not checked.
Note: Even though Version 6.x is running, the Service tab still offers the IIS 5.0 isolation mode.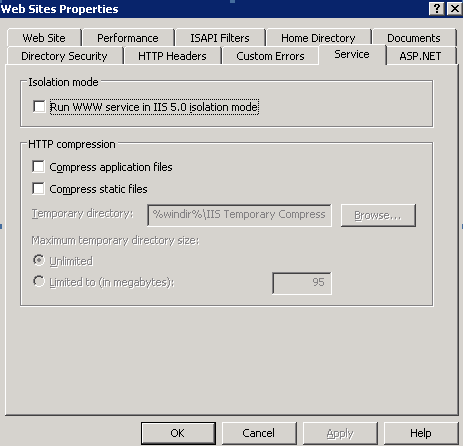
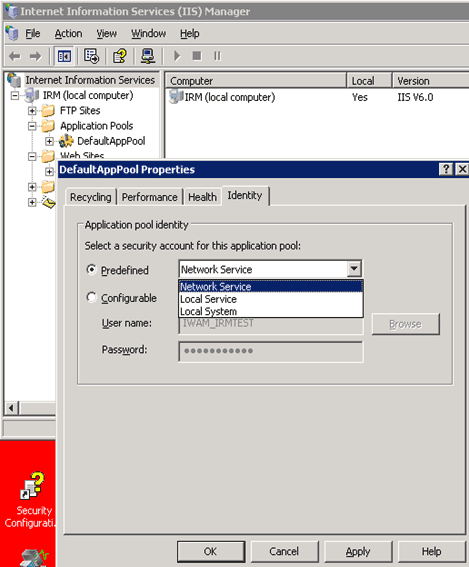
- From IIS, right-click on DefaultAppPool, select Properties, select the Identity tab, select the Predefined radio button, and choose Network Service from the drop-down box.
- From IIS, click on the
 to expand the IRM (local computer) and select "Web Service Extensions".
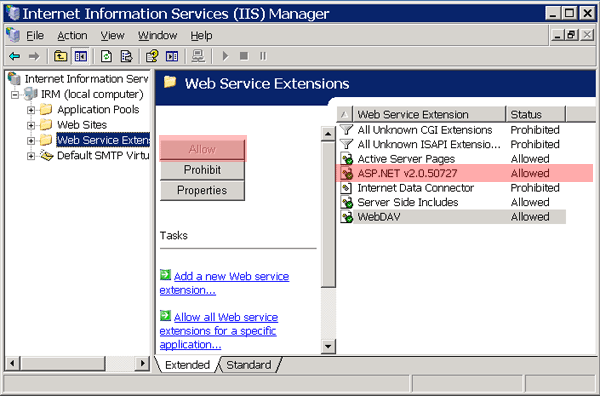
- In the list of Web Service Extensions on the right, confirm the Status for ASP.Net is Allowed. If not, Select ASP.Net and click the Allow button as shown above.
- FOR 32 BIT SERVERS
(Click here for 64-bit server)
- If the ASP.NETV2.0.50727 extension is not present, add it.
- Click the "Add a new web service extension" link shown in blue above.
- At the prompt, enter the extension name ASP.NETV2.0.50727.
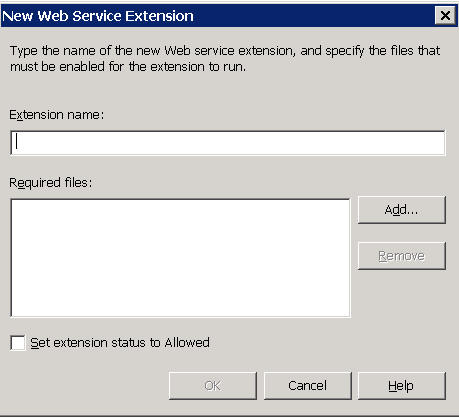
- Check the "Set Extension Status to Allowed" box.
- Click the Add button to add the file to permit web service extensions. Browse to the web service extension file which is: c:\windows\Microsoft.NET\Framework\v2.0.50727\aspnet_isapi.dll.

- Click Start, click Run, type cmd, and then click OK.
- Type the following command to enable the 32-bit
mode:
cscript %SYSTEMDRIVE%\inetpub\adminscripts\adsutil.vbs SET
W3SVC/AppPools/Enable32bitAppOnWin64 1 - Type the following command to install the version
of ASP.NET 2.0 (32-bit) and to install the script maps at
the IIS root and under:
%SYSTEMROOT%\Microsoft.NET\Framework\v2.0.50727\aspnet_regiis.exe -i - Make sure that the status of ASP.NET version 2.0.50727 (32-bit) is set to Allowed in the Web service extension list in Internet Information Services Manager.
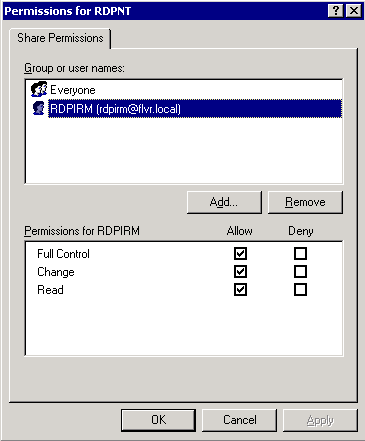
- Give RDPIRM user full rights to RDPNT folder.
-
- Log into the RDP data server.
- Add RDPIRM to IRM server under Computer Management and assign password "xxxxxx".
- Give RDPIRM user Full Control.
- On the RDP data server, navigate to Windows Explorer.
- Right-click on the RDPNT folder and select Properties.
- Select the Sharing tab and click the Permissions button.
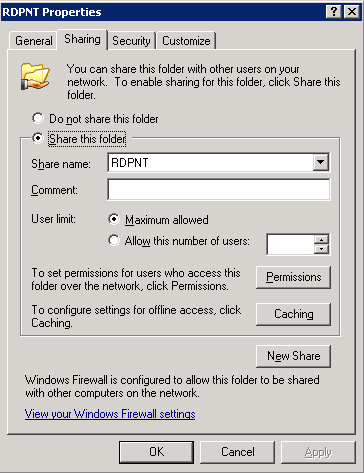
- Give full control to the folder.
Confirm that Active Server Pages, ASP.NET, Server Side Includes, and WebDAV are set to Allowed. - Select Internet Information Services (IIS) from the Start/Settings/Control Panel/Administrative Tools menu. Right-click on the
"Web Sites" folder, select Properties, select the Service tab, and verify that "Run WWW service in IIS 5.0 isolation mode" is not checked.
- IIS must be restarted. From IIS, right-click on "Local Computer".
- Select Restart Services from the All Tasks submenu.
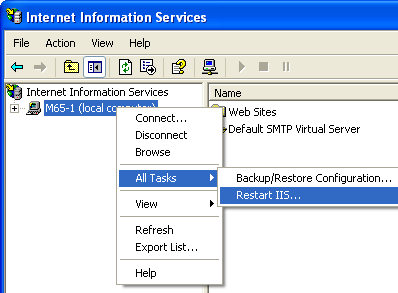
- Confirm "Restart Internet Services on..." is selected in the "What do you want to do?" drop-down, then click OK.
- Right-click on web-config, Properties and remove the read-only
property from c:\inetpub\wwwroot\IRMNet\web.config.
- Change web.config using Notepad. Find the line <System.web>
near the top. Add the following text (case sensitive) directly
below it:
<identity impersonate ="true" userName="RDPIRM" password="xxxxxx" />
where xxxxxx is the RDPIRM user password.
- Change web.config using Notepad. Find the line <System.web>
near the top. Add the following text (case sensitive) directly
below it:
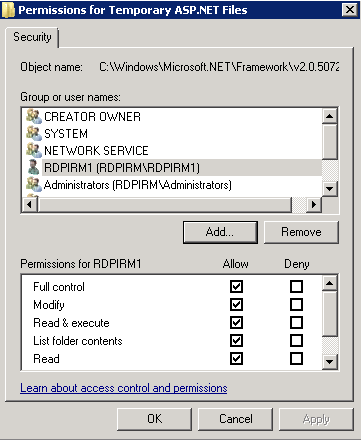
- Use Windows Explorer to find
c:\windows\Microsoft.Net\Framework\v2.0.50727\Temporary ASP.Net Files folder.
- Right-click and select Properties, Security Tab, Add.
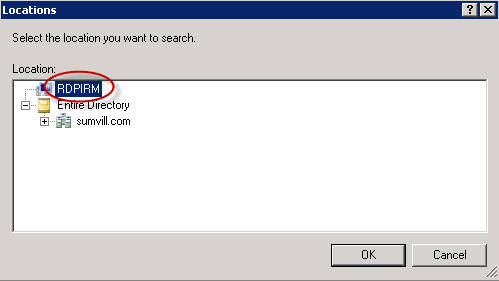
- Click the Locations button.
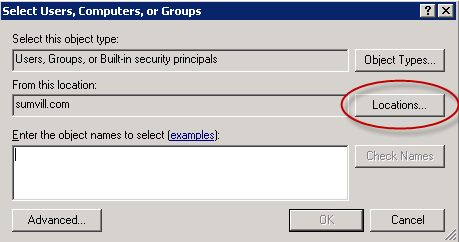
- Select the IRM computer name and click OK.
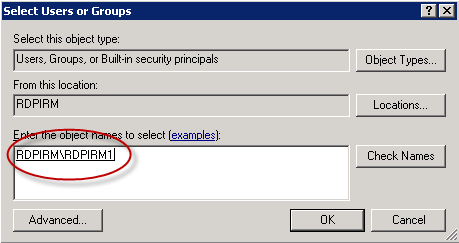
- Enter the IRM computer name in the field for "Enter the
object names to select". Click the Check Names
button, then click OK.
- Check the Allow checkbox for Full Control, and click OK.
Click these links for Frequently Asked Questions or Troubleshooting assistance.
© 1983-2009 Resort Data Processing, Inc. All rights reserved.