- Click here for IRM.net Navigation
IRM.net Installation Steps for IIS Version 5 Users
- All IIS Version 5.x users must complete the steps listed here. Version 6.x users click here
- On the IRM bridge server, access Computer Management from the Start/Programs/Administrative Tools menu. Click on the
 to expand Local Users and Groups. Select the Users folder and verify that the ASPNET user exists.
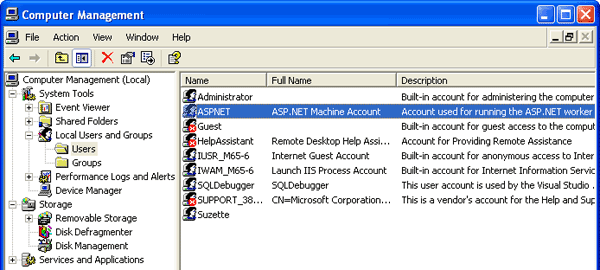
If not, add ASPNET user with the following command. DO NOT manually add the ASPNET user in computer management. -
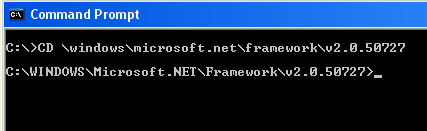
- Open a command prompt.
- At a prompt on the C:/ drive, type "CD \windows\microsoft.net\framework\v2.0.50727".
- From the v2.0.50727 directory, type "aspnet_regIIs -I". and press the <ENTER> key to add the ASPNET user to Computer Management
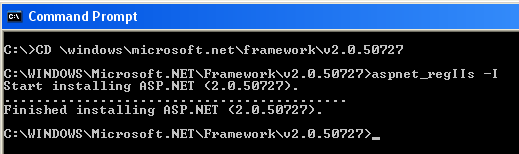
It may be necessary to exit and go back into Computer Management to see the ASPNET user.
- Change the ASPNET password on IRM bridge and on data server to rdp123456.
- Give ASPNET user or the "Users" group full control to the RDP directory.
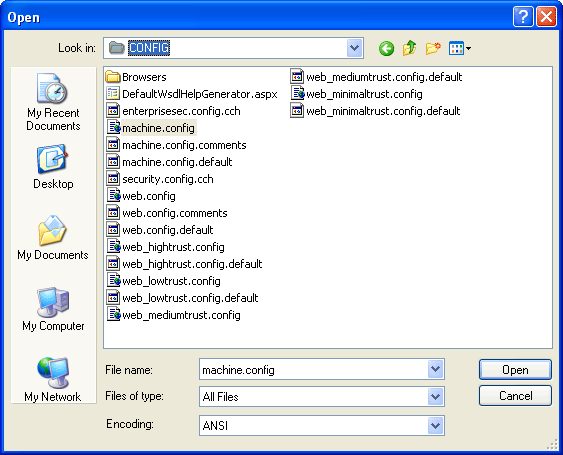
- Using NotePad, navigate to "c:\windows\microsoft.net\framework\v2.0.xxx\config\machine.config"
and open the document for change in Notepad by right-clicking and
using the "Open With…" command.
In the document, find <processModel autoConfig="true" />.
Add to this line the exact text: userName="ASPNET" password="rdp123456". The N in userName must be uppercase. The finished tag displays as follows: <processModel autoConfig="true" userName="ASPNET" password="rdp123456" />.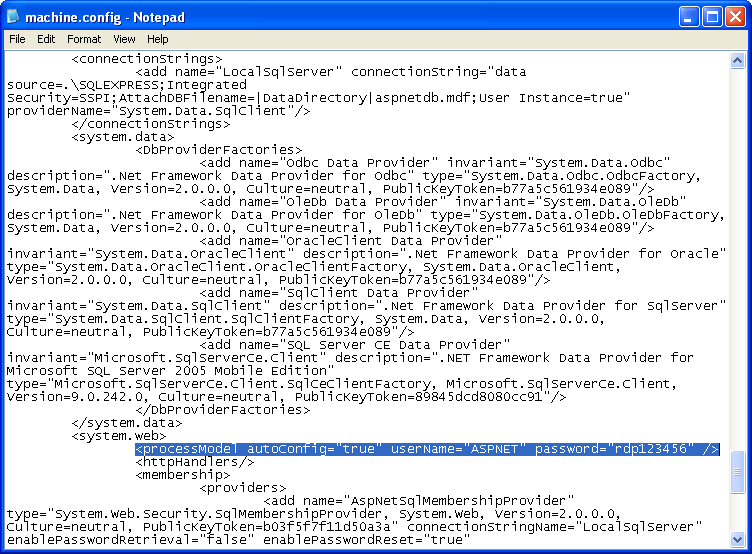
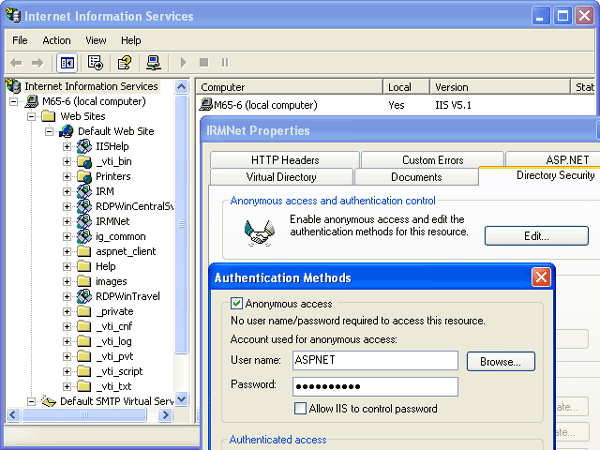
- From IIS, right-click on IRMNet, select Properties, select the "Directory Security" tab, "Edit Anonymous Access", and change the user name to ASPNET and the password to rdp123456. Click OK.
- Use Windows Explorer to find
c:\windows\Microsoft.Net\Framework\v2.0.50727\Temporary ASP.Net Files folder.
- Right-click and select Properties, Security Tab, Add.
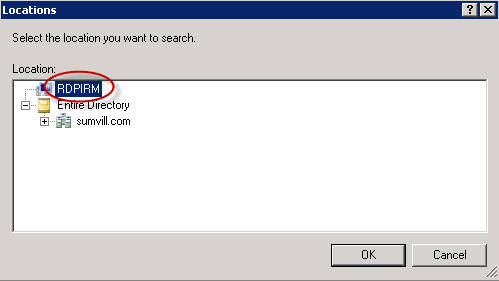
- Click the Locations button.
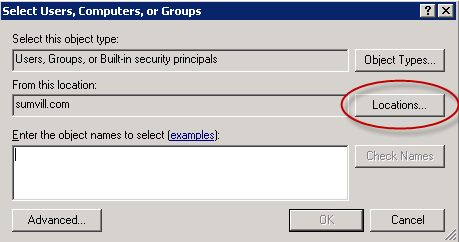
- Select the IRM computer name and click OK.
- Enter the IRM computer name in the field for "Enter the
object names to select". Click the Check Names
button, then click OK.
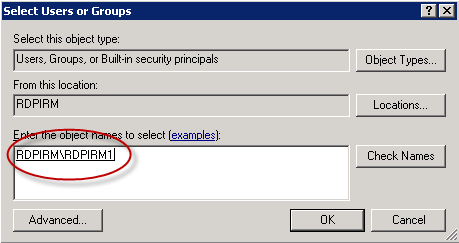
- Check the Allow checkbox for Full Control, and click OK.
Note: Users on a version of Microsoft.Net Framework higher than 2.0 (i.e. v3.0, v3.5) should follow the instructions below using the v.2.0.xxx folder path. This is important, since the file below is not located in a later version’s folder.
- On the IRM bridge server, access Computer Management from the Start/Programs/Administrative Tools menu. Click on the
- IIS must be restarted. From IIS, right-click on "Local Computer".
- Select Restart Services from the All Tasks submenu.
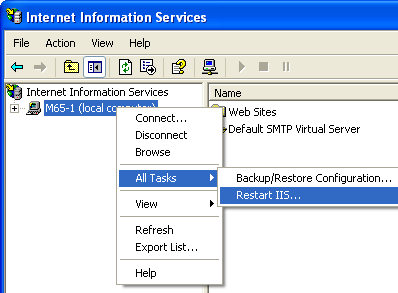
- Confirm "Restart Internet Services on..." is selected in the "What do you want to do?" drop-down, then click OK.
- Give RDPIRM user full control.
- under Computer Management and assign password "xxxxxx".
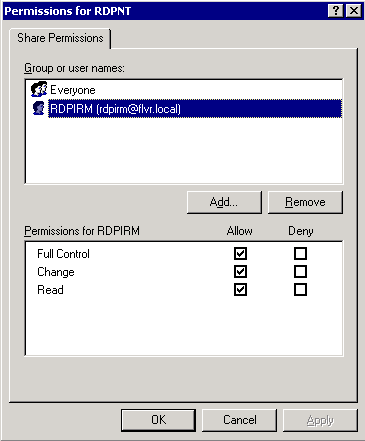
- On the RDP data server, navigate to Windows Explorer.
- Right-click on the RDPNT folder and select Properties.
- Select the Sharing tab and click the Permissions button.
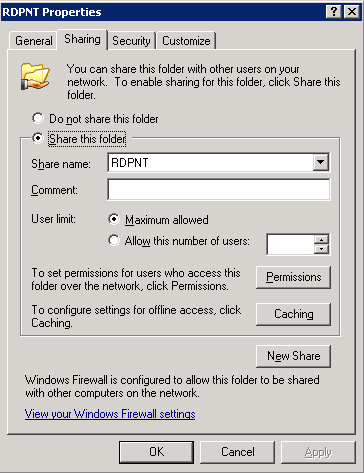
- Give full control to the folder.
- Right-click on web-config, Properties and remove the read-only
property from c:\inetpub\wwwroot\IRMNet\web.config.
- Change web.config using Notepad. Find the line <System.web>
near the top. Add the following text (case sensitive) directly
below it:
<identity impersonate ="true" userName="RDPIRM" password="xxxxxx" />
where xxxxxx is the RDPIRM user password.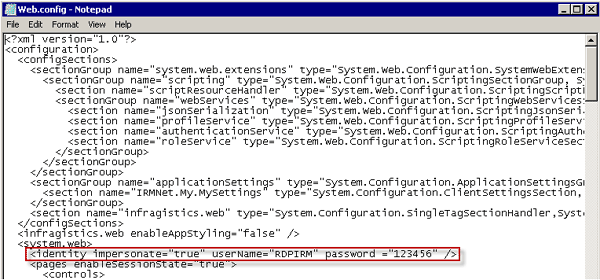
- Change web.config using Notepad. Find the line <System.web>
near the top. Add the following text (case sensitive) directly
below it:
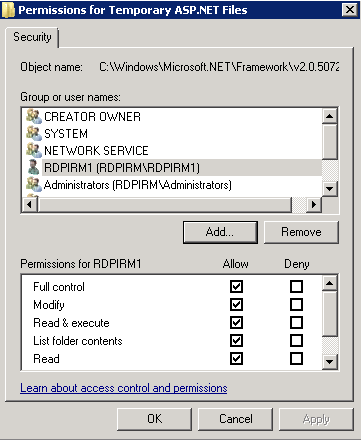
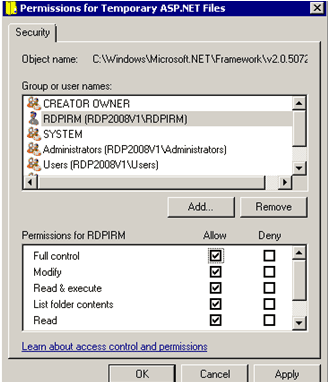
- Use Windows Explorer to find
c:\windows\Microsoft.Net\Framework\v2.0.50727\Temporary ASP.Net Files
folder. Right-click and select Properties, Security Tab, Add,
and give RDPIRM user Full Control to this folder.
04/16/2010
Click these links for Frequently Asked Questions or Troubleshooting assistance.
© 1983-2009 Resort Data Processing, Inc. All rights reserved.