Click here for Night Audit tutorials
Click here for a complete list of
audit procedures
Overview
The Export GL program creates a file to be imported into a separate accounting software, which includes the debit and credit entries for each GL account. This feature requires the General Ledger Interface (SV) module to be installed. There is an option for a daily or monthly export. For more information about purchasing this module, contact RDP Sales.
Configuration
Before completing the Export GL for the first time, the program must be configured. To configure the Export GL program:
- In RDPWin, go to the Night Audit or Day End menu --> Configuration.
- On the Night Audit/Day End tab, select the Export Frequency by clicking the Daily or Monthly radio buttons.
- Select the Accounting System from the drop down. If your accounting software package is not listed, check with the accounting software vendor to determine if it has import capabilities. Then contact RDP Support for setup.
- Enter the path of the Export File or click the Browse button. RDP recommends creating a new folder in the RDP folder so the files are easy to locate. Each time the GL Export program is run, a new file will be saved to this location with the file named entered. Note: override the file name each day when the export program is run in order to save each day's export file. Otherwise, if the file name is the same as a the previous day, it will be overridden. RDP recommends using the date in the file name (i.e. GLExport110731.txt).

Export GL
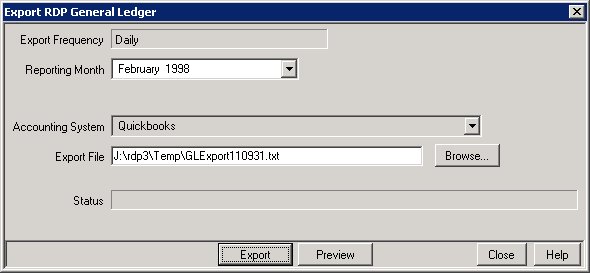
- In RDPWin, go to the Night Audit or Day End menu --> Export GL.
- The Reporting Month should default to the previous month. It is not necessary to change this unless creating an export file for a different month.
- The Export File field will have the default path and file name for the export. If the export file needs to be a unique file and saved everyday, enter the date after the name (i.e. GLExport110931.txt). If a unique name is not entered each time, then the new file will override the existing one.
- Click the Export button. This saves the file to the location in the Export File field. The file can be previewed in Notepad by clicking the Preview button.
- Click Close.
Click these links for Frequently Asked Questions or Troubleshooting assistance.
01/11/2013
© 1983-2013 Resort Data Processing, Inc. All rights reserved.