Click here to Sign up and receive these tips directly to your inbox!
| RDP News Item |
|---|
|
Transform Your Workflow with Effortless Integration Are you ready to elevate your business operations? Introducing our cutting-edge Hapi module, designed to seamlessly integrate RDP with Salesforce, the world's leading Customer Relationship Management (CRM) platform. Why Choose Our Hapi Module? Streamlined Operations: Say goodbye to the hassle of switching between platforms. Our Hapi module ensures a smooth, uninterrupted workflow by connecting RDP directly with Salesforce. Enhanced Productivity: Empower your team to work more efficiently. With real-time data synchronization, your sales and support teams can access crucial information instantly, leading to faster decision-making and improved customer service. Please reach out to your sales representative for more information! |
|
Wishing you and your loved ones a joyful and relaxing holiday season from all of us at RDP. Thank you for your trust and partnership throughout the year. Please note that our offices will be closed on Wednesday, December 24th and Thursday, December 25th in observance of the holidays. We will resume normal business hours on Friday, December 26th. Emergency Support is available if needed. |
|
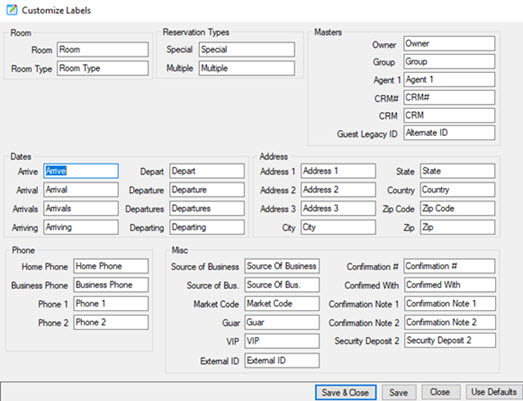
Does your property only rent villas, homes or sites instead of "units"? Do you have "members" instead of "owners"? Do you prefer to use "postal code" instead of "zip code"? Use Custom Labels to customize RDP to display the label you prefer. Under System menu, Configuration, Custom Labels, you can change the label for various fields related to rooms, reservation types, masters, dates, addresses, and other areas. After any changes, logoff and log back in order for the changes to take effect.
|
|
Are you ready to transform your front desk operations? The Dashboard Module – designed to make your staff's job easier and more efficient than ever before! Key Features: Intuitive Interface: User-friendly design that requires minimal training. All-in-One Screen: Check guests in and out, modify reservations, post charges, take payments, and handle walk-ins seamlessly. Efficiency Boost: Streamline your processes and reduce wait times for guests. Please get in touch with your sales representative for more information!
|
|
Do you need to add more room to add fields to your Crystal Report or do you want to reduce the number of fields on the report to be easier to read? If your Crystal Report is printing in "portrait" mode, you can change the Crystal Report to be in "landscape" mode. When the Crystal Report is in landscape mode, the report will be viewed horizontally, and there will be more room for additional fields. Conversely, if you would like to reduce the number of fields on a report, you can remove the unwanted fields and even change the report to be in portrait mode to be easier to read. To update the report to be portrait or landscape, open the report in Crystal Reports software. Select from the File menu, Page Setup. Select either "Portrait" or "Landscape" and make the necessary changes to the report. As a reminder, if the report is one of RDP's standard reports, remember to save the report as a different name!
|
|
If you don't use the 'Miscellaneous' payment option in RDPWin, you can remove it as an option. Go to System -> Switches -> Search "C1PAY6". This switch allows you to set a fence level, which will make this option only available for users whose fence levels meet or exceed the requirement set on the switch. Go to System -> Manage Users to manage users' fence levels. |
|
Did you know that reservations can be swapped within the same room type in the tape chart? Under Reservations, Configuration, Tape Chart tab, check the box for "Allowing swapping reservations." In the Tape Chart, you can drag a reservation right on top of the other reservation to swap reservations within the same room type.
|
|
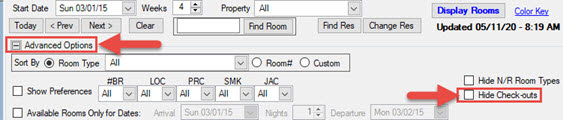
Did you know that the tape chart can display all checked out reservations from active and non-active history? This is a great way to find all reservations that stayed in a particular room for previous dates. Make sure that the check box for "Hide Check Outs" is not checked under the Advanced Options. |
|
When is the last time you looked at the 'Checked-out Guests with Balance Due' report? You could have reservations that still owe you money! This report is included in your daily Internal Audit report, or you can run it directly by going to Reporter -> Reports -> Night Audit folder. Go run the report and see if you have funds you need to collect! To password protect checking out a reservation with a balance due, go to System -> Switches and enter C1BALREQ in the Search field. Enter a password in the Setting field. When checking out a reservation with a non-zero balance, there will be a prompt to enter that password. |
|
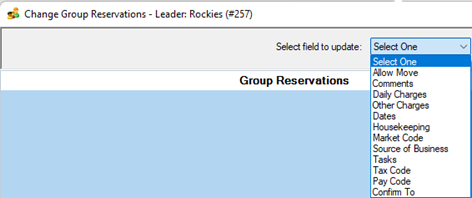
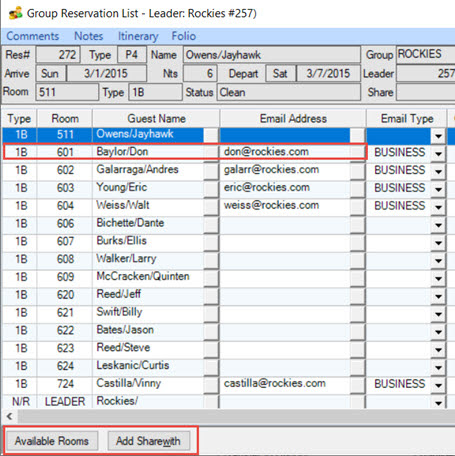
Other Charges can be changed to all group reservations under Change Group Res. Select a group reservation from F3 Find Res, F6 Arrivals, F7 In-House, F8 Departures, or F9 Tape Chart. Select Group under Options, Change Group Res. Use drop-down arrow to select field to update. Check the boxes for Other Charges as needed, Save.
|
|
RDP offers the ability to use the Demo directory to train new employees or you can use the Demo directory as a sandbox to play around in. Just about anything can be done in the Demo directory, and it will not affect the Live directory. It is always good practice to refresh the demo directory prior to using it. Also, if there is a new employee to train, add them first in the Live system prior to refreshing the Demo directory. Under Help menu, select Refresh Demo Directory. Select Copy. When all files are copied, then the Demo directory is now refreshed! To easily change to the Demo directory, use the drop down arrow key in the Resort field at bottom of screen and select the appropriate Demo directory.
|
|
Did you know that RDP offers both onsite training and remote professional services? Investing in dedicated training sessions is one of the best ways to ensure your team gets the most out of your property management system. Comprehensive training empowers staff to use every feature efficiently, reduce errors, and streamline daily operations—whether you’re onboarding new team members or customizing advanced workflows. Take advantage of expert guidance to tailor the system to your property’s unique needs and drive long-term success with RDP! Please reach out to your sales representative for more details. |
|
Want to format several text fields in Crystal Reports all at the same time? Use Format Painter button to format one or multiple text fields! To use Format Painter, highlight the field that is formatted correctly. Select the Format Painter button, and then click on the field that you would like to format with the same properties. To format multiple text fields, highlight the field that is formatted correctly. Double click on the Format Painter button, and then select each field that needs to be formatted the same way. The Format Painter button can be used for text fields and database fields in Crystal Reports, and this can save you a lot of time!
|
|
Reporter Security can be used to hide report folders and also reports within a folder. This can be helpful to only display report folders and reports needed for a particular department or users. Under Reporter menu, Security, set the fence levels on a report folder to hide the folder. If the fence level is higher than the user's power level, then the folder will not be displayed. Expand a reports folder and assign fence levels to reports within a folder. This is a great way to hide duplicate or unused reports or simply to put security on the report. Security is defined by the power level assigned to the user under System Menu, Manage Users. A security scale should be developed to group similar types of users in a security group.
|
|
This is a helpful tip if you make Inventory reservations or use group blocks. Under Reservations, Configuration, Availability tab, there is a checkbox for "Check Room Type Availability." When this setting is checked, a new column under Available Rooms is added to the right of the Room Type column named "Inv." If there is no allocation remaining for the room type, a red "I" will be displayed in the Inv column. Security is defined by the power level assigned to the user under System Menu, Manage Users. A security scale should be developed to group similar types of users in a security group.
|
|
Would you like to offer rooms on IRMng for today but also set a cutoff time to stop selling? To avoid issues with housekeeping preparing rooms for arrivals, it is helpful to cutoff available rooms at a certain time for same-day reservations. Under IRM menu, IRMng Configuration, Customization tab, select "Cutoff same day bookings" and enter the desired time. To cutoff only the Dirty rooms for same day reservations, check the box for "Cutoff dirty rooms only."
|
|
As we head into the holiday, the entire team at RDP would like to wish you and your loved ones a very happy Thanksgiving! Your trust and partnership mean a great deal, and it is a privilege to support your business throughout the year. Wishing you a holiday filled with rest, joy, and great food. We look forward to working together in the months ahead. Our offices will be closed on Thursday, November 27 and Friday, November 28. Emergency Support will be available if needed. |
|
At Resort Data Processing, your security and your guests' privacy are our top priorities. We are committed to protecting your information and want to keep you informed about potential threats.
Phishing is when scammers trick you into revealing personal information, such as your private information, guests' private information, Social Security number, credit card details, or login credentials. These may appear legitimate, so it’s important to know the warning signs.
If you receive a communication that’s not from a trusted Resort Data Processing source or seems suspicious, do not click on any links or attachments. If you have concerns about a phishing attempt or have any questions about your account or system, it’s best to contact us directly. You can reach our Customer Care Representatives at 970-845-7108. You may also submit a support ticket by emailing support@resortdata.com.
To help identify scams, here are things Resort Data Processing will NOT do. We will never ask for an RDPWin user name or password information via email or on the phone. We will never ask for your Hosted username or password via email or on the phone. We will never ask for your RDP system serial number by email. All Zoho sessions will include https://assist.resortdata.com/. If you think your login information has been compromised, contact RDP Support immediately. Social Engineering Tactics to Watch Out For: Scammers use manipulation to deceive individuals into sharing sensitive information. Here are some common social engineering techniques: Pretexting – Fraudsters create a fabricated scenario to obtain data, often pretending to be trusted individuals like technical support reps. Baiting – Scammers promise something enticing, like free software or a giveaway, but clicking on links can lead to malware installation. Tailgating – Unauthorized individuals follow employees into secured areas by pretending to be part of the company. Impersonation – Attackers pose as IT staff or executives to request login details. Best Practices to Stay Safe: Verify Sources: Always confirm the legitimacy of unexpected emails or calls by directly reaching out to our support or sales team. Enable Multi-Factor Authentication (MFA): Add an extra layer of security to your accounts to prevent unauthorized access by turning on MFA in RDPWin and NgSuites Be Cautious with Urgency: Scammers often create pressure to act quickly—always pause and assess before taking action. |
|
Would you like to learn shortcuts in RDP? Under the Help menu, select Menu Shortcuts. Expand Module R0 to see all of the Reservation shortcuts. Alt+F12 is the shortcut for Availability and Ctrl+Shift+A is the shortcut to Res Analysis. Shortcuts are also available for Module R3 for Condo Owner Accounting, Module R4 for Guest History, Module RN for Rates & Packages, Module RV for GDS, Module SA for Central Availability, and Module W0 for the Dashboard module, and Module W6 for Activity Inventory Control.
|
|
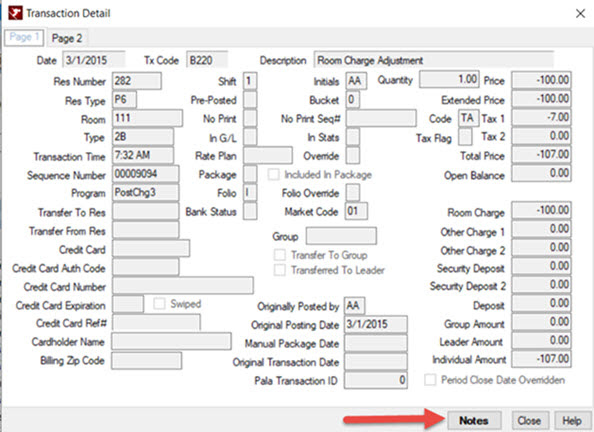
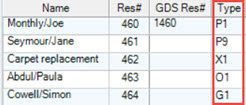
Are you familiar with Res Type and Res Status? Knowing the Res Type and Res Status can be very helpful in identifying what kind of reservation it is and the status of the reservation.
Some examples of Res Types are P6, I1, O8, X1, C5. Res Types are found next to the Res # when looking at a list of reservations.
The Res Type will always be represented by a letter. Since RDP offers many different types of systems, some of these Res Types may not apply to you. Here is a list of all the possible Res Types: P = Paying Guest / Room # Assigned I = Paying Guest / No Room # Assigned S = Special Reservation / Room # Assigned C = Comp Reservation X = Maintenance Reservation O = Owner Reservation (wholly owned) G = Guest of Reservation T = Timeshare Reservation / Room # Assigned Q = Timeshare Reservation / No Room # Assigned B = Timeshare Bonus Reservation E = Timeshare Exchange Reservation The Res Status will always be represented by a number. Here is a list of all the possible Res Statuses: 1 = Future Reservation / No Deposit 2 = Future Reservation / With Deposit 4 = Future Reservation / With Changes 5 = Checked-in Reservation 6 = Checked-in Reservation / With Changes 7 = Checked-out Reservation / With Security Deposit 8 = Checked-out Reservation 9 = Canceled Reservation
|
|
The General Ledger Interface will export daily or monthly totals for each general ledger in the format for several accounting programs, such as M3, Quickbooks, Sage, and NetSuite. From the accounting program, just import the totals! This will save you time and avoid any erroneous manual entries to your accounting software. For more information regarding the General Ledger Interface, please contact your sales representative. |
|
The Tape Chart can automatically display with a date that is a couple of days prior to today. It is beneficial to display the tape chart with a starting date 2 or 3 days prior to today to show in-house reservations that may be checking out today. In the example below, today's date is March 1st. The tape chart starting days is set to 2 days prior to today's date. Under Reservations menu, Configuration, Tape Chart tab, use the drop down arrow key to change the Starting Days to -2 or -3.
|
|
Version 5.5 Security Enhancements Updated: 5/20/25
New Encryption Technology All RDP 5.5 products use the latest and strongest password encryption technology. This allows for configurable password lengths, use of all special characters in passwords, and PCI 4.0 compliance. All passwords stored in RDPWin will be re-encrypted after the 5.5 conversion. This includes passwords for RDPWin users, Owners, Groups, Guests, and CMS Users. The only exception is Guest records in guest history. The passwords for these users will be deleted to decrease the downtime required for the 5.5 conversion. Guests logging into NgSuite will be prompted to reset their passwords.
RDPWin
Multi-Factor Authentication for RDPWin Users: Two-factor authentication may be enabled for all RDPWin users or individual users. RDPSupport recommends and PCI 4.0 requires that all customers enable two-factor authentication for all their users. RDPWin Two-factor authentication requires a third-party authenticator application. Most authenticator apps are supported, but RDPSupport recommends installing either Microsoft Authenticator or Google Authenticator on a mobile phone or tablet.
Configuration: To enable Two-factor authentication for all RDPWin users, log in to RDPWin as an admin and go to System – Configuration – System In the system security section, enable Multifactor Authentication using the Authenticator App. To enable Two-factor authentication for individual RDPWin users, log in to RDPWin as an admin and go to System – Manage Users Change the user in question and check Require MFA After Two-factor authentication has been enabled, users will be prompted with a QR code or manual code to add RDPWin to their authenticator app. Add RDPWin to the authenticator app and enter the code from the authenticator app into the code field Moving forward, the user will be prompted for an auth code at each logon If the user changes devices where the authenticator app (Microsoft or Google) is installed, their two-factor key can be reset in Manage Users.
Complex passwords enforced: PCI 4.0 requires a minimum of 12 characters for passwords and a suggested maximum of 20 characters. RDPWin requires at least one lower-case letter, one upper-case letter, one digit, and one special character to be used in all RDPWin user passwords, Owner Ng, Group Ng, Agent Ng, and CMS Ng portal passwords. The password requirements will not be enforced after the initial upgrade to version 5.5, but will be enforced when changing or entering new passwords.
Configuration: The min and max password length can now be configured in RDPWin – System – Configuration – System. Remember that to be PCI 4.0 compliant, the min password length must be at least 12 characters. After Version 5.5 conversion, all RDPWin/IRMNg users can be forced to reset their passwords to the new requirements. *RDPWin version 5.5.000.32 or higher.
Password eye button on the login screen and password fields: To prevent users from disabling their accounts in RDPWin and to facilitate easier password management for managers, RDPWin now features an eye icon in the password field that can be clicked to view the entered passwords. The eye icon is only available in Manage Users when resetting or adding a new password.
IRMNg
Cloudflare: If you are using any of our NgSuite web products or our REST/SOAP API, RDP highly recommends that you make use of a Web Application Firewall, WAF, such as Cloudflare, https://www.cloudflare.com/. Cloudflare will optimize the performance of your marketing site and protect your NgSuites and API’s from cyber threats. Here is a link to our white paper - https://support.resortdata.com/support/Content/GettingStarted/Online-Firewall.htm?Highlight=cloudflare CMSNg: CMSNg now requires multifactor authentication using SMS text messaging. Email authentication is no longer supported. Make sure your CMSNg user has a cell phone number on their record in RDPWin -Manage Users OwnerNg: OwnerNg or the Owner Portal no longer supports customized HTML due to cybersecurity concerns. |
|
Have you realized that if you right-click on any reservation while on the Arrivals, In-House, or Departures list, you have an extended list of actions to choose from? You can quickly print or email the reservation's folio, print registration card or confirmation, view the Guest History or even send them a text! .
|
|
A popular credit card scam in hospitality is for someone to book a reservation, put a deposit on a stolen credit card, cancel, then request a refund on a different card. The challenge is that this can often be a legitimate transaction in our industry. It's important to train staff to be on the lookout for this and have them ask questions when a payment is requested to be refunded to a different credit card. Consider turning on a switch to prompt for a password when refunding on a new credit card. To implement, go to the System menu, Switches, and in the Search field, enter C1REFCC. In the Setting field, enter the password to be prompted when adding a new credit card during a refund.
|
|
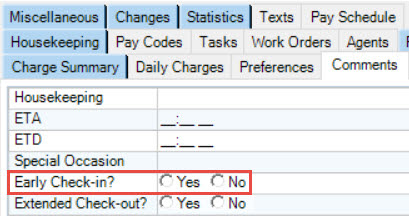
Would you like to format a reservation comment field to be a date or a Yes/No radio button? Comment fields can be customized to be a date, time, currency, phone number, Yes/No options, Yes/No dropdown, and a checkbox. Comment fields can be formatted on reservations, guest history, group masters, owners, room masters, travel agents, activity vendors, work orders, work order vendors, work order assets, CRM, and timeshare/fractional weeks. The descriptions of comment fields are changed under System menu, Comment fields, and selecting the appropriate Type of Master, such as Reservation/Guest for Reservation and Guest comment fields. Formats are added by adding a sub-record to the lookup table with a “~”. The second field of the sub-record is the format type: 1 Text (this is the default and does not have to be added to the table) 2 Integer 3 Double 4 Currency 5 Yes/No dropdown 6 Yes/No radio buttons 7 Date 8 Time 9 Date/Time 10 Phone Number 11 Social Security Number (should not be used or stored in RDP database) 12 Checkbox
Below are the files, comment fields, and their corresponding tables: Reservations & Guest History Comment 1: Table EF Comment 2: Table EG Comment 3: Table EH Comment4: Table E1 Comment 5: Table E2 Comment 6: Table E3 Comment 7: Table E4 Comment 8: Table E5 Comment 9: Table E6 Comment 10: Table E7 Comment 11: Table E8 Comment 12: Table E9 Comment 13: Table EA Comment 14: Table EB Comment 15: Table EC Comment 16: Table ED Comment 17: Table EF Comment 18: Table Y0 Comment 19: Table Y1 Comment 20: Table Y2 Comment 21: Table Y3 Comment 22: Table Y4 Comment 23: Table Y5 Comment 24: Table Y6 Comment 25: Table Y7 Groups Comment 1: Table JA Comment 2: Table JB Comment 3: Table JC Comment 4: Table JD Comment 5: Table JE Comment 6: Table JF Comment 7: Table JG Comment 8: Table JH Comment 9: Table JI Comment 10: Table JJ Comment 11: Table JK Comment 12: Table JL Comment 13: Table J0 Comment 14: Table J1 Comment 15: Table J2 Comment 16: Table J3 Comment 17: Table J4 Comment 18: Table J5 Owners Comment 1: Table IA Comment 2: Table IB Comment 3: Table IC Comment 4: Table ID Comment 5: Table IE Comment 6: Table IF Comment 7: Table IG Comment 8: Table IH Comment 9: Table II Comment 10: Table IJ Comment 11: Table IK Comment 12: Table IL Comment 13: Table I0 Comment 14: Table I1 Comment 15: Table I2 Comment 16: Table I3 Comment 17: Table I4 Comment 18: Table I5 Rooms Comment 1: Table IM Comment 2: Table IN Comment 3: Table IO Comment 4: Table IP Comment 5: Table IQ Comment 6: Table IR Comment 7: Table IS Comment 8: Table IT Comment 9: Table IU Comment 10: Table IV Comment 11: Table IW Comment 12: Table IX Comment 13: Table YA Comment 14: Table YB Comment 15: Table YC Comment 16: Table YD Comment 17: Table YE Comment 18: Table YF Travel Agents Comment 1: Table KA Comment 2: Table KB Comment 3: Table KC Comment 4: Table KD Comment 5: Table KE Comment 6: Table KF Comment 7: Table KG Comment 8: Table KH Comment 9: Table KI Comment 10: Table KJ Comment 11: Table KK Comment 12: Table KL Comment 13: Table K0 Comment 14: Table K1 Comment 15: Table K2 Comment 16: Table K3 Comment 17: Table K4 Comment 18: Table K5 Activity Vendors Comment 1: Table LA Comment 2: Table LB Comment 3: Table LC Comment 4: Table LD Comment 5: Table LE Comment 6: Table LF Comment 7: Table LG Comment 8: Table LH Comment 9: Table LI Comment 10: Table LJ Comment 11: Table LK Comment 12: Table LL Comment 13: Table LM Comment 14: Table LN Comment 15: Table LO Comment 16: Table LP Comment 17: Table LQ Work Order Vendors Comment 1: Table NJ Comment 2: Table NK Comment 3: Table NL Comment 4: Table NM Comment 5: Table NN Comment 6: Table NO Comment 7: Table NP Comment 8: Table NQ Comment 9: Table NR Comment 10: Table NS Comment 11: Table NT Comment 12: Table NU Comment 13: Table NV Comment 14: Table NW Comment 15: Table NX Comment 16: Table NY Comment 17: Table NZ Work Order Assets Comment 1: Table N2 Comment 2: Table N3 Comment 3: Table N4 Comment 4: Table N5 Comment 5: Table N6 Comment 6: Table N7 Comment 7: Table N8 Comment 8: Table N9 Comment 9: Table NA Comment 10: Table NB Comment 11: Table NC Comment 12: Table ND Comment 13: Table NE Comment 14: Table NF Comment 15: Table NG Comment 16: Table NH Comment 17: Table NI CRM Comment 1: Table T2 Comment 2: Table T3 Comment 3: Table T4 Comment 4: Table T5 Comment 5: Table T6 Comment 6: Table T7 Comment 7: Table T8 Comment 8: Table T9 Comment 9: Table TA Comment 10: Table TB Comment 11: Table TC Comment 12: Table TD Comment 13: Table TE Comment 14: Table TF Comment 15: Table TG Comment 16: Table TH Comment 17: Table TI Timeshare/Fractional Weeks Comment 1: Table EV Comment 2: Table EW Comment 3: Table EX Comment 4: Table EY Comment 5: Table EZ
For example, here is how to change Comment-5 on reservations to show "Early Check-in" and format it as a Yes/No Radio button: System menu, Comment Labels, select Reservation/Guest for Type of Master. Update Comment-5 with a description of "Early Check-in", Save.
System menu, Table Maintenance, Add Table, enter appropriate table from list above. In this case, Comment-5 for Reservations/Guest History is table E2, enter description "Early Check-in", Save & Close, Display.
Add Subrecord, enter ~ in the Subrecord field, enter 6 in Description, Save & Close.
|
|
Use Find Res button in tape chart to display a reservation. When using Find Res, enter the guest name or reservation number, and the reservation will be displayed in the tape chart. Remember that only reservations with room numbers appear in the tape chart.
|
|
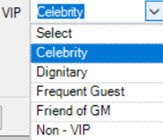
The VIP field can be changed to display choices, and each of those choices can be assigned a unique tape chart color. To implement this feature, go to System, Switches, and enter 427-04 in the Search field. Set this switch to Yes for "Use list for VIP field on Res and Guest Screens (Table VI). Next, go to System, Table Maintenance, and enter table VI, Display. Use Add Code and enter each VIP code and assign a unique tape chart color. Be sure to include code "N" for Non-VIP.
|
|
Do you have any owners that are considered VIP? Check the box for VIP on the owner masters for those owners that are considered to be VIP.
|
|
Use the tape chart scroll to go right to the room number! When scrolling up and down the tape chart, use the tool tip to go right to the room number. For example, use the scroll bar and when the tool tip shows the room number you are looking for, just release your mouse, and the tape chart will bring you right to that room number.
|
|
Our comprehensive Manager Report delivers detailed insights, including occupancy rates, average daily rate (ADR), revenue per available room (RevPAR), complimentary and out-of-order rooms, total revenue, and booking trends by year, month, or day. You’ll also have real-time stats on arrivals, departures, no-shows, in-house guests, cancellations, room nights reserved, and so much more. The Manager Report is located under Reporter, Reports, Stats folder, and can be run for any past date. |
|
Do you need an additional Res Type to distinguish from your other Res Types? Use Res Type S for Special Res Type to separate out reservations from other Res Types. Res Type S reservations act exactly like a Preassigned reservation where a room number is required. A unique tape chart color can also be assigned to Res Type S under Res Menu, Configuration, Tape Chart tab. In addition, if you want to replace "Special" with another description, this can be changed. Go to the System menu, Switches, enter C1TYPE-S in the Search field. Update the description in the Setting column. |
|
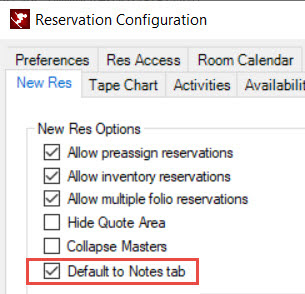
Do you always add Notes when making a new reservation? You have an option to default to the Notes tab! Go to Reservations, Configuration, under the New Res tab, check the box for "Default to Notes tab." |
|
Mobile Housekeeping Benefits Real-Time Room Status Updates: Housekeepers, inspectors, and housekeeping managers can instantly update room status from any mobile device, ensuring front desk and management always have up-to-date information on which rooms are clean, dirty, or ready for inspection. Dynamic Scheduling: Any changes to cleaning schedules are immediately visible to staff on their mobile devices, reducing miscommunication and improving workflow adaptability. Optimized Staff Productivity: The system allows for customizable daily housekeeping boards, grouping rooms by zones, room numbers, or custom sequences to minimize travel time and maximize efficiency. Forecasting & Planning: Accurately forecast housekeeping requirements based on future reservations, arrivals, and departures, allowing you to schedule the right number of staff for each day and avoid over- or understaffing. Performance Tracking: Track estimated versus actual clean times, monitor housekeeper performance, and generate detailed history and performance reports to identify training needs and reward top performers Mobile Housekeeping Checklist Benefits Mobile Checklists: Housekeepers access their cleaning checklists directly on their mobile devices, ensuring every task is completed and nothing is overlooked. Checklists can be viewed, updated, and submitted in real time. Fully Customizable Checklists: Create unique checklists for each room type or even individual rooms. Add checkboxes, dropdowns, and text fields to match your property's specific standards and requirements. Guided Cleaning Process: Housekeepers see the checklist as soon as they start a clean, with clear instructions and sections-reducing errors and ensuring consistent quality across your property. Data-Driven Operations: All checklist responses are stored in the database, allowing management to review cleaning records, monitor compliance, and analyze trends for continuous improvement. Enhanced Accountability: Know exactly who cleaned or inspected each room, when, and what was completed-supporting transparency and accountability throughout your housekeeping team. Please reach out to your account manager for more details! |
|
The Master Links for Pictures and Documents module allows documents to be stored on owner masters, guest history, group masters, travel agent masters, and room masters. This is a great way to also store pictures of your owners and repeat guests! The ability to add or delete documents under the Documents tab can be restricted by adding a fence level. Under System menu, Menu Security, enter "document" in the Search field. Assign the appropriate fence level for Add Document, Delete Documents, or Rename Documents. Interested in storing documents and pictures? Please reach out to your account manager for more details! |
|
Itinerary Comment-1 and Comment-2 display under the Itinerary tab on a reservation. Itinerary Comments can be easily changed by right-clicking on the itinerary and selecting Change Comments.
|
|
Confirmations can be mass emailed by res type for any arrival range. Under Reporter menu, Mass E-mails, Confirmations, select the By Arrival tab. Select the appropriate Res Type. If a Res Type is not selected, All Res Types will be the default.
|
|
Drive Direct Bookings with RDP’s WIHP Interface Powered by Cendyn RDP’s integration with WIHP and Cendyn empowers hotels to seamlessly activate Google and other metasearch platforms, placing their direct website listings alongside OTAs like Expedia and Booking.com. With 72% of travelers using metasearch during their booking journey and 45% of Google searches resulting in clicks on sponsored links, this solution ensures your property is visible where it matters most. The Pay-Per-Stay (PPS) model eliminates risk—commissions are only paid after the guest has completed their stay, excluding cancellations. The streamlined onboarding process, managed by Cendyn and WIHP, includes inventory setup, pixel tracking, QA, and campaign activation. Hotels retain control over monthly budgets and receive ongoing optimization and reporting. Stand out, stay visible, and convert more direct bookings—risk-free. Interested in WIHP Metasearch? Please contact your sales representative.
|
|
The rate detail for HTML confirmations can be displayed with the date, description, room rate, tax, days, and total charge options using [*RateDetail*] data item. The rate detail can also be more concise using [*RateDetailN*] data item, which includes date, description, days, and total charge columns. HTML Confirmations configuration documentation can be found here: Interested in making your confirmations, guest folios, and guest surveys more attractive with your brand? Contact your sales representative regarding HTML Confirmations module |
|
Administrators can clear the lock and login to RDP successfully! Verify that Reset Availability is not currently running by another RDP user. Login as an RDP user that is a member of User Type "Administrator." This is configured under System menu, Manage Users. After selecting Logon, select Yes to the below message.
|
|
Did you know that with Virtual Store, guests can purchase activities not only while they are making reservations on IRMng but also afterwards? Guests can access their reservation under "My Reservations" and view or add activities to their reservation.
Virtual Store is an excellent revenue source for selling activities and products, such as wine & cheese baskets, chocolate, or events. Have activities where there is a limited number available? Use Activity Inventory Control module to sell those activities that have a maximum capacity, such as theater tickets, dinners, and group events. Reach out to your sales representative for more details on IRMng, Virtual Store, and Activity Inventory Control. |
|
A fence level can be added to Change Rates button. If the fence level on the Change Rates button is higher than the RDP User's power level, access will be denied to change rates on a reservation. Under System, Menu Security, expand UI Security and assign the appropriate fence level to Change Rates Button.
|
|
Rate Plans can be changed to all group reservations under Change Group Res. Select a group reservation from F3 Find Res, F6 Arrivals, F7 In-House, F8 Departures, or F9 Tape Chart. Select Group, Change Group Res. Use drop-down arrow to select Rate Plan to update. In the During field, select the appropriate rate plan, Save.
|
|
Daily Charges can automatically be added to a new sharewith based on the Daily Charges on the primary sharewith. Under System, Switches, enter 414-80 in Search field. Set switch to YES to "Add Daily Charges to New Sharewiths." Changes to the Daily Charges on the sharewiths can still be made. |
|
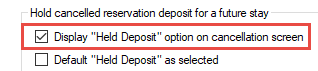
A list of cancellation reasons can be displayed when a reservation is cancelled. This is helpful to standardize the reasons why a guest cancels their reservation and requires a selection from the list.
Under System menu, Switches, enter 416-77 in the Search field. Set switch Yes to "Display cancellation list dropdown (Table CL)." Next, under System menu, Table Maintenance, enter CL in Table field, Display. Add Subrecord to add cancellation reasons. The Subrecord is alphanumeric and controls the order the cancellation reasons are displayed.
|
|
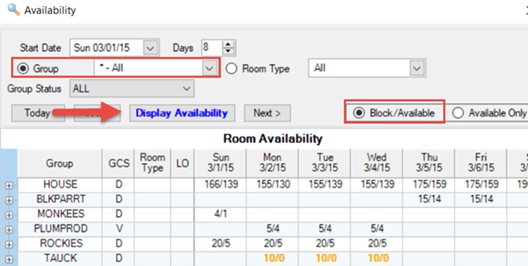
This is a helpful tip if you make Inventory reservations or use group blocks. Under Reservations, Configuration, Availability tab, there is a checkbox for "Check Room Type Availability."
When this setting is checked, a new column under Available Rooms is added to the right of the Room Type column named "Inv." If there is no allocation remaining for the room type, a red "I" will be displayed in the Inv column Security is defined by the power level assigned to the user under System Menu, Manage Users. A security scale should be developed to group similar types of users in a security group
|
|
Would you like to offer rooms on IRMng for today but also set a cutoff time to stop selling? To avoid issues with housekeeping preparing rooms for arrivals, it is helpful to cutoff available rooms at a certain time for same-day reservations. Under IRM menu, IRMng Configuration, Customization tab, select "Cutoff same day bookings" and enter the desired time. To cutoff only the Dirty rooms for same day reservations, check the box for "Cutoff dirty rooms only."
|
|
Under the Help menu select Menu Shortcuts. Expand Module R0 to see all of the Reservation shortcuts. Alt+F12 is the shortcut for Availability and Ctrl+Shift+A is the shortcut to Res Analysis. Shortcuts are also available for Module R3 for Condo Owner Accounting, Module R4 for Guest History, Module RN for Rates & Packages, Module RV for GDS, Module SA for Central Availability, and Module W0 for the Dashboard module, and Module W6 for Activity Inventory Control.
|
|
At Resort Data Processing, your security and your guests' privacy are our top priorities. We are committed to protecting your information and want to keep you informed about potential threats.
Phishing is when scammers trick you into revealing personal information, such as your private information, guests' private information, Social Security number, credit card details, or login credentials. These may appear legitimate, so it’s important to know the warning signs.
If you receive a communication that’s not from a trusted Resort Data Processing source or seems suspicious, do not click on any links or attachments. If you have concerns about a phishing attempt or have any questions about your account or system, it’s best to contact us directly. You can reach our Customer Care Representatives at 970-845-7108. You may also submit a support ticket by emailing support@resortdata.com.
To help identify scams, here are things Resort Data Processing will NOT do. We will never ask for an RDPWin user name or password information via email or on the phone. We will never ask for your Hosted username or password via email or on the phone. We will never ask for your RDP system serial number by email. All Zoho sessions will include https://assist.resortdata.com/. If you think your login information has been compromised, contact RDP Support immediately. Social Engineering Tactics to Watch Out For: Scammers use manipulation to deceive individuals into sharing sensitive information. Here are some common social engineering techniques: Pretexting – Fraudsters create a fabricated scenario to obtain data, often pretending to be trusted individuals like technical support reps. Baiting – Scammers promise something enticing, like free software or a giveaway, but clicking on links can lead to malware installation. Tailgating – Unauthorized individuals follow employees into secured areas by pretending to be part of the company. Impersonation – Attackers pose as IT staff or executives to request login details. Best Practices to Stay Safe: Verify Sources: Always confirm the legitimacy of unexpected emails or calls by directly reaching out to our support or sales team. Enable Multi-Factor Authentication (MFA): Add an extra layer of security to your accounts to prevent unauthorized access by turning on MFA in RDPWin and NgSuites Be Cautious with Urgency: Scammers often create pressure to act quickly—always pause and assess before taking action. |
|
An embedded payment processing solution designed for lodging. We are thrilled to announce that RDPPay, our integrated payment processing solution, is available in the US and Canada! Whether you’re looking to take the complexity out of payment processing, speed up your reconciliations, or increase your property’s security, you can do it all with our integrated platform. Cost Savings – We guarantee to save you money. No Gateway fees! Single Sign-On – Improved reporting and management embedded in our user permissions module, making it easier to oversee your operations Embedded Reconciliation Report – Easily reconcile batches and transactions using SMART Matching to save you time. Increased Security – Increased tokenization and reduced risk through PCI 3.2 compliance, EMV terminals and breach protection. Tier 1 Support – Provided directly from your RDP team. Integration to the PMS & Mobile Features – Collect credit cards at all stages of the guest stay and automate incremental authorizations. Ready to take your property to the next level with an embedded payment processing solution? Schedule a 15-minute call with Camille Fowler at Camille@ResortData.com to discuss your specific needs and explore how RDP Payments can benefit your property. |
|
Under the Help menu, select Menu Shortcuts. Expand Module R0 to see all of the Reservation shortcuts. Alt+F12 is the shortcut for Availability and Ctrl+Shift+A is the shortcut to Res Analysis. Shortcuts are also available for Module R3 for Condo Owner Accounting, Module R4 for Guest History, Module RN for Rates & Packages, Module RV for GDS, Module SA for Central Availability, and Module W0 for the Dashboard module, and Module W6 for Activity Inventory Control.
|
|
Are you familiar with Res Type and Res Status? Knowing the Res Type and Res Status can be very helpful in identifying what kind of reservation it is and the status of the reservation.
Some examples of Res Types are P6, I1, O8, X1, C5. Res Types are found next to the Res # when looking at a list of reservations.
The Res Type will always be represented by a letter. Since RDP offers many different types of systems, some of these Res Types may not apply to you. Here is a list of all the possible Res Types: P = Paying Guest / Room # Assigned I = Paying Guest / No Room # Assigned S = Special Reservation / Room # Assigned C = Comp Reservation X = Maintenance Reservation O = Owner Reservation (wholly owned) G = Guest of Reservation T = Timeshare Reservation / Room # Assigned Q = Timeshare Reservation / No Room # Assigned B = Timeshare Bonus Reservation E = Timeshare Exchange Reservation The Res Status will always be represented by a number. Here is a list of all the possible Res Statuses: 1 = Future Reservation / No Deposit 2 = Future Reservation / With Deposit 4 = Future Reservation / With Changes 5 = Checked-in Reservation 6 = Checked-in Reservation / With Changes 7 = Checked-out Reservation / With Security Deposit 8 = Checked-out Reservation 9 = Canceled Reservation
|
|
The General Ledger Interface will export daily or monthly totals for each general ledger in the format for several accounting programs, such as M3, Quickbooks, Sage, and NetSuite. From the accounting program, just import the totals! This will save you time and avoid any erroneous manual entries to your accounting software. For more information regarding the General Ledger Interface, please contact your sales representative. |
|
The Tape Chart can automatically display with a date that is a couple of days prior to today. It is beneficial to display the tape chart with a starting date 2 or 3 days prior to today to show in-house reservations that may be checking out today. In the example below, today's date is March 1st. The tape chart starting days is set to 2 days prior to today's date. Under Reservations menu, Configuration, Tape Chart tab, use the drop down arrow key to change the Starting Days to -2 or -3.
|
|
Would you like to be prompted to confirm to exit or logoff RDPWin? Under System menu, Configuration, System, check the boxes for "Confirm RDPWin Exit" and "Confirm RDPWin Logoff."
|
|
Have you realized that if you right-click on any reservation while on the Arrivals, In-House, or Departures list, you have an extended list of actions to choose from? You can quickly print or email the reservation's folio, print registration card or confirmation, view the Guest History or even send them a text! .
|
|
A popular credit card scam in hospitality is for someone to book a reservation, put a deposit on a stolen credit card, cancel, then request a refund on a different card. The challenge is that this can often be a legitimate transaction in our industry. It's important to train staff to be on the lookout for this and have them ask questions when a payment is requested to be refunded to a different credit card. Consider turning on a switch to prompt for a password when refunding on a new credit card. To implement, go to the System menu, Switches, and in the Search field, enter C1REFCC. In the Setting field, enter the password to be prompted when adding a new credit card during a refund.
|
|
Would you like to format a reservation comment field to be a date or a Yes/No radio button? Comment fields can be customized to be a date, time, currency, phone number, Yes/No options, Yes/No dropdown, and a checkbox. Comment fields can be formatted on reservations, guest history, group masters, owners, room masters, travel agents, activity vendors, work orders, work order vendors, work order assets, CRM, and timeshare/fractional weeks. The descriptions of comment fields are changed under System menu, Comment fields, and selecting the appropriate Type of Master, such as Reservation/Guest for Reservation and Guest comment fields. Formats are added by adding a sub-record to the lookup table with a “~”. The second field of the sub-record is the format type: 1 Text (this is the default and does not have to be added to the table) 2 Integer 3 Double 4 Currency 5 Yes/No dropdown 6 Yes/No radio buttons 7 Date 8 Time 9 Date/Time 10 Phone Number 11 Social Security Number (should not be used or stored in RDP database) 12 Checkbox
Below are the files, comment fields, and their corresponding tables: Reservations & Guest History Comment 1: Table EF Comment 2: Table EG Comment 3: Table EH Comment4: Table E1 Comment 5: Table E2 Comment 6: Table E3 Comment 7: Table E4 Comment 8: Table E5 Comment 9: Table E6 Comment 10: Table E7 Comment 11: Table E8 Comment 12: Table E9 Comment 13: Table EA Comment 14: Table EB Comment 15: Table EC Comment 16: Table ED Comment 17: Table EF Comment 18: Table Y0 Comment 19: Table Y1 Comment 20: Table Y2 Comment 21: Table Y3 Comment 22: Table Y4 Comment 23: Table Y5 Comment 24: Table Y6 Comment 25: Table Y7 Groups Comment 1: Table JA Comment 2: Table JB Comment 3: Table JC Comment 4: Table JD Comment 5: Table JE Comment 6: Table JF Comment 7: Table JG Comment 8: Table JH Comment 9: Table JI Comment 10: Table JJ Comment 11: Table JK Comment 12: Table JL Comment 13: Table J0 Comment 14: Table J1 Comment 15: Table J2 Comment 16: Table J3 Comment 17: Table J4 Comment 18: Table J5 Owners Comment 1: Table IA Comment 2: Table IB Comment 3: Table IC Comment 4: Table ID Comment 5: Table IE Comment 6: Table IF Comment 7: Table IG Comment 8: Table IH Comment 9: Table II Comment 10: Table IJ Comment 11: Table IK Comment 12: Table IL Comment 13: Table I0 Comment 14: Table I1 Comment 15: Table I2 Comment 16: Table I3 Comment 17: Table I4 Comment 18: Table I5 Rooms Comment 1: Table IM Comment 2: Table IN Comment 3: Table IO Comment 4: Table IP Comment 5: Table IQ Comment 6: Table IR Comment 7: Table IS Comment 8: Table IT Comment 9: Table IU Comment 10: Table IV Comment 11: Table IW Comment 12: Table IX Comment 13: Table YA Comment 14: Table YB Comment 15: Table YC Comment 16: Table YD Comment 17: Table YE Comment 18: Table YF Travel Agents Comment 1: Table KA Comment 2: Table KB Comment 3: Table KC Comment 4: Table KD Comment 5: Table KE Comment 6: Table KF Comment 7: Table KG Comment 8: Table KH Comment 9: Table KI Comment 10: Table KJ Comment 11: Table KK Comment 12: Table KL Comment 13: Table K0 Comment 14: Table K1 Comment 15: Table K2 Comment 16: Table K3 Comment 17: Table K4 Comment 18: Table K5 Activity Vendors Comment 1: Table LA Comment 2: Table LB Comment 3: Table LC Comment 4: Table LD Comment 5: Table LE Comment 6: Table LF Comment 7: Table LG Comment 8: Table LH Comment 9: Table LI Comment 10: Table LJ Comment 11: Table LK Comment 12: Table LL Comment 13: Table LM Comment 14: Table LN Comment 15: Table LO Comment 16: Table LP Comment 17: Table LQ Work Order Vendors Comment 1: Table NJ Comment 2: Table NK Comment 3: Table NL Comment 4: Table NM Comment 5: Table NN Comment 6: Table NO Comment 7: Table NP Comment 8: Table NQ Comment 9: Table NR Comment 10: Table NS Comment 11: Table NT Comment 12: Table NU Comment 13: Table NV Comment 14: Table NW Comment 15: Table NX Comment 16: Table NY Comment 17: Table NZ Work Order Assets Comment 1: Table N2 Comment 2: Table N3 Comment 3: Table N4 Comment 4: Table N5 Comment 5: Table N6 Comment 6: Table N7 Comment 7: Table N8 Comment 8: Table N9 Comment 9: Table NA Comment 10: Table NB Comment 11: Table NC Comment 12: Table ND Comment 13: Table NE Comment 14: Table NF Comment 15: Table NG Comment 16: Table NH Comment 17: Table NI CRM Comment 1: Table T2 Comment 2: Table T3 Comment 3: Table T4 Comment 4: Table T5 Comment 5: Table T6 Comment 6: Table T7 Comment 7: Table T8 Comment 8: Table T9 Comment 9: Table TA Comment 10: Table TB Comment 11: Table TC Comment 12: Table TD Comment 13: Table TE Comment 14: Table TF Comment 15: Table TG Comment 16: Table TH Comment 17: Table TI Timeshare/Fractional Weeks Comment 1: Table EV Comment 2: Table EW Comment 3: Table EX Comment 4: Table EY Comment 5: Table EZ
For example, here is how to change Comment-5 on reservations to show "Early Check-in" and format it as a Yes/No Radio button: System menu, Comment Labels, select Reservation/Guest for Type of Master. Update Comment-5 with a description of "Early Check-in", Save.
System menu, Table Maintenance, Add Table, enter appropriate table from list above. In this case, Comment-5 for Reservations/Guest History is table E2, enter description "Early Check-in", Save & Close, Display.
Add Subrecord, enter ~ in the Subrecord field, enter 6 in Description, Save & Close.
|
|
Use Find Res button in tape chart to display a reservation. When using Find Res, enter the guest name or reservation number, and the reservation will be displayed in the tape chart. Remember that only reservations with room numbers appear in the tape chart.
|
|
The VIP field can be changed to display choices, and each of those choices can be assigned a unique tape chart color. To implement this feature, go to System, Switches, and enter 427-04 in the Search field. Set this switch to Yes for "Use list for VIP field on Res and Guest Screens (Table VI). Next, go to System, Table Maintenance, and enter table VI, Display. Use Add Code and enter each VIP code and assign a unique tape chart color. Be sure to include code "N" for Non-VIP.
|
|
RDP Support is closed Monday, May 26th, for the Memorial Day holiday. We wish everyone a wonderful holiday weekend and best wishes for a busy and enjoyable summer season. Emergency Support is available during the holiday closure. |
|
Missed out on our May conference? No worries - you still have the opportunity to join us at our Fall RDP Conference! We are excited to invite you to this exclusive event set against the stunning backdrop of Vail, Colorado! From September 22nd to 24th, connect with industry professionals and RDP enthusiasts to deepen your knowledge and sharpen your skills. Whether you’re just starting out or have years of experience, this conference offers a unique chance to learn, collaborate, and grow-all while enjoying the inspiring mountain scenery. Why Attend? Expert-led sessions designed to enhance your RDP expertise Hands-on workshops for all skill levels Valuable networking with industry leaders and peers Experience the vibrant atmosphere and natural beauty of Vail We can’t wait to welcome you to this memorable event! If you have any questions or need help with travel arrangements, please feel free to contact your sales representative. Reserve your spot today and prepare for an unforgettable experience in Vail! |
|
Do you have any owners that are considered VIP? Check the box for VIP on the owner masters for those owners that are considered to be VIP.
|
|
Use the tape chart scroll to go right to the room number! When scrolling up and down the tape chart, use the tool tip to go right to the room number. For example, use the scroll bar and when the tool tip shows the room number you are looking for, just release your mouse, and the tape chart will bring you right to that room number.
|
|
Do you need an additional Res Type to distinguish from your other Res Types? Use Res Type S for Special Res Type to separate out reservations from other Res Types. Res Type S reservations act exactly like a Preassigned reservation where a room number is required. A unique tape chart color can also be assigned to Res Type S under Res Menu, Configuration, Tape Chart tab. In addition, if you want to replace "Special" with another description, this can be changed. Go to the System menu, Switches, enter C1TYPE-S in the Search field. Update the description in the Setting column. |
|
Do you always add Notes when making a new reservation? You have an option to default to the Notes tab! Go to Reservations, Configuration, under the New Res tab, check the box for "Default to Notes tab." |
|
Res Comments can be easily edited right under the Comments tab on a reservation. Under the Comments tab on a reservation, select Change Comments to update the comments and select Save & Close to save the changes.
|
|
RDPWin Log records all of the events in RDP. To view the the log file, go to System menu and select RDPWin Log. The log can be displayed by date range, logon name, program name, and message type. Since the log is displayed in a grid, all of the sorting, filters, and grouping functions are available. The log can also be filtered by a specific station number.
|
|
Mobile Housekeeping Benefits Real-Time Room Status Updates: Housekeepers, inspectors, and housekeeping managers can instantly update room status from any mobile device, ensuring front desk and management always have up-to-date information on which rooms are clean, dirty, or ready for inspection. Dynamic Scheduling: Any changes to cleaning schedules are immediately visible to staff on their mobile devices, reducing miscommunication and improving workflow adaptability. Optimized Staff Productivity: The system allows for customizable daily housekeeping boards, grouping rooms by zones, room numbers, or custom sequences to minimize travel time and maximize efficiency. Forecasting & Planning: Accurately forecast housekeeping requirements based on future reservations, arrivals, and departures, allowing you to schedule the right number of staff for each day and avoid over- or understaffing. Performance Tracking: Track estimated versus actual clean times, monitor housekeeper performance, and generate detailed history and performance reports to identify training needs and reward top performers Mobile Housekeeping Checklist Benefits Mobile Checklists: Housekeepers access their cleaning checklists directly on their mobile devices, ensuring every task is completed and nothing is overlooked. Checklists can be viewed, updated, and submitted in real time. Fully Customizable Checklists: Create unique checklists for each room type or even individual rooms. Add checkboxes, dropdowns, and text fields to match your property's specific standards and requirements. Guided Cleaning Process: Housekeepers see the checklist as soon as they start a clean, with clear instructions and sections-reducing errors and ensuring consistent quality across your property. Data-Driven Operations: All checklist responses are stored in the database, allowing management to review cleaning records, monitor compliance, and analyze trends for continuous improvement. Enhanced Accountability: Know exactly who cleaned or inspected each room, when, and what was completed-supporting transparency and accountability throughout your housekeeping team. Please reach out to your account manager for more details!
|
|
The Master Links for Pictures and Documents module allows documents to be stored on owner masters, guest history, group masters, travel agent masters, and room masters. This is a great way to also store pictures of your owners and repeat guests! The ability to add or delete documents under the Documents tab can be restricted by adding a fence level. Under System menu, Menu Security, enter "document" in the Search field. Assign the appropriate fence level for Add Document, Delete Documents, or Rename Documents. Interested in storing documents and pictures? Please reach out to your account manager for more details! |
|
Itinerary Comment-1 and Comment-2 display under the Itinerary tab on a reservation. Itinerary Comments can be easily changed by right-clicking on the itinerary and selecting Change Comments.
|
|
Confirmations can be mass emailed by res type for any arrival range. Under Reporter menu, Mass E-mails, Confirmations, select the By Arrival tab. Select the appropriate Res Type. If a Res Type is not selected, All Res Types will be the default.
|
|
The rate detail for HTML confirmations can be displayed with the date, description, room rate, tax, days, and total charge options using [*RateDetail*] data item. The rate detail can also be more concise using [*RateDetailN*] data item, which includes date, description, days, and total charge columns. HTML Confirmations configuration documentation can be found here: Interested in making your confirmations, guest folios, and guest surveys more attractive with your brand? Contact your sales representative regarding HTML Confirmations module |
|
Did you know that with Virtual Store, guests can purchase activities not only while they are making reservations on IRMng but also afterwards? Guests can access their reservation under "My Reservations" and view or add activities to their reservation.
Virtual Store is an excellent revenue source for selling activities and products, such as wine & cheese baskets, chocolate, or events. Have activities where there is a limited number available? Use Activity Inventory Control module to sell those activities that have a maximum capacity, such as theater tickets, dinners, and group events. Reach out to your sales representative for more details on IRMng, Virtual Store, and Activity Inventory Control. |
|
Ever receive the below error message when logging in?
Administrators can clear the lock and login to RDP successfully! Verify that Reset Availability is not currently running by another RDP user. Login as an RDP user that is a member of User Type "Administrator." This is configured under System menu, Manage Users. After selecting Logon, select Yes to the below message.
|
|
A fence level can be added to Change Rates button. If the fence level on the Change Rates button is higher than the RDP User's power level, access will be denied to change rates on a reservation. Under System, Menu Security, expand UI Security and assign the appropriate fence level to Change Rates Button.
|
|
Names and address fields can automatically uppercase letters after a space or a special character. Under System, Switches, Search for 414-82. Set to Yes to "Camel case name fields." |
|
Rate Plans can be changed to all group reservations under Change Group Res. Select a group reservation from F3 Find Res, F6 Arrivals, F7 In-House, F8 Departures, or F9 Tape Chart. Select Group, Change Group Res. Use drop-down arrow to select Rate Plan to update. In the During field, select the appropriate rate plan, Save.
|
|
Daily Charges can automatically be added to a new sharewith based on the Daily Charges on the primary sharewith. Under System, Switches, enter 414-80 in Search field. Set switch to YES to "Add Daily Charges to New Sharewiths." Changes to the Daily Charges on the sharewiths can still be made. |
|
A list of cancellation reasons can be displayed when a reservation is cancelled. This is helpful to standardize the reasons why a guest cancels their reservation and requires a selection from the list. Under System menu, Switches, enter 416-77 in the Search field. Set switch Yes to "Display cancellation list dropdown (Table CL)." Next, under System menu, Table Maintenance, enter CL in Table field, Display. Add Subrecord to add cancellation reasons. The Subrecord is alphanumeric and controls the order the cancellation reasons are displayed.
|
|
RDP welcomes you to share your suggestions for system improvements and features in our !deas Portal. Your ideas are reviewed and considered for future releases and will help us to understand your priorities. You will also have the opportunity to vote on ideas! |
|
Self Check-in can be configured to allow owners to check-in after their original arrival date. This applies to Owners, Timeshare Owners, Bonus, and Exchange reservations. In Content Management System (CMS), Configuration, Check-in, Self Check-in Settings, check the box to "Allow owners to check-in after reservations arrival date." Are you interested in Self Check-in? Please contact your sales representative for more details! |
|
Join us in Vail, Colorado for an RDP Conference! We are thrilled to invite you to one of our upcoming RDP conferences, hosted in breathtaking Vail, Colorado. These exclusive events are tailored to help you maximize the power of RDP and network with industry professionals. Whether you're new to RDP or a seasonal user, these conferences provide a unique opportunity to enhance your skills in an inspiring setting. RDP is hosting the conferences from May 19th through May 21st and September 22nd through September 24th. Registration and lodging are now open for both conferences: We look forward to seeing you in Vail! If you have any questions or need assistance with travel arrangements, please reach out to us. |
|
Daily charges can be calculated based on the number of people. Add a package component and check the appropriate People Classifications under "Multiply by Times Number of." Under Reservations, Configuration, Daily Charges tab, scroll over to the right to see a column for Times People.
|
|
Looking for a report but not sure where to look? Under the Reporter menu, Reports, enter the key word in the Search field, and select Search
|
|
Right-click on a reservation in the tape cart and select "Show Reservation in List." This option goes to the reservation list and is particularly useful for viewing group reservations with the entire group listed.
|
|
For premise-based customers, Cloudflare Online Firewall is a powerful tool designed to safeguard your online presence. Please read our knowledge base article regarding Cloudfare and consult with your IT Professional: |
|
For premise-based customers, this is your friendly reminder to back up your RDP data! We recommend daily backups. Be sure to back up your RDPNT folder on the data server and also the following folders on the IRM server: C:\inetpub\wwwroot\RDPRepository C:\inetpub\wwwroot\IRMCMS C:\ProgramData\ResortDataProcessing Once your backup is complete, test your backup. You want to verify that you are able to recover all of your files when needed. Please consult with your IT professional. |
|
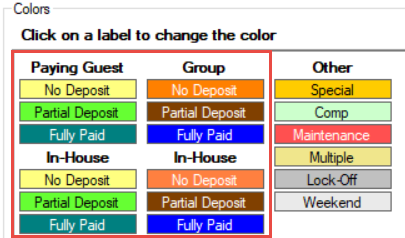
Tape chart colors can be assigned to show reservations that have No Deposit, Partial Deposit, or are Fully Paid. Under Reservations menu, Configuration, Tape Chart tab, click on each of the categories under Paying Guest to assign the colors based on payment received. Tape chart colors can also be assigned to Group reservations based on payment received. |
|
Interested in an integration with Toast POS? Please contact your sales representative for more details!
|
|
F12 Quick View is a great tool that opens a separate window to access various areas of RDP. While in the tape chart, for example, F12 Quick View can be used to Find Reservation or view today's arrivals, in-house reservations, and departures. Reports can also be run from F12 Quick View as well as viewing the current clean status of a room. F12 Quick View can be minimized and accessed quickly!
|
|
UnCheck-Out can be used to check-in a reservation that has already been checked out. UnCheck-Out can only be used if the departure date of the reservation is the same date as the RDP date. If the departure date of the reservation is prior to the RDP date or if the room is no longer available, make a new reservation and check it in. Make sure to select the guest from Guest History, to expedite making the new reservation. |
|
Would you like to sign others up for Tip of the Day? Under Start menu in RDPWin, go to Home, and select the link for SignUp under "Tip of the Day." You can also use this link to sign others up for Tip of the Day.
|
|
Transform Your Workflow with Effortless Integration Are you ready to elevate your business operations? Introducing our cutting-edge Hapi module, designed to seamlessly integrate RDP with Salesforce, the world's leading Customer Relationship Management (CRM) platform. Why Choose Our Hapi Module? Streamlined Operations: Say goodbye to the hassle of switching between platforms. Our Hapi module ensures a smooth, uninterrupted workflow by connecting RDP directly with Salesforce. Enhanced Productivity: Empower your team to work more efficiently. With real-time data synchronization, your sales and support teams can access crucial information instantly, leading to faster decision-making and improved customer service. Please reach out to your sales representative for more information! |
|
Does your property only rent villas, homes or sites instead of "units"? Do you have "members" instead of "owners"? Do you prefer to use "postal code" instead of "zip code"? Use Custom Labels to customize RDP to display the label you prefer. Under System menu, Configuration, Custom Labels, you can change the label for various fields related to rooms, reservation types, masters, dates, addresses, and other areas. After any changes, logoff and log back in order for the changes to take effect.
|
|
Are you ready to transform your front desk operations? The Dashboard Module – designed to make your staff's job easier and more efficient than ever before! Key Features: Intuitive Interface: User-friendly design that requires minimal training. All-in-One Screen: Check guests in and out, modify reservations, post charges, take payments, and handle walk-ins seamlessly. Efficiency Boost: Streamline your processes and reduce wait times for guests. Please get in touch with your sales representative for more information!
|
|
Do you need to add more room to add fields to your Crystal Report or do you want to reduce the number of fields on the report to be easier to read? If your Crystal Report is printing in "portrait" mode, you can change the Crystal Report to be in "landscape" mode. When the Crystal Report is in landscape mode, the report will be viewed horizontally, and there will be more room for additional fields. Conversely, if you would like to reduce the number of fields on a report, you can remove the unwanted fields and even change the report to be in portrait mode to be easier to read. To update the report to be portrait or landscape, open the report in Crystal Reports software. Select from the File menu, Page Setup. Select either "Portrait" or "Landscape" and make the necessary changes to the report. As a reminder, if the report is one of RDP's standard reports, remember to save the report as a different name!
|
|
Go to System -> Switches -> Search "C1PAY6". This switch allows you to set a fence level, which will make this option only available for users whose fence levels meet or exceed the requirement set on the switch. Go to System -> Manage Users to manage users' fence levels. |
|
Did you know that the tape chart can display all checked out reservations from active and non-active history? This is a great way to find all reservations that stayed in a particular room for previous dates. Make sure that the check box for "Hide Check Outs" is not checked under the Advanced Options. |
|
When is the last time you looked at the 'Checked-out Guests with Balance Due' report? You could have reservations that still owe you money! This report is included in your daily Internal Audit report, or you can run it directly by going to Reporter -> Reports -> Night Audit folder. Go run the report and see if you have funds you need to collect! To password protect checking out a reservation with a balance due, go to System -> Switches and enter C1BALREQ in the Search field. Enter a password in the Setting field. When checking out a reservation with a non-zero balance, there will be a prompt to enter that password. |
|
Other Charges can be changed to all group reservations under Change Group Res. Select a group reservation from F3 Find Res, F6 Arrivals, F7 In-House, F8 Departures, or F9 Tape Chart. Select Group under Options, Change Group Res. Use drop-down arrow to select field to update. Check the boxes for Other Charges as needed, Save.
|
|
RDP offers the ability to use the Demo directory to train new employees or you can use the Demo directory as a sandbox to play around in. Just about anything can be done in the Demo directory, and it will not affect the Live directory. It is always good practice to refresh the demo directory prior to using it. Also, if there is a new employee to train, add them first in the Live system prior to refreshing the Demo directory. Under Help menu, select Refresh Demo Directory. Select Copy. When all files are copied, then the Demo directory is now refreshed! To easily change to the Demo directory, use the drop down arrow key in the Resort field at bottom of screen and select the appropriate Demo directory.
|
|
Use Find Res field to select a reservation by guest name or reservation number wherever you are in RDPWin! Find Res field is located in bottom right-hand corner on all screens.
|
|
Want to format several text fields in Crystal Reports all at the same time? Use Format Painter button to format one or multiple text fields! To use Format Painter, highlight the field that is formatted correctly. Select the Format Painter button, and then click on the field that you would like to format with the same properties. To format multiple text fields, highlight the field that is formatted correctly. Double click on the Format Painter button, and then select each field that needs to be formatted the same way. The Format Painter button can be used for text fields and database fields in Crystal Reports, and this can save you a lot of time!
|
|
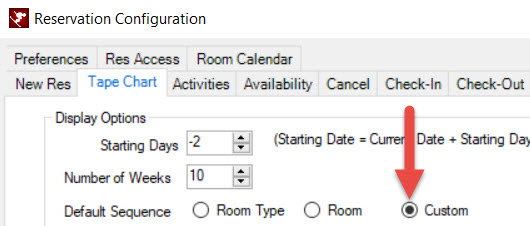
Would you like to display your tape chart in a different order other than room number or room type? A unique sequence number can be defined for each room number to be displayed in the tape chart. Under Reservations menu, Configuration, Tape Chart tab, select the radio button for "Custom" for Default Sequence. Next, under Masters menu, Rooms, Analysis, update each room number with the Custom Display Sequence. It is good practice to use 3 digits and to use increments of 10 in case you need to add a custom sequence in between in the future.
|
|
Protecting against ransomware on a Windows server requires a robust data backup strategy. Here are some key strategies to consider when your RDP Data server is onsite: Regular Backups: Implement a regular automated backup schedule to ensure critical data is backed up frequently. RDP recommends at least daily backups of the RDP data server and weekly backups of the IRM server. The RDP Database is stored in the ..\RDPNT share directory. The files for the IRM are stored in the C:\Inetpub directory. RDP recommends 3 rd party backup software such as Acronis, Backup Exec or the built in Windows Server Backup utility. Offline or Offsite Backups: Store backups offline or in an offsite location to prevent them from being compromised in case of a ransomware attack. Offline backups, such as tape drives or external hard drives, are disconnected from the network when not in use. Offsite backups can be stored in a separate physical location or on a cloud storage service. RDP recommends at least one backup per week is stored offsite. Incremental and Versioned Backups: Use incremental backups to only back up changed or new files since the last backup. Additionally, employ versioning to retain multiple copies of backed-up files over time. This way, if ransomware infects the server, you can restore from a clean backup that predates the attack. Immutable Backups: Consider using technologies that make backups immutable, preventing them from being modified or deleted by ransomware. This can be achieved through features like write-once-read-many (WORM) storage or backup solutions that include immutable storage capabilities. Secure Backup Storage: Ensure that the backup storage infrastructure is adequately protected. Limit access to backup resources, apply strong access controls, and encrypt backups both during transit and at rest. Regularly update backup software and hardware with the latest security patches. Test and Verify Backups: Regularly test the backup process to ensure backups are completed successfully and can be restored when needed. Verify the integrity and completeness of backup data by performing test restores periodically. This step is crucial in validating the effectiveness of your backup strategy. RDP recommends testing a backup restore of the RDP database monthly. Please submit a support ticket and we will help you configure a restore directory to test your RDP data backups. Security Awareness Training: Educate employees about ransomware threats, how they spread, and best practices for safe computing. Teach users to recognize suspicious emails, avoid clicking on unknown links or opening attachments from untrusted sources, and to report any potential security incidents promptly. Network Segmentation: Implement network segmentation to isolate critical servers from other network resources. This can help contain the spread of ransomware by limiting its impact on other systems. Endpoint Security: Deploy robust endpoint security solutions, including antivirus/anti-malware software, firewalls, and intrusion detection/prevention systems. Keep these security tools up to date and regularly patch them to address any vulnerabilities. Remember that while backups are crucial, they should be just one part of a comprehensive defense-in-depth approach to ransomware protection. Additional measures such as strong security policies, network monitoring, user awareness, and incident response planning are also essential to protect your Windows server and data from ransomware threats. Please feel free to reach out to RDP support for more information on properly backing up your RDPWin database. Here are links to white papers on effectively backing up a RDPWin/Actian Database: Selecting A Backup Method For Zen v15 Database Files |
|
If you want to display current work orders only in Work Orders Monitor, uncheck the box to "Include Future Work Orders. This is a great feature when using Enhanced Work Orders module to create Recurring Work Orders for preventative maintenance. For more information regarding Enhanced Work Orders, please contact your sales representative.
|
|
This is a helpful tip if you make Inventory reservations or use group blocks. Under Reservations, Configuration, Availability tab, there is a checkbox for "Check Room Type Availability." When this setting is checked, a new column under Available Rooms is added to the right of the Room Type column named "Inv." If there is no allocation remaining for the room type, a red "I" will be displayed in the Inv column. Security is defined by the power level assigned to the user under System Menu, Manage Users. A security scale should be developed to group similar types of users in a security group.
|
|
Reporter Security can be used to hide report folders and also reports within a folder. This can be helpful to only display report folders and reports needed for a particular department or users. Under Reporter menu, Security, set the fence levels on a report folder to hide the folder. If the fence level is higher than the user's power level, then the folder will not be displayed. Expand a reports folder and assign fence levels to reports within a folder. This is a great way to hide duplicate or unused reports or simply to put security on the report. Security is defined by the power level assigned to the user under System Menu, Manage Users. A security scale should be developed to group similar types of users in a security group.
|
|
Would you like to send a text message to all of your in-house guests about a special in the restaurant? Would you like to mass text all of the departures to advise them of a storm warning? Mobile Communications module allows mass texting to all arrivals, in-house guests, and departures. If you combine Mobile Communications with Mobile Housekeeping, you can also have a text message automatically sent to guests when their room is clean! |
|
Would you like to offer rooms on IRMng for today but also set a cutoff time to stop selling? To avoid issues with housekeeping preparing rooms for arrivals, it is helpful to cutoff available rooms at a certain time for same-day reservations. Under IRM menu, IRMng Configuration, Customization tab, select "Cutoff same day bookings" and enter the desired time. To cutoff only the Dirty rooms for same day reservations, check the box for "Cutoff dirty rooms only." //
|
|
Under the Help menu select Menu Shortcuts. Expand Module R0 to see all of the Reservation shortcuts. Alt+F12 is the shortcut for Availability and Ctrl+Shift+A is the shortcut to Res Analysis. Shortcuts are also available for Module R3 for Condo Owner Accounting, Module R4 for Guest History, Module RN for Rates & Packages, Module RV for GDS, Module SA for Central Availability, and Module W0 for the Dashboard module, and Module W6 for Activity Inventory Control.
|
|
Are you familiar with Res Type and Res Status? Knowing the Res Type and Res Status can be very helpful in identifying what kind of reservation it is and the status of the reservation.
Some examples of Res Types are P6, I1, O8, X1, C5. Res Types are found next to the Res # when looking at a list of reservations.
The Res Type will always be represented by a letter. Since RDP offers many different types of systems, some of these Res Types may not apply to you. Here is a list of all the possible Res Types: P = Paying Guest / Room # Assigned I = Paying Guest / No Room # Assigned S = Special Reservation / Room # Assigned C = Comp Reservation X = Maintenance Reservation O = Owner Reservation (wholly owned) G = Guest of Reservation T = Timeshare Reservation / Room # Assigned Q = Timeshare Reservation / No Room # Assigned B = Timeshare Bonus Reservation E = Timeshare Exchange Reservation The Res Status will always be represented by a number. Here is a list of all the possible Res Statuses: 1 = Future Reservation / No Deposit 2 = Future Reservation / With Deposit 4 = Future Reservation / With Changes 5 = Checked-in Reservation 6 = Checked-in Reservation / With Changes 7 = Checked-out Reservation / With Security Deposit 8 = Checked-out Reservation 9 = Canceled Reservation
|
|
The General Ledger Interface will export daily or monthly totals for each general ledger in the format for several accounting programs, such as M3, Quickbooks, Sage, and NetSuite. From the accounting program, just import the totals! This will save you time and avoid any erroneous manual entries to your accounting software. |
|
The Tape Chart can automatically display with a date that is a couple of days prior to today. It is beneficial to display the tape chart with a starting date 2 or 3 days prior to today to show in-house reservations that may be checking out today. In the example below, today's date is March 1st. The tape chart starting days is set to 2 days prior to today's date. Under Reservations menu, Configuration, Tape Chart tab, use the drop down arrow key to change the Starting Days to -2 or -3.
|
|
Would you like to be prompted to confirm to exit or logoff RDPWin? Under System menu, Configuration, System, check the boxes for "Confirm RDPWin Exit" and "Confirm RDPWin Logoff."
|
|
Have you realized that if you right-click on any reservation while on the Arrivals, In-House, or Departures list, you have an extended list of actions to choose from? You can quickly print the reservation's folio, registration card, or confirmation, view the Guest History or CRM info, or even send them a text!
|
|
A popular credit card scam in hospitality is for someone to book a reservation, put a deposit on a stolen credit card, cancel, then request a refund on a different card. The challenge is that this can often be a legitimate transaction in our industry. It's important to train staff to be on the lookout for this and have them ask questions when a payment is requested to be refunded to a different credit card. Consider turning on a switch to prompt for a password when refunding on a new credit card. To implement, go to the System menu, Switches, and in the Search field, enter C1REFCC. In the Setting field, enter the password to be prompted when adding a new credit card during a refund.
|
|
Would you like to format a reservation comment field to be a date or a Yes/No radio button? Comment fields can be customized to be a date, time, currency, phone number, Yes/No options, Yes/No dropdown, and a checkbox. Comment fields can be formatted on reservations, guest history, group masters, owners, room masters, travel agents, activity vendors, work orders, work order vendors, work order assets, CRM, and timeshare/fractional weeks. The descriptions of comment fields are changed under System menu, Comment fields, and selecting the appropriate Type of Master, such as Reservation/Guest for Reservation and Guest comment fields. Formats are added by adding a sub-record to the lookup table with a “~”. The second field of the sub-record is the format type: 1 Text (this is the default and does not have to be added to the table) 2 Integer 3 Double 4 Currency 5 Yes/No dropdown 6 Yes/No radio buttons 7 Date 8 Time 9 Date/Time 10 Phone Number 11 Social Security Number (should not be used or stored in RDP database) 12 Checkbox Below are the files, comment fields, and their corresponding tables: Reservations & Guest History Comment 1: Table EF Comment 2: Table EG Comment 3: Table EH Comment4: Table E1 Comment 5: Table E2 Comment 6: Table E3 Comment 7: Table E4 Comment 8: Table E5 Comment 9: Table E6 Comment 10: Table E7 Comment 11: Table E8 Comment 12: Table E9 Comment 13: Table EA Comment 14: Table EB Comment 15: Table EC Comment 16: Table ED Comment 17: Table EF Comment 18: Table Y0 Comment 19: Table Y1 Comment 20: Table Y2 Comment 21: Table Y3 Comment 22: Table Y4 Comment 23: Table Y5 Comment 24: Table Y6 Comment 25: Table Y7 Groups Comment 1: Table JA Comment 2: Table JB Comment 3: Table JC Comment 4: Table JD Comment 5: Table JE Comment 6: Table JF Comment 7: Table JG Comment 8: Table JH Comment 9: Table JI Comment 10: Table JJ Comment 11: Table JK Comment 12: Table JL Comment 13: Table J0 Comment 14: Table J1 Comment 15: Table J2 Comment 16: Table J3 Comment 17: Table J4 Comment 18: Table J5 Owners Comment 1: Table IA Comment 2: Table IB Comment 3: Table IC Comment 4: Table ID Comment 5: Table IE Comment 6: Table IF Comment 7: Table IG Comment 8: Table IH Comment 9: Table II Comment 10: Table IJ Comment 11: Table IK Comment 12: Table IL Comment 13: Table I0 Comment 14: Table I1 Comment 15: Table I2 Comment 16: Table I3 Comment 17: Table I4 Comment 18: Table I5 Rooms Comment 1: Table IM Comment 2: Table IN Comment 3: Table IO Comment 4: Table IP Comment 5: Table IQ Comment 6: Table IR Comment 7: Table IS Comment 8: Table IT Comment 9: Table IU Comment 10: Table IV Comment 11: Table IW Comment 12: Table IX Comment 13: Table YA Comment 14: Table YB Comment 15: Table YC Comment 16: Table YD Comment 17: Table YE Comment 18: Table YF Travel Agents Comment 1: Table KA Comment 2: Table KB Comment 3: Table KC Comment 4: Table KD Comment 5: Table KE Comment 6: Table KF Comment 7: Table KG Comment 8: Table KH Comment 9: Table KI Comment 10: Table KJ Comment 11: Table KK Comment 12: Table KL Comment 13: Table K0 Comment 14: Table K1 Comment 15: Table K2 Comment 16: Table K3 Comment 17: Table K4 Comment 18: Table K5 Activity Vendors Comment 1: Table LA Comment 2: Table LB Comment 3: Table LC Comment 4: Table LD Comment 5: Table LE Comment 6: Table LF Comment 7: Table LG Comment 8: Table LH Comment 9: Table LI Comment 10: Table LJ Comment 11: Table LK Comment 12: Table LL Comment 13: Table LM Comment 14: Table LN Comment 15: Table LO Comment 16: Table LP Comment 17: Table LQ Work Order Vendors Comment 1: Table NJ Comment 2: Table NK Comment 3: Table NL Comment 4: Table NM Comment 5: Table NN Comment 6: Table NO Comment 7: Table NP Comment 8: Table NQ Comment 9: Table NR Comment 10: Table NS Comment 11: Table NT Comment 12: Table NU Comment 13: Table NV Comment 14: Table NW Comment 15: Table NX Comment 16: Table NY Comment 17: Table NZ Work Order Assets Comment 1: Table N2 Comment 2: Table N3 Comment 3: Table N4 Comment 4: Table N5 Comment 5: Table N6 Comment 6: Table N7 Comment 7: Table N8 Comment 8: Table N9 Comment 9: Table NA Comment 10: Table NB Comment 11: Table NC Comment 12: Table ND Comment 13: Table NE Comment 14: Table NF Comment 15: Table NG Comment 16: Table NH Comment 17: Table NI CRM Comment 1: Table T2 Comment 2: Table T3 Comment 3: Table T4 Comment 4: Table T5 Comment 5: Table T6 Comment 6: Table T7 Comment 7: Table T8 Comment 8: Table T9 Comment 9: Table TA Comment 10: Table TB Comment 11: Table TC Comment 12: Table TD Comment 13: Table TE Comment 14: Table TF Comment 15: Table TG Comment 16: Table TH Comment 17: Table TI Timeshare/Fractional Weeks Comment 1: Table EV Comment 2: Table EW Comment 3: Table EX Comment 4: Table EY Comment 5: Table EZ
For example, here is how to change Comment-5 on reservations to show "Early Check-in" and format it as a Yes/No Radio button: System menu, Comment Labels, select Reservation/Guest for Type of Master. Update Comment-5 with a description of "Early Check-in", Save.
System menu, Table Maintenance, Add Table, enter appropriate table from list above. In this case, Comment-5 for Reservations/Guest History is table E2, enter description "Early Check-in", Save & Close, Display.
Add Subrecord, enter ~ in the Subrecord field, enter 6 in Description, Save & Close.
|
|
Use Find Res button in tape chart to display a reservation. When using Find Res, enter the guest name or reservation number, and the reservation will be displayed in the tape chart. Remember that only reservations with room numbers appear in the tape chart.
|
|
The VIP field can be changed to display choices, and each of those choices can be assigned a unique tape chart color. To implement this feature, go to System, Switches, and enter 427-04 in the Search field. Set this switch to Yes for "Use list for VIP field on Res and Guest Screens (Table VI). Next, go to System, Table Maintenance, and enter table VI, Display. Use Add Code and enter each VIP code and assign a unique tape chart color. Be sure to include code "N" for Non-VIP.
|
|
Do you have any owners that are considered VIP? Check the box for VIP on the owner masters for those owners that are considered to be VIP.
|
|
Use the tape chart scroll to go right to the room number! When scrolling up and down the tape chart, use the tool tip to go right to the room number. For example, use the scroll bar and when the tool tip shows the room number you are looking for, just release your mouse, and the tape chart will bring you right to that room number. |
|
Do you need an additional Res Type to distinguish from your other Res Types? Use Res Type S for Special Res Type to separate out reservations from other Res Types. Res Type S reservations act exactly like a Preassigned reservation where a room number is required. A unique tape chart color can also be assigned to Res Type S under Res Menu, Configuration, Tape Chart tab. In addition, if you want to replace "Special" with another description, this can be changed. Go to the System menu, Switches, enter C1TYPE-S in the Search field. Update the description in the Setting column. |
|
Do you always add Notes when making a new reservation? You have an option to default to the Notes tab! Go to Reservations, Configuration, under the New Res tab, check the box for "Default to Notes tab." |
|
Res Comments can be easily edited right under the Comments tab on a reservation. Under the Comments tab on a reservation, select Change Comments to update the comments and select Save & Close to save the changes.
|
|
RDP would like to extend our warmest wishes to you this Valentine's Day. We deeply value the trust and partnership we share with you, and we are grateful for your continued support. May your day be filled with love, joy, and special moments. We look forward to continuing our successful collaboration and achieving great things together. Happy Valentine's Day! |
|
RDPWin Log records all of the events in RDP. To view the the log file, go to System menu and select RDPWin Log. The log can be displayed by date range, logon name, program name, and message type. Since the log is displayed in a grid, all of the sorting, filters, and grouping functions are available. The log can also be filtered by a specific station number.
|
|
The Master Links for Pictures and Documents module allows documents to be stored on owner masters, guest history, group masters, travel agent masters, and room masters. This is a great way to also store pictures of your owners and repeat guests! The ability to add or delete documents under the Documents tab can be restricted by adding a fence level. Under System menu, Menu Security, enter "document" in the Search field. Assign the appropriate fence level for Add Document, Delete Documents, or Rename Documents. Interested in storing documents and pictures? Please reach out to your account manager for more details! |
|
Itinerary Comment-1 and Comment-2 display under the Itinerary tab on a reservation. Itinerary Comments can be easily changed by right-clicking on the itinerary and selecting Change Comments.
|
|
Confirmations can be mass emailed by res type for any arrival range. Under Reporter menu, Mass E-mails, Confirmations, select the By Arrival tab. Select the appropriate Res Type. If a Res Type is not selected, All Res Types will be the default.
|
|
The rate detail for HTML confirmations can be displayed with the date, description, room rate, tax, days, and total charge options using [*RateDetail*] data item. The rate detail can also be more concise using [*RateDetailN*] data item, which includes date, description, days, and total charge columns. HTML Confirmations configuration documentation can be found here: Interested in making your confirmations, guest folios, and guest surveys more attractive with your brand? Contact your sales representative regarding HTML Confirmations module |
|
Join us in Vail, Colorado for an RDP Conference! We are thrilled to invite you to one of our upcoming RDP conferences, hosted in breathtaking Vail, Colorado. These exclusive events are tailored to help you maximize the power of RDP and network with industry professionals. Whether you're new to RDP or a seasonal user, these conferences provide a unique opportunity to enhance your skills in an inspiring setting. RDP is hosting the conferences from May 19th through May 21st and September 22nd through September 24th. Registration and lodging are now open for both conferences: We look forward to seeing you in Vail! If you have any questions or need assistance with travel arrangements, please reach out to us. |
|
Did you know that with Virtual Store, guests can purchase activities not only while they are making reservations on IRMng but also afterwards? Guests can access their reservation under "My Reservations" and view or add activities to their reservation.
Virtual Store is an excellent revenue source for selling activities and products, such as wine & cheese baskets, chocolate, or events. Have activities where there is a limited number available? Use Activity Inventory Control module to sell those activities that have a maximum capacity, such as theater tickets, dinners, and group events. Reach out to your sales representative for more details on IRMng, Virtual Store, and Activity Inventory Control. |
|
Administrators can clear the lock and login to RDP successfully! Verify that Reset Availability is not currently running by another RDP user. Login as an RDP user that is a member of User Type "Administrator." This is configured under System menu, Manage Users. After selecting Logon, select Yes to the below message.
|
|
A fence level can be added to Change Rates button. If the fence level on the Change Rates button is higher than the RDP User's power level, access will be denied to change rates on a reservation. Under System, Menu Security, expand UI Security and assign the appropriate fence level to Change Rates Button.
|
|
Names and address fields can automatically uppercase letters after a space or a special character. Under System, Switches, Search for 414-82. Set to Yes to "Camel case name fields." |
|
Rate Plans can be changed to all group reservations under Change Group Res. Select a group reservation from F3 Find Res, F6 Arrivals, F7 In-House, F8 Departures, or F9 Tape Chart. Select Group, Change Group Res. Use drop-down arrow to select Rate Plan to update. In the During field, select the appropriate rate plan, Save.
|
|
Daily Charges can automatically be added to a new sharewith based on the Daily Charges on the primary sharewith. Under System, Switches, enter 414-80 in Search field. Set switch to YES to "Add Daily Charges to New Sharewiths." Changes to the Daily Charges on the sharewiths can still be made. |
|
A list of cancellation reasons can be displayed when a reservation is cancelled. This is helpful to standardize the reasons why a guest cancels their reservation and requires a selection from the list. Under System menu, Switches, enter 416-77 in the Search field. Set switch Yes to "Display cancellation list dropdown (Table CL)." Next, under System menu, Table Maintenance, enter CL in Table field, Display. Add Subrecord to add cancellation reasons. The Subrecord is alphanumeric and controls the order the cancellation reasons are displayed.
|
|
RDP welcomes you to share your suggestions for system improvements and features in our !deas Portal. Your ideas are reviewed and considered for future releases and will help us to understand your priorities. You will also have the opportunity to vote on ideas! |
|
Our office will be closed on Monday, January 20th in observance of Martin Luther King, Jr. Day Our office will resume normal business hours on Tuesday, January 21st. Emergency Support is available if needed |
|
Self Check-in can be configured to allow owners to check-in after their original arrival date. This applies to Owners, Timeshare Owners, Bonus, and Exchange reservations. In Content Management System (CMS), Configuration, Check-in, Self Check-in Settings, check the box to "Allow owners to check-in after reservations arrival date." Are you interested in Self Check-in? Please contact your sales representative for more details! |
|
Join us in Vail, Colorado for an RDP Conference! We are thrilled to invite you to one of our upcoming RDP conferences, hosted in breathtaking Vail, Colorado. These exclusive events are tailored to help you maximize the power of RDP and network with industry professionals. Whether you're new to RDP or a seasonal user, these conferences provide a unique opportunity to enhance your skills in an inspiring setting. RDP is hosting the conferences from May 19th through May 21st and September 22nd through September 24th. Registration and lodging are now open for both conferences: We look forward to seeing you in Vail! |
|
Daily charges can be calculated based on the number of people. Add a package component and check the appropriate People Classifications under "Multiply by Times Number of." Under Reservations, Configuration, Daily Charges tab, scroll over to the right to see a column for Times People.
|
|
Housekeeping Notes tab is accessible from the Housekeeping Schedule, Room Status, and Rooms Analysis. This is a great way to track notes for housekeeping services, such as a turndown or refusing a housekeeping service. Under Housekeeping menu, Schedule for Today or Future, expand a board, and select either Res or Next Res and Notes tab. Select the Housekeeping Notes tab to Add Note. Access to Housekeeping Notes tab is also available under Housekeeping, Room Status and also from Masters, Rooms, Analysis. This feature is available in RDPWin5.4.001.124
|
|
Looking for a report but not sure where to look? Under the Reporter menu, Reports, enter the key word in the Search field, and select Search
|
|
Right-click on a reservation in the tape cart and select "Show Reservation in List." This option goes to the reservation list and is particularly useful for viewing group reservations with the entire group listed.
|
|
For premise-based customers, Cloudflare Online Firewall is a powerful tool designed to safeguard your online presence. Please read our knowledge base article regarding Cloudfare and consult with your IT Professional: https://support.resortdata.com/support/Content/GettingStarted/Online-Firewall.htm |
|
For premise-based customers, this is your friendly reminder to back up your RDP data! We recommend daily backups. Be sure to back up your RDPNT folder on the data server and also the following folders on the IRM server: C:\inetpub\wwwroot\RDPRepository C:\inetpub\wwwroot\IRMCMS C:\ProgramData\ResortDataProcessing Once your backup is complete, test your backup. You want to verify that you are able to recover all of your files when needed. Please consult with your IT professional. |
|
Tape chart colors can be assigned to show reservations that have No Deposit, Partial Deposit, or are Fully Paid. Under Reservations menu, Configuration, Tape Chart tab, click on each of the categories under Paying Guest to assign the colors based on payment received. Tape chart colors can also be assigned to Group reservations based on payment received.
|
|
Are you interested in an interface with Toast point of sale? Please contact your sales representative for more details!
|
|
F12 Quick View is a great tool that opens a separate window to access various areas of RDP. While in the tape chart, for example, F12 Quick View can be used to Find Reservation or view today's arrivals, in-house reservations, and departures. Reports can also be run from F12 Quick View as well as viewing the current clean status of a room. F12 Quick View can be minimized and accessed quickly!
|
|
Thank you for being a valued partner in 2024. We appreciate your collaboration and look forward to an even stronger 2025! Our office will be closed on Wednesday, January 1st. Our office will be opened on Thursday, January 2nd. Emergency Support is available if needed |
|
UnCheck-Out can be used to check-in a reservation that has already been checked out. UnCheck-Out can only be used if the departure date of the reservation is the same date as the RDP date. If the departure date of the reservation is prior to the RDP date or if the room is no longer available, make a new reservation and check it in. Make sure to select the guest from Guest History, to expedite making the new reservation. |
|
Would you like to sign others up for Tip of the Day? Under Start menu in RDPWin, go to Home, and select the link for SignUp under "Tip of the Day." You can also use this link to sign others up for Tip of the Day. |
|
Does your property only rent villas, homes or sites instead of "units"? Do you have "members" instead of "owners"? Do you prefer to use "postal code" instead of "zip code"? Use Custom Labels to customize RDP to display the label you prefer. Under System menu, Configuration, Custom Labels, you can change the label for various fields related to rooms, reservation types, masters, dates, addresses, and other areas. After any changes, logoff and log back in order for the changes to take effect. |
|
Happy Holidays from our RDP family to yours! May your holidays be filled with peace, happiness, and memorable moments. Our office will be closed on Tuesday, December 24th and Wednesday, December 25th, Our office will be opened on Thursday, December 26th. Emergency Support is available if needed |
|
Use Vonage or Twilio to send text messages to guests directly from RDPWin! When using either of these services, the mobile carrier is not required to send a text message. Mass Texts can also be sent to all Arrivals, In-House reservations, and all Departures. Each text is stored on each reservation and owner under the Texts tab. Please contact your sales representative for more information about Mobile Communications! |
|
The reservations listed for owners can be configured to default to reservations with a res status of your choice. For example, if you prefer to list reservations that only display future reservations for an owner, this default can now be configured. Under Owners menu, Configuration, General tab, select the option from the list under Default Res List Res Status.
|
|
For Timeshare and Fractional customers, the Start Date is added to the Tape Chart based on the Week. Search Tape Chart by Week # or Start Date, Display. RDPWin5.4.1.106 or higher is required for this feature.
|
|
Want your No-Shows to stand out in the tape chart? Under the Reservations menu, Configuration, Tape Chart tab, select "No-Show" and assign a unique color. RDPWin5.4.1.106 or higher is required for this feature.
|
|
Res Comments can be easily edited right under the Comments tab on a reservation. Under the Comments tab on a reservation, select Change Comments to update the comments and select Save & Close to save the changes.
|
|
Do you ever need to know how much room revenue was taxable or non-taxable for a specific date range? Under Accounting reports folder, use reports Room Charge By Tax Code-Detail to get room revenue for each reservation for each day for each tax code or use Room Charge By Tax Code-Summary to get the summary of room revenue for each date for each tax code |
|
If you want to display all rooms immediately when the tape chart is launched, there is a switch for that! When this switch is turned on, you won't have to select the button to "Display Rooms" when the tape chart is first launched. Under Reservations, Configuration, Tape Chart tab, check the box for "Display all rooms when tape chart is first shown." This setting is configured per user.
|
|
Do you have guests that you prefer to not to make a reservation for? You can flag a guest with Guest Type "Do Not Rent" to alert you when they try to make a reservation. Under System menu, Table Maintenance, enter "CA" in the Table field, Display. If Guest Type "DNR" doesn't already exist, add this with description "Do Not Rent."
|
|
12/10/2024 - Note Templates Note Templates can be very helpful on reservations to keep track of important information about the reservation or the guest. For example, use a note template that will load notes related to different departments, such as Reservations, Front Desk, Concierge, Bell Staff, Housekeeping or Maintenance. This can help you organize your notes. Note Templates can also be configured based on the reservation type, so a Note Template can be configured for a Pre-assigned or Inventory reservation and a different Note Template for an Owner or Guest of Owner reservation. Note Templates are available on Reservations, Owners, Group Masters, Room Masters, Travel Agents, Activity Vendor Masters, Work Order Vendor Masters, Work Order Assets, and itineraries. Click here on How to Configure Note Templates |
|
Tape chart colors can be assigned to IRM reservations that have No Deposit, Partial Deposit, or Fully Paid deposit. Under Reservations, Configuration, Tape Chart tab, check the box for "Use color for IRM Reservations." Select the desired tape chart colors for IRM Reservations for No Deposit, Partial Deposit, and Fully Paid deposit. RDPWin5.4.001.48 or higher is required for this feature. |
|
Would you like payments taken at check-in to be considered a Guest Payment instead of an Advanced Deposit? Under System Menu, Switches, enter 414-43 in Search field. Change Setting to "Yes" for "Use B2 ledger when taking a payment at check-in." |
|
Change Group Reservations option allows changes made to all of the reservations within the group without having to change each group reservation one at a time. Use F3 to select the group leader reservation then select Change Options, Group Reservations. Use drop-down in "Select the field to update." Choose any option from one of the following: Allow Move, Comments, Daily Charges, Other Charges, Dates, Rate Plan, Housekeeping, Market Code, Source of Business, Tasks, Tax Code, Pay Code, and Confirm To. |
|
Enhanced Work Orders module can be used to schedule preventative maintenance and also automatically schedule Tasks for reservations. Recurring work orders can be scheduled in advance on a daily, weekly, monthly, or annual basis. Use this to schedule work orders to change the A/C filters in all of the rooms every other month. In addition, Tasks can be scheduled by Reservation Type based on Arrival Date or Departure Date. Use this to schedule Tasks to turn on the heated driveway 2 days before the owner arrives. For more information regarding Enhanced Work Orders, please contact your sales representative. |
|
Create a booking window when a rate plan can be sold. Enter the Booking Start date and the Booking End date on the rate plan to determine when the rate plan can be purchased. In the example below, a Fall package is available to be sold in advance from 7/1/24 to 7/31/24 as indicated in the Booking Start and Booking End dates. The Fall package can only be consumed based on the arrival date range from 9/1/24 to 9/30/24 as indicated in the Start Date and End Dates.
|
|
Want to make the reservation tape chart easier to read? Under Reservations, Configuration, Tape Chart tab, increase the Day Width to the desired setting. The standard setting is 20 and the max is 80.
|
|
The RDP family would like to wish you and your families a very Happy Thanksgiving! A friendly reminder that our offices will be closed on Thursday, November 28th and Friday, November 29th Our office will reopen on Monday, December 2nd. Emergency Support is available if needed.
|
|
Rooms that are marked as Waiting appear in both the Housekeeping Summary and Housekeeping Schedule. Rooms that are marked as Waiting also appear in Mobile Housekeeping and pushed to the top of each housekeeper's schedule for prioritization. First, the switch under Reservations menu, Configuration, Check-in tab needs to be checked for "Turn on Guest Waiting feature." Secondly, use the checkbox on reservations for "Waiting" for those guests who are waiting for their room to be cleaned. The Waiting checkbox is available under F6 Arrivals and F7 In-House. Under the Housekeeping menu, Schedule, Today, there is a Waiting column in the Summary to indicate how many rooms are marked as Waiting. In addition, the Housekeeping Schedule will display how many rooms are marked as "Waiting" for each Board. Expand each Board to view the rooms that are Waiting. There is also a check box for "Waiting Only" that can display all rooms marked as Waiting when a Board is expanded.
|
|
The Sigma symbol ∑ is used to summarize rows with numeric values in all of the Analysis grids. ∑ is available under Res Analysis, Groups Analysis, Travel Agents Analysis, Guest History Analysis, Owner Analysis, and Rooms Analysis. When ∑ is selected in a row, there are options to get an average, count, maximum, minimum, or to sum the row. The value will be located at the bottom of the row. You may need to expand the row to see the entire value.
|
|
Itinerary Comment-1 and Comment-2 display under the Itinerary tab on a reservation. Itinerary Comments can be easily changed by right-clicking on the itinerary and selecting Change Comments.
|
|
The rate detail for HTML confirmations can be displayed with the date, description, room rate, tax, days, and total charge options using [*RateDetail*] data item. The rate detail can also be more concise using [*RateDetailN*] data item, which includes date, description, days, and total charge columns. HTML Confirmations configuration documentation can be found here: Interested in making your confirmations, guest folios, and guest surveys more attractive with your brand? Contact your sales representative regarding HTML Confirmations module. |
|
Did you know that with Virtual Store, guests can purchase activities not only while they are making reservations on IRMng but also afterward? Guests can access their reservation under "My Reservations" and view or add activities to their reservation. Virtual Store is an excellent revenue source for selling activities and products, such as wine & cheese baskets, chocolate, or events. Have activities where there is a limited number available? Use the Activity Inventory Control module to sell those activities that have a maximum capacity, such as theater tickets, dinners, and group events. Reach out to your sales representative for more details on IRMng, Virtual Store, and Activity Inventory Control. |
|
Rate Plans can be changed to all group reservations under Change Group Res. Select a group reservation from F3 Find Res, F6 Arrivals, F7 In-House, F8 Departures, or F9 Tape Chart. Select Group under Options, Change Group Res. Use drop-down arrow and select Rate Plan. In the During field, select the appropriate rate plan, Save.
|
|
A fence level can be added to Change Rates button. If the fence level on the Change Rates button is higher than the RDP User's power level, access will be denied to change rates on a reservation. Under System, Menu Security, expand UI Security. In the Search field, enter "rates" and assign the appropriate fence level to Change Rates Button.
|
|
Names and address fields can automatically uppercase letters after a space or a special character. Under System, Switches, Search for 414-82. Set to Yes for "Camel case name fields." |
|
Rate Plans can be changed to all group reservations under Change Group Res. Select a group reservation from F3 Find Res, F6 Arrivals, F7 In-House, F8 Departures, or F9 Tape Chart. Select Group under Options, Change Group Res. Use drop-down arrow to select field to update. In the During field, select the appropriate rate plan, Save.
|
|
A list of cancellation reasons can be displayed when a reservation is canceled. This is helpful to standardize the reasons why a guest cancels their reservation and requires a selection from the list. Under System menu, Switches, enter 416-77 in the Search field. Set switch Yes to "Display cancellation list dropdown (Table CL)." Next, under System menu, Table Maintenance, enter CL in Table field, Display. Add Subrecord to add cancellation reasons. The Subrecord is alphanumeric and controls the order the cancellation reasons are displayed.
|
|
Daily charges can be calculated based on the number of people. Add a package component and check the appropriate People Classifications under "Multiply by Times Number of." Under Reservations, Configuration, Daily Charges tab, scroll over to the right to see a column for Times People.
|
|
Looking for a report but not sure where to look? Under the Reporter menu, Reports, enter the key word in the Search field, and select Search.
|
|
Right-click on a reservation in the tape cart and select "Show Reservation in List." This option goes to the reservation list and is particularly useful for viewing group reservations with the entire group listed.
|
|
Tape chart colors can be assigned to show reservations that have No Deposit, Partial Deposit, or are Fully Paid. Under Reservations menu, Configuration, Tape Chart tab, click on each of the categories under Paying Guest to assign the colors based on payment received. Tape chart colors can also be assigned to Group reservations based on payment received.
|
|
UnCheck-Out can be used to check-in a reservation that has already been checked out. UnCheck-Out can only be used if the departure date of the reservation is the same date as the RDP date. If the departure date of the reservation is prior to the RDP date or if the room is no longer available, make a new reservation and check it in. Make sure to select the guest from Guest History, to expedite making the new reservation. |
|
Would you like to sign others up for Tip of the Day? Under Start menu in RDPWin, go to Home, and select the link for SignUp under "Tip of the Day." You can also use this link to sign others up for Tip of the Day. |
|
Does your property only rent villas, homes or sites instead of "units"? Do you have "members" instead of "owners"? Do you prefer to use "postal code" instead of "zip code"? Use Custom Labels to customize RDP to display the label you prefer. Under System menu, Configuration, Custom Labels, you can change the label for various fields related to rooms, reservation types, masters, dates, addresses, and other areas. After any changes, logoff and log back in order for the changes to take effect.
|
|
Do you need to add more room to add fields to your Crystal Report or do you want to reduce the number of fields on the report to be easier to read? If your Crystal Report is printing in "portrait" mode, you can change the Crystal Report to be in "landscape" mode. When the Crystal Report is in landscape mode, the report will be viewed horizontally, and there will be more room for additional fields. Conversely, if you would like to reduce the number of fields on a report, you can remove the unwanted fields and even change the report to be in portrait mode to be easier to read. To update the report to be portrait or landscape, open the report in Crystal Reports software. Select from the File menu, Page Setup. Select either "Portrait" or "Landscape" and make the necessary changes to the report. As a reminder, if the report is one of RDP's standard reports, remember to save the report as a different name!
|
|
If you don't use the 'Miscellaneous' payment option in RDPWin, you can remove it as an option. Go to System -> Switches -> Search "C1PAY6". This switch allows you to set a fence level, which will make this option only available for users whose fence levels meet or exceed the requirement set on the switch. Go to System -> Manage Users to manage users' fence levels |
|
Did you know that the tape chart can display all checked out reservations from active and non-active history? This is a great way to find all reservations that stayed in a particular room for previous dates. Make sure that the check box for "Hide Check Outs" is not checked under the Advanced Options. |
|
When is the last time you looked at the 'Checked-out Guests with Balance Due' report? You could have reservations that still owe you money! This report is included in your daily Internal Audit report, or you can run it directly by going to Reporter -> Reports -> Night Audit folder. Go run the report and see if you have funds you need to collect! To password protect checking out a reservation with a balance due, go to System -> Switches and enter C1BALREQ in the Search field. Enter a password in the Setting field. When checking out a reservation with a non-zero balance, there will be a prompt to enter that password. |
|
Would you like to display your tape chart in a different order other than room number or room type? A unique sequence number can be defined for each room number to be displayed in the tape chart. Under Reservations menu, Configuration, Tape Chart tab, select the radio button for "Custom" for Default Sequence.
|
|
10/22/2024 - Folio Filters Folio Filter can be used to filter All transactions, Pre-Posted transactions, or Actual transactions on a folio or reservation. The Folio Filter is available under Folio tab, Charge Summary tab, Charge Summary tab in Reservation Change screen, Deposit/Payment option, and when Previewing or Printing a folio. Actual transactions are transactions that have already been posted to the folio and will affect general ledger accounts and statistics. Actual transactions will have a blank field in the "Pre" column in the list of transactions on the folio. Pre-posted transactions are transactions that are scheduled to be posted, and Pre-Posted transactions will displayed with an " * " in the "Pre" column in the list of transactions on the folio. If a guest is departing tomorrow, and the guest would like to know what their balance due will be at the end of their stay, use the Folio tab and change the Folio Filter to All transactions to list the Actual transactions plus the Pre-Posted Transactions. Another way to view the balance of a reservation prior to the guest's checkout date is to view the amount in the "Due" column for "All" under the Folio tab.
|
|
Other Charges can be changed to all group reservations under Change Group Res. Select a group reservation from F3 Find Res, F6 Arrivals, F7 In-House, F8 Departures, or F9 Tape Chart. Select Group under Options, Change Group Res. Use drop-down arrow to select field to update. Check the boxes for Other Charges as needed, Save.
|
|
RDP offers the ability to use the Demo directory to train new employees or you can use the Demo directory as a sandbox to play around in. Just about anything can be done in the Demo directory, and it will not affect the Live directory. It is always good practice to refresh the demo directory prior to using it. Also, if there is a new employee to train, add them first in the Live system prior to refreshing the Demo directory. Under Help menu, select Refresh Demo Directory. Select Copy. When all files are copied, then the Demo directory is now refreshed! To easily change to the Demo directory, use the drop down arrow key in the Resort field at bottom of screen and select the appropriate Demo directory.
|
|
Use Find Res field to select a reservation by guest name or reservation number wherever you are in RDPWin! Find Res field is located in bottom right-hand corner on all screens. |
|
Want to format several text fields in Crystal Reports all at the same time? Use Format Painter button to format one or multiple text fields!
To use Format Painter, highlight the field that is formatted correctly. Select the Format Painter button, and then click on the field that you would like to format with the same properties. To format multiple text fields, highlight the field that is formatted correctly. Double click on the Format Painter button, and then select each field that needs to be formatted the same way. The Format Painter button can be used for text fields and database fields in Crystal Reports, and this can save you a lot of time!
|
|
Would you like to display your tape chart in a different order other than room number or room type? A unique sequence number can be defined for each room number to be displayed in the tape chart. Under Reservations menu, Configuration, Tape Chart tab, select the radio button for "Custom" for Default Sequence.
|
|
Protecting against ransomware on a Windows server requires a robust data backup strategy. Here are some key strategies to consider when your RDP Data server is onsite: Regular Backups: Implement a regular automated backup schedule to ensure critical data is backed up frequently. RDP recommends at least daily backups of the RDP data server and weekly backups of the IRM server. The RDP Database is stored in the ..\RDPNT share directory. The files for the IRM are stored in the C:\Inetpub directory. RDP recommends 3 rd party backup software such as Acronis, Backup Exec or the built in Windows Server Backup utility. Offline or Offsite Backups: Store backups offline or in an offsite location to prevent them from being compromised in case of a ransomware attack. Offline backups, such as tape drives or external hard drives, are disconnected from the network when not in use. Offsite backups can be stored in a separate physical location or on a cloud storage service. RDP recommends at least one backup per week is stored offsite. Incremental and Versioned Backups: Use incremental backups to only back up changed or new files since the last backup. Additionally, employ versioning to retain multiple copies of backed-up files over time. This way, if ransomware infects the server, you can restore from a clean backup that predates the attack. Immutable Backups: Consider using technologies that make backups immutable, preventing them from being modified or deleted by ransomware. This can be achieved through features like write-once-read-many (WORM) storage or backup solutions that include immutable storage capabilities. Secure Backup Storage: Ensure that the backup storage infrastructure is adequately protected. Limit access to backup resources, apply strong access controls, and encrypt backups both during transit and at rest. Regularly update backup software and hardware with the latest security patches. Test and Verify Backups: Regularly test the backup process to ensure backups are completed successfully and can be restored when needed. Verify the integrity and completeness of backup data by performing test restores periodically. This step is crucial in validating the effectiveness of your backup strategy. RDP recommends testing a backup restore of the RDP database monthly. Please submit a support ticket and we will help you configure a restore directory to test your RDP data backups. Security Awareness Training: Educate employees about ransomware threats, how they spread, and best practices for safe computing. Teach users to recognize suspicious emails, avoid clicking on unknown links or opening attachments from untrusted sources, and to report any potential security incidents promptly. Network Segmentation: Implement network segmentation to isolate critical servers from other network resources. This can help contain the spread of ransomware by limiting its impact on other systems. Endpoint Security: Deploy robust endpoint security solutions, including antivirus/anti-malware software, firewalls, and intrusion detection/prevention systems. Keep these security tools up to date and regularly patch them to address any vulnerabilities. Remember that while backups are crucial, they should be just one part of a comprehensive defense-in-depth approach to ransomware protection. Additional measures such as strong security policies, network monitoring, user awareness, and incident response planning are also essential to protect your Windows server and data from ransomware threats. Please feel free to reach out to RDP support for more information on properly backing up your RDPWin database. Here are links to white papers on effectively backing up a RDPWin/Actian Database: Selecting A Backup Method For Zen v15 Database Files |
|
If you want to display current work orders only in Work Orders Monitor, uncheck the box to "Include Future Work Orders. This is a great feature when using Enhanced Work Orders module to create Recurring Work Orders for preventative maintenance.
|
|
This is a helpful tip if you make Inventory reservations or use group blocks. Under Reservations, Configuration, Availability tab, there is a checkbox for "Check Room Type Availability." When this setting is checked, a new column under Available Rooms is added to the right of the Room Type column named "Inv." If there is no allocation remaining for the room type, a red "I" will be displayed in the Inv column
|
|
When under menus for Reservations, Night Audit or Day End, Group, Owner, or Accounting, there is a shortcut to access reports located in the Navigation area on the left-hand side. Additional report folders can be added under these Reports menus. To add the Accounting report folder under the Reservation Navigation area, go to Reporter menu, Configuration, General tab. In the section for "Additional Report Folders in Navigation Areas," add "Accounting" under the header for "Reservation."
|
|
You can sort one column in Res Analysis and then add a secondary sort for another column. After displaying the list of reservations under Reservations menu, Analysis, Reservations, select the column header for the first sort. Hold the <Shift> key down and select the additional column that you would like to sort next. |
|
Daily Charges allows charges to be posted to reservations nightly and monthly. Daily Charges can also based on frequency. Enter a "3" in "Posting Frequency" if the charge is to be posted at check-in and every 3rd night thereafter. In addition, Daily Charges can be applied to a specific date range and a maximum dollar amount can also be set as the limit. Daily Charges are configured under Reservations menu, Configuration, Daily Charges tab. Add the Daily Charge with appropriate settings and then add the Transaction Code as needed |
|
Would you like the ability to add a note to explain why an adjustment was made? A note can be added directly to the transaction posted to the guest folio. Under the Folio tab on a reservation, just double-click on the transaction, and select the Notes tab. After adding and saving the note, the transaction will be in bold to indicate that there is a note on the transaction. Transaction notes can also be added to Group Masters, Travel Agents, Work Order Vendors, and Owners. |
|
Do you have Source of Business codes or Market Codes that you no longer want to use? Both Source of Business codes and Market Codes can be disabled, so that they no longer display as an option. Under System menu, Table Maintenance, enter "CD" in the Table field for Source of Business codes or "CF" for Market Codes, Display. Select the Source of Business code or Market Code and Enter a "Y" in the Disable field. In order to preserve historical information, it would be best practice to add new Source of Business codes or Market Codes instead of changing or deleting existing ones. |
|
Do you ever need to post a charge or a payment to a reservation that is in Non-Active History? Deposits and charges can only be posted to reservations that are Future, In-House, or in Active History. To transfer a reservation from Non-Active History to Active History, go to Night Audit Menu, Transfer to History, and select the button for "Transfer 1 Res FROM Non Active," enter the guest name or reservation number. Once the reservation is transferred to Active History, you will be allowed to post charges and payments to the reservation. |
|
Notes can be added to the Room Availability Grand Totals under Reservations menu, Availability. This is helpful to communicate to your staff regarding availability for a specific day. For example, if a group unexpectedly canceled, a note can be added for that day with an explanation as to why there are a lot of available rooms. When a day has a note, the availability totals will be displayed in red. To add a note, right-click on the day in the Available Rooms row, select Edit Note, and Add the note. Any days with a note will be highlighted in red. To view the note, right click on the day and select View Note.
|
|
RDP is undergoing internal infrastructure upgrades on Tuesday, October 1, 2024. There may be response delays as the team works through these internal upgrades. Thanks for your patience! |
|
Reporter Security can be used to hide report folders and also reports within a folder. This can be helpful to only display report folders and reports needed for a particular department or users. Under Reporter menu, Security, set the fence levels on a report folder to hide the folder. If the fence level is higher than the user's power level, then the folder will not be displayed. Expand a reports folder and assign fence levels to reports within a folder. This is a great way to hide duplicate or unused reports or simply to put security on the report. Security is defined by the power level assigned to the user under System Menu, Manage Users. A security scale should be developed to group similar types of users in a security group |
|
Would you like to send a text message to all of your in-house guests about a special in the restaurant? Would you like to mass text all of the departures to advise them of a storm warning? Mobile Communications module allows mass texting to all arrivals, in-house guests, and departures. If you combine Mobile Communications with Mobile Housekeeping, you can also have a text message automatically sent to guests when their room is clean! For more information regarding Mobile Communications module, please contact your sales representative. |
|
Would you like to offer rooms on IRMng for today but also set a cutoff time to stop selling? To avoid issues with housekeeping preparing rooms for arrivals, it is helpful to cutoff available rooms at a certain time for same-day reservations. Under IRM menu, IRMng Configuration, Customization tab, select "Cutoff same day bookings" and enter the desired time. To cutoff only the Dirty rooms for same day reservations, check the box for "Cutoff dirty rooms only."
|
|
Under the Help menu select Menu Shortcuts. Expand Module R0 to see all of the Reservation shortcuts. Alt+F12 is the shortcut for Availability and Ctrl+Shift+A is the shortcut to Res Analysis. Shortcuts are also available for Module R3 for Condo Owner Accounting, Module R4 for Guest History, Module RN for Rates & Packages, Module RV for GDS, Module SA for Central Availability, and Module W0 for the Dashboard module, and Module W6 for Activity Inventory Control.
|
|
Are you familiar with Res Type and Res Status? Knowing the Res Type and Res Status can be very helpful in identifying what kind of reservation it is and the status of the reservation.
Some examples of Res Types are P6, I1, O8, X1, C5. Res Types are found next to the Res # when looking at a list of reservations.
The Res Type will always be represented by a letter. Since RDP offers many different types of systems, some of these Res Types may not apply to you. Here is a list of all the possible Res Types: P = Paying Guest / Room # Assigned I = Paying Guest / No Room # Assigned S = Special Reservation / Room # Assigned C = Comp Reservation X = Maintenance Reservation O = Owner Reservation (wholly owned) G = Guest of Reservation T = Timeshare Reservation / Room # Assigned Q = Timeshare Reservation / No Room # Assigned B = Timeshare Bonus Reservation E = Timeshare Exchange Reservation The Res Status will always be represented by a number. Here is a list of all the possible Res Statuses: 1 = Future Reservation / No Deposit 2 = Future Reservation / With Deposit 4 = Future Reservation / With Changes 5 = Checked-in Reservation 6 = Checked-in Reservation / With Changes 7 = Checked-out Reservation / With Security Deposit 8 = Checked-out Reservation 9 = Canceled Reservation
|
|
The General Ledger Interface will export daily or monthly totals for each general ledger in the format for several accounting programs, such as M3, Quickbooks, Sage, and NetSuite. From the accounting program, just import the totals! This will save you time and avoid any erroneous manual entries to your accounting software. For more information regarding the General Ledger Interface, please contact your sales representative. |
|
The Tape Chart can automatically display with a date that is a couple of days prior to today. It is beneficial to display the tape chart with a starting date 2 or 3 days prior to today to show in-house reservations that may be checking out today. In the example below, today's date is March 1st. The tape chart starting days is set to 2 days prior to today's date. Under Reservations menu, Configuration, Tape Chart tab, use the drop down arrow key to change the Starting Days to -2 or -3.
|
|
Would you like to be prompted to confirm to exit or logoff RDPWin? Under System menu, Configuration, System, check the boxes for "Confirm RDPWin Exit" and "Confirm RDPWin Logoff".
|
|
Have you realized that if you right-click on any reservation while on the Arrivals, In-House, or Departures list, you have an extended list of actions to choose from? You can quickly print the reservation's folio, registration card, or confirmation, view the Guest History or CRM info, or even send them a text!
|
|
A list of cancellation reasons can be displayed when a reservation is cancelled. This is helpful to standardize the reasons why a guest cancels their reservation and requires a selection from the list. Under System menu, Switches, enter 416-77 in the Search field. Set switch Yes to "Display cancellation list dropdown (Table CL)." Next, under System menu, Table Maintenance, enter CL in Table field, Display. Add Subrecord to add cancellation reasons. The Subrecord is alphanumeric and controls the order the cancellation reasons are displayed.
|
|
A popular credit card scam in hospitality is for someone to book a reservation, put a deposit on a stolen credit card, cancel, then request a refund on a different card. The challenge is that this can often be a legitimate transaction in our industry. It's important to train staff to be on the lookout for this and have them ask questions when a payment is requested to be refunded to a different credit card. Consider turning on a switch to prompt for a password when refunding on a new credit card. To implement, go to the System menu, Switches, and in the Search field, enter C1REFCC. In the Setting field, enter the password to be prompted when adding a new credit card during a refund.
|
|
Phone numbers can be automatically formatted with dashes on reservations, owners, group masters, travel agents, work order vendors, and itinerary vendors. This feature will also automatically format phone numbers for all the above that were already made! When typing the phone number, the dashes will automatically appear. When more than 10 digits are entered, it is assumed that there is an extension number and will be followed by an "x". For example: 970-845-1140x 1176. For non-US and Canadian numbers, use "+" prior to the number, and there is no formatting. Under System, Switches, enter 414-81 in Search field, set "Format phone fields to 111-222-3333 x123" to Yes
|
|
Would you like to format a reservation comment field to be a date or a Yes/No radio button? Comment fields can be customized to be a date, time, currency, phone number, Yes/No options, Yes/No dropdown, and a checkbox. Comment fields can be formatted on reservations, guest history, group masters, owners, room masters, travel agents, activity vendors, work orders, work order vendors, work order assets, CRM, and timeshare/fractional weeks. The descriptions of comment fields are changed under System menu, Comment fields, and selecting the appropriate Type of Master, such as Reservation/Guest for Reservation and Guest comment fields. Formats are added by adding a sub-record to the lookup table with a “~”. The second field of the sub-record is the format type: 1 Text (this is the default and does not have to be added to the table) 2 Integer 3 Double 4 Currency 5 Yes/No dropdown 6 Yes/No radio buttons 7 Date 8 Time 9 Date/Time 10 Phone Number 11 Social Security Number (should not be used or stored in RDP database) 12 Checkbox
Below are the files, comment fields, and their corresponding tables: Reservations & Guest History Comment 1: Table EF Comment 2: Table EG Comment 3: Table EH Comment4: Table E1 Comment 5: Table E2 Comment 6: Table E3 Comment 7: Table E4 Comment 8: Table E5 Comment 9: Table E6 Comment 10: Table E7 Comment 11: Table E8 Comment 12: Table E9 Comment 13: Table EA Comment 14: Table EB Comment 15: Table EC Comment 16: Table ED Comment 17: Table EF Comment 18: Table Y0 Comment 19: Table Y1 Comment 20: Table Y2 Comment 21: Table Y3 Comment 22: Table Y4 Comment 23: Table Y5 Comment 24: Table Y6 Comment 25: Table Y7 Groups Comment 1: Table JA Comment 2: Table JB Comment 3: Table JC Comment 4: Table JD Comment 5: Table JE Comment 6: Table JF Comment 7: Table JG Comment 8: Table JH Comment 9: Table JI Comment 10: Table JJ Comment 11: Table JK Comment 12: Table JL Comment 13: Table J0 Comment 14: Table J1 Comment 15: Table J2 Comment 16: Table J3 Comment 17: Table J4 Comment 18: Table J5 Owners Comment 1: Table IA Comment 2: Table IB Comment 3: Table IC Comment 4: Table ID Comment 5: Table IE Comment 6: Table IF Comment 7: Table IG Comment 8: Table IH Comment 9: Table II Comment 10: Table IJ Comment 11: Table IK Comment 12: Table IL Comment 13: Table I0 Comment 14: Table I1 Comment 15: Table I2 Comment 16: Table I3 Comment 17: Table I4 Comment 18: Table I5 Rooms Comment 1: Table IM Comment 2: Table IN Comment 3: Table IO Comment 4: Table IP Comment 5: Table IQ Comment 6: Table IR Comment 7: Table IS Comment 8: Table IT Comment 9: Table IU Comment 10: Table IV Comment 11: Table IW Comment 12: Table IX Comment 13: Table YA Comment 14: Table YB Comment 15: Table YC Comment 16: Table YD Comment 17: Table YE Comment 18: Table YF Travel Agents Comment 1: Table KA Comment 2: Table KB Comment 3: Table KC Comment 4: Table KD Comment 5: Table KE Comment 6: Table KF Comment 7: Table KG Comment 8: Table KH Comment 9: Table KI Comment 10: Table KJ Comment 11: Table KK Comment 12: Table KL Comment 13: Table K0 Comment 14: Table K1 Comment 15: Table K2 Comment 16: Table K3 Comment 17: Table K4 Comment 18: Table K5 Activity Vendors Comment 1: Table LA Comment 2: Table LB Comment 3: Table LC Comment 4: Table LD Comment 5: Table LE Comment 6: Table LF Comment 7: Table LG Comment 8: Table LH Comment 9: Table LI Comment 10: Table LJ Comment 11: Table LK Comment 12: Table LL Comment 13: Table LM Comment 14: Table LN Comment 15: Table LO Comment 16: Table LP Comment 17: Table LQ Work Order Vendors Comment 1: Table NJ Comment 2: Table NK Comment 3: Table NL Comment 4: Table NM Comment 5: Table NN Comment 6: Table NO Comment 7: Table NP Comment 8: Table NQ Comment 9: Table NR Comment 10: Table NS Comment 11: Table NT Comment 12: Table NU Comment 13: Table NV Comment 14: Table NW Comment 15: Table NX Comment 16: Table NY Comment 17: Table NZ Work Order Assets Comment 1: Table N2 Comment 2: Table N3 Comment 3: Table N4 Comment 4: Table N5 Comment 5: Table N6 Comment 6: Table N7 Comment 7: Table N8 Comment 8: Table N9 Comment 9: Table NA Comment 10: Table NB Comment 11: Table NC Comment 12: Table ND Comment 13: Table NE Comment 14: Table NF Comment 15: Table NG Comment 16: Table NH Comment 17: Table NI CRM Comment 1: Table T2 Comment 2: Table T3 Comment 3: Table T4 Comment 4: Table T5 Comment 5: Table T6 Comment 6: Table T7 Comment 7: Table T8 Comment 8: Table T9 Comment 9: Table TA Comment 10: Table TB Comment 11: Table TC Comment 12: Table TD Comment 13: Table TE Comment 14: Table TF Comment 15: Table TG Comment 16: Table TH Comment 17: Table TI Timeshare/Fractional Weeks Comment 1: Table EV Comment 2: Table EW Comment 3: Table EX Comment 4: Table EY Comment 5: Table EZ
For example, here is how to change Comment-5 on reservations to show "Early Check-in" and format it as a Yes/No Radio button: System menu, Comment Labels, select Reservation/Guest for Type of Master. Update Comment-5 with a description of "Early Check-in", Save.
System menu, Table Maintenance, Add Table, enter appropriate table from list above. In this case, Comment-5 for Reservations/Guest History is table E2, enter description "Early Check-in", Save & Close, Display.
Add Subrecord, enter ~ in the Subrecord field, enter 6 in Description, Save & Close.
|
|
Use Find Res button in tape chart to display a reservation. When using Find Res, enter the guest name or reservation number, and the reservation will be displayed in the tape chart. Remember that only reservations with room numbers appear in the tape chart.
|
|
If you are using the feature to display VIP descriptions, the VIP description can be displayed in Mobile Housekeeping. Under the Housekeeping menu, Configuration, Mobile tab, check the box for "Display reservation VIP description."
|
|
RDP would like to wish everyone and their families a very happy and safe Labor Day Weekend! Our office will be closed on Monday, September 2nd and will re-open on Tuesday, September 3rd. Emergency Support is available if needed.
|
|
Do you have any owners that are considered VIP? Check the box for VIP on the owner masters for those owners that are considered to be VIP.
|
|
Use the tape chart scroll to go right to the room number! When scrolling up and down the tape chart, use the tool tip to go right to the room number. For example, use the scroll bar and when the tool tip shows the room number you are looking for, just release your mouse, and the tape chart will bring you right to that room number.
|
|
Do you need an additional Res Type to distinguish from your other Res Types? Use Res Type S for Special Res Type to separate out reservations from other Res Types. Res Type S reservations act exactly like a Preassigned reservation where a room number is required. A unique tape chart color can also be assigned to Res Type S under Res Menu, Configuration, Tape Chart tab. In addition, if you want to replace "Special" with another description, this can be changed. Go to the System menu, Switches, enter C1TYPE-S in the Search field. Update the description in the Setting column. |
|
Do you always add Notes when making a new reservation? You have an option to default to the Notes tab! Go to Reservations, Configuration, under the New Res tab, check the box for "Default to Notes tab." |
|
Res Comments can be easily edited right under the Comments tab on a reservation. Under the Comments tab on a reservation, select Change Comments to update the comments and select Save & Close to save the changes.
|
|
RDPWin Log records all of the events in RDP. To view the the log file, go to System menu and select RDPWin Log. The log can be displayed by date range, logon name, program name, and message type. Since the log is displayed in a grid, all of the sorting, filters, and grouping functions are available. The log can also be filtered by a specific station number.
|
|
The Master Links for Pictures and Documents module allows documents to be stored on owner masters, guest history, group masters, travel agent masters, and room masters. This is a great way to also store pictures of your owners and repeat guests! The ability to add or delete documents under the Documents tab can be restricted by adding a fence level. Under System menu, Menu Security, enter "document" in the Search field. Assign the appropriate fence level for Add Document, Delete Documents, or Rename Documents. Interested in storing documents and pictures? Please reach out to your account manager for more details! |
|
When making a reservation for a guest from guest history, the source of business can be required instead of using the source of business on the guest history record. To implement this feature, go to System menu, Switches, and enter 109-22 in the Search field. Change Setting to Yes to "For repeat guests, don't use SOB from guest history." |
|
Itinerary Comment-1 and Comment-2 display under the Itinerary tab on a reservation. Itinerary Comments can be easily changed by right-clicking on the itinerary and selecting Change Comments.
|
|
Confirmations can be mass emailed by res type for any arrival range. Under Reporter menu, Mass E-mails, Confirmations, select the By Arrival tab. Select the appropriate Res Type. If a Res Type is not selected, All Res Types will be the default.
|
|
The rate detail for HTML confirmations can be displayed with the date, description, room rate, tax, days, and total charge options using [*RateDetail*] data item. The rate detail can also be more concise using [*RateDetailN*] data item, which includes date, description, days, and total charge columns. HTML Confirmations configuration documentation can be found here: HTML Documentation Interested in making your confirmations, guest folios, and guest surveys more attractive with your brand? Contact your sales representative regarding HTML Confirmations module |
|
Did you know that with Virtual Store, guests can purchase activities not only while they are making reservations on IRMng but also afterwards? Guests can access their reservation under "My Reservations" and view or add activities to their reservation.
Virtual Store is an excellent revenue source for selling activities and products, such as wine & cheese baskets, chocolate, or events. Have activities where there is a limited number available? Use Activity Inventory Control module to sell those activities that have a maximum capacity, such as theater tickets, dinners, and group events. Reach out to your sales representative for mor details on IRMng, Virtual Store, and Activity Inventory Control. |
|
Ever receive the below error message when logging in?
Administrators can clear the lock and login to RDP successfully! Verify that Reset Availability is not currently running by another RDP user. Login as an RDP user that is a member of User Type "Administrator." This is configured under System menu, Manage Users. After selecting Logon, select Yes to the below message.
|
|
A fence level can be added to Change Rates button. If the fence level on the Change Rates button is higher than the RDP User's power level, access will be denied to change rates on a reservation. Under System, Menu Security, expand UI Security and assign the appropriate fence level to Change Rates Button.
|
|
Names and address fields can automatically uppercase letters after a space or a special character. Under System, Switches, Search for 414-82. Set to Yes to "Camel case name fields." |
|
Rate Plans can be changed to all group reservations under Change Group Res. Select a group reservation from F3 Find Res, F6 Arrivals, F7 In-House, F8 Departures, or F9 Tape Chart. Select Group, Change Group Res. Use drop-down arrow to select Rate Plan to update. In the During field, select the appropriate rate plan, Save.
|
|
Daily Charges can automatically be added to a new sharewith based on the Daily Charges on the primary sharewith. Under System, Switches, enter 414-80 in Search field. Set switch to YES to "Add Daily Charges to New Sharewiths." Changes to the Daily Charges on the sharewiths can still be made. |
|
A list of cancellation reasons can be displayed when a reservation is cancelled. This is helpful to standardize the reasons why a guest cancels their reservation and requires a selection from the list. Under System menu, Switches, enter 416-77 in the Search field. Set switch Yes to "Display cancellation list dropdown (Table CL)." Next, under System menu, Table Maintenance, enter CL in Table field, Display. Add Subrecord to add cancellation reasons. The Subrecord is alphanumeric and controls the order the cancellation reasons are displayed.
|
|
RDP welcomes you to share your suggestions for system improvements and features in our Ideas Portal. Your ideas are reviewed and considered for future releases and will help us to understand your priorities. You will also have the opportunity to vote on ideas! Please sign up in the Ideas Portal as we encourage you to share your feature requests! |
|
Self Check-in can be configured to allow owners to check-in after their original arrival date. This applies to Owners, Timeshare Owners, Bonus, and Exchange reservations. In Content Management System (CMS), Configuration, Check-in, Self Check-in Settings, check the box to "Allow owners to check-in after reservations arrival date." |
|
Daily charges can be calculated based on the number of people. Add a package component and check the appropriate People Classifications under "Multiply by Times Number of." Under Reservations, Configuration, Daily Charges tab, scroll over to the right to see a column for Times People.
|
|
Looking for a report but not sure where to look? Under the Reporter menu, Reports, enter the key word in the Search field, and select Search
|
|
Right-click on a reservation in the tape cart and select "Show Reservation in List." This option goes to the reservation list and is particularly useful for viewing group reservations with the entire group listed.
|
|
For premise-based customers, Cloudflare Online Firewall is a powerful tool designed to safeguard your online presence. Please read our knowledge base article regarding Cloudfare and consult with your IT Professional: https://support.resortdata.com/support/Content/GettingStarted/Online-Firewall.htm |
|
For premise-based customers, this is your friendly reminder to back up your RDP data! We recommend daily backups. Be sure to back up your RDPNT folder on the data server and also the following folders on the IRM server: C:\inetpub\wwwroot\RDPRepository C:\inetpub\wwwroot\IRMCMS C:\ProgramData\ResortDataProcessing Once your backup is complete, test your backup. You want to verify that you are able to recover all of your files when needed. Please consult with your IT professional. |
|
Tape chart colors can be assigned to show reservations that have No Deposit, Partial Deposit, or are Fully Paid. Under Reservations menu, Configuration, Tape Chart tab, click on each of the categories under Paying Guest to assign the colors based on payment received. Tape chart colors can also be assigned to Group reservations based on payment received.
|
|
RDP is pleased to announce that we are Live with Toast POS! Please contact your sales representative for more details!
|
|
Would you like to see revenue and accounting reports from the previous day already in your email Inbox? Would you like to email critical reports, in case the power shuts down? Use Reporter Scheduler to schedule reports to be emailed automatically on a daily, weekly, monthly, or annual basis. Here is a knowledge base article to guide you through How to Create a Report Schedule. |
|
F12 Quick View is a great tool that opens a separate window to access various areas of RDP. While in the tape chart, for example, F12 Quick View can be used to Find Reservation or view today's arrivals, in-house reservations, and departures. Reports can also be run from F12 Quick View as well as viewing the current clean status of a room. F12 Quick View can be minimized and accessed quickly!
|
|
Folio Filter can be used to filter All transactions, Pre-Posted transactions, or Actual transactions on a folio or reservation. The Folio Filter is available under Folio tab, Charge Summary tab, Charge Summary tab in Reservation Change screen, Deposit/Payment option, and when Previewing or Printing a folio.
Actual transactions are transactions that have already been posted to the folio and will affect general ledger accounts and statistics. Actual transactions will have a blank field in the "Pre" column in the list of transactions on the folio.
Pre-posted transactions are transactions that are scheduled to be posted, and Pre-Posted transactions will displayed with an " * " in the "Pre" column in the list of transactions on the folio.
If a guest is departing tomorrow, and the guest would like to know what their balance due will be at the end of their stay, use the Folio tab and change the Folio Filter to All transactions to list the Actual transactions plus the Pre-Posted Transactions. Another way to view the balance of a reservation prior to the guest's checkout date is to view the amount in the "Due" column for "All" under the Folio tab.
|
|
F5 New Res has a drop down for a shortcut to make new reservations. The dropdown will allow a quicker way for all reservation types to be made.
|
|
Are you familiar with Res Type and Res Status? Knowing the Res Type and Res Status can be very helpful to identify what kind of reservation it is and the status of the reservation. The Res Type and Res Status can be found on a reservation or when viewing a list of reservations as shown below:
The Res Type will always be represented by a letter. Since RDP offers many different types of systems, some of these Res Types may not apply to you. Here is a list of all the possible Res Types: P = Paying Guest / Room # Assigned I = Paying Guest / No Room # Assigned S = Special Reservation / Room # Assigned C = Comp Reservation X = Maintenance Reservation O = Owner Reservation (wholly owned) G = Guest of Reservation T = Timeshare Reservation / Room # Assigned Q = Timeshare Reservation / No Room # Assigned B = Timeshare Bonus Reservation E = Timeshare Exchange Reservation The Res Status will always be represented by a number. Here is a list of all the possible Res Statuses: 1 = Future Reservation / No Deposit 2 = Future Reservation / With Deposit 4 = Future Reservation / With Changes 5 = Checked-in Reservation 6 = Checked-in Reservation / With Changes 7 = Checked-out Reservation / With Security Deposit 8 = Checked-out Reservation 9 = Canceled Reservation |
|
The General Ledger Interface will export daily or monthly totals for each general ledger in the format for several accounting programs, such as M3, Quickbooks, and Sage. From the accounting program, just import the totals! This will save you time and avoid any erroneous manual entries to your accounting software. For more information regarding the General Ledger Interface, please contact your sales representative. |
|
When under menus for Reservations, Night Audit or Day End, Group, Owner, or Accounting, there is a shortcut to access reports located in the Navigation area on the left-hand side. Additional report folders can be added under these Reports menus. Here is an example of the report folders under the Reservations menu:
To add the Owner report folder under the Reservation Navigation area, go to Reporter menu, Configuration, General tab. In the section for "Additional Report Folders in Navigation Areas," add "Owner" under the header for "Reservation." See below the end result:
|
|
This is a helpful tip if you make Inventory reservations or use group blocks. Under Reservations, Configuration, Availability tab, there is a checkbox for "Check Room Type Availability."
When this setting is checked, a new column under Available Rooms is added to the right of the Room Type column named "Inv." If there is no allocation remaining for the room type, a red "I" will be displayed in the Inv column.
|
|
When using the option to Add Sharewith or Add Room, use New Guest button to assign a new guest history number. When the reservation has a unique guest history number, then a unique email address can be assigned to the guest history record and to the reservation.
|
|
Owners who make a payment in the owner portal can receive a receipt. The owner receipt is an HTML document, so this can be customized with logo, colors, and text.
|
|
Do you have a Crystal report where the fields and field titles need to be lined up? Guidelines and the option to Arrange Lines in Crystal Reports can help you with this! Guidelines in Crystal Reports are triangular buttons with attached dashed lines that appear in the horizontal and vertical ruler bar. Guidelines can be used to easily move and align objects. Open up the Crystal report, and select File, Options, Layout tab. Under Design Review, make sure that Guidelines is checked.
|
|
F12 Quick View is a great tool that opens a separate window to access various areas of RDP. While in the tape chart, for example, F12 Quick View can be used to Find Reservation or view today's arrivals, in-house reservations, and departures. Reports can also be run from F12 Quick View as well as viewing the current clean status of a room. F12 Quick View can be minimized and accessed quickly!
|
|
All the reservations of a group can be checked in all at once regardless of the clean status to save time. Under Reservations menu, Configuration, Check-in tab, select "For Group & Mass Check-in: Allow reservations to be checked into dirty rooms."
|
|
Create Room Info or Room Type Info with specific details about a room number or a room type. Pictures can also be included. Here is a sample Room Info for Room 717:
Create the document under \RDP\Rooms folder. Save the file with the room number or the room type. Example: 717.RTF or 1B.HTML. The files can be in the format of RTF, PDF, HTM, HTML, or MHT. When searching for available rooms, select Room Info or Room Type Info as shown below:
When searching for availability by room type, select the appropriate room type and then select View Info as shown below.
|
|
Right-click on a reservation in the tape cart and select "Show Reservation in List." This option goes to the reservation list and is particularly useful for viewing group reservations with the entire group listed.
|
|
Guest History can be updated when changes are made to reservations. Guest information and comment fields will be updated. Under System menu, Switches, enter 425-20 in the Search field. Select Yes in the Setting to "Update Guest History when reservation is changed." |
|
Tape chart colors can be assigned to show reservations that have No Deposit, Partial Deposit, or are Fully Paid. Under Reservations menu, Configuration, Tape Chart tab, click on each of the categories under Paying Guest to assign the colors based on payment received. Tape chart colors can also be assigned to Group reservations based on payment received.
|
|
UnCheck-Out can be used to check-in a reservation that has already been checked out. UnCheck-Out can only be used if the departure date of the reservation is the same date as the RDP date. If the departure date of the reservation is prior to the RDP date or if the room is no longer available, make a new reservation and check it in. Make sure to select the guest from Guest History, to expedite making the new reservation. |
|
Would you like to sign others up for Tip of the Day? Under Start menu in RDPWin, go to Home, and select the link for SignUp under "Tip of the Day." You can also use this link to sign others up for Tip of the Day.
|
|
Would you like to display your tape chart in a different order other than room number or room type? A unique sequence number can be defined for each room number to be displayed in the tape chart. Under Reservations menu, Configuration, Tape Chart tab, select the radio button for "Custom" for Default Sequence.
|
|
Does your property only rent villas, homes or sites instead of "units"? Do you have "members" instead of "owners"? Do you prefer to use "postal code" instead of "zip code"? Use Custom Labels to customize RDP to display the label you prefer. Under System menu, Configuration, Custom Labels, you can change the label for various fields related to rooms, reservation types, masters, dates, addresses, and other areas. After any changes, logoff and log back in order for the changes to take effect.
|
Daylight Savings Ends!Remember to change your clocks back 1 hour on Sunday at 2:00 AM!
|
Do you need an additional Res Type to distinguish from your other Res Types?Use Res Type S for Special Res Type to separate out reservations from other Res Types. Res Type S reservations act exactly like a Preassigned reservation where a room number is required. A unique tape chart color can also be assigned to Res Type S under Res Menu, Configuration, Tape Chart tab. In addition, if you want to replace "Special" with another description, this can be changed. Go to System menu, Switches, enter C1TYPE-S in the Search field. Update the description in the Setting column.
|
Do you always add Notes when making a new reservation?You have an option to default to the Notes tab! Go to Reservations, Configuration, under the New Res tab, check the box for "Default to Notes tab."
|
Res Comments can be easily edited right under the Comments tab on a reservation.Under the Comments tab on a reservation, select Change Comments to update the comments and select Save & Close to save the changes.
|
RDPWin Log records all of the events in RDP.To view the the log file, go to System menu and select RDPWin Log. The log can be displayed by date range, logon name, program name, and message type. Since the log is displayed in a grid, all of the sorting, filters, and grouping functions are available. The log can also be filtered by a specific station number.
|
Use Vonage or Twilio to send text messages to guests directly from RDPWin!When using either of these services, the mobile carrier is not required to send a text message. Mobile Communication module SN is required to text guests from RDPWin. Please contact your sales representative for more information about Mobile Communications! |
The reservations listed for owners can be configured to default to reservations with a res status of your choice.For example, if you prefer to list reservations that only display future reservations for an owner, this default can now be configured. Under Owners menu, Configuration, General tab, select the option from the list under Default Res List Res Status
|
You can sort one column in Res Analysis and then add a secondary sort for another column.After displaying the list of reservations under Reservations menu, Analysis, Reservations, select the column header for the first sort. Hold the <Shift> key down and select the additional column that you would like to sort next. |
Daily Charges allows charges to be posted to reservations nightly and monthly.Daily Charges can also based on frequency. Enter a "3" in "Posting Frequency" if the charge is to be posted at check-in and every 3rd night thereafter. In addition, Daily Charges can be applied to a specific date range and a maximum dollar amount can also be set as the limit. Daily Charges are configured under Reservations menu, Configuration, Daily Charges tab. Add the Daily Charge with appropriate settings and then add the Transaction Code as needed. |
A unique tape chart color can be assigned to IRM reservations.Under Reservations menu, Configuration, Tape Chart tab, check the box for "Use a color for IRM Reservations." When this box is checked, an option for "IRM Res" will appear under the "Other" column. Select "IRM Res" and change to desired color.
|
Create a booking window when a rate plan can be sold!Enter the Booking Start date and the Booking End date on the rate plan to determine when the rate plan can be purchased. In the example below, a Fall Package is available to be sold in advance from 3/15/22 to 7/31/22 as indicated in the Booking Start and Booking End dates. The Fall package can only be consumed based on the arrival date range from 9/12/22 to 11/20/22 as indicated in the Start Date and End Dates.
|
Have you ever provided a quote and need to provide another quote with different dates?This can be done all on the same reservation screen! Once a quote is created at the bottom of the New Res screen, change the dates to the desired dates and select Add Quote to get the quote for those dates. After the guest decides which quote they want, highlight the quote and select Make Reservation. The other quote will be discarded. Additional quotes can be added by updating Arrival Date, number of Nights, Departure Date, number of People, Room Type, Room Number, and Rate Plan.
|
Are you familiar with Res Type and Res Status?Knowing the Res Type and Res Status can be very helpful to identify what kind of reservation it is and the status of the reservation. The Res Type and Res Status can be found on a reservation or when viewing a list of reservations as shown below: The Res Type will always be represented by a letter. Since RDP offers many different types of systems, some of these Res Types may not apply to you. Here is a list of all the possible Res Types:
P = Paying Guest / Room # Assigned I = Paying Guest / No Room # Assigned S = Special Reservation / Room # Assigned C = Comp Reservation X = Maintenance Reservation O = Owner Reservation (wholly owned) G = Guest of Reservation T = Timeshare Reservation / Room # Assigned Q = Timeshare Reservation / No Room # Assigned B = Timeshare Bonus Reservation E = Timeshare Exchange Reservation The Res Status will always be represented by a number. Here is a list of all the possible Res Statuses: 1 = Future Reservation / No Deposit 2 = Future Reservation / With Deposit 4 = Future Reservation / With Changes 5 = Checked-in Reservation 6 = Checked-in Reservation / With Changes 7 = Checked-out Reservation / With Security Deposit 8 = Checked-out Reservation 9 = Canceled Reservation |
Under Stats menu, Statistical Totals, you can compare room revenue, room nights, average rate, and RevPAR to the previous year.You can drill-down into any month and all of the days of the month will display with the same comparisons. You can drill-down further into any single day and see the individual contributing transactions that sum to the revenue total. Drill-down even further by highlighting one transaction & clicking 'Reservation Detail' to see the full reservation that the transaction originated from. |
A hyperlink to a website or an email address can be added to a Crystal Report, such as a confirmation.In the Crystal report, select the text box, and select the "Insert Hyperlink" button in the Expert Tool Bar. If you are adding a hyperlink to a website address, select the radio button for "A Website on the Internet" and then enter the URL in the field for "Website Address
|
Would you like the ability to add a note to explain why an adjustment was made?A note can be added directly to the transaction posted to the guest folio. Under the Folio tab on a reservation, just double click on the transaction, and select the Notes tab. After adding and saving the note, the transaction will be in bold to indicate that there is a note on the transaction. Transaction notes can also be added to Group Masters, Travel Agents, Work Order Vendors, and Owners.
|
Do you ever need to post a charge or a payment to a reservation that is in Non-Active History?Deposits and charges can only be posted to reservations that are Future, In-House, or in Active History. To transfer a reservation from Non-Active History to Active History, go to Night Audit Menu, Transfer to History, and select the button for "Transfer 1 Res FROM Non Active," enter the guest name or reservation number. Once the reservation is transferred to Active History, you will be allowed to post charges and payments to the reservation.
|
Have you ever needed to copy a reservation number, notes, or an email address?Highlight the text to copy and use keystroke Ctrl+C to Copy and then use keystroke Ctrl+V to Paste! |
RDPWin Log records all of the events in RDP.To view the the log file, go to System menu and select RDPWin Log. The log can be displayed by date range, logon name, program name, and message type. Since the log is displayed in a grid, all of the sorting, filters, and grouping functions are available. The log can also be filtered by a specific station number.
|
Notes on reservations can be easily viewed in the tape chart and can be marked with a character to indicate that there is a note on the reservation.Under Reservations menu, Configuration, Tape Chart tab, there are two switches that can be helpful. If you would like to see notes on a reservation in the tape chart when hovering over it, check the box for "Show reservation note on hover over bar." If you would like to indicate that there is a note on a reservation in the tape chart, a character can be placed in front of the name on the reservation. This can be turned on by checking the box for "Show character in front of name if reservation note exists."
|
Would you like to require that a work order is always assigned to a vendor, such as the Maintenance or Housekeeping department?Under Work Orders menu, Configuration, check the box for "Vendor required when adding/changing work order."
|
The reservations listed for owners can be configured to default to reservations with a res status of your choice.For example, if you prefer to list reservations that only display future reservations for an owner, this default can now be configured. Under Owners menu, Configuration, General tab, select the option from the list under Default Res List Res Status
|
Comments tab on reservations can now be edited without opening reservation.
RDPWin5.3.002.05 or higher is required for this feature. |
Use Find Res field to select a reservation wherever you are in RDPWin!Find Res field is located in bottom right-hand corner on all screens.
RDPWin5.3.002.02 is required for this feature. |
You can sort one column in Res Analysis and then add a secondary sort for another column.After displaying the list of reservations under Reservations menu, Analysis, Reservations, select the column header for the first sort. Hold the <Shift> key down and select the additional column that you would like to sort next. |
Daily Charges allows charges to be posted to reservations nightly and monthly.Daily Charges can also based on frequency. Enter a "3" in "Posting Frequency" if the charge is to be posted at check-in and every 3rd night thereafter. In addition, Daily Charges can be applied to a specific date range and a maximum dollar amount can also be set as the limit. Daily Charges are configured under Reservations menu, Configuration, Daily Charges tab. Add the Daily Charge with appropriate settings and then add the Transaction Code as needed. |
Create a booking window when a rate plan can be sold!Enter the Booking Start date and the Booking End date on the rate plan to determine when the rate plan can be purchased. In the example below, a Fall Package is available to be sold in advance from 3/15/22 to 7/31/22 as indicated in the Booking Start and Booking End dates. The Fall package can only be consumed based on the arrival date range from 9/12/22 to 11/20/22 as indicated in the Start Date and End Dates.
|
Join us for three days of RDP Training at the Resort Data Processing Headquarters in Vail, Colorado!Sessions will focus on ways of maximizing the most from your RDP system by mastering Crystal Reports and delving deeper into Modules and Features personalized to your property. October 24 - October 26 is our Condominiums & Vacation Rental Conference to close out our Conference series. October is a beautiful month to visit Vail, Colorado! To register for the conference please reach out to your sales rep. |
Would you like to save credit card tokens on your owner masters so that you can use them for future payments?Under System menu, Switches, enter 419-62 in Search field. Set to Yes for "Always retain credit card data for owners."
|
Do you ever need to know how much room revenue was taxable or non-taxable for a specific date range?Under Accounting reports folder, use reports Room Charge By Tax Code-Detail to get room revenue for each reservation for each day for each tax code or use Room Charge By Tax Code-Summary to get the summary of room revenue for each date for each tax code |
If you want to display all rooms immediately when the tape chart is launched, there is a switch for that!When this switch is turned on, you won't have to select the button to "Display Rooms" when the tape chart is first launched. Under Reservations, Configuration, Tape Chart tab, check the box for "Display all rooms when tape chart is first shown."
|
A deposit placed on the group leader can be disbursed to all reservations within the group.Use F3 to Find the group leader reservation, select option for Group and Disburse Deposit. Select the deposit and use button to Disburse. Select the option to "Disburse across all group members evenly" to evenly distribute the payments among the group reservations.
|
Pay code changes can be pre-scheduled on reservations.
In the example above, there is a reservation with a group where the group leader is paying for all of the charges arriving on 3/1 and departing on 3/5. The guest wants to stay an extra day, depart on 3/6, and pay for their own charges.
The Pay Codes tab on the reservation can be used to pre-schedule a pay code change, so that the guest is responsible for the night of 3/5. Since the pay code for the group leader is set to ZZ on the reservation, the pay code change would be on 3/5 using pay code IP. |
Pre-Arrival confirmations can be automatically emailed to guests.Under Reporter, Configuration, Confirmation Settings, select Add to add a new confirmation. Set Master field to "Res", enter the name of the confirmation, such as "Pre-Arrival 10 Days," and select the number of days in "Days prior to Arrival".
Configure the remaining sections as needed. Under Reporter, Configuration, Confirmation Associations tab, select Add Confirmation. Select "Pre-Arrival Confirmation" under Reservations Status, select the appropriate Reservation Type, and then select the "Pre-Arrival" confirmation created under "Confirmation Settings."
Multiple Pre-Arrival confirmations can be added, such as 30 Days, 10 Days, and 1 Day prior to arrival. |
The credit card token from an owner master can be copied to new owner reservations!Under System menu, Switches, enter 421-78 in Search field. Change the setting to Yes for "Copy credit card from owner master when making owner reservations."
RDPWin5.3.001.38 or higher is required. |
Room attendants and Inspectors often find issues in rooms that need to be reported to the Maintenance department.Mobile Housekeeping allows room attendants, inspectors, and the Housekeeping manager to add a work order from their mobile device. Under Housekeeping, Configuration, Mobile tab, you can allow your Housekeeping staff to add a work order.
You can also automatically send an email to the Maintenance department whenever a work order is added from Mobile Housekeeping! Are you interested in Mobile Housekeeping? Please reach out to your sales representative for a full demo! |
After a dirty occupied room is cleaned in Mobile Housekeeping, the status can be changed directly to Clean instead of Inspect.Under Housekeeping menu, Configuration, Mobile tab, check the box for "Clean Status = Clean Not Inspected if room is occupied."
Are you interested in Mobile Housekeeping? Please contact your sales representative for more information! |
Folio Filter can be used to filter All transactions, Pre-Posted transactions, or Actual transactions on a folio or reservation.The Folio Filter is available under Folio tab, Charge Summary tab, Charge Summary tab in Reservation Change screen, Deposit/Payment option, and when Previewing or Printing a folio.
Actual transactions are transactions that have already been posted to the folio and will affect general ledger accounts and statistics. Actual transactions will have a blank field in the "Pre" column in the list of transactions on the folio.
Pre-posted transactions are transactions that are scheduled to be posted, and Pre-Posted transactions will displayed with an " * " in the "Pre" column in the list of transactions on the folio.
If a guest is departing tomorrow, and the guest would like to know what their balance due will be at the end of their stay, use the Folio tab and change the Folio Filter to All transactions to list the Actual transactions plus the Pre-Posted Transactions. Another way to view the balance of a reservation prior to the guest's checkout date is to view the amount in the "Due" column for "All" under the Folio tab.
|
Notes can be added to the Room Availability Grand Totals under Reservations menu, Availability.This is helpful to communicate to your staff regarding availability for a specific day. For example, if a group unexpectedly canceled, a note can be added for that day with an explanation as to why there are a lot of available rooms. When a day has a note, the availability totals will be displayed in red. To add a note, right click on the day and select Edit Note and Add note. To view the note, right click on the day and select View Note.
|
F5 New Res has a drop down for a shortcut to make new reservations.The dropdown will allow a quicker way for all reservation types to be made.
|
Are you familiar with Res Type and Res Status?Knowing the Res Type and Res Status can be very helpful to identify what kind of reservation it is and the status of the reservation. The Res Type and Res Status can be found on a reservation or when viewing a list of reservations as shown below:
The Res Type will always be represented by a letter. Since RDP offers many different types of systems, some of these Res Types may not apply to you. Here is a list of all the possible Res Types: P = Paying Guest / Room # Assigned I = Paying Guest / No Room # Assigned S = Special Reservation / Room # Assigned C = Comp Reservation X = Maintenance Reservation O = Owner Reservation (wholly owned) G = Guest of Reservation T = Timeshare Reservation / Room # Assigned Q = Timeshare Reservation / No Room # Assigned B = Timeshare Bonus Reservation E = Timeshare Exchange Reservation
The Res Status will always be represented by a number. Here is a list of all the possible Res Statuses: 1 = Future Reservation / No Deposit 2 = Future Reservation / With Deposit 4 = Future Reservation / With Changes 5 = Checked-in Reservation 6 = Checked-in Reservation / With Changes 7 = Checked-out Reservation / With Security Deposit 8 = Checked-out Reservation 9 = Canceled Reservation |
The General Ledger Interface will export daily or monthly totals for each general ledger in the format for several accounting programs, such as M3, Quickbooks, and Sage.From the accounting program, just import the totals! This will save you time and avoid any erroneous manual entries to your accounting software. For more information regarding the General Ledger Interface, please contact your sales representative. |
Want to make the reservation tape chart easier to read?The tape chart could look similar to this:
Under Reservations, Configuration, Tape Chart tab, increase the Day Width to the desired setting. The standard setting is 20 and the max is 80. |
When under menus for Reservations, Night Audit or Day End, Group, Owner, or Accounting, there is a shortcut to access reports located in the Navigation area on the left-hand side. Additional report folders can be added under these Reports menus.Here is an example of the report folders under the Reservations menu:
To add the Owner report folder under the Reservation Navigation area, go to Reporter menu, Configuration, General tab. In the section for "Additional Report Folders in Navigation Areas," add "Owner" under the header for "Reservation." See below the end result:
|
|
09/02/2022 - Happy Labor Day Weekend!
Our office will be closed on Monday, September 5th and will re-open on Tuesday, September 6th. Emergency Support is available if needed. |
This is a helpful tip if you make Inventory reservations or use group blocks.Under Reservations, Configuration, Availability tab, there is a checkbox for "Check Room Type Availability."
When this setting is checked, a new column under Available Rooms is added to the right of the Room Type column named "Inv." If there is no allocation remaining for the room type, a red "I" will be displayed in the Inv column.
|
Owners who make a payment in the owner portal can receive a receipt.The owner receipt is an HTML document, so this can be customized with logo, colors, and text.
|
When using the option to Add Sharewith or Add Room, use New Guest button to assign a new guest history number.When the reservation has a unique guest history number, then a unique email address can be assigned to the guest history record and to the reservation.
|
Do you have a Crystal report where the fields and field titles need to be lined up?Guidelines and the option to Arrange Lines in Crystal Reports can help you with this! Guidelines in Crystal Reports are triangular buttons with attached dashed lines that appear in the horizontal and vertical ruler bar. Guidelines can be used to easily move and align objects. Open up the Crystal report, and select File, Options, Layout tab. Under Design Review, make sure that Guidelines is checked.
|
Tape chart colors can be assigned to show reservations that haveNo Deposit, Partial Deposit, or are Fully Paid. Under Reservations menu, Configuration, Tape Chart tab, click on each of the categories under Paying Guest to assign the colors based on payment received. Tape chart colors can also be assigned to Group reservations based on payment received.
|
Would you like to get an alert if there is a special request or a special occasion on a reservation?Go to Reservations menu, Configuration, Res Access tab. In the Alert section, you can check the box to include reservation notes in the alert. You can also select which comment fields to be included in the alert by using the drop down arrow in "Select comments to show on alert."
Whenever a reservation is selected under F3 Find Res, any comments and/or notes configured for an alert, the alert will appear.
|
The Sigma symbol ∑ is used to summarize rows with numeric values in all of the Analysis grids.∑ is available under Res Analysis, Groups Analysis, Travel Agents Analysis, Guest History Analysis, Owner Analysis, and Rooms Analysis. When ∑ is selected in a row, there are options to get an average, count, maximum, minimum, or to sum the row. The value will be located at the bottom of the row. You may need to expand the row to see the entire value.
|
Join us for three days of RDP Training at the Resort Data Processing Headquarters in Vail, Colorado!Sessions will focus on ways of maximizing the most from your RDP system by mastering Crystal Reports and delving deeper into Modules and Features personalized to your property. September 19 - September 21 will be our most popular Hotels & Resorts Conference. Enjoy Colorado's spectacular Fall foliage. This conference fills up quickly! October 24 - October 26 is our Condominiums & Vacation Rental Conference to close out our Conference series. October is a beautiful month to visit Vail, Colorado! To register for the conference please reach out to your sales rep. |
UnCheck-Out can be used to check-in a reservation that has already been checked out.UnCheck-Out can only be used if the departure date of the reservation is the same date as the RDP date. If the departure date of the reservation is prior to the RDP date or if the room is no longer available, make a new reservation and check it in. Make sure to select the guest from Guest History, to expedite making the new reservation. |
Rooms that are marked as Waiting appear in both the Housekeeping Summary and Housekeeping Schedule.First, the switch under Reservations menu, Configuration, Check-in tab needs to be checked for "Turn on Guest Waiting feature." Secondly, use the checkbox on reservations for "Waiting" for those guests that are waiting for their room to be cleaned. The Waiting checkbox is available under F6 Arrivals and F7 In-House. Under Housekeeping menu, Schedule, Today, there is a Waiting column in the Summary to indicate how many rooms are marked as Waiting. In addition, the Housekeeping Schedule will display how many rooms are marked as Waiting for each Board. Expand each Board to view the rooms that are Waiting. There is also a check box for "Waiting Only" that can display all rooms marked as Waiting when a Board is expanded.
|
Would you like to sign others up for Tip of the Day?Under Start menu in RDPWin, go to Home, and select the link for SignUp under "Tip of the Day." You can also use this link to sign others up for Tip of the Day.
|
Would you like to display your tape chart in a different order other than room number or room type?A unique sequence number can be defined for each room number to be displayed in the tape chart. Under Reservations menu, Configuration, Tape Chart tab, select the radio button for "Custom" for Default Sequence.
|
Does your property only rent villas, homes or sites instead of "units"? Do you have "members" instead of"owners"? Do you prefer to use "postal code" instead of "zip code"?Use Custom Labels to customize RDP to display the label you prefer. Under System menu, Configuration, Custom Labels, you can change the label for various fields related to rooms, reservation types, masters, dates, addresses, and other areas. After any changes, logoff and log back in order for the changes to take effect.
|
Do you need an additional Res Type to distinguish from your other Res Types?Use Res Type S for Special Res Type to separate out reservations from other Res Types. Res Type S reservations act exactly like a Preassigned reservation where a room number is required. A unique tape chart color can also be assigned to Res Type S under Res Menu, Configuration, Tape Chart tab. In addition, if you want to replace "Special" with another description, this can be changed. Go to System menu, Switches, enter C1TYPE-S in the Search field. Update the description in the Setting column.
|
Problem: When field names are displayed in Field Explorer in Crystal Reports, are they not displayed alphabetically as seen below?
Solution: To display field names alphabetically in Crystal Reports Field Explorer, go to File, Options, Database tab. Check the box for "Sort Fields Alphabetically."
Want to learn more about how to use Crystal Reports? Attend one of RDP's conferences to learn Crystal Reports! Please contact your sales representative to attend an RDP conference or purchase Crystal Reports webinars. |
Have you ever just booked a reservation and had trouble remembering the reservation number or the guest's name?Go to Reservations -> Reservations Made Today to see a list of all the reservations made today. Also, to see the last reservations made, click 'F3 Find Res' & then click the last page button to view the last reservation made
|
You can now add Cancel Date column to Res Analysis.The Defaults button will update the Additional Columns in Res Analysis.
RDPWin5.3.002.11 is required. |
Does your property allow guests to use bicycles or other items that you would like to keep track of?The Itinerary & Concierge module can be used to track Open Activities. On the Activity Vendor Master, check the box for "Check for Open Activities."
If you are interested in the Itinerary & Concierge module, please contact your sales representative. |
Please include your times of availability for a support session for the current day and the following couple of business days along with the appropriate phone number to reach you.This will expedite the scheduling process and how soon we can assist you. If you are unavailable when we call at the scheduled time, expect to be re-scheduled to the next available time slot. Thank you! |
Have you ever wondered if a switch was designed to affect just the user, computer, resort or all resorts?Under Reservations, Configuration, at the bottom of the page, there is a checkbox to "Show Switch Levels." When this is checked, this will enable the switches to display colors based on the switch level. Blue= User level Brown=Computer (workstation) level Green=Resort level Red= All Resorts level
This feature is available in RDPWin5.3.002.11. |
Phone numbers can now be automatically formatted with dashes on reservations, owners, group masters, travel agents, work order vendors, and itinerary vendors. This feature will also automatically format phone numbers for all the above that were already made! When typing the phone number, the dashes will automatically appear.When more than 10 digits are entered, it is assumed that there is an extension number and will be followed by an "x". For example: 970-845-1140x 1176. For non-US and Canadian numbers, use "+" prior to the number, and there is no formatting. Under System, Switches, enter 414-81 in Search field, set "Format phone fields to 111-222-3333 x123."
|
A fence level can now be added to Change Rates button.If the fence level on the Change Rates button is higher than the RDP User's power level, access will be denied to change rates on a reservation. Under System, Menu Security, expand UI Security and assign the appropriate fence level to Change Rates Button.
|
Names and address fields can automatically uppercase letters after a space ora special character. Under System, Switches, Search for 414-82. Set to Yes to "Camel case name fields." RDPWin5.3.002.11 is required. |
Would you like to easily track how much revenue is discounted on discounted rates?A discounted rate can be split into two general ledger accounts, one for gross room revenue and another for the discounted revenue. Under System menu, Switches, enter 425-29 in the Search field. Change Setting to Yes to "Split discount rate plan into two GL accounts (Gross & Discount.)" When adding the Discount Rate Plan or selecting an existing Discounted Rate Plan, assign the general ledger account for the discounted revenue.
The gross room revenue will continue to go to the general ledger assigned to the rate set, and the discounted room revenue will go to the assigned general ledger assigned to the Discount Rate Plan. Below is an example of a journal detail of a Discount Rate Plan with a RACK Rate of $165 and a 25% off. The gross room revenue of $165 is applied to general ledger account #40200 and the discounted room revenue is applied to general ledger account #40205.
|
Virtual Store module allows activities and items to be sold in RDPWin and on the RDP booking engine, IRMng. Virtual Store can be an excellent revenue source!Activity Inventory Control module allows inventory to be loaded for activities for each day and limit the activities being sold. This is a great solution to sell activities for conference meetings, special events, early check-ins, late check-outs, ferry tickets, beach umbrellas, and holiday dinners! Please contact your sales representative for more information on Virtual Store and Activity Inventory Control. |
Would you like to know the description of what a report does in RDPWin?Just highlight the report and select the button for Description to get the details of what the report does! These descriptions are available for reports that were created by RDP.
Report Descriptions can also be viewed for custom Crystal Reports. The description can be added in Crystal Reports under File, Summary Info in the Comments field.
|
The default symbol displayed when viewing room availability in the Before and After columns is a "Full Stop" or a "."There are additional symbols available options will make it easier to read when viewing available rooms before the arrival date and after the departure date of the reservation. Under Reservations menu, Configuration, Availability tab, there are configurations for the Font, Font Size, Vacant Symbol, and a Sample field to display how the configurations will be displayed.
Below is an example of an Underscore used in the Before and After columns under Available Rooms:
|
A hyperlink to a website or an email address can be added to a Crystal Report, such as a confirmation.In the Crystal report, select the text box, and select the "Insert Hyperlink" button If you are adding a hyperlink to a website address, select the radio button for "A Website on the Internet" and then enter the URL in the field for "Website Address."
|
Join us for three days of RDP Training at the Resort Data Processing Headquarters in Vail, Colorado!Sessions will focus on ways of maximizing the most from your RDP system by mastering Crystal Reports and delving deeper into Modules and Features personalized to your property. September 19 - September 21 will be our most popular Hotels & Resorts Conference. Enjoy Colorado's spectacular Fall foliage. This conference fills up quickly! October 24 - October 26 is our Condominiums & Vacation Rental Conference to close out our Conference series. October is a beautiful month to visit Vail, Colorado! To register for the conference please reach out to your sales rep. |
A note can be added directly to the transaction posted to the guest folio.Under the Folio tab on a reservation, just double click on the transaction, and select the Notes tab. After adding and saving the note, the transaction will be in bold to indicate that there is a note on the transaction. Transaction notes can also be added to Group Masters, Travel Agents, Work Order Vendors, and Owners.
|
Do you ever need to post a charge or a payment to a reservation that is in Non-Active History?Deposits and charges can only be posted to reservations that are Future, In-House, or in Active History. To transfer a reservation from Non-Active History to Active History, go to Night Audit Menu, Transfer to History, and select the button for "Transfer 1 Res FROM Non Active," enter the guest name or reservation number. Once the reservation is transferred to Active History, you will be allowed to post charges and payments to the reservation.
|
Res Comments can be easily edited right under the Comments tab on a reservation.Under the Comments tab on a reservation, select Change Comments to update the comments and select Save & Close to save the changes. RDPWin5.3.002.11 or higher is required for this feature. |
RDPWin Log records all of the events in RDP.To view the the log file, go to System menu and select RDPWin Log. The log can be displayed by date range, logon name, program name, and message type. Since the log is displayed in a grid, all of the sorting, filters, and grouping functions are available. The log can also be filtered by a specific station number.
|
Have you ever provided a quote and need to provide another quote with different dates? This can be done all on the same reservation screen!Once a quote is created at the bottom of the New Res screen, change the dates to the desired dates and select Add Quote to get the quote for those dates. After the guest decides which quote they want, highlight the quote and select Make Reservation. The other quote will be discarded. Additional quotes can be added by updating Arrival Date, number of Nights, Departure Date, number of People, Room Type, Room Number, and Rate Plan.
|
Notes on reservations can be easily viewed in the tape chart and can be marked with a character to indicate that there is a note on the reservation.Under Reservations menu, Configuration, Tape Chart tab, there are two switches that can be helpful. If you would like to see notes on a reservation in the tape chart when hovering over it, check the box for "Show reservation note on hover over bar." If you would like to indicate that there is a note on a reservation in the tape chart, a character can be placed in front of the name on the reservation. This can be turned on by checking the box for "Show character in front of name if reservation note exists."
|
Would you like to require that a work order is always assigned to a vendor, such as the Maintenance or Housekeeping department?Under Work Orders menu, Configuration, check the box for "Vendor required when adding/changing work order."
|
The reservations listed for owners can be configured to default to reservations with a res status of your choice.For example, if you prefer to list reservations that only display future reservations for an owner, this default can now be configured. Under Owners menu, Configuration, General tab, select the option from the list under Default Res List Res Status
|
You can sort one column in Res Analysis and then add a secondary sort for another column.After displaying the list of reservations under Reservations menu, Analysis, Reservations, select the column header for the first sort. Hold the <Shift> key down and select the additional column that you would like to sort next. |
Daily Charges allows charges to be posted to reservations nightly and monthly.Daily Charges can also based on frequency. Enter a "3" in "Posting Frequency" if the charge is to be posted at check-in and every 3rd night thereafter. In addition, Daily Charges can be applied to a specific date range and a maximum dollar amount can also be set as the limit. Daily Charges are configured under Reservations menu, Configuration, Daily Charges tab. Add the Daily Charge with appropriate settings and then add the Transaction Code as needed. |
Create a booking window when a rate plan can be sold!Enter the Booking Start date and the Booking End date on the rate plan to determine when the rate plan can be purchased. In the example below, a Fall Package is available to be sold in advance from 3/15/22 to 7/31/22 as indicated in the Booking Start and Booking End dates. The Fall package can only be consumed based on the arrival date range from 9/12/22 to 11/20/22 as indicated in the Start Date and End Dates.
|
Join us for three days of RDP Training at the Resort Data Processing Headquarters in Vail, Colorado!Sessions will focus on ways of maximizing the most from your RDP system by mastering Crystal Reports and delving deeper into Modules and Features personalized to your property. September 19 - September 21 will be our most popular Hotels & Resorts Conference. Enjoy Colorado's spectacular Fall foliage. This conference fills up quickly! October 24 - October 26 is our Condominiums & Vacation Rental Conference to close out our Conference series. October is a beautiful month to visit Vail, Colorado! Here is more information regarding our upcoming Fall conferences: RDP Conferences To register for the conference please reach out to your sales rep. |
Do you ever need to know how much room revenue was taxable or non-taxable for a specific date range?Under Accounting reports folder, use reports Room Charge By Tax Code-Detail to get room revenue for each reservation for each day for each tax code or use Room Charge By Tax Code-Summary to get the summary of room revenue for each date for each tax code |
Do you want your RDPWin session to not automatically log out after a period of inactivity?If your user is set up as user type Administrator, then this time-out will occur. You can go to System -> Manage Users and switch your user type to 'User' instead of 'Admin', or create a second login name with user type 'User' and that user will never be automatically logged out! |
If you want to display all rooms immediately when the tape chart is launched, there is a switch for that!
When this switch is turned on, you won't have to select the button to "Display Rooms" when the tape chart is first launched. Under Reservations, Configuration, Tape Chart tab, check the box for "Display all rooms when tape chart is first shown."
|
A deposit placed on the group leader can be disbursed to all reservations within the group.Use F3 to Find the group leader reservation, select option for Group and Disburse Deposit. Select the deposit and use button to Disburse. Select the option to "Disburse across all group members evenly" to evenly distribute the payments among the group reservations.
|
House Status displays Arrivals, In-House, and Departures all on one screen.Under Reservations menu, House Status, you can quickly view all of today's arrivals, in-house reservations, and departures. Select any of the categories, and the reservations for that category will display. In addition, changes can be made to that reservation as well as the ability to use the Options on the left-hand side panel, such as Check-in, Check-out, Post Charges, Deposit/Payment etc.
|
Pay code changes can be pre-scheduled on reservations.
In the example above, there is a reservation with a group where the group leader is paying for all of the charges arriving on 3/1 and departing on 3/5. The guest wants to stay an extra day, depart on 3/6, and pay for their own charges.
The Pay Codes tab on the reservation can be used to pre-schedule a pay code change, so that the guest is responsible for the night of 3/5. Since the pay code for the group leader is set to ZZ on the reservation, the pay code change would be on 3/5 using pay code IP. |
Pre-Arrival confirmations can be automatically emailed to guests.Under Reporter, Configuration, Confirmation Settings, select Add to add a new confirmation. Set Master field to "Res", enter the name of the confirmation, such as "Pre-Arrival 10 Days," and select the number of days in "Days prior to Arrival".
Configure the remaining sections as needed. Under Reporter, Configuration, Confirmation Associations tab, select Add Confirmation. Select "Pre-Arrival Confirmation" under Reservations Status, select the appropriate Reservation Type, and then select the "Pre-Arrival" confirmation created under "Confirmation Settings."
Multiple Pre-Arrival confirmations can be added, such as 30 Days, 10 Days, and 1 Day prior to arrival. |
Credit card tokens can automatically be copied to a new reservation when using option toAdd Rooms and also option to Add Sharewith. To turn on the feature to copy credit card for Add Rooms, go to System, Switches, and enter 420-01 in Search field. Set 420-01 to Yes for "Copy credit card when reserving additional room." To turn on the feature to copy credit card for Add Sharewith, set 420-02 to Yes for "Copy credit card when making a sharewith." |
Note Templates can be very helpful on reservations to keep track of important information about the reservation or the guest.For example, use a note template that will load notes related to different departments, such as Reservations, Front Desk, Concierge, Bell Staff, Housekeeping or Maintenance. This can help you organize your notes. Note Templates can also be configured based on the reservation type, so a Note Template can be configured for a Pre-assigned or Inventory reservation and a different Note Template for an Owner or Guest of Owner reservation. Note Templates are available on Reservations, Owners, Group Masters, Room Masters, Travel Agents, Activity Vendor Masters, Work Order Vendor Masters, Work Order Assets, and Itineraries. Click here on how to configure Note Templates Here is an example of a Note Template:
|
Do you have guests that you prefer to not to make a reservation for?You can flag a guest with Guest Type "Do Not Rent" to alert you when they try to make a reservation. Under System menu, Table Maintenance, enter "CA" in the Table field, Display. If Guest Type "DNR" doesn't already exist, add this with description "Do Not Rent."
Under Reservations menu, Configuration, New Res tab, set "Block guest type" to "DNR- Do Not Rent."
When making a reservation for a guest that is marked as "Do Not Rent," the following message will appear:
|
Enhanced Work Orders module can be used to schedule preventative maintenance and also automatically schedule Tasks for reservations.Recurring work orders can be scheduled in advance on a daily, weekly, monthly, or annual basis. Use this to schedule work orders to change the A/C filters in all of the rooms every other month. In addition, Tasks can be scheduled by Reservation Type based on Arrival Date or Departure Date. Use this to schedule Tasks to turn on the heated driveway 2 days before the owner arrives. For more information regarding Enhanced Work Orders, please contact your sales representative. |
IRMng in RDPWin5 has an upsell feature!When IRMng is configured for Inventory reservations, up to two upgrade options per room type can be configured. The upgrade options will display below the Reservation Summary. Under IRM menu, IRMng Configuration, Customization tab, select Upgrade Options button. After the upgrade options are configured, make sure to check the box next to the Upgrade Option button to "Enable upgrade options."
|
Would you like payments taken at check-in to be considered a Guest Payment instead of an Advanced Deposit?Under System Menu, Switches, enter 414-43 in Search field. Change Setting to "Yes" for "Use B2 ledger when taking a payment at check-in." |
Hide cancelled reservations from displaying when viewing group reservations.Use F3 Find Reservation to select the group leader or any member of the group. Select "Hide Cancelled" to hide any cancelled reservations within the group from displaying.
|
Join us for three days of RDP Training at the Resort Data Processing Headquarters inVail, Colorado! Sessions will focus on ways of maximizing the most from your RDP system by mastering Crystal Reports and delving deeper into Modules and Features personalized to your property. September 19 - September 21 will be our most popular Hotels & Resorts Conference. Enjoy Colorado's spectacular Fall foliage. This conference fills up quickly! October 24 - October 26 is our Condominiums & Vacation Rental Conference to close out our Conference series. October is a beautiful month to visit Vail, Colorado! To register for the conference please reach out to your sales rep. |
Would you like to format a reservation comment field to be a date or a Yes/No radio button?Comment fields can be customized to be a date, time, currency, phone number, Yes/No options, Yes/No dropdown, and a checkbox. Comment fields can be formatted on reservations, guest history, group masters, owners, room masters, travel agents, activity vendors, work orders, work order vendors, work order assets, CRM, and timeshare/fractional weeks. The descriptions of comment fields are changed under System menu, Comment fields, and selecting the appropriate Type of Master. For example, here is how to change Comment-5 on reservations to show "Early Check-in" and format it as a Yes/No Radio button: System menu, Comment fields, select Reservation/Guest for Type of Master. Update Comment-5 with a description of "Early Check-in."
System menu, Table Maintenance, Add Table, enter appropriate table from list below. In this case, Comment-5 for Reservations/Guest History is table E2, enter description "Early Check-in", Save & Close, Display.
Add Subrecord, enter ~ in the Subrecord field, enter 6 in Description, Save & Close. Comment-5 on the reservation should now have a radio button as displayed below:
Formats are added by adding a sub-record to the lookup table with a “~”. The second field of the sub-record is the format type: 1 Text (this is the default and does not have to be added to the table) 2 Integer 3 Double 4 Currency 5 Yes/No dropdown 6 Yes/No radio buttons 7 Date 8 Time 9 Date/Time 10 Phone Number 11 Social Security Number (should not be used or stored in RDP database) 12 Checkbox Below are the files, comment fields, and their corresponding tables:Reservations & Guest History Comment 1: Table EF Comment 2: Table EG Comment 3: Table EH Comment4: Table E1 Comment 5: Table E2 Comment 6: Table E3 Comment 7: Table E4 Comment 8: Table E5 Comment 9: Table E6 Comment 10: Table E7 Comment 11: Table E8 Comment 12: Table E9 Comment 13: Table EA Comment 14: Table EB Comment 15: Table EC Comment 16: Table ED Comment 17: Table EF Comment 18: Table Y0 Comment 19: Table Y1 Comment 20: Table Y2 Comment 21: Table Y3 Comment 22: Table Y4 Comment 23: Table Y5 Comment 24: Table Y6 Comment 25: Table Y7 Groups Comment 1: Table JA Comment 2: Table JB Comment 3: Table JC Comment 4: Table JD Comment 5: Table JE Comment 6: Table JF Comment 7: Table JG Comment 8: Table JH Comment 9: Table JI Comment 10: Table JJ Comment 11: Table JK Comment 12: Table JL Comment 13: Table J0 Comment 14: Table J1 Comment 15: Table J2 Comment 16: Table J3 Comment 17: Table J4 Comment 18: Table J5 Owners Comment 1: Table IA Comment 2: Table IB Comment 3: Table IC Comment 4: Table ID Comment 5: Table IE Comment 6: Table IF Comment 7: Table IG Comment 8: Table IH Comment 9: Table II Comment 10: Table IJ Comment 11: Table IK Comment 12: Table IL Comment 13: Table I0 Comment 14: Table I1 Comment 15: Table I2 Comment 16: Table I3 Comment 17: Table I4 Comment 18: Table I5 Rooms Comment 1: Table IM Comment 2: Table IN Comment 3: Table IO Comment 4: Table IP Comment 5: Table IQ Comment 6: Table IR Comment 7: Table IS Comment 8: Table IT Comment 9: Table IU Comment 10: Table IV Comment 11: Table IW Comment 12: Table IX Comment 13: Table YA Comment 14: Table YB Comment 15: Table YC Comment 16: Table YD Comment 17: Table YE Comment 18: Table YF Travel Agents Comment 1: Table KA Comment 2: Table KB Comment 3: Table KC Comment 4: Table KD Comment 5: Table KE Comment 6: Table KF Comment 7: Table KG Comment 8: Table KH Comment 9: Table KI Comment 10: Table KJ Comment 11: Table KK Comment 12: Table KL Comment 13: Table K0 Comment 14: Table K1 Comment 15: Table K2 Comment 16: Table K3 Comment 17: Table K4 Comment 18: Table K5 Activity Vendors Comment 1: Table LA Comment 2: Table LB Comment 3: Table LC Comment 4: Table LD Comment 5: Table LE Comment 6: Table LF Comment 7: Table LG Comment 8: Table LH Comment 9: Table LI Comment 10: Table LJ Comment 11: Table LK Comment 12: Table LL Comment 13: Table LM Comment 14: Table LN Comment 15: Table LO Comment 16: Table LP Comment 17: Table LQ Work Order Vendors Comment 1: Table NJ Comment 2: Table NK Comment 3: Table NL Comment 4: Table NM Comment 5: Table NN Comment 6: Table NO Comment 7: Table NP Comment 8: Table NQ Comment 9: Table NR Comment 10: Table NS Comment 11: Table NT Comment 12: Table NU Comment 13: Table NV Comment 14: Table NW Comment 15: Table NX Comment 16: Table NY Comment 17: Table NZ Work Order Assets Comment 1: Table N2 Comment 2: Table N3 Comment 3: Table N4 Comment 4: Table N5 Comment 5: Table N6 Comment 6: Table N7 Comment 7: Table N8 Comment 8: Table N9 Comment 9: Table NA Comment 10: Table NB Comment 11: Table NC Comment 12: Table ND Comment 13: Table NE Comment 14: Table NF Comment 15: Table NG Comment 16: Table NH Comment 17: Table NI CRM Comment 1: Table T2 Comment 2: Table T3 Comment 3: Table T4 Comment 4: Table T5 Comment 5: Table T6 Comment 6: Table T7 Comment 7: Table T8 Comment 8: Table T9 Comment 9: Table TA Comment 10: Table TB Comment 11: Table TC Comment 12: Table TD Comment 13: Table TE Comment 14: Table TF Comment 15: Table TG Comment 16: Table TH Comment 17: Table TI Timeshare/Fractional Weeks Comment 1: Table EV Comment 2: Table EW Comment 3: Table EX Comment 4: Table EY Comment 5: Table EZ |
Change Group Reservations option allows changes made to all of the reservations within the group without having to change each group reservation one at a time.Use F3 to select the group leader reservation then select Change Options, Group Reservations. Use drop down in Select the field to update. Choose any option from one of the following: Allow Move, Comments, Daily Charges, Dates, Housekeeping, Market Code, Source of Business, Tasks, Tax Code, and Pay Code. Recently the options were added for Other Charges and Confirm To.
|
Use Find Res button in tape chart to display a reservation.When using Find Res, enter the guest name or reservation number, and the reservation will be displayed in the tape chart. Remember that only reservations with room numbers appear in the tape chart.
|
Did you know that you can split a room charge while adding a Sharewith?When adding a Sharewith to a reservation, select the box to "Split Room Charges." This option will automatically split the room charge between two Sharewiths. This only applies to Room Only rate plans.
|
The VIP field can be changed to display choices, and each of those choices can be assigned a unique tape chart color.To implement this feature, go to System, Switches, and enter 427-04 in Search field. Set this switch to Yes for "Use list for VIP field on Res and Guest Screens (Table VI). Next, go to System, Table Maintenance, and enter table VI, Display. Use Add Code and enter each VIP code and assign a unique tape chart color. Be sure to include code "N" for Non-VIP.
|
Did you know that the tape chart can display all checked out reservations from active andnon-active history? This is a great way to find all reservations that stayed in a particular room for previous dates. Make sure that the check box for "Hide Check Outs" is not checked under the Advanced Options.
|
Would you like to have more control over allowing dirty rooms to be checked in?A password can be prompted when checking in a dirty room. Under System, Switches, enter C1RMDRTY in the Search field. Enter a password in the Setting field.
|
Would you like to offer rooms on IRMng for today but also set a cutoff time to stop selling?To avoid issues with housekeeping preparing rooms for arrivals, it is helpful to cutoff available rooms at a certain time for same-day reservations. Under IRM menu, IRMng Configuration, Customization tab, select "Cutoff same day bookings" and enter the desired time. To cutoff only the Dirty rooms for same day reservations, check the box for "Cutoff dirty rooms only."
|
RDP Support is closed Monday, May 30th, for the Memorial Day holiday.We wish everyone a wonderful holiday weekend and best wishes for a busy and enjoyable summer season. Emergency Support is available during the holiday closure. |
If you use group blocks, Availability can be displayed for just the House block, a specific group block, or all group blocks and House block.Under Reservations menu, Availability, select the radio button for Group, select House, Display Availability to display just the House block. If a group block exists for a specific group for the dates selected, you are able to select the group. Select radio button for Block/Available and Display Availability to see what has been blocked and what is available. To view both House block and all group blocks, select the radio button for Group, select the option for "*-All", select Block/Available, Display Availability.
If you do not use group blocks, it would be best practice to select the radio button for Room Type and select Availability Only. The defaults for the Availability screen can be configured under Reservations, Configuration, Availability tab. |
Are you familiar with our rate plan cut-offs feature?It allows you to stop offering a certain rate plan once the property reaches a specified occupancy percentage. This allows you to tier your rates to automatically increase at times of high occupancy and decrease at times of low occupancy. If you are using multiple BAR rates (Best Available Rates), you can also cut-off BAR rates based on occupancy percentage. Navigate to System menu -> Rates -> Rate Plan Cut-Offs to get started. Do you need comprehensive training on rates and packages? Please contact your sales representative to help you and your staff get the training you need! |
Would you like to store owner and group contracts or photos of owners or frequent guests?Master Links for Documents and Pictures module allows documents and pictures to be stored for Owners, Group Masters, and Past Guests. Group contracts, owner contracts, rental contracts and much more can be stored in RDP. For more information about Master Links for Pictures & Documents module, please contact your sales representative. |
Do you have any groups that are a rooming list?Take advantage of the available features under Rooming List found under Reservations menu, Group Reservations! Once the group is displayed, the guest name and email address can be entered quickly. The room number can be assigned or changed by using Available Rooms. If the guest is sharing the room, use Add Sharewith. The dates, rates, and other reservation detail can be changed just by double-clicking on the reservation.
Would you like to get training on Group Reservations? Please reach out to your sales representative for more information. |
The credit card token from an owner master can now be copied to new owner reservations!Under System menu, Switches, enter 421-78 in Search field. Change the setting to Yes for "Copy credit card from owner master when making owner reservations."
RDPWin5.3.001.38 or higher is required. |
Would you like to offer your guests an option to hold their deposit if they cancel their reservation?Holding a deposit on a canceled reservation is a good incentive for the guest to re-book their stay for a future date. Under Reservations, Configuration, Cancel tab, select the check box to "Display "Held Deposit" option on cancellation screen.
When canceling a reservation with a deposit, select the option for "Held Deposit" if you would like to hold the deposit.
When the guest wants to re-book their reservation, Un-cancel the reservation and make the necessary changes, such as dates, room type or room number, etc. To forfeit a held deposit on a cancelled reservation, select Cancel again. Forfeiting deposits on canceled reservations with held deposits can be completed in a batch based on the original arrival date. Use option to "Process Held Deposits" under Reservations menu. |
Room attendants and Inspectors often find issues in rooms that need to be reported to the Maintenance department.Mobile Housekeeping allows room attendants, inspectors, and the Housekeeping manager to add a work order from their mobile device. Under Housekeeping, Configuration, Mobile tab, you can allow your Housekeeping staff to add a work order.
You can also automatically send an email to the Maintenance department whenever a work order is added from Mobile Housekeeping! Are you interested in Mobile Housekeeping? Please reach out to your sales representative for a full demo! |
After a dirty occupied room is cleaned in Mobile Housekeeping, the status can be changed directly to Clean instead of Inspect.Under Housekeeping menu, Configuration, Mobile tab, check the box for "Clean Status = Clean Not Inspected if room is occupied."
Are you interested in Mobile Housekeeping? Please contact your sales representative for more information! |
Folio Filter can be used to filter All transactions, Pre-Posted transactions, or Actual transactions on a folio or reservation.The Folio Filter is available under Folio tab, Charge Summary tab, Charge Summary tab in Reservation Change screen, Deposit/Payment option, and when Previewing or Printing a folio.
Actual transactions are transactions that have already been posted to the folio and will affect general ledger accounts and statistics. Actual transactions will have a blank field in the "Pre" column in the list of transactions on the folio.
Pre-posted transactions are transactions that are scheduled to be posted, and Pre-Posted transactions will displayed with an " * " in the "Pre" column in the list of transactions on the folio.
If a guest is departing tomorrow, and the guest would like to know what their balance due will be at the end of their stay, use the Folio tab and change the Folio Filter to All transactions to list the Actual transactions plus the Pre-Posted Transactions. Another way to view the balance of a reservation prior to the guest's checkout date is to view the amount in the "Due" column for "All" under the Folio tab.
|
Join us for three days of RDP Training at the Resort Data Processing Headquarters inVail, Colorado!Sessions will focus on ways of maximizing the most from your RDP system by mastering Crystal Reports and delving deeper into Modules and Features personalized to your property. September 19 - September 21 will be our most popular Hotels & Resorts Conference. Enjoy Colorado's spectacular Fall foliage. This conference fills up quickly! October 24 - October 26 is our Condominiums & Vacation Rental Conference to close out our Conference series. October is a beautiful month to visit Vail, Colorado! Here is more information regarding our upcoming Fall conferences: https://www2.resortdata.com/e/691233/conferences-hotels-resorts-/7nd4c/525579133?h=Z_p09aHs8BtgB939X02Sk_Tqy1ciVU8_PqYjTkaU1nE To register for the conference please reach out to your sales rep. |
Notes can be added to the Room Availability Grand Totals under Reservations menu, Availability.This is helpful to communicate to your staff regarding availability for a specific day. For example, if a group unexpectedly canceled, a note can be added for that day with an explanation as to why there are a lot of available rooms. When a day has a note, the availability totals will be displayed in red. To add a note, right click on the day and select Edit Note and Add note. To view the note, right click on the day and select View Note.
|
F5 New Res has a drop down for a shortcut to make new reservations.The dropdown will allow a quicker way for all reservation types to be made.
|
Are you familiar with Res Type and Res Status?Knowing the Res Type and Res Status can be very helpful to identify what kind of reservation it is and the status of the reservation. The Res Type and Res Status can be found on a reservation or when viewing a list of reservations as shown below:
The Res Type will always be represented by a letter. Since RDP offers many different types of systems, some of these Res Types may not apply to you. Here is a list of all the possible Res Types: P = Paying Guest / Room # Assigned I = Paying Guest / No Room # Assigned S = Special Reservation / Room # Assigned C = Comp Reservation X = Maintenance Reservation O = Owner Reservation (wholly owned) G = Guest of Reservation T = Timeshare Reservation / Room # Assigned Q = Timeshare Reservation / No Room # Assigned B = Timeshare Bonus Reservation E = Timeshare Exchange Reservation The Res Status will always be represented by a number. Here is a list of all the possible Res Statuses: 1 = Future Reservation / No Deposit 2 = Future Reservation / With Deposit 4 = Future Reservation / With Changes 5 = Checked-in Reservation 6 = Checked-in Reservation / With Changes 7 = Checked-out Reservation / With Security Deposit 8 = Checked-out Reservation 9 = Canceled Reservation |
The General Ledger Interface will export daily or monthly totals for each general ledger in the format for several accounting programs, such as M3, Quickbooks, and Sage. From the accounting program, just import the totals! This will save you time and avoid any erroneous manual entries to your accounting software.For more information regarding the General Ledger Interface, please contact your sales representative. |
Want to make the reservation tape chart easier to read?The tape chart could look similar to this:
Under Reservations, Configuration, Tape Chart tab, increase the Day Width to the desired setting. The standard setting is 20 and the max is 80. |
When under menus for Reservations, Night Audit or Day End, Group, Owner, or Accounting, there is a shortcut to access reports located in the Navigation area on the left-hand side. Additional report folders can be added under these Reports menus.Here is an example of the report folders under the Reservations menu:
To add the Owner report folder under the Reservation Navigation area, go to Reporter menu, Configuration, General tab. In the section for "Additional Report Folders in Navigation Areas," add "Owner" under the header for "Reservation." See below the end result:
|
|
After a dirty occupied room is cleaned in Mobile Housekeeping, the status can be changed directly to Clean instead of Inspect. Under Housekeeping menu, Configuration, Mobile tab, check the box for "Clean Status = Clean Not Inspected if room is occupied."
|
OwnerNG (owner portal) can restrict any new and any changes to Owner, Guest of Owner, and Owner Referral reservations based on number of days prior to arrival.Under IRM menu, Configuration, OwnerNG tab, update the number of days in switch "Arrival date must be 'x' days from the current date for owner, guest of owner, and owner referral reservations." |
Would you like to send a text message to all of your in-house guests about a special in the restaurant? Would you like to mass text all of the departures to advise them of a storm warning?Mobile Communications module allows mass texting to all arrivals, in-house guests, and departures. If you combine Mobile Communications with Mobile Housekeeping, you can also have a text message automatically sent to guests when their room is clean! For more information regarding Mobile Communications module, please contact your sales representative. |
Do you have Source of Business codes or Market Codes that you no longer want to use?Both Source of Business codes and Market Codes can be disabled, so that they no longer display as an option. Under System menu, Table Maintenance, enter "CD" in the Table field for Source of Business codes or "CF" for Market Codes, Display. Select the Source of Business code or Market Code and Enter a "Y" in the Disable field. In order to preserve historical information, it would be best practice to add new Source of Business codes or Market Codes instead of changing or deleting existing ones.
|
This is a helpful tip if you make Inventory reservations or use group blocks.Under Reservations, Configuration, Availability tab, there is a checkbox for "Check Room Type Availability."
When this setting is checked, a new column under Available Rooms is added to the right of the Room Type column named "Inv." If there is no allocation remaining for the room type, a red "I" will be displayed in the Inv column.
|
Use Reservations Analysis to list all reservations with a deposit due and also apply the payment!Under Reservations menu, Analysis, Reservations, select Future, Deposit Due Date, enter Deposit Due Date range of dates, Display.
From the Columns button, add columns for "DepositAmount" and "DepositDueDate" and Save. These columns can be moved as needed.
From the list of reservations displayed with deposits due, select each reservation and use option for Deposit/Payment.
|
Owners who make a payment in the owner portal can receive a receipt!The owner receipt is an HTML document, so this can be customized with logo, colors, and text.
|
When using the option to Add Sharewith or Add Room, use New Guest button to assign a new guest history number.When the reservation has a unique guest history number, then a unique email address can be assigned to the guest history record and to the reservation.
|
Do you have a Crystal report where the fields and field titles need to be lined up?Guidelines and the option to Arrange Lines in Crystal Reports can help you with this! Guidelines in Crystal Reports are triangular buttons with attached dashed lines that appear in the horizontal and vertical ruler bar. Guidelines can be used to easily move and align objects. Open up the Crystal report, and select File, Options, Layout tab. Under Design Review, make sure that Guidelines is checked.
|
Tape chart colors can be assigned to show reservations that haveNo Deposit, Partial Deposit, or are Fully Paid. Under Reservations menu, Configuration, Tape Chart tab, click on each of the categories under Paying Guest to assign the colors based on payment received. Tape chart colors can also be assigned to Group reservations based on payment received.
|
Join us for three days of RDP Training at the Resort Data Processing Headquarters inVail, Colorado! Sessions will focus on ways of maximizing the most from your RDP system by mastering Crystal Reports and delving deeper into Modules and Features personalized to your property. September 19 - September 21 will be our most popular Hotels & Resorts Conference. Enjoy Colorado's spectacular Fall foliage. This conference fills up quickly! October 24 - October 26 is our Condominiums & Vacation Rental Conference to close out our Conference series. October is a beautiful month to visit Vail, Colorado! To register for the conference please reach out to your sales rep. |
Would you like to get an alert if there is a special request or a special occasion on a reservation?Go to Reservations menu, Configuration, Res Access tab. In the Alert section, you can check the box to include reservation notes in the alert. You can also select which comment fields to be included in the alert by using the drop down arrow in "Select comments to show on alert."
Whenever a reservation is selected under F3 Find Res, any comments and/or notes configured for an alert, the alert will appear.
|
The Sigma symbol ∑ is used to summarize rows with numeric values in all of the Analysis grids.∑ is available under Res Analysis, Groups Analysis, Travel Agents Analysis, Guest History Analysis, Owner Analysis, and Rooms Analysis. When ∑ is selected in a row, there are options to get an average, count, maximum, minimum, or to sum the row. The value will be located at the bottom of the row. You may need to expand the row to see the entire value.
|
UnCheck-Out can be used to check-in a reservation that has already been checked out.UnCheck-Out can only be used if the departure date of the reservation is the same date as the RDP date. If the departure date of the reservation is prior to the RDP date or if the room is no longer available, make a new reservation and check it in. Make sure to select the guest from Guest History, to expedite making the new reservation. |
Rooms that are marked as Waiting appear in both the Housekeeping Summary and Housekeeping Schedule.First, the switch under Reservations menu, Configuration, Check-in tab needs to be checked for "Turn on Guest Waiting feature." Secondly, use the checkbox on reservations for "Waiting" for those guests that are waiting for their room to be cleaned. The Waiting checkbox is available under F6 Arrivals and F7 In-House. Under Housekeeping menu, Schedule, Today, there is a Waiting column in the Summary to indicate how many rooms are marked as Waiting. In addition, the Housekeeping Schedule will display how many rooms are marked as Waiting for each Board. Expand each Board to view the rooms that are Waiting. There is also a check box for "Waiting Only" that can display all rooms marked as Waiting when a Board is expanded.
|
Would you like to sign others up for Tip of the Day?Under Start menu in RDPWin, go to Home, and select the link for SignUp under "Tip of the Day." You can also use this link to sign others up for Tip of the Day.
|
Would you like to display your tape chart in a different order other thanroom number or room type? A unique sequence number can be defined for each room number to be displayed in the tape chart. Under Reservations menu, Configuration, Tape Chart tab, select the radio button for "Custom" for Default Sequence.
|
Does your property only rent villas, homes or sites instead of "units"? Do you have "members" instead of "owners"? Do you prefer to use "postal code" instead of "zip code"?Use Custom Labels to customize RDP to display the label you prefer. Under System menu, Configuration, Custom Labels, you can change the label for various fields related to rooms, reservation types, masters, dates, addresses, and other areas. After any changes, logoff and log back in order for the changes to take effect.
|
Do you need an additional Res Type to distinguish from your other Res Types?Use Res Type S for Special Res Type to separate out reservations from other Res Types. Res Type S reservations act exactly like a Preassigned reservation where a room number is required. A unique tape chart color can also be assigned to Res Type S under Res Menu, Configuration, Tape Chart tab. In addition, if you want to replace "Special" with another description, this can be changed. Go to System menu, Switches, enter C1TYPE-S in the Search field. Update the description in the Setting column.
|
|
Problem: When field names are displayed in Field Explorer in Crystal Reports, are they not displayed alphabetically as seen below?
Solution: To display field names alphabetically in Crystal Reports Field Explorer, go to File, Options, Database tab. Check the box for "Sort Fields Alphabetically."
Want to learn more about how to use Crystal Reports? Attend one of RDP's conferences to learn Crystal Reports! Please contact your sales representative to attend an RDP conference or purchase Crystal Reports webinars. |
Do you always add Notes when making a new reservation?You have an option to default to the Notes tab! Go to Reservations, Configuration, under the New Res tab, check the box for "Default to Notes tab."
|
Does your property allow guests to use bicycles or other items that you would like to keep track of?The Itinerary & Concierge module can be used to track Open Activities. On the Activity Vendor Master, check the box for "Check for Open Activities."
If you are interested in the Itinerary & Concierge module, please contact your sales representative. |
Please include your times of availability for a support session for the current day and the following couple of business days along with the appropriate phone number to reach you.This will expedite the scheduling process and how soon we can assist you. If you are unavailable when we call at the scheduled time, expect to be re-scheduled to the next available time slot. Thank you! |
|
Would you like the ability to add a note to explain why an adjustment was made? A note can be added directly to the transaction posted to the guest folio. Under the Folio tab on a reservation, just double click on the transaction, and select the Notes tab. After adding and saving the note, the transaction will be in bold to indicate that there is a note on the transaction. Transaction notes can also be added to Group Masters, Travel Agents, Work Order Vendors, and Owners.
|
Do you ever need to post a charge or a payment to a reservation that is in Non-Active History?Deposits and charges can only be posted to reservations that are Future, In-House, or in Active History. To transfer a reservation from Non-Active History to Active History, go to Night Audit Menu, Transfer to History, and select the button for "Transfer 1 Res FROM Non Active," enter the guest name or reservation number. Once the reservation is transferred to Active History, you will be allowed to post charges and payments to the reservation.
|
RDPWin Log records all of the events in RDP.To view the the log file, go to System menu and select RDPWin Log. The log can be displayed by date range, logon name, program name, and message type. Since the log is displayed in a grid, all of the sorting, filters, and grouping functions are available. The log can also be filtered by a specific station number.
|
Have you ever provided a quote and need to provide another quote with different dates? This can be done all on the same reservation screen!Once a quote is created at the bottom of the New Res screen, change the dates to the desired dates and select Add Quote to get the quote for those dates. After the guest decides which quote they want, highlight the quote and select Make Reservation. The other quote will be discarded. Additional quotes can be added by updating Arrival Date, number of Nights, Departure Date, number of People, Room Type, Room Number, and Rate Plan.
|
Notes on reservations can be easily viewed in the tape chart and can be marked with a character to indicate that there is a note on the reservation.Under Reservations menu, Configuration, Tape Chart tab, there are two switches that can be helpful. If you would like to see notes on a reservation in the tape chart when hovering over it, check the box for "Show reservation note on hover over bar." If you would like to indicate that there is a note on a reservation in the tape chart, a character can be placed in front of the name on the reservation. This can be turned on by checking the box for "Show character in front of name if reservation note exists."
|
Would you like to require that a work order is always assigned to a vendor, such as the Maintenance or Housekeeping department?Under Work Orders menu, Configuration, check the box for "Vendor required when adding/changing work order."
|
Under the Help menu select Menu Shortcuts. Expand Module R0 to see all of the Reservation shortcuts. Alt+F12 is the shortcut for Availability and Ctrl+Shift+A is the shortcut to Res Analysis.Shortcuts are also available for Module R3 for Condo Owner Accounting, Module R4 for Guest History, Module RN for Rates & Packages, Module RV for GDS, Module SA for Central Availability, and Module W0 for the new Dashboard module, and Module W6 for Activity Inventory Control in RDPWin Version 5. |
The reservations listed for owners can be configured to default to reservations with a res status of your choice.For example, if you prefer to list reservations that only display future reservations for an owner, this default can now be configured. Under Owners menu, Configuration, General tab, select the option from the list under Default Res List Res Status
|
You can sort one column in Res Analysis and then add a secondary sort for another column.After displaying the list of reservations under Reservations menu, Analysis, Reservations, select the column header for the first sort. Hold the <Shift> key down and select the additional column that you would like to sort next. |
|
Daily Charges allows charges to be posted to reservations nightly and monthly.Daily Charges can also based on frequency. Enter a "3" in "Posting Frequency" if the charge is to be posted at check-in and every 3rd night thereafter. In addition, Daily Charges can be applied to a specific date range and a maximum dollar amount can also be set as the limit. Daily Charges are configured under Reservations menu, Configuration, Daily Charges tab. Add the Daily Charge with appropriate settings and then add the Transaction Code as needed. |
Join us for three days of RDP Training, at the Resort Data Processing Headquarters in Vail, Colorado! Sessions will focus on ways of maximizing the most from your RDP system, by mastering Crystal Reporting and delving deeper into Modules and Features personalized to your property.April 11 - April 13 kicks off our conference series with Hotels & Resorts Conference. If you want to learn a lot about RDP and also get some turns in on the mountain during ski season, this is the conference for you! Happy Hour Sponsored by SendSquared. September 19 - September 21 will be our most popular Hotels & Resorts Conference. Enjoy Colorado's spectacular Fall foliage. This conference fills up quickly! Happy Hour Sponsored by DuVoice. October 24 - October 26 is our Condominiums & Vacation Rental Conference to close out our Conference series. October is a beautiful month to visit Vail, Colorado! Happy Hour Sponsored by Tenerum/Chosen. To register for the conference please reach out to your sales rep |
Create a booking window when a rate plan can be sold!Enter the Booking Start date and the Booking End date on the rate plan to determine when the rate plan can be purchased. In the example below, a Fall Package is available to be sold in advance from 3/15/22 to 7/31/22 as indicated in the Booking Start and Booking End dates. The Fall package can only be consumed based on the arrival date range from 9/12/22 to 11/20/22 as indicated in the Start Date and End Dates.
|
Do you ever need to know how much room revenue was taxable or non-taxable for a specific date range?Under Accounting reports folder, use reports Room Charge By Tax Code-Detail to get room revenue for each reservation for each day for each tax code or use Room Charge By Tax Code-Summary to get the summary of room revenue for each date for each tax code. |
Do you want your RDPWin session to not automatically log out after a period of inactivity?If your user is set up as user type Administrator, then this time-out will occur. You can go to System -> Manage Users and switch your user type to 'User' instead of 'Admin', or create a second login name with user type 'User' and that user will never be automatically logged out! |
If you want to display all rooms immediately when the tape chart is launched, there is a switch for that!When this switch is turned on, you won't have to select the button to "Display Rooms" when the tape chart is first launched. Under Reservations, Configuration, Tape Chart tab, check the box for "Display all rooms when tape chart is first shown."
|
A deposit placed on the group leader can be disbursed to all reservations within the group.Use F3 to Find the group leader reservation, select option for Group and Disburse Deposit. Select the deposit and use button to Disburse. Select the option to "Disburse across all group members evenly" to evenly distribute the payments among the group reservations. |
Pay code changes can be pre-scheduled on reservations.
|
House Status displays Arrivals, In-House, and Departures all on one screen.Under Reservations menu, House Status, you can quickly view all of today's arrivals, in-house reservations, and departures. Select any of the categories, and the reservations for that category will display. In addition, changes can be made to that reservation as well as the ability to use the Options on the left-hand side panel, such as Check-in, Check-out, Post Charges, Deposit/Payment etc.
|
Pre-Arrival confirmations can be automatically emailed to guests.Under Reporter, Configuration, Confirmation Settings, select Add to add a new confirmation. Set Master field to "Res", enter the name of the confirmation, such as "Pre-Arrival 10 Days," and select the number of days in "Days prior to Arrival".
Configure the remaining sections as needed. Under Reporter, Configuration, Confirmation Associations tab, select Add Confirmation. Select "Pre-Arrival Confirmation" under Reservations Status, select the appropriate Reservation Type, and then select the "Pre-Arrival" confirmation created under "Confirmation Settings."
Multiple Pre-Arrival confirmations can be added, such as 30 Days, 10 Days, and 1 Day prior to arrival. |
Credit card tokens can automatically be copied to a new reservation when using option to Add Rooms and also option to Add Sharewith.To turn on the feature to copy credit card for Add Rooms, go to System, Switches, and enter 420-01 in Search field. Set 420-01 to Yes for "Copy credit card when reserving additional room." To turn on the feature to copy credit card for Add Sharewith, set 420-02 to Yes for "Copy credit card when making a sharewith." |
Note Templates can be very helpful on reservations to keep track of important information about the reservation or the guest.For example, use a note template that will load notes related to different departments, such as Reservations, Front Desk, Concierge, Bell Staff, Housekeeping or Maintenance. This can help you organize your notes. Note Templates can also be configured based on the reservation type, so a Note Template can be configured for a Pre-assigned or Inventory reservation and a different Note Template for an Owner or Guest of Owner reservation. Note Templates are available on Reservations, Owners, Group Masters, Room Masters, Travel Agents, Activity Vendor Masters, Work Order Vendor Masters, Work Order Assets, and Itineraries. Click here on how to configure Note Templates Here is an example of a Note Template:
|
The Tape Chart can automatically display with a date that is a couple of days prior to today.It is beneficial to display the tape chart with a starting date 2 or 3 days prior to today to show in-house reservations that may be checking out today. In the example below, today's date is March 1st. The tape chart starting days is set to 2 days prior to today's date.
Under Reservations menu, Configuration, Tape Chart tab, use the drop down arrow key to change the Starting Days to -2 or -3.
|
Join us for three days of RDP Training at the Resort Data Processing Headquarters inVail, Colorado! Sessions will focus on ways of maximizing the most from your RDP system by mastering Crystal Reports and delving deeper into Modules and Features personalized to your property. April 11 - April 13 kicks off our conference series with Hotels & Resorts Conference. If you want to learn a lot about RDP and also get some turns in on the mountain during ski season, this is the conference for you! September 19 - September 21 will be our most popular Hotels & Resorts Conference. Enjoy Colorado's spectacular Fall foliage. This conference fills up quickly! October 24 - October 26 is our Condominiums & Vacation Rental Conference to close out our Conference series. October is a beautiful month to visit Vail, Colorado! To register for the conference please reach out to your sales rep. |
Do you have guests that you prefer to not to make a reservation for?You can flag a guest with Guest Type "Do Not Rent" to alert you when they try to make a reservation. Under System menu, Table Maintenance, enter "CA" in the Table field, Display. If Guest Type "DNR" doesn't already exist, add this with description "Do Not Rent."
|
Enhanced Work Orders module can be used to schedule preventative maintenance and also automatically schedule Tasks for reservations.Recurring work orders can be scheduled in advance on a daily, weekly, monthly, or annual basis. Use this to schedule work orders to change the A/C filters in all of the rooms every other month. In addition, Tasks can be scheduled by Reservation Type based on Arrival Date or Departure Date. Use this to schedule Tasks to turn on the heated driveway 2 days before the owner arrives. For more information regarding Enhanced Work Orders, please contact your sales representative. |
|
President's Day ClosureOur office will be closed to observe President's Day on Monday, February 21st.Our office will resume normal business hours on Tuesday, February 22nd. Emergency Support is available if needed. |
If you use Group Blocks to allocate a number of rooms by room type to a group, here is a helpful tip related to canceling reservations.When you set up a Group Block, enter the Release Date when the Group Block should be released.
If a reservation for the group is canceled within the Release Date, the allocation for that room type will be released to the Group Block. If the reservation for the group is canceled beyond the Release Date, the allocation for that room type will be released to House. |
Increase your revenue by using Mass Email to offer a Promo Code to your prior guests.Set up the promotional code and tie it to a discount rate plan under IRM menu, Configuration, Promotional Codes tab. Under Reporter menu, Mass E-mail option, select Guests, and use the filter options to mass email your guests. Filters can be used for prior stay dates, zip code, state, source of business code, and market code. Include the promotional offer with a link to your IRM booking engine. |
When IRM is configured for Inventory reservations, up to two upgrade options per room type can be configured.The upgrade options will display below the Reservation Summary. Under IRM menu, IRMng Configuration, Customization tab, select Upgrade Options button. After the upgrade options are configured, make sure to check the box next to the Upgrade Option button to "Enable upgrade options."
|
Would you like to offer rooms on IRMng for today but also set a cutoff time to stop selling?To avoid issues with housekeeping preparing rooms for arrivals, it is helpful to cutoff available rooms at a certain time for same-day reservations. Under IRM menu, IRMng Configuration, Customization tab, select "Cutoff same day bookings" and enter the desired time. To cutoff only the Dirty rooms for same day reservations, check the box for "Cutoff dirty rooms only."
|
If you use group blocks, Availability can be displayed for just the House block, a specific group block, or all group blocks and House block.Under Reservations menu, Availability, select the radio button for Group, select House, Display Availability to display just the House block. If a group block exists for a specific group for the dates selected, you are able to select the group. Select radio button for Block/Available and Display Availability to see what has been blocked and what is available. To view both House block and all group blocks, select the radio button for Group, select the option for "*-All", select Block/Available, Display Availability.
If you do not use group blocks, it would be best practice to select the radio button for Room Type and select Availability Only. The defaults for the Availability screen can be configured under Reservations, Configuration, Availability tab. |
Are you familiar with our rate plan cut-offs feature?It allows you to stop offering a certain rate plan once the property reaches a specified occupancy percentage. This allows you to tier your rates to automatically increase at times of high occupancy and decrease at times of low occupancy. If you are using multiple BAR rates (Best Available Rates), you can also cut-off BAR rates based on occupancy percentage. Navigate to System menu -> Rates -> Rate Plan Cut-Offs to get started. Do you need comprehensive training on rates and packages? Please contact your sales representative to help you and your staff get the training you need! |
Would you like to store owner and group contracts or photos of owners or frequent guests?Master Links for Documents and Pictures module allows documents and pictures to be stored for Owners, Group Masters, and Past Guests. Group contracts, owner contracts, rental contracts and much more can be stored in RDP. For more information about Master Links for Pictures & Documents module, please contact your sales representative. |
Would you like to offer your guests to hold their deposit if they cancel their reservation?Holding a deposit on a canceled reservation is a good incentive for the guest to re-book their stay for a future date. Under Reservations, Configuration, Cancel tab, select the check box to "Display "Held Deposit" option on cancellation screen.
When canceling a reservation with a deposit, select the option for "Held Deposit" if you would like to hold the deposit.
When the guest wants to re-book their reservation, Un-cancel the reservation and make the necessary changes, such as dates, room type or room number, etc. To forfeit a held deposit on a cancelled reservation, select Cancel again. Forfeiting deposits on canceled reservations with held deposits can be completed in a batch based on the original arrival date. Use option to "Process Held Deposits" under Reservations menu. |
Room attendants and Inspectors often find issues in rooms that need to be reported to the Maintenance department.Mobile Housekeeping allows room attendants, inspectors, and the Housekeeping manager to add a work order from their mobile device. Under Housekeeping, Configuration, Mobile tab, you can allow your Housekeeping staff to add a work order.
You can also automatically send an email to the Maintenance department whenever a work order is added from Mobile Housekeeping! Are you interested in Mobile Housekeeping? Please reach out to your sales representative for a full demo! |
After a dirty occupied room is cleaned in Mobile Housekeeping, the status can be changed directly to Clean instead of Inspect.Under Housekeeping menu, Configuration, Mobile tab, check the box for "Clean Status = Clean Not Inspected if room is occupied."
|
OwnerNG (owner portal) can restrict any new and any changes to Owner, Guest of Owner, and Owner Referral reservations based on number of days prior to arrival.Under IRM menu, Configuration, OwnerNG tab, update the number of days in switch "Arrival date must be 'x' days from the current date for owner, guest of owner, and owner referral reservations." |
Would you like to send a text message to all of your in-house guests about a special in the restaurant? Would you like to mass text all of the departures to advise them of a storm warning?Mobile Communications module allows mass texting to all arrivals, in-house guests, and departures. If you combine Mobile Communications with Mobile Housekeeping, you can also have a text message automatically sent to guests when their room is clean! For more information regarding Mobile Communications module, please contact your sales representative. |


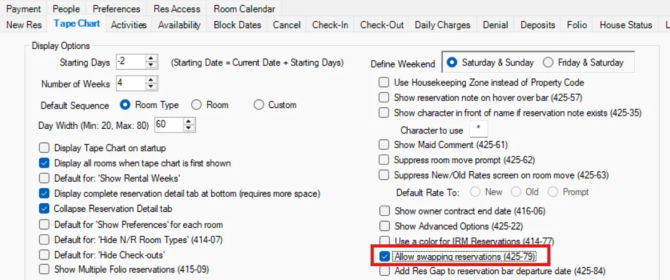


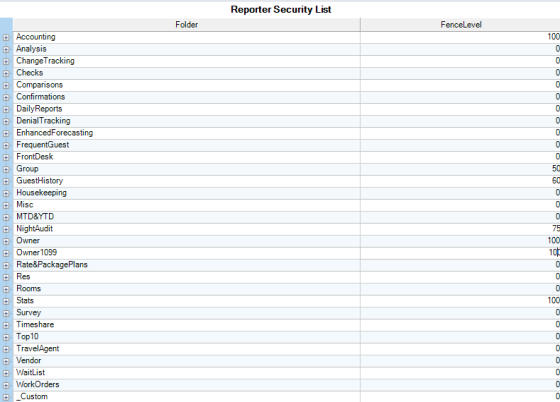
_465x367.png)
_364x400.png)
_416x665.png)
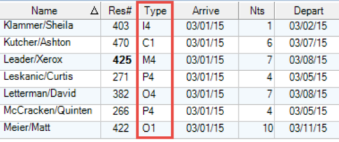
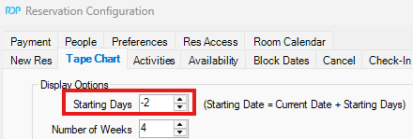
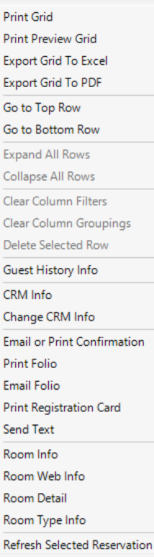

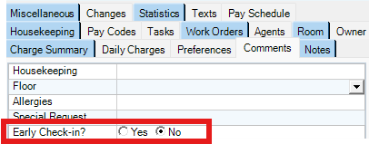

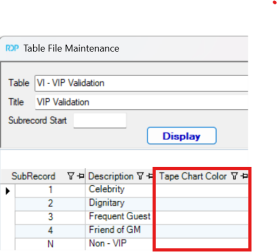

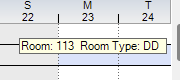


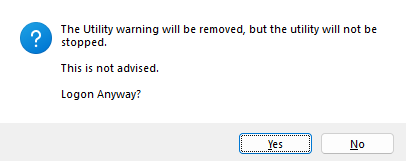


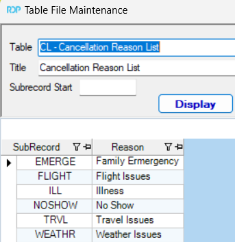
_545x431.png)
_359x395.png)

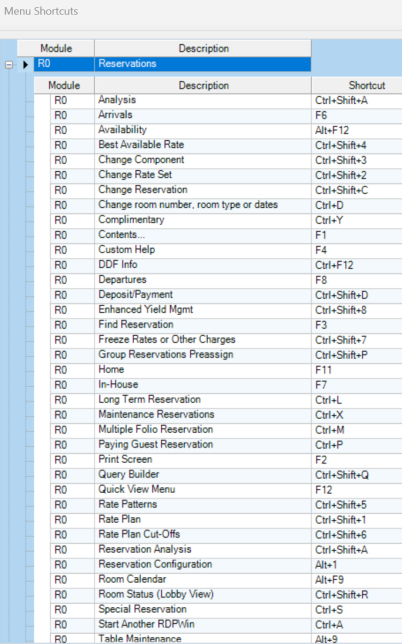
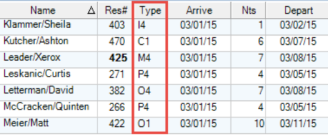

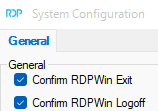
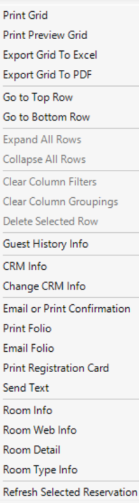

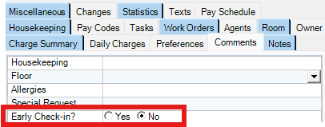

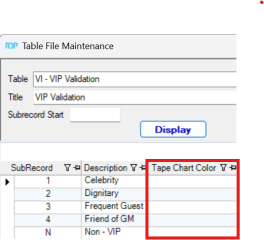
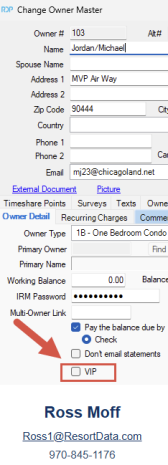
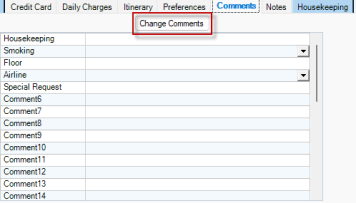

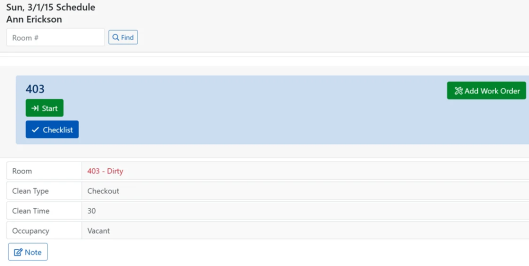


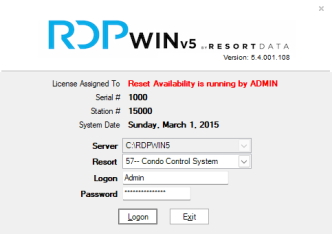


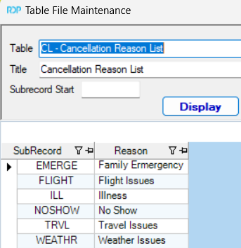
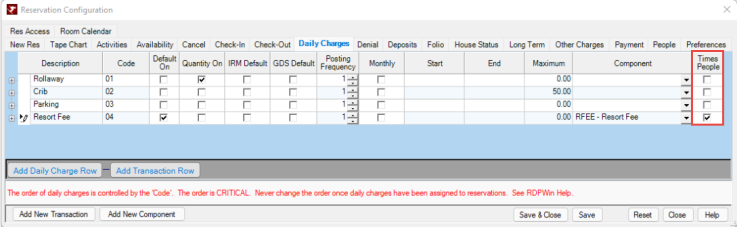
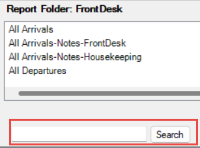


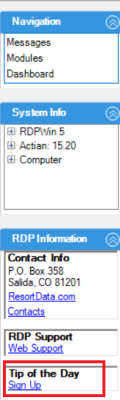
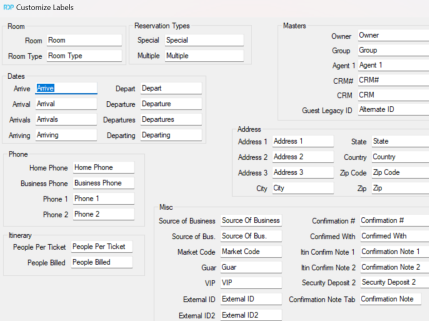
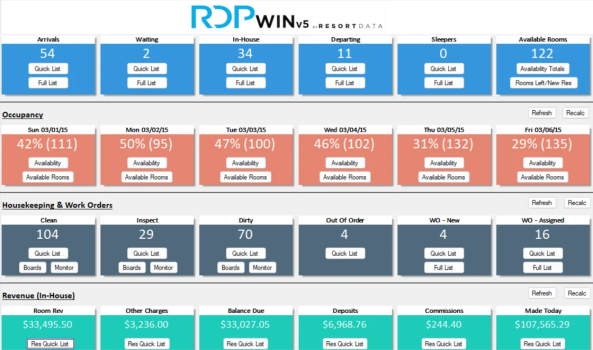
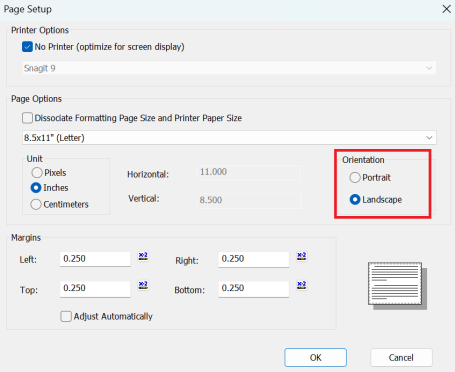


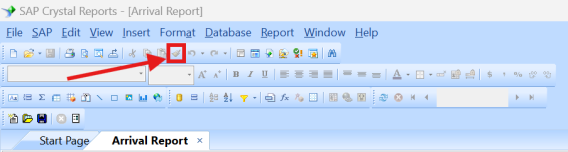
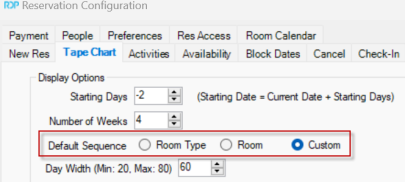
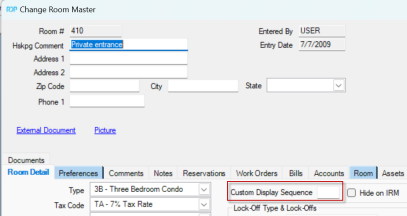


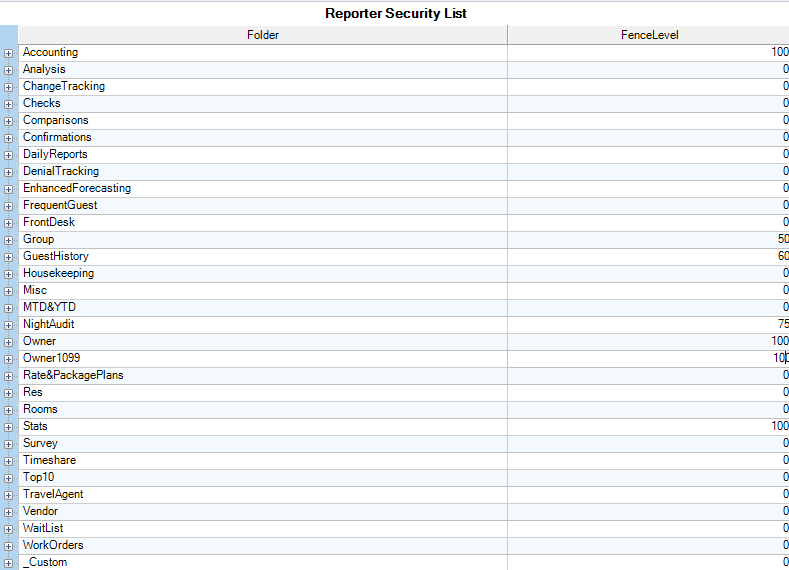
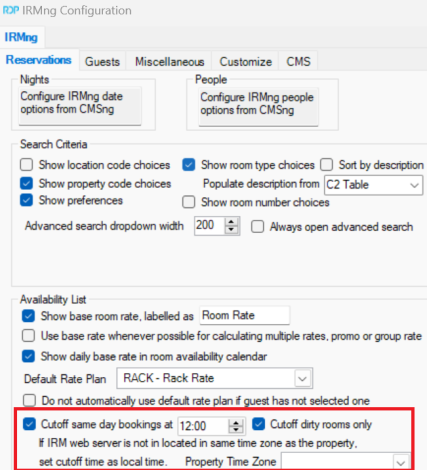
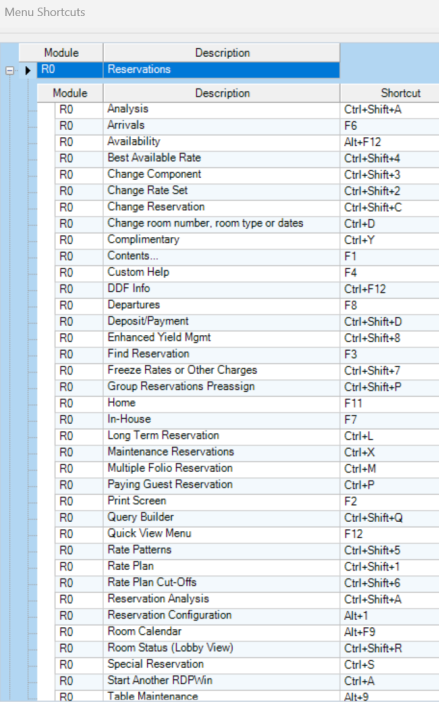
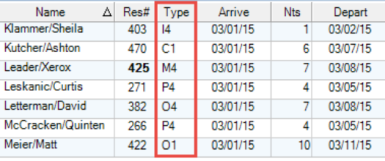
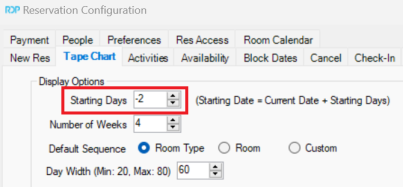
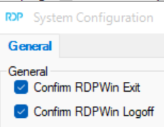


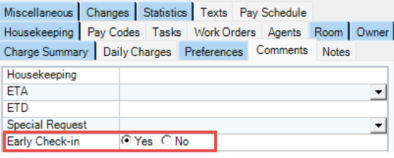

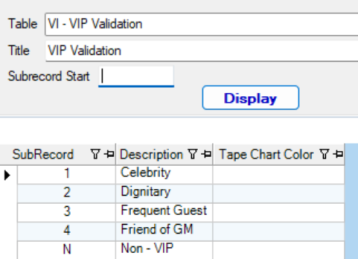
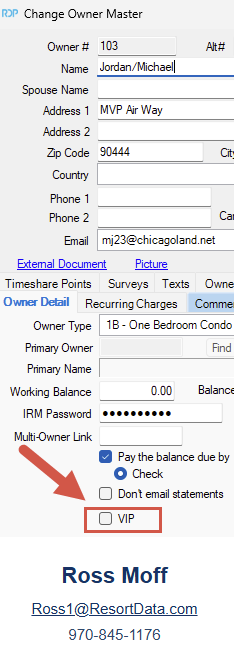


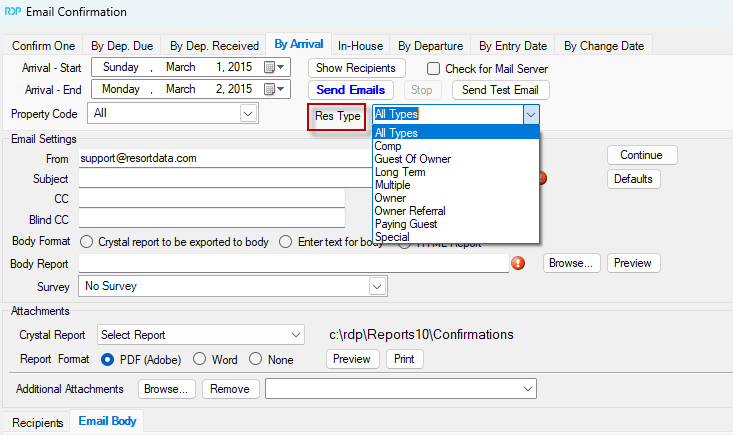


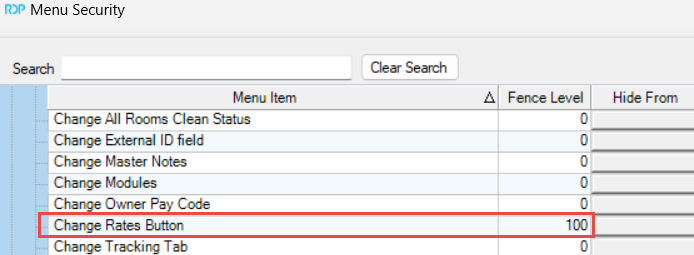
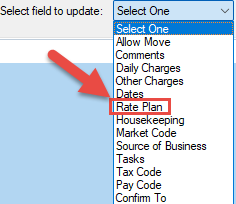
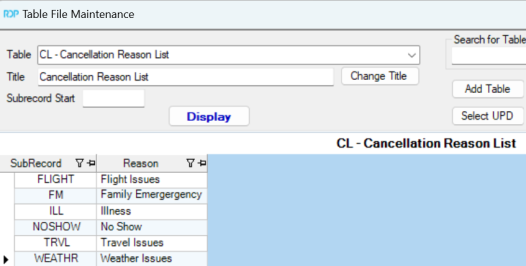

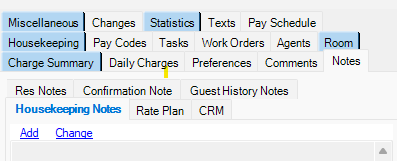
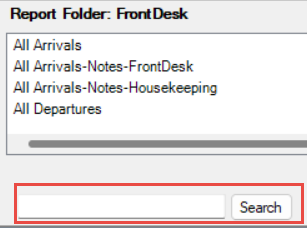
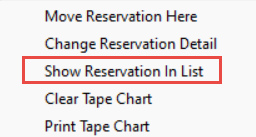


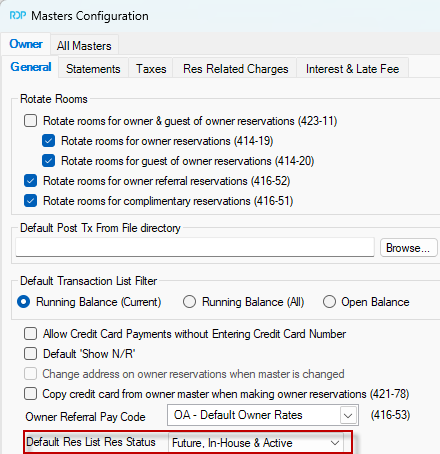
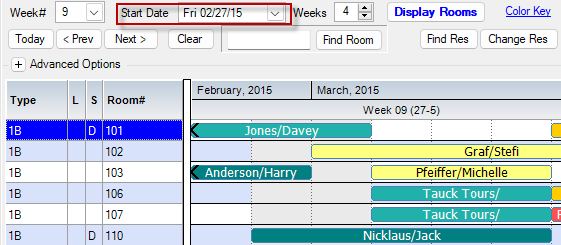
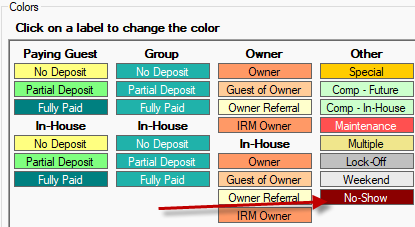
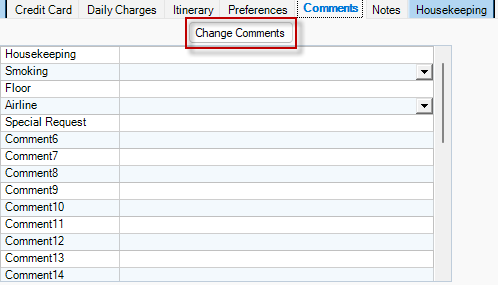
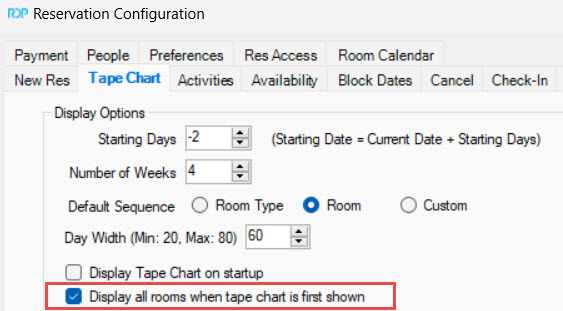


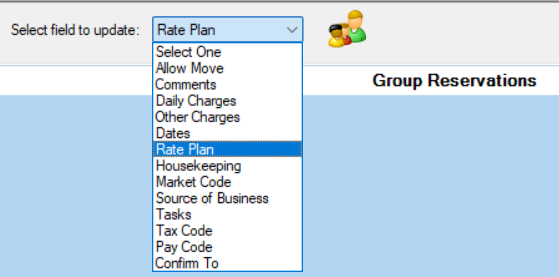


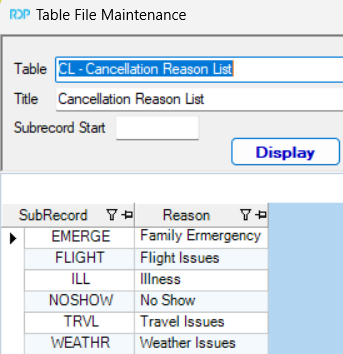
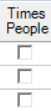


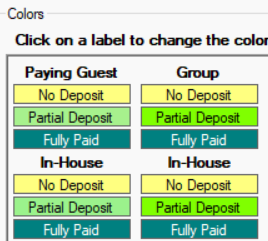


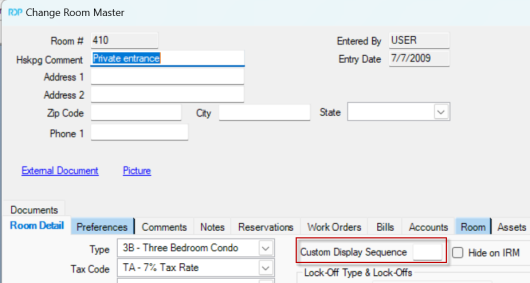

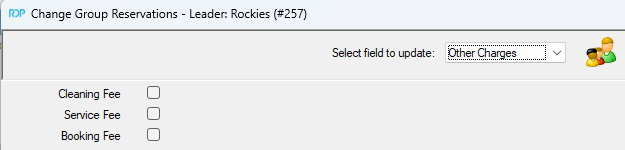


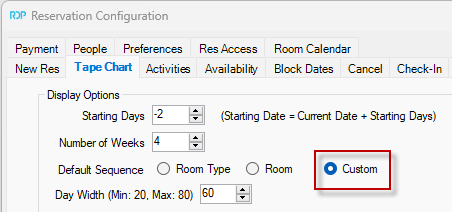

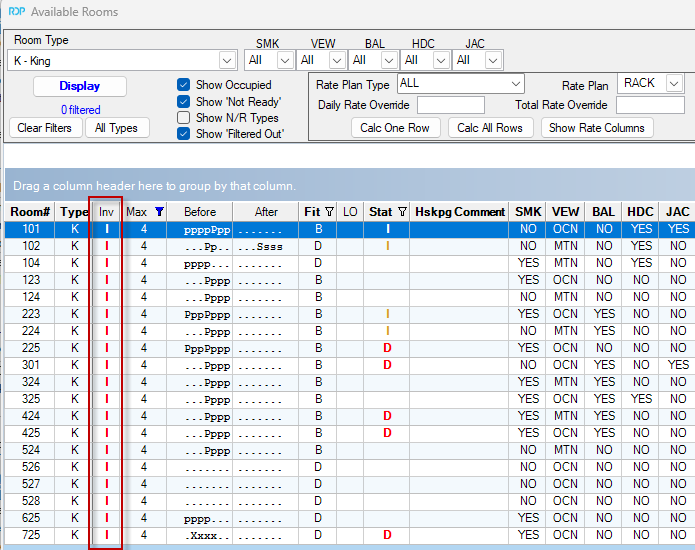
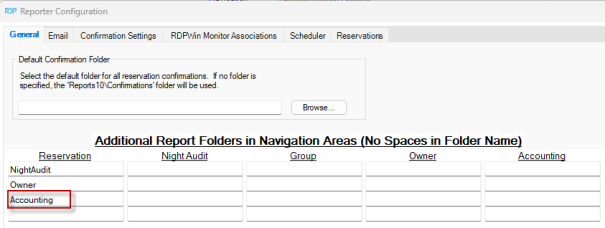

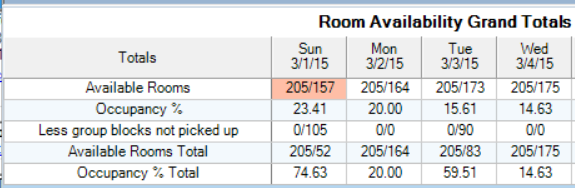

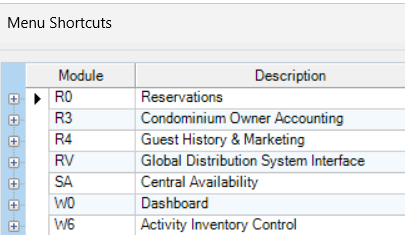
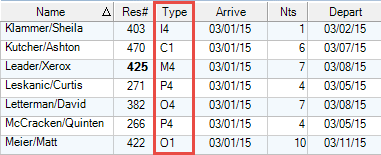
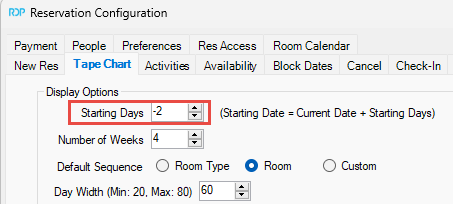
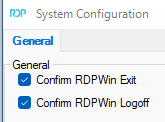
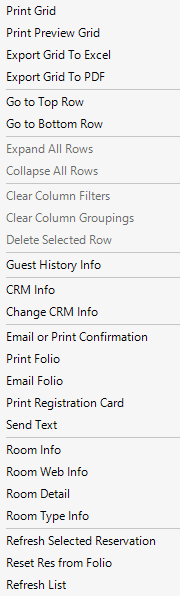


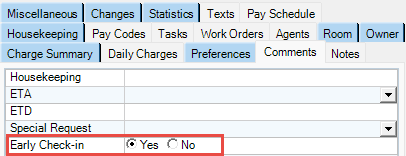

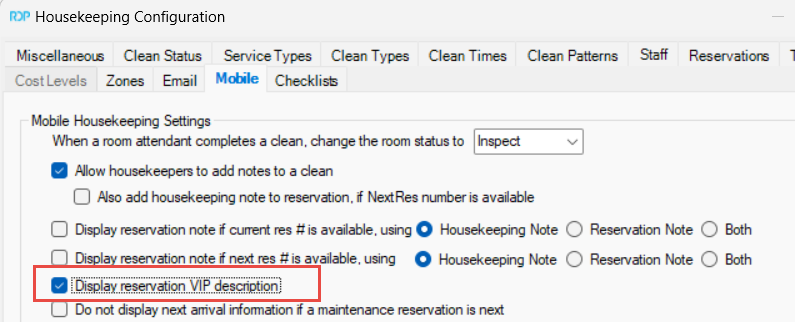

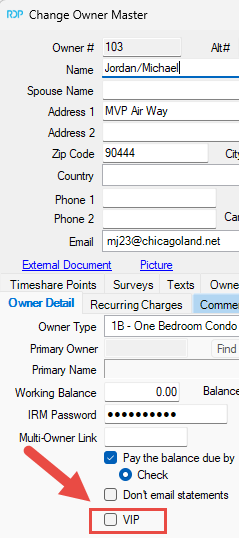
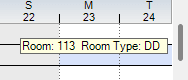
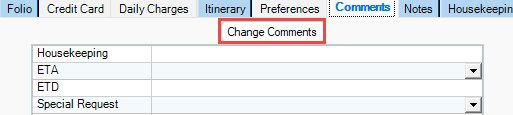


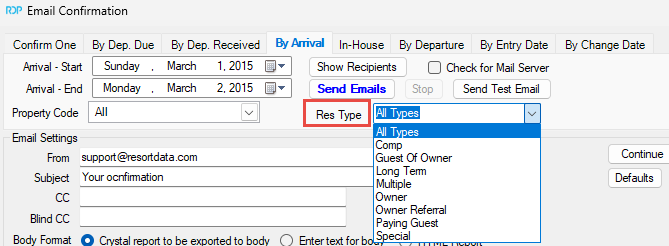

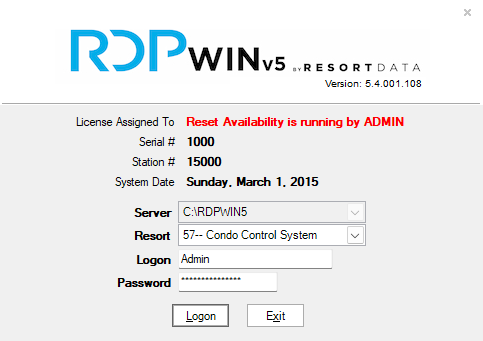

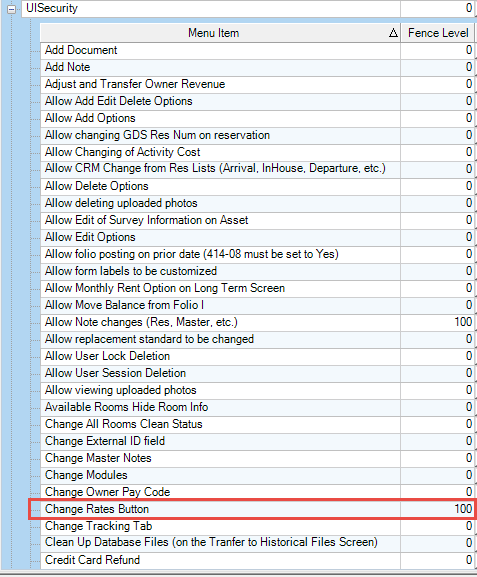

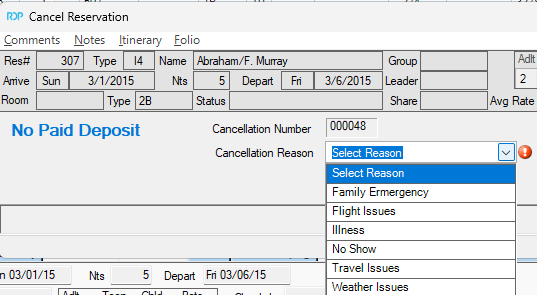

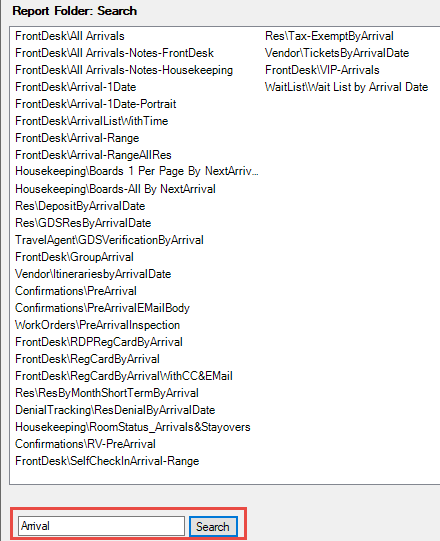
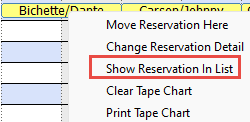
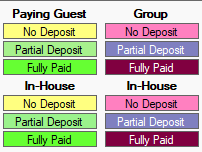


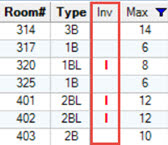


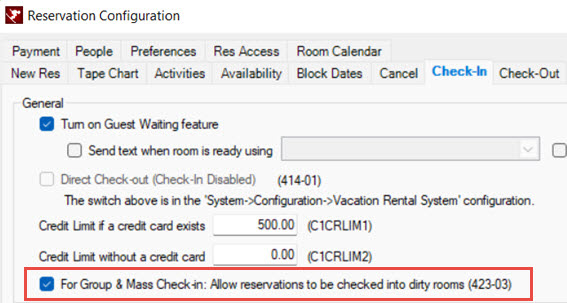
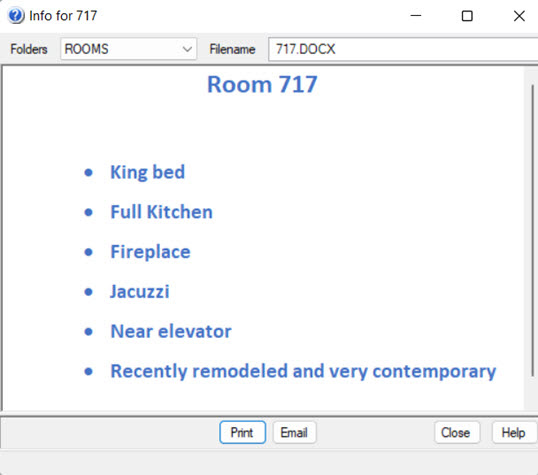
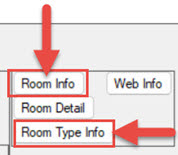
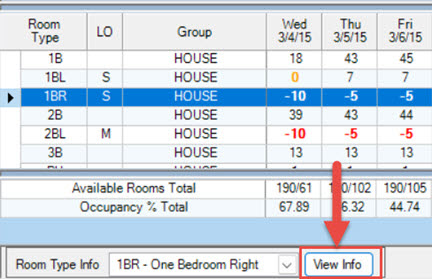
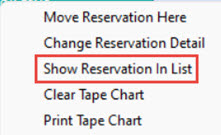


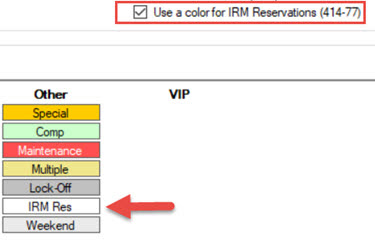


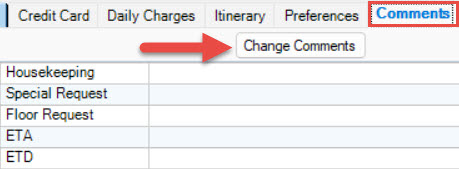


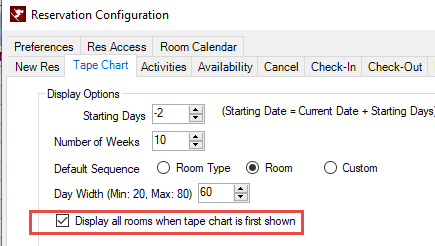


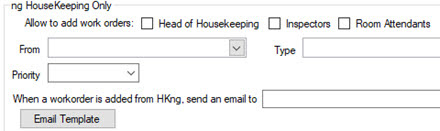

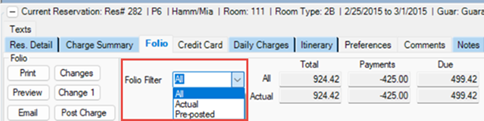


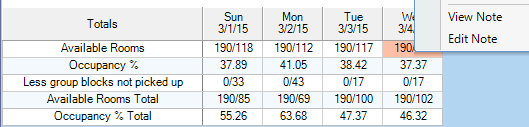


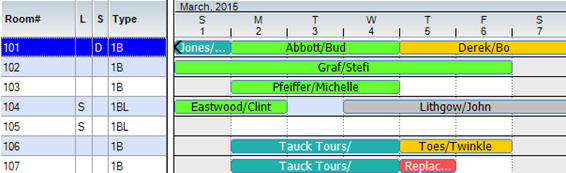
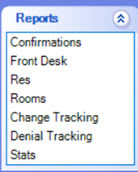
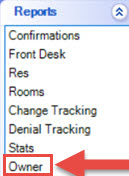


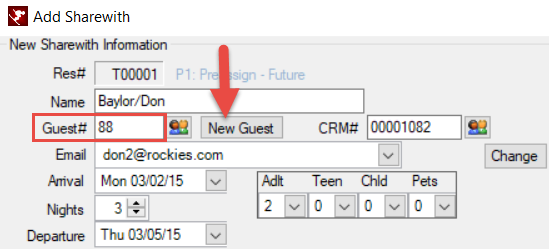
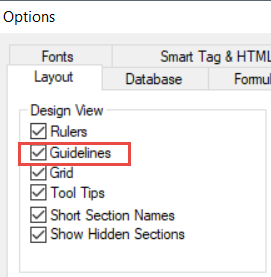

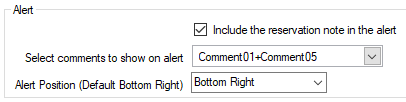


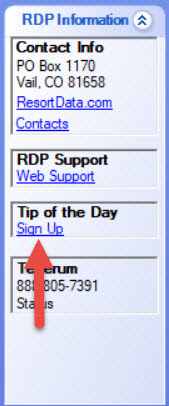


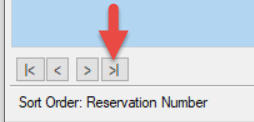
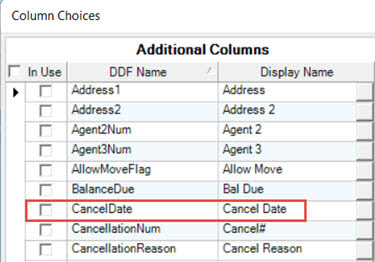

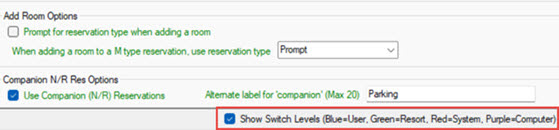

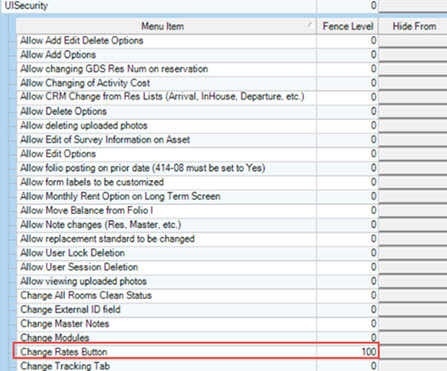
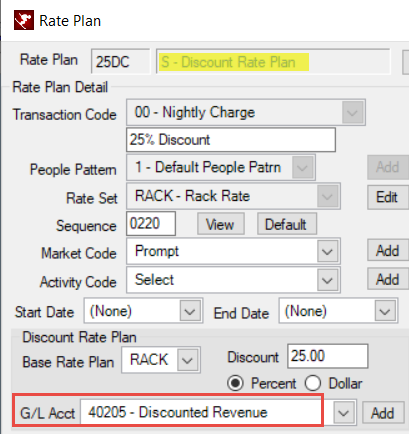

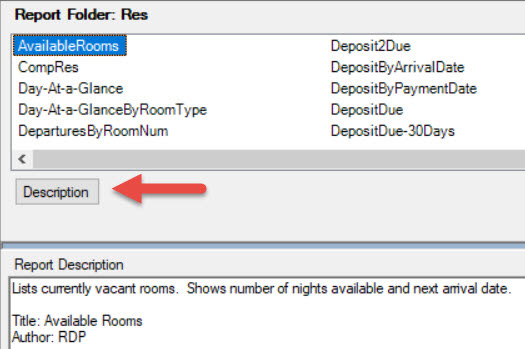
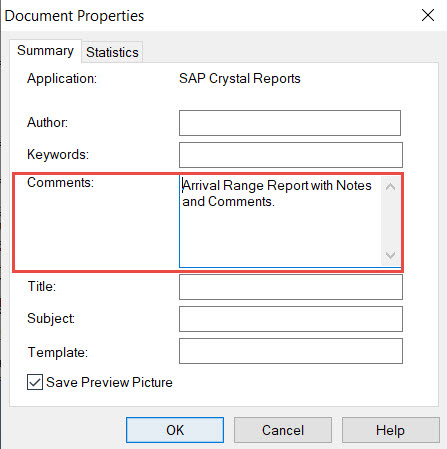
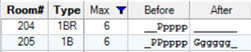
 in the Expert Tool Bar.