Overview
The Report Scheduler allows reports to be configured to print or export automatically on a specified time interval.

How to Create a Report Schedule
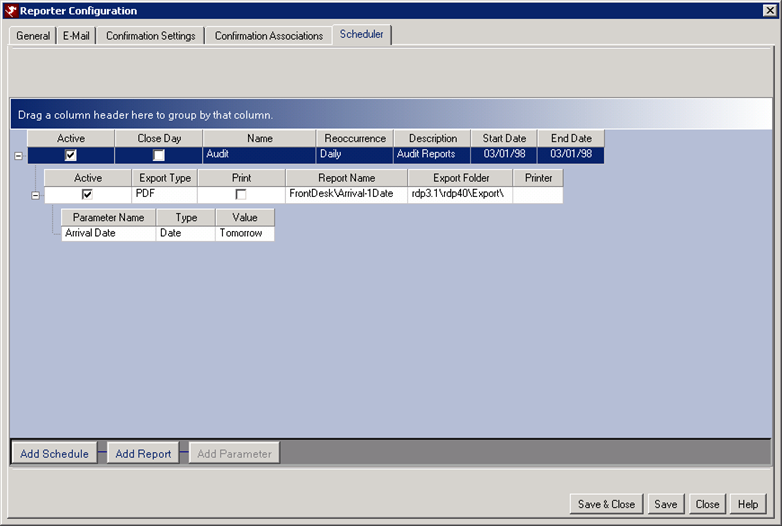
- In RDPWin, go to the Reporter menu --> Configuration --> Scheduler tab.
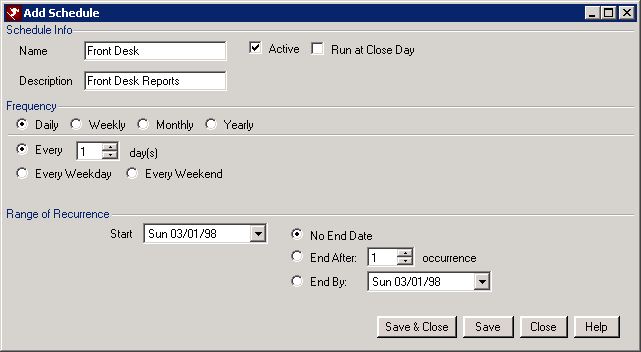
- Click the Add Schedule button.
- Enter the name of the schedule in the Name field, i.e. Audit.
- Enter the description of the schedule in the Description field, i.e. Night Audit Reports.
- If the reports should run automatically when the Close Day program runs, check the Run at Close Day box.
- Select the frequency of when the reports will run: Daily, Weekly, Monthly, and Yearly. See Frequency for more information.
- Select the Range of Recurrence. For details, see Range of Recurrence.
- Save and Close.
- Click the Add Reports button.
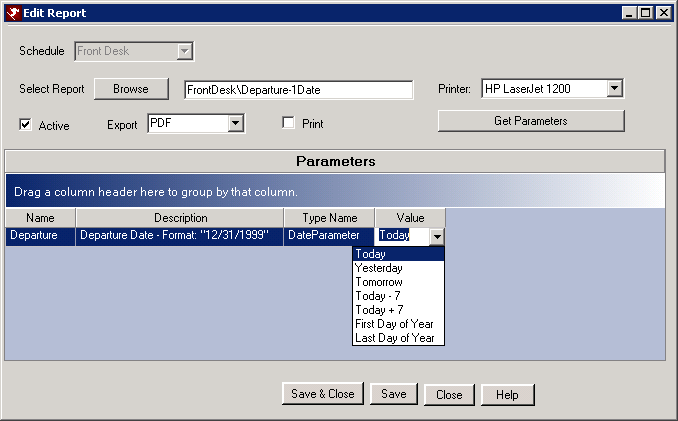
- Click the Browse button to find the report to add to the schedule. Crystal Reports reside in RDP\Reports10 folder.
- If the printing the report, select the default printer from the drop down. All printers configured for this workstation will display.
- If export the reports instead of printing, select the format of Word, Excel or PDF from the Export drop down.
- If printing the reports, check the Print box.
- Click the Get Parameters button. The parameters from the report will display below in the grid.
- In the grid, select the value of each parameter from the Value drop down. For example, if the parameter is a date parameter, select the option to have the report generated for today, yesterday, tomorrow, today -7 days, today + 7 days, first day of the year, or last day of the year.
- Save and Close.
- Repeat step 9 to add additional reports to the schedule.
- To generate the reports immediately, go to the Reporter menu --> Scheduler --> click the Process Reports button. For more information, see Reporter - Scheduler.
Add Schedule
Click the Add Schedule button to create a group of reports to be printed or exported automatically.

The Report Scheduler has three different configurable parts: Schedule, Reports, and Parameters.
- Schedule: group of reports that can be scheduled to run at the close of day during the audit or manually by the user.
- Reports: attached to Crystal Report attached to a schedule. Select the report from the Reports10 folder.
- Parameters: parameter from the Crystal Report to determines that which data will display on the report, such as a date parameter, reservation number parameter, etc. The parameter must be entered on the Scheduler in order for the report to generate correctly.
- Name
- Enter the name of schedule, i.e Audit, Front Desk, Reservations, etc. This will display in the Name field on the Scheduler screen in Reporter.
- Active
- Check the Active box to enable the group of reports to be scheduled. If unchecked, the group of reports will not print or export.
- Run at Close of Day
- When checked, the group of reports will automatically run when the Close Day program is run from the Night Audit menu. The reports will be printed or exported based on the configuration.
- Description
- Enter the description of the report group such as Front Desk Reports or Night Audit Reports.
- Frequency
- Select the frequency for which the reports should be generated. The options for scheduling are:
- Daily: If Daily is selected, choose whether the reports should run each day. Enter 1 in the Every x Days field. The reports can also be run every weekday or every weekend day based on the selection of the radio buttons.
- Weekly: When Weekly is selected, choose whether the reports should run each week. Enter 1 in the Recur Every x Weeks field. Then select the day of the week the report should process. More than one day can be selected. For example, if this report should be generated twice a week on Mondays and Thursday, place a check in box of those days.
- Monthly: When Monthly is selected, choose when the report should be generated in that month. Select the day of the month the report will process. If the report should be generated each month, enter 1 in the Every x Months field. The reports can be generated a on a certain day of the week within that month by selecting first, second, third, fourth or last and then choosing the day of the week.
- Yearly: When Yearly is selected, choose when the report should be generated each year. Select the month and the day, or choose first, second, third, fourth or last followed by the day of the week and month.
- Start
- A start date for the reports to be begin generating automatically can be selected. The date will default to the current system date.
- No End Day
- If the reports have no end date, select this radio button. This will continue to generate the reports on the specified interval.
- End After X Recurrence
- If the reports should stop generating after a certain number of recurrences, enter this number. Once generated the specified number of times, the reports will no longer print or export.
- End By Date
- If the reports should stop generating after a certain date, select the date from the calendar.


Range of Recurrence
Add Reports
Highlight the Schedule that you would like to add reports to and click the Add Reports button. This will allow Crystal Reports to be added to the schedule. The reports will be generated based on the Schedule that was created.

- Schedule
- The Schedule drop down displays the schedule that has been selected to add reports to. If the schedule is incorrect, click Close and select the correct schedule.
- Report
- Click the Browse button and select the report to add to the schedule. Crystal Reports reside in the RDP\Reports10 folder.
- Print / Printer
- If printing the report, check the Print box and select the printer from the drop down. This will display all printers configured for the workstation.
- Export
- If exporting the report, select the format for which to export: Word, Excel, or PDF.
- Get Parameters
- Click the Get Parameters button. This will retrieve that parameters needed to run the report. The parameters display in the grid below. Some reports may have more than one parameter.
- Parameters
- The Parameter grid displays the parameter that is the report. The parameter Name, Description, and Type of parameter display. In the Value drop down, select the value. The value changes based on the report selected.
Click these links for Frequently Asked Questions or Troubleshooting assistance.
5/2/2012
© 1983-2012 Resort Data Processing, Inc. All rights reserved.