Listed below are step by step instructions on how to add or configure surveys. The Module SK must be installed. Please contact RDP for more information about the Survey Module. Customers must provide a list of survey questions. RDP does not provide the questions or text.
How to Add or Configure Surveys:
- In RDPWin, go to the Stats main menu --> Surveys --> Configuration.
- In the IRM URL field, enter or verify the URL of the IRM.Net. For example: http://resortdata.com/irmnet/. Note: this field is required in order for guests to receive and complete the survey.
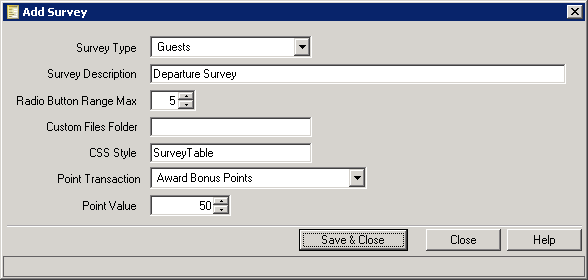
- If creating a new survey click the Add button.
- Select the Survey Type from the drop down. The Survey Type field for the intended recipients. Surveys can be sent to owners, guest history or reservations.
- In the Radio Button Range Max field, enter or arrow up or down to reach the max radio button range. The radio button range is the used for scoring certain questions. For example: the range is set to 5, with 1 being the lowest score and 5 being the highest score.
- If using custom files for this survey, enter the folder location in the Custom Files Folder field. Each survey can have custom style sheets, headers, footers and text. Sample path: c:/inetpub/www.root/irmnet3/custom/rdpdemo/rdp01/usertext/surveys folder.
- Enter the name of the custom style sheet for this survey in the CSS Style field. Note: RDP does NOT offer assistance with CSS Styles. Please contact your web designer.
- If using the CRM to award points to guests for completing the survey, select the Point Transaction from the drop down, such as Award Bonus Points. Note: the CRM Module (RX) must be installed. For more information about CRM, please contact RDP.
- If awarding points for survey completion, enter the number of points in the Point Value field.
- Save & Close.
- Click the Display button next to the Survey field.
- Click the Add Title Section or Question button.
- In the Title Section/Question field, enter the title section or question. A Title Section is used for grouping more than one question of the same category together, such as Cleanliness of the Hotel. If a question will not be grouped with other questions, it can be added as a stand alone question, such as How Did You Hear About Us?
- If adding a Title Section, select Title Section from the drop down. If it is a question, select the type of response requested such as check box, drop down, radio buttons or text.
- If using a specific CSS Style for this question or Title Section, enter the name in the CSS Style field. Note: RDP does NOT offer assistance with CSS Styles. Please contact your web designer.
- If the Type selected is Drop Down, Radio Button Horizontal or Radio Button Vertical, then click the Add/Change Options button. Note: this button is only active if the question type is Drop Down.
- If using the Add/Change Options, click the Add Option button and enter the Text and the Value for that answer. Repeat for all answers.
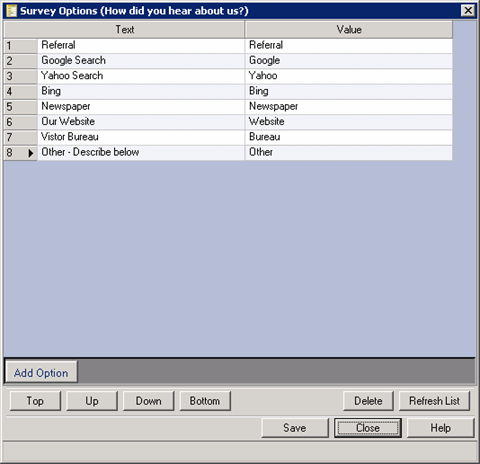
- If a Title Section was added from step 14, click the Add Question button. Enter the question in the Question field.
- Select the Type from the drop down.
- Enter a CSS Style if applicable.
- If the Type of question is Drop Down, Radio Button Horizontal, or Radio Button Vertical, click the Add/Change Options and enter the appropriate answers for the question.
- Repeat the appropriate steps 11-21 for the remaining questions.

Attach Survey to Confirmation Report:
- Go to the Reporter main menu --> Configuration.
- Click the Confirmation Settings tab.
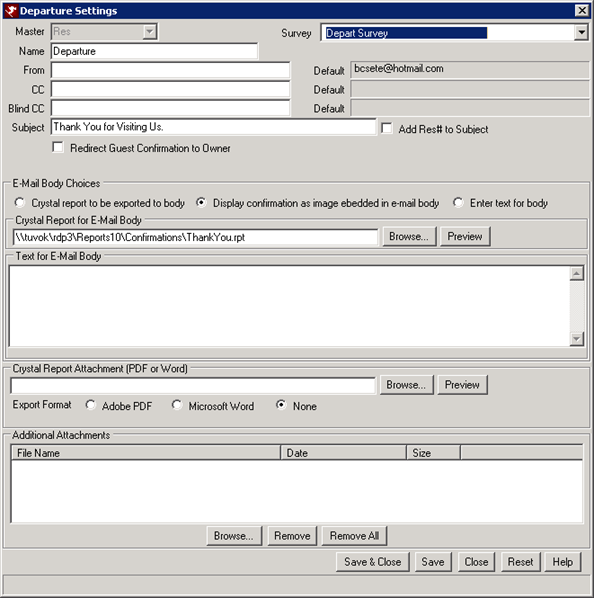
- If attaching the survey to an existing confirmation such as Departure, double click or click the change button when the appropriate confirmation is selected. Note: the report does not need be an actual confirmation. The survey could be attached to a thank you letter, an arrival reminder or folio.
- If a new confirmation needs to be added, click the Add button. Enter all necessary fields. See Confirmation Settings for more information.
- In the Survey field, select the survey configured in the above steps from the drop down.
- Save & Close.
Crystal Report Configuration:
The following steps require Crystal Reports version 10 or higher. New parameters and hyperlinks are needed in the report in order for the guest to link to the survey. For a sample report with correct parameters and links, view the ThankYou report from the Confirmations folder. This report can be used and reformatted with your specific information.
- Open the Crystal Report program.
- Click File --> Open --> browse to the report for which the survey link will be included. All reports are located in \\<RDPData>\RDPNT\RDP\Reports10 folder.
- Click View --> Field Explorer.
- In the Field Explorer, right click Parameters and select New.
- In the Name field, enter SurveyAddress.
- In the Type field, select String from the drop down.
- In the List of Values field, select Static from the drop down.
- Under the Value Options section, select Allow Custom Values and change the Settings drop down to True.
- Click OK.
- Right click Parameter and select New.
- In the Name field, enter OptOutAddress.
- In the Type field, select String from the drop down.
- In the List of Values field, select Static from the drop down.
- Under the Value Options section, select Allow Custom Values and change the Settings drop down to True.
- Click OK.
- For surveys sent to reservations, verify there is a parameter for ResNum. If not, add it using the name ResNum as a String, and Allow Custom Values is set to True. For surveys sent to owners or guest history, verify there is a parameter for MasterNum. If not, add it using the name MasterNum as a String, and Allow Custom Values is set to True.
- If adding the ResNum or MasterNum parameter from step 16, click Report --> Select Expert --> Record. Click New.
- For Reservations, select HReserve.ResNumNumeric. In the field next to it, select the parameter {?ResNum}.
- For Owners, select Owners.Number. In the field next to it, select the parameter {?MasterNum}.
- For Guest History, select Guests.Number. In the field next to it, select the parameter {?MasterNum}.
- In the body of the report, add a picture or text object for guests to click in order to be directed to the survey.
- Right click the picture or text object and click Format Graphic or Format Text.
- Click the Hyperlink tab.
- Select the radio button A Website on the Internet.
- In the Hyperlink Information section, click the formula button

- Enter the formula: {?SurveyAddress}
- Save and Close.
- In order to be compliant with anti-spamming regulations, add a text object for guests to opt out of future e-mails.
- Right click the text object and click Format Text.
- Click the Hyperlink tab.
- Select the radio button A Website on the Internet.
- In the Hyperlink Information section, click the formula button
- Enter the formula: {?OptOutAddress}
- Save and Close.
Optional Configuration:
Follow the steps below if the configured report with the survey links should be automatically sent to the guest via the RDPWin Monitor upon departure.
- Go to the Reporter main menu --> Configuration --> click the Confirmation Assocations tab.
- Click Add Confirmation.
- In the Reservation Status drop down, select After Departure.
- Select Paying Guest or Owner from the Reservation Type drop down.
- In the Confirmation Settings drop down, select the confirmation report configured to include a survey from the Attach Survey to Confirmation Report steps.
- Save & Close.

Test Survey Configuration:
The survey can be tested before it is sent to guests. Use the following link from the IRM Server only to test.
http://localhost/irmnet/Survey.aspx?/Resort=xx&Path=R:\RDP\&Master=1234&Survey=1
- Change the Resort=xx to the RDP Directory being tested, such as 01
- Change the Path=R:\RDP\ to the correct path to the RDP data
- Change &Master=1234 to a reservation, guest history or owner number (which ever is being used in the survey)
More information about Survey Configuration or Customize and Style Surveys.
Click these links for Frequently Asked Questions or Troubleshooting assistance.
02/04/2011