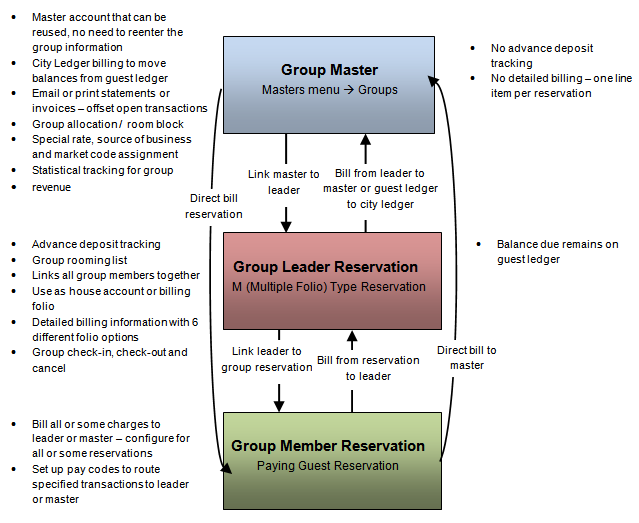
The diagram below describes the hierarchy of the group set up in RDP.
To Make New Group Reservations Including Master and Leader:
- In RDPWin, go to the Reservations main menu --> Group Reservations.
- Select Preassign if assigning rooms at the time of reservation, or select Inventory to only select the room type and assign the room numbers later.
- Find the appropriate group master by entering the group name in the Name field or group number in the Group # field. If the group does not exist follow steps a - s below:
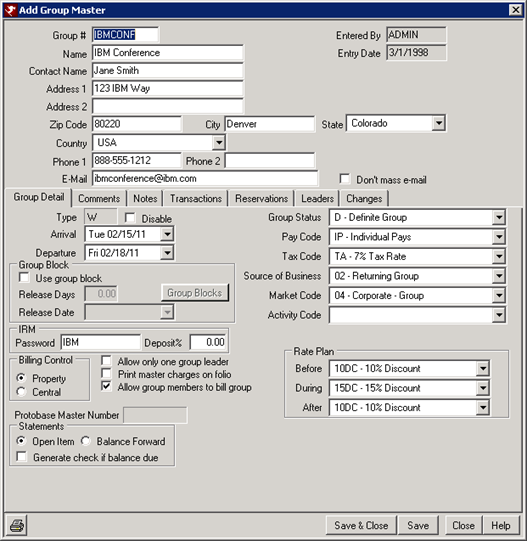
- From the Find Group screen, click the Add New button.
- Enter the group number in the Group # field. This field can be up to 8 alphanumeric characters. Best Practices: Use a group number that resembles the name of the group to make is easier to identify in the future. For example, if the group is IBM Conference, make the group number IBMCONF.
- Enter the name of the group in the Name field.
- Enter the group contact, if applicable, in the Contact Name field.
- Enter the address and zip, and the city and state will auto-populate.
- Enter the phone number(s) and email address. If the group does not want to be included in any mass e-mail campaigns through RDP, select the Don't Mass Email box.
- From the Group Detail tab, enter the Arrival and Departure dates if everyone is arriving or departing on or around the same dates. If the group does not have the same dates, this field may be left blank.
- Check the Use Group Block checkbox if creating a room block. If a room block is not needed or the rooms will be preassigned when the group reservations are made, leave the box unchecked. Note: A group block does not make the actual reservations, but rather removes the rooms from the house inventory. See Group Blocks for more information.
- If not using a group block, skip step j.
- Enter the Release Days or Release Date for the block. The Release Days can be set to specific number of days for the block the release from the current system date. Release Date is a specific date for which the block will be released. Note: both cannot be used.
- Assign an IRM Password if the group will be allowed to book reservations using the Internet Reservations Module. Enter the a deposit percent in the Deposit % field if collecting a different deposit amount than what is configured for IRM reservations.
- Check the appropriate boxes for Allow Only One Group Leader, Print Master Charges on Folio, and Allow Group Members to Bill Group. Best Practices: If the group is to be used again in the future, do not check the Allow Only One Group Leader box. If group members should not see rates or charges billed to the group, do not check the Print Master Charge on Folio box. If even one member will be billing charges to the group, check the Allow Group Members to Bill Group box.
- Select the Statement type Open Item or Balance Forward. Best Practices: select Open Item, because this allows open transactions to be offset against payments and other open items. See Group Statements for more information.
- Define the Group Status from the drop down. Note: if the status is anything other than D-Definite Group, the system will not allow reservations to be made for this group.
- Select the appropriate Pay Code for billing to the group master. Best Practices: do not bill charges to the master if the leader will pay the bill at checkout. Billing to the master sends the charges to the city ledger, and itemized folios from the master are not available. See Pay Codes for more information.
- Select the appropriate Tax Code, Source of Business and Market Code. Only enter the Activity Code if applicable.
- Enter the Rate Plan for the group in the During field. If assigning different rate plans for Before and After the arrival and departure date of the group, select the rate plan from the appropriate fields.
- Enter any necessary comments or notes from the Comments or Notes tabs.
- Save & Close.
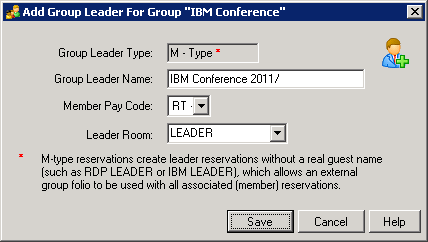
- From the Add Group Leader on the Group Screen enter the Group Leader Name. The group leader is designated to be a linking or billing folio only, not an actual person. This reservation will be in a non-rental room called Leader. Best Practices: use the name of the group for the Group Leader Name. This makes it easy to identify when searching for the group. This should not be an actual person's name, as they can be entered as a reservation in a rental room.
- Select the Member Pay Code if the group members are allowed to bill charges to the group leader. If only a few members are allowed to bill the group, set the Pay Code to IP-Individual Pays and change only those reservations to the correct pay code after the group reservations are complete.
- Select LEADER for the Leader Room.
- Save.
- From the Group Reservations screen enter the Arrival, Nights and Departures, if not already defaulting to the dates entered on the group master.
- Select the number of people for the individual rooms. If uncertain of the people count, enter 1 adult and change this field later as rooms are picked up or rooming list is received.
- Click the Select Rooms button under to "Step 2" on the screen.
- Select the rooms needed for the group by checking the appropriate rooms, or click Select Range and choose a starting and ending room number in a range, or click the radio button Select Specific Number of Rooms and enter the number needed. Click Save & Close.
- Click the Calculate All Rates button under "Step 3" on the screen.
- Verify the rates calculated correctly. To change rate prices, click the Override All Rates button or Daily Rate Override field on the grid and enter the correct rate.
- Click the Reserve All button under "Step 4" on the screen.
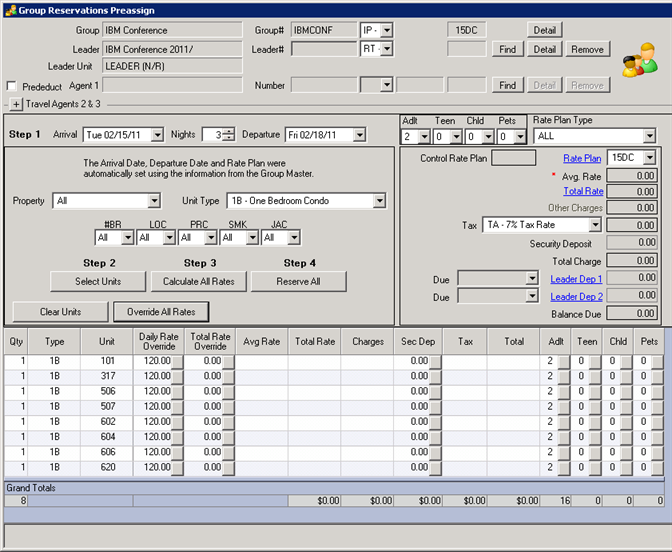
- Verify the information on the Group Reservation Information screen is correct before clicking Save & Close.
- If the Address/Phone from the group master should be copied to all group reservations, check the Address/Phone box before clicking Save & Close.
FAQ:
What is the benefit of entering an arrival and departure date on the group master?
Using the arrival and departure dates has a few benefits that can assist in the reservation process. When making the group reservation from the group master, the dates automatically default to the group's arrival and departure dates. It also allows you to set up a Before and After Rate Plan on the master for group members that may arrive before the group or leave after.
When should I use a group block?
A group block works best if you do not want to make the actual reservations for group members but rather set aside a certain number of rooms from the house inventory to be picked up at a later time. Group blocks are not reservations. Blocks reduce the house inventory on specific room types, making them available for group members to pick up.
Click these links for Frequently Asked Questions or Troubleshooting assistance.
Last Updated 1/13/2012
© 1983-2012 Resort Data Processing, Inc. All rights reserved.