An Opt Out link can be added to mass emails sent through RDP. Offering an opt out or unsubscribe option for emails is necessary to be in compliance with Anti-Spam regulations. The guest clicks the link from the Crystal Report or HTML email body and has the ability to opt out or unsubscribe from future email blasts. The opt out feature requires the IRM.Net be installed and configured. If the guest unsubscribes, the Don't Mass Email box on their guest history record is checked. This also applies all masters including owners, groups, travel agents, and CRM.
Note: The opt out link can only be added to Crystal Reports that accept the parameter for MasterNum. To find out if the report accepts the MasterNum parameter, in the Field Explorer on the report, expand Parameter Fields. If MasterNum is listed, the report is in the acceptable format for including the opt out link.
The following topics are included in this document:
- Configure Standard Opt Out Crystal Report if IRM.Net is Installed
- Crystal Report Link Configuration on the Non-Standard Report for Reservations if IRM.Net is Installed
- Crystal Report Link Configuration on the Non-Standard Report for All Masters if IRM.Net is Installed
- Crystal Report Link Configuration with No IRM.Net
- IRM.Net Configuration
- Opt Out for HTML Emails
Configure Standard Opt Out Report if IRM.Net is Installed
RDPWin provides a standard report that can be used to email to guests that includes the opt out link. This report is called GuestEmailLetter_OptOut.rpt and is located in \RDP\Reports10\GuestHistory folder. The hyperlink is included in a text box at the bottom of the report for the guest to click to opt out.
In order for the opt out link to work, the hyperlink must be changed to include the IRM.Net link. To change the hyperlink to your IRM.Net:
- Open Crystal Reports.
- File --> Open --> select GuestEmailLetter_OptOut from the \RDP\Reports10\GuestHistory folder.
- File --> Save As --> save this report with a different name or save it to a different folder. WARNING: failure to save it with a different name or location will result in the report being overridden on the next RDPWin update. RDPWin updates replace all standard reports with new reports. Saving it with a different name ensures the report will not be overridden or changed by the update.
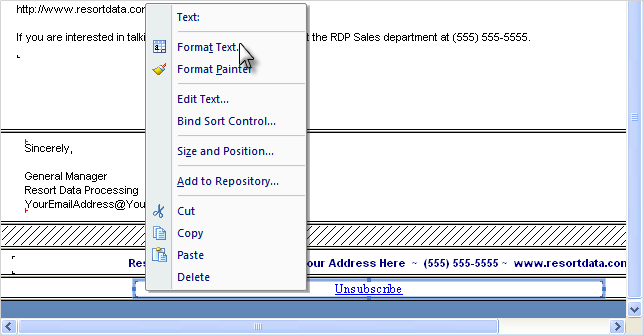
- Right click on the Unsubscribe link at the bottom of the report and select Format Text.
- Click the Hyperlink tab.
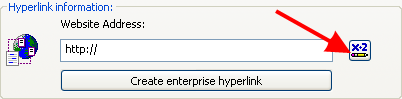
- Next to the Website Address field, click the Formula Edit button.
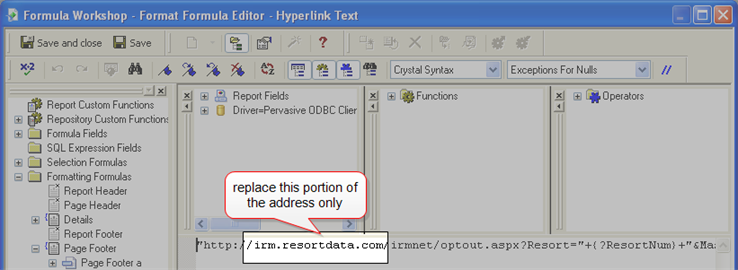
- Repalce irm.resortdata.com portion of the address with your IRM.Net address. Leave the remaining address as is.
- Click Save and Close.
- Save the report.
Crystal Report Link Configuration on the Non-Standard Report for Reservations if IRM.Net is Installed
If not using the standard report GuestEmailLetter_OptOut.rpt, a link must be added to the Crystal Report that is being emailed from RDPWin. This link connects to the IRM.Net Opt Out page. The link passes in the guest history number, to update the guest history record's Don't Mass Email field. Follow these steps for adding the opt out option for reservations. The next section below includes steps to configure opt out for all masters.
- Open Crystal Reports.
- Go to File --> Open --> select the report that will be used in the email blast. It is recommended to use a report located in the Guest History folder for guest history email blasts. The GuestEmailLetter report can be modified and used for mass emails.
- Double check that the report accepts the MasterNum Parameter. From the Field Explorer, expand Parameter Fields. If MasterNum is listed, continue with the remaining steps.
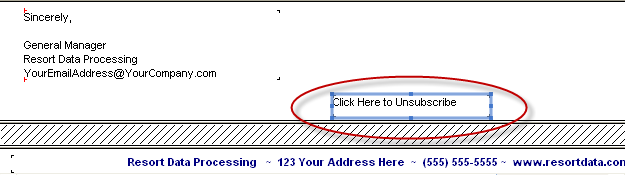
- Place the text object or picture in the report for the recipient to click to unsubscribe.
- Right click on the text object or picture --> select Format Text --> click the Hyperlink tab.
- Select the radio button A Website on the Internet.
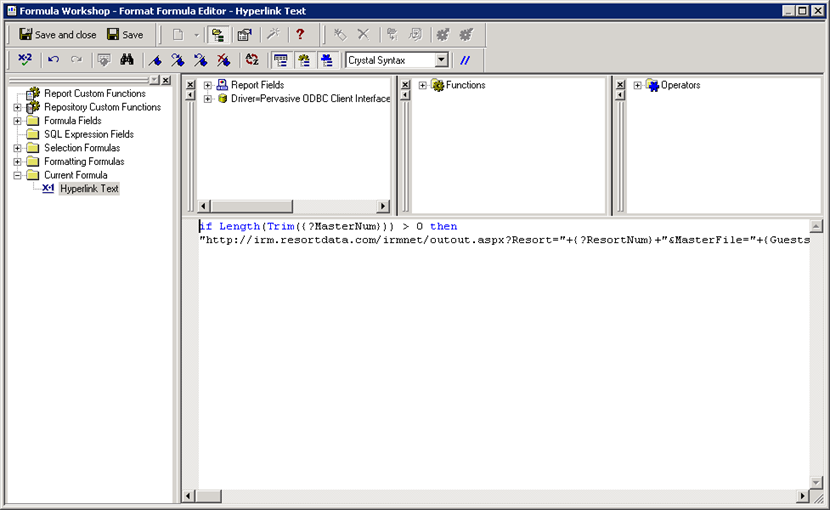
- Next to the Website Address field, click the Formula Edit button.
- Enter the following formula (replacing irm.resortdata.com with the customer's IRM Server):
- Save and Close.
- Save the report with a new name, so RDPWin updates to do override the customizations.
if Length(Trim({?MasterNum})) > 0 then"http://irm.resortdata.com/irmnet/outout.aspx?Resort="+{?ResortNum}+"&MasterFile="+{Guests.MasterFile}+"MasterNum"+trim({Guests.Number})
Crystal Report Link Configuration on the Non-Standard Report for Masters if IRM.Net is Installed
To include a link on the Crystal Report for emails sent to masters (Owner, Groups, Travel Agents, and CRM), follow the steps below to add the link in the report. e This link connects to the IRM.Net Opt Out page. The link passes in the master number, to update the record's Don't Mass Email field. Each master will have a different link.
- Open Crystal Reports.
- Go to File --> Open --> select the report that will be used in the email blast. It is recommended to use a report located in the appropriate master's folder, such as Owners or Groups because it has the appropriate fields needed. The GroupEmailLetter or OwnerEmailLetter report can be modified and used for mass emails.
- Double check that the report accepts the MasterNum Parameter. From the Field Explorer, expand Parameter Fields. If MasterNum is listed, continue with the remaining steps.
- Place the text object or picture in the report for the recipient to click to unsubscribe.
- Right click on the text object or picture --> select Format Text --> click the Hyperlink tab.
- Select the radio button A Website on the Internet.
- Next to the Website Address field, click the Formula Edit button.
- Enter the following formula depending in the master (replacing irm.resortdata.com with the customer's IRM Server):
- Group Masters:
- Owners:
- Travel Agents:
- CRM:
- Save and Close.
- Save the report with a new name, so RDPWin updates to do override the customizations.
if Length(Trim({?MasterNum})) > 0 then"http://irm.resortdata.com/irmnet/outout.aspx?Resort="+{ResortNum}+"&MasterFile="+{GroupMst.MasterFile}="&MasterNum=+trim({GroupMst.Number})
if Length(Trim({?MasterNum})) > 0 then"http://irm.resortdata.com/irmnet/outout.aspx?Resort="+{ResortNum}+"&MasterFile="+{Owners.MasterFile}="&MasterNum=+trim({Owners.Number})
if Length(Trim({?MasterNum})) > 0 then"http://irm.resortdata.com/irmnet/outout.aspx?Resort="+{ResortNum}+"&MasterFile="+{Agents.MasterFile}="&MasterNum=+trim({Agents.Number})
if Length(Trim({?MasterNum})) > 0 then"http://irm.resortdata.com/irmnet/outout.aspx?Resort="+{ResortNum}+"&MasterFile="+{FrqGuest.MasterFile}="&MasterNum=+trim({FrqGuest.Number})
Properties with a Path in the Resorts File:
For properties that have a path in the resorts file, it is necessary to add the path to the Opt Out path. This configuration is not typical and only applies to a few properties. If you have unsure of whether this applies to your property, contact RDP Support.
The paths above are the same with addition of the RDP data path:
"http://irm.resortdata.com/irmnet/outout.aspx?Resort="+{ResortNum}+"&Path=\\RDPServer\RDPNT\RDP\"&MasterFile="+{Owners.MasterFile}="&MasterNum=+trim({Owners.Number})
Crystal Report Link Configuration with No IRM.Net
This option requires an email account to be set up and the mailbox to be manually monitored. If the recipient clicks the link, it will send an email to the designated inbox to unsubscribe. Once the email is received, find the guest history or master account and update the record by checking the Don't Mass Email box.
- Open Crystal Reports.
- Go to File --> Open --> select the report that will be used in the email blast. It is recommended to use a report located in the appropriate master's folder, such as Owners or Groups because it has the appropriate fields needed. The GroupEmailLetter or OwnerEmailLetter report can be modified and used for mass emails.
- Place the text object or picture in the report for the recipient to click to unsubscribe.
- Right click on the text object or picture --> select Format Text --> click the Hyperlink tab.
- Select the radio button An E-mail Address.
- In the E-mail Address field, enter: mailto:unsubscribe@YOUREMAIL.com?subject=Unsubscribe&body=Please remove me from your mailing list. Note: replace the unsubscribe@YOUREMAIL.com with the designated email address.
- Click OK and Save the report.

IRM.Net Configuration
Two user customizable files can be set up, letting the guest know they are unsubscribing.
- /IRMNet/Custom/<dataserver>/RDP<xx>/UserText/OptOut.htm - The contents will display upon successfully setting the Don't Mass Email field on the record. If the file does not exist, the message displayed is "You have been unsubscribed."
- /IRMNet/Custom/<dataserver>/RDP<xx>/UserText/OptOutFailed.htm - The contents will display if the Don't Mass Email was not able to be set on the record. If the file does not exist, a generic message will display.
Opt Out for HTML Emails (Requires T7 Module)
The opt out option to be included on the email is different based on whether the Guest Survey & Communication Module (SK) is installed. For more information, see HTML Email Body.
- IRM.Net is Installed
- The path to the IRM.Net must be included in the link along with the [*OptOutAddress*] data item.
- For example: http://irm.resortdata.com/irmnet[*OptOutAddress*]
- No IRM.Net
- This option requires an email account to be set up and the mailbox to be manually monitored. If the recipient clicks the link, it will send an email to the designated inbox to unsubscribe. Once the email is received, find the guest history or master account and update the record by checking the Don't Mass Email box. Include this line of HTML code to unsubscribe:
- <a href="mailto:unsubscribe@YOUREMAIL.com?subject=Unsubscribe&body=Please remove me from your mailing list.">Unsubscribe</a>
- Note:the unsubscribe@YOUREMAIL should be replaced with the designated email address.
Click these links for Frequently Asked Questions or Troubleshooting assistance.
Last Updated 01/17/2012
© 1983-2013 Resort Data Processing, Inc. All rights reserved.