The steps below outline how to add a confirmation to the Reporter Configuration in order to be emailed from RDPWin.
To Configure Email Confirmations:
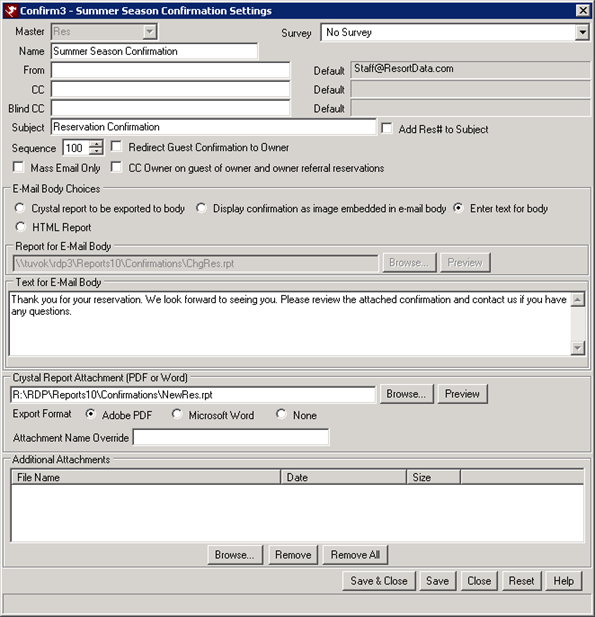
- In RDPWin, go to the Reporter main menu --> Configuration --> Confirmation Settings tab.
- Click the Add button.
- Select the Master for which the confirmation was designed. If the confirmation is for reservations, select Res from the drop down.
- If including a survey with the confirmation, select the survey from the drop down. Note: this requires the Guest Survey & Communications Module (SK).
- Enter the name of the confirmation, such a Summer Season Confirmation.
- If the From is different than the default, enter the email address in the From field.
- If the CC or Blind CC are different than the default, enter the email address in the CC field or Blind CC field.
- Enter the subject of the email in the Subject field, such as Reservation Confirmation.
- To include the guest's reservation number in the subject, check Add Res# to Subject box.
- Enter the sequence number of the confirmation in the Sequence field. This determines the order the confirmations will appear when emailing, printing or previewing confirmations from the reservation. The lower the sequence number, the higher on the list it will appear.
- If this confirmation is designed only for mass emails, meaning that it will not be sent to just one guest at a time, check the Mass Email Only box.
- If the owner of the unit would like to receive a copy of the confirmation, check the box to CC Owner on Guest of Owner and Owner Referral Reservations.
- Under the Email Body Choices section, select the type of email body for the confirmation.
- Crystal Report to be Exported to Email Body - If selected, click the Browse button next to the Report for Email Body line. Locate the Crystal Report that will be included in the body of the email. Reports reside on the RDP server, RDPNT\RDP\Reports10 folder, then select the folder of where the confirmation resides. Note: Crystal Reports selected should not include any images, colors, special formatting, etc. because they will not display in the body of the email. This option only displays simple formatting and text. RDP provides a sample of an email body confirmation located under the Reports10\Confirmation folder. Include the more complexly formatted confirmation as the attachment.
- Display Confirmation as Image Embedded in Email Body - If selected, click the Browse button next to the Report for Email Body line. Locate the Crystal Report that will be included in the body of the email. This options takes a snapshot of the Crystal Report.
- Enter Text for Body - If selected, enter the text in the Text for Email Body section. This text will be the default text in the body of the email. It can be changed manually each time the confirmation is emailed by typing in the Email Body section of the Email Confirmation.
- HTML Report - This option requires the HTML Email Confirmation Module (T7). For details, see HTML Email Body Confirmations.
- If including a Crystal Report Confirmation as the attachment, click the Browse button Crystal Report Attachment field. Locate the Crystal Report on the RDP server, RDPNT\RDP\Reports10 folder, then select the folder of where the confirmation resides.
- Determine the Export Format: Adobe PDF (recommended because it cannot be changed by the guest), Microsoft Word, or None.
- To change the name of the attachment, enter the name in the Attachment Name Override field.
- To include additional attachments, such as a map, directions, photos, etc., under the Additional Attachments section click Browse. Locate these files
- Click Save & Close
Click these links for Frequently Asked Questions or Troubleshooting assistance.
Last Updated 01/14/2013