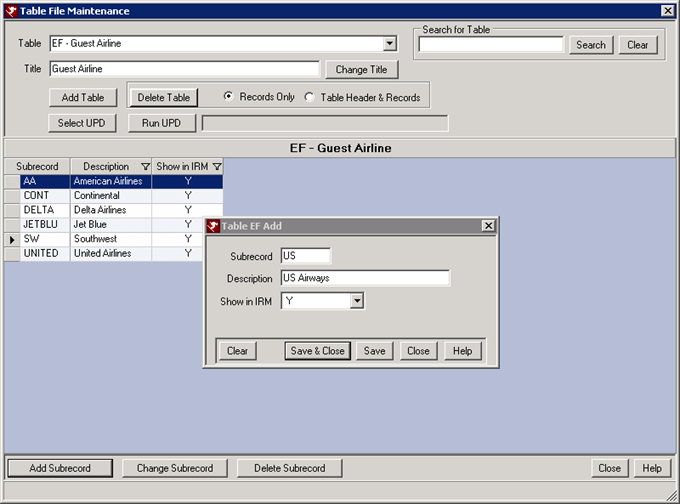
To Configure Comment Tables with Drop Downs:
- In RDPWin, go to the System main menu --> Table Maintenance.
- Click the Select Table drop down to determine if a comment table has already been added for a certain comment field. If it does not exist, click the Add Table button.
- Enter the correct "E" table using the list above to determine which to use based on the comment number. For example, add table EG if creating a drop down for comment 2. The comment will be labeled Guest Airline.
- Click the Add Subrecord button.
- Enter the subrecord, up to 6 characters, and the description. If this comment should available on the IRM, select Y.
- Repeat for the remain subrecords.

Customize Comment Tables
Each comment field can be designated to have specific information available for selection from a drop down. By standardizing the data in each field, it will allows the reservation to quickly and easily select one of the options in the comment field. For example, Comment 4 is used for the airline the guest will be using. Enter the options in the corresponding comment table, which creates a drop down on the comment field on the reservation. Listed in the table below are the comment tables and the corresponding comment field.
| Comment Field | Table | Length | Comment Field | Table | Length |
|---|---|---|---|---|---|
| Comment-1 | EF | 20 | Comment-10 | E7 | 20 |
| Comment-2 | EG | 12 | Comment-11 | E8 | 20 |
| Comment-3 | EH | 12 | Comment-12 | E9 | 10 |
| Comment-4 | E1 | 20 | Comment-13 | EA | 10 |
| Comment-5 | E2 | 20 | Comment-14 | EB | 2 |
| Comment-6 | E3 | 20 | Comment-15 | EC | 2 |
| Comment-7 | E4 | 20 | Comment-16 | ED | 2 |
| Comment-8 | E5 | 20 | Comment-17 | EE | 2 |
| Comment-9 | E6 | 20 |
Click here for How To Index or Tutorials Index.
Click these links for Frequently Asked Questions or Troubleshooting assistance.
03/11/2011