Click here for tutorials
Overview
The UPD Maintenance utility is designed to create, maintain, and import UPD files. This is the RDPWin equivalent of the RDP DOS 997 option. The UPD Maintenance is a useful tool to transfer information from one directory to another, or to download a table to a text file for easy updating. For example, if the market codes from directory 01 should be uploaded into directory 02, create a UPD of this table and update the table file from the UPD. Use this feature to transfer seasons, source of business codes, or any table or subrecord from a table from directory to another.
The steps below outline how to complete the following:
- Create a new UPD file
- Download UPD file to text file
- Upload text file to UPD file
- Update TableFile from UPD file

Create a New UPD File
- Go to the System menu --> File Utilities --> UPD Maintenance.
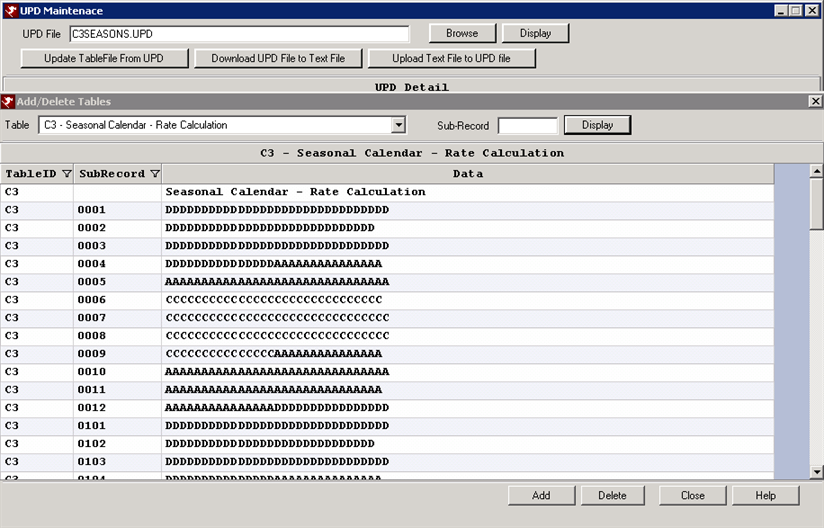
- In the UPD File field, enter the name of the UPD that will be created. For example, if creating a UPD of the season table, name the UPD file 'C3Season.' The system will automatically add the file extension of UPD.
- Click the Display button.
- If this UPD file does not exist, a prompt displays stating "File does not exists, create it?" Click Yes to create the file.

- Click the Add button at the bottom.
- From the Table drop down, select the table from which to create the UPD file.
- If a certain subrecord is needed from that table, click the Display button to located the subrecord. Enter that subrecord in the Subrecord field.
- Click the Display button. All the records in that table will display. If only selecting one subrecord, that record will display in the grid.

- Click the Add button at the bottom.
- The data displays in the grid. If any changes are needed to any of the records, click into the record and update the information. To delete a subrecord from the grid, right click on the row and choose Delete Selected Row.
- If any rows or new subrecords should be added, click the Add Row button. Enter the data in the same format as the other records. Note: failure to enter the record in the same format can result in errors in the system when accessing that table.
- Once the data is correct, click the Save button to complete the UPD file.
Download UPD File to Text File
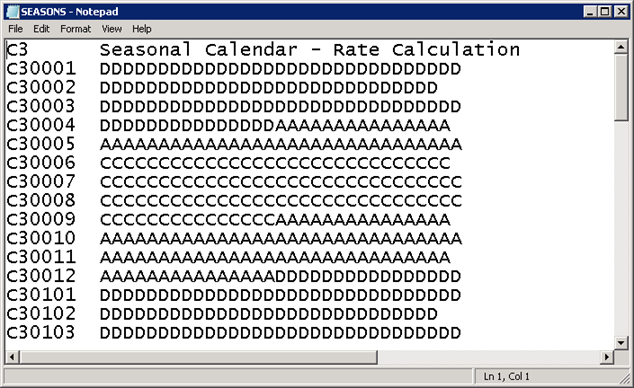
This option is available in order to export the UPD file into a text file that can be changed in Notepad. By sending it to Notepad, the records can be updated quickly or sent to other formats.
- Go to the System menu --> File Utilities --> UPD Maintenance.
- If the UPD file already exists, click the Browse button to locate the file.
- If creating a new UPD file to download to a text file, enter the file name in the UPD File field. For example, if creating a UPD of the season table, name the UPD file 'C3Season.' The system will automatically add the file extension of UPD.
- Click the Display button.
- If this UPD file does not exist, a prompt displays stating "File does not exists, create it?" Click Yes to create the file.

- Click the Add button at the bottom.
- From the Table drop down, select the table from which to create the UPD file.
- If a certain subrecord is needed from that table, click the Display button to located the subrecord. Enter that subrecord in the Subrecord field.
- Click the Display button. All the records in that table will display. If only selecting one subrecord, that record will display in the grid.

- Click the Add button at the bottom.
- The data displays in the grid. If any changes are needed to any of the records, click into the record and update the information. To delete a subrecord from the grid, right click on the row and choose Delete Selected Row.
- If any rows or new subrecords should be added, click the Add Row button. Enter the data in the same format as the other records. Note: failure to enter the record in the same format can result in errors in the system when accessing that table.
- If all the data is correct, click the Download UPD File to Text File button.
- The UPD file will be saved in the RDP folder with the same name that was entered in the UPD file name folder. Open the file in Notepad to view or make changes. Note: make sure to open the .TXT file, not the .UPD file.

Upload Text File to UPD File
If a UPD file was downloaded to a text file and changes made, the updated text file can be uploaded back into the system to create a UPD file.
- Go to the System menu --> File Utilities --> UPD Maintenance.
- In the UPD File field, enter the name of the new UPD file that the system will create from the text file. The same name can be entered that was used to create the text file. The system will automatically enter the .UPD file extension.
- Click the Update button. Click Yes to create the new file for which the text file will be uploaded.
- Click the Upload Text File to UPD File button to locate the text file.
- The data will display in the grid. If any changes are needed, make them directly in the grid.
- Click the Save button.

Update TableFile from UPD
Once the UPD file has been created and any changes made, the TableFile must be updated to reflect the changes from the UPD.
- Go to the System menu --> File Utilities --> UPD Maintenance.
- Click the Browse button to locate the UPD file or enter the file name in the UPD File field.
- Click the Update TableFile from UPD button.
- If there are more than one RDP directory, select the directories for which to update the TableFile from the UPD. Note: this will update each selected directory with the information in the UPD.
- Click the Process button.
- Once the process is complete, click the OK button.
Click these links for Frequently Asked Questions or Troubleshooting assistance.
05/08/2012
© 1983-2012 Resort Data Processing, Inc. All rights reserved.