Overview of Reporter
Reporter is designed to view and print the information contained in
RDPWin. Select the Reports option from the Navigation page, Navigation panel, or from the
Reporter main menu. Many standard reports are available in categorized folders.
Custom reports can also be created for specific purposes. as an
example of the stand reports available, click the Analysis folder to view nearly 30 different standard reports available. As each new folder is clicked, the list of reports
for that category is displayed.
These folders subfolders under RDPNT/RDP/Reports10 folder. Since all
properties can have different drive letters assigned to their data servers,
reports should have a non-discriminating path assigned to insure proper
access. For example, assume PropertyA's data server is assigned to the
C:\ drive, but PropertyB's data server is assigned to the F:\ drive.
If reports, and any subreports, are directed to the C:\ drive, then the
property accessing the F:\ drive would not able to access the data on the
reports. Upon installation of RDPWin, the correct path must be
confirmed using the following steps. The same steps should be
performed on any custom reports created or updated.
- Open Crystal Reports Designer.
- Select any report from RDPWin's standard list (i.e., Accounting\GLBalanceSheet.rpt).
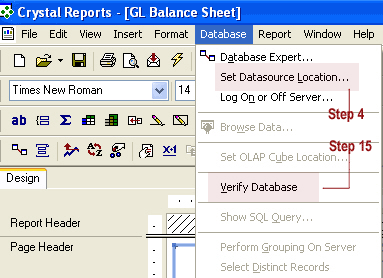
- Click Database from the main menu.
- Select "Set Datasource Location".

Figure 1 - Database main menu - Click
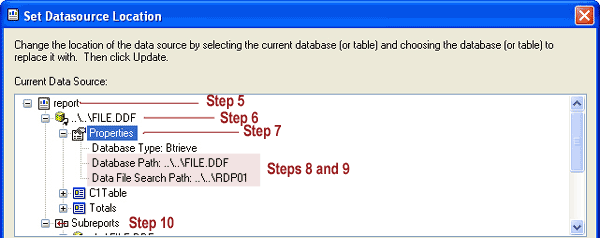
 to expand and access the main report.
Figure 2 - Datasource Location - main report - Click
 to expand and access the DDF folder.
 - Click
 to expand and access the Properties folder.
 - Confirm the Database Path is set to ..\..\FILE.DDF.
- Confirm the Data File Search Path is set to ..\..\RDP01.
- Click
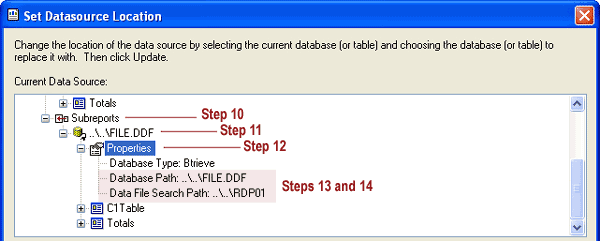
 to expand and access ALL subreports.
Figure 3 - Datasource Location - subreport - Click
 to expand and access the DDF folder.
 - Click
 to expand and access the Properties folder.
 - Confirm the Database Path is set to ..\..\FILE.DDF.
- Confirm the Data File Search Path is set to ..\..\RDP01.
- Select "Verify Database" from the Database main menu. See Figure 1.
- Click OK at the system message "The database is up to date".
- Save and Close the report.
- Highlighted Report Description
- The description gives the title, subject, author, and function detail.
- Preview
- Select any report from within a folder, and click the Preview Report button or double-click the report from the list. The Report Viewer requests any necessary parameters and opens the report. When entering date parameters, a drop-down calendar is available when the "Pick from defaults" box is unchecked.
- Print and Printer
- Open the print options form, select parameters, and click OK. The name of the current printer is displayed next to the Print button. If the desired printer is not on the list, please see your system administrator.
- Report Folders
-
The folders are listed for the selected drive. All available reports are listed under the RDP\Reports folder. Standard RDPReporter folders include:
- Analysis
- Awards
- Comparisons
- Confirmations
- Daily Reports
- EnchancedForecasting
- Forecast
- FrontDesk
- Group
- GuestHistory
- Housekeeping
- Misc
- MTD&YTD
- NightAudit
- Owner
- Rate&PackagePlans
- Res
- Rooms
- Stats
- Top10
- TravelAgent
- Vendor
- WorkOrders
Properties should add folders for custom reports. Please note that confirmations must be stored in a folder containing the text "confirm" in order for them to be available to e-mail from RDPReporter. For example, a property may create a custom folder named "Confirm-OurResort." Any other standard reports created at the property should be stored in property specific folders. With custom reports stored in property specific folders, they will not be overwritten by RDPReporter updates.
Previewing and Printing Reports
Use the following steps for previewing and printing reports.
- Open RDPWin Reporter.
- Open the appropriate report folder.
- Highlight a report and click the Preview button.
- If necessary, enter parameter values (i.e. - a range of arrival dates).
- The report displays in the Crystal Report viewer. The following buttons are available
from the ReportViewer's toolbar:

| Button | Description |
|---|---|
| The header contains the program name, RDPReporter, along with the version number in parenthesis. Check the RDP website (http://support.resortdata.com) for updates to RDPReporter. | |

|
Close drill-down tab. When a user drills down into a report, each drill-down operation creates a new tab. The drill-down tabs can be closed individually by clicking on this close button. The  is used to close the entire report. is used to close the entire report. |

|
Print the report using the current printer settings. |

|
Export the data in a variety of standard formats, including ASCII, Microsoft Excel, Lotus, ODBC, and Microsoft Word. |

|
Refresh the report. Select new parameter values. For example, an arrival report may have been ran for the dates of 3/1 - 3/15. Click the refresh button to see the report for the date range of 3/16 - 3/31. |

|
Toggle the "group tree" on and off. The "group tree" is listed in the left-hand frame and allows the user to click on a specific group in order to "jump" directly to that group's data.
For example, an arrival report for 3/1 - 3/15 grouped by date would include a group tree with each arrival date. To see arrivals for 3/8, click the 3/8 option in the group tree. |

|
Select the magnification value. Increase the value to "zoom in" and decrease the value to "zoom out". |

|
Go to the report's first page. |

|
Go to the previous page. |

|
Go to the next page. |

|
Go to the report's last page. |

|
Cancel reading report records. |

|
Select Expert. |

|
Search Expert. |

|
Search the report for specific text. Enter the text in the field, and click the binoculars or press |
Click these links for Frequently Asked Questions or Troubleshooting assistance.
04/05/2010
© 1983-2009 Resort Data Processing, Inc. All rights reserved.